
To install a drop-in farmhouse sink, measure and cut the countertop opening to fit the sink, apply a bead of silicone adhesive around the sink’s rim, and drop the sink into the opening.
Pre-Installation Preparations
Before you can begin the installation of a drop-in farmhouse sink, it is essential to properly prepare the area. This involves measuring the cabinet and sink, gathering the necessary tools and materials, and clearing the workspace. By following these pre-installation preparations, you can ensure a smooth and successful installation process.
Measuring the Cabinet and Sink
The first step in preparing for the installation of a drop-in farmhouse sink is to measure the cabinet and sink dimensions. This ensures that the sink will fit perfectly into the designated space. Start by measuring the width, height, and depth of the cabinet. Take precise measurements and note them down.
Next, measure the dimensions of the farmhouse sink. Measure the width and length of the sink’s rim, as well as the depth. This will help determine the size of the opening needed in the countertop for the sink to fit properly.
Gathering the Necessary Tools and Materials
Once you have accurate measurements, it’s time to gather the tools and materials necessary for the installation. Below is a list of the essential items you will need:
| Tools | Materials |
|---|---|
| Measuring tape | Drop-in farmhouse sink |
| Adjustable wrench | Silicone adhesive |
| Screwdriver | Plumber’s putty |
| Hacksaw | Mounting clips |
Make sure to gather all the necessary tools and materials before you start the installation process. This will save you time and effort later on.
Clearing the Workspace
Before installing a drop-in farmhouse sink, it is important to clear the workspace and create a clean and clutter-free environment. Remove any items from the countertop and the surrounding area to have ample space to work. This will also prevent any damage to your belongings during the installation process.
Additionally, ensure that the area around the sink is free of any debris or dust. Clean the countertop thoroughly to provide a clean surface for the sink installation. This will help create a secure and stable foundation for your new drop-in farmhouse sink.
By following these pre-installation preparations carefully, you will be well-prepared for the installation of your drop-in farmhouse sink. These steps will help guarantee a smooth and efficient installation process, ensuring you can enjoy your beautiful and functional sink for years to come.

Removing The Old Sink (If Applicable)
If you’re looking to upgrade your kitchen with a stylish drop-in farmhouse sink, the first step is to remove the old sink from the countertop. This may seem like a daunting task, but with a few simple steps, you can easily tackle this project. In this section, we’ll guide you through the process of removing the old sink, ensuring you have a clean slate for installing your new farmhouse sink. Let’s get started!
Shutting Off Water Supply
Before you begin removing the old sink, it’s crucial to shut off the water supply to your kitchen. This will prevent any accidental leaks or water damage during the process. To do this, locate the shut-off valves under the sink. Turn them clockwise until they are tightly closed. If you can’t find individual shut-off valves, you may need to shut off the main water supply to your home. It’s always a good idea to double-check that the water is shut off by turning on the faucet and ensuring no water flows out.
Disconnecting Plumbing Connections
The next step in removing the old sink is to disconnect the plumbing connections. Start by placing a bucket or towel beneath the sink to catch any water or debris that may spill out. Using adjustable pliers, loosen the nuts connecting the water supply lines to the valves. Once loose, carefully remove the water supply lines from the valves. Next, locate the drain pipe connected to the sink’s drain and use pliers to loosen the slip nut. Once the slip nut is loose, pull the drain pipe downward to disconnect it from the sink. Be mindful of any water that may be trapped inside the pipe.
Removing the Old Sink from the Countertop
With the plumbing connections disconnected, it’s time to remove the old sink from the countertop. Start by locating any clips or brackets securing the sink in place. Using a screwdriver, remove these clips or brackets and set them aside for later use or disposal. Once the sink is no longer secured, carefully lift it upward to detach it from the countertop. If the sink is sealed to the countertop with caulk, gently pry it away using a putty knife, being careful not to damage the countertop surface. Once the sink is completely detached, set it aside or dispose of it responsibly.
In conclusion, removing the old sink is an essential step in installing a drop-in farmhouse sink. By shutting off the water supply, disconnecting the plumbing connections, and removing the sink from the countertop, you’ll be well on your way to creating a fresh and modern look in your kitchen. Stay tuned for the next section where we’ll guide you through the installation process of your new drop-in farmhouse sink.
Installing The Drop-In Farmhouse Sink
The installation process of a drop-in farmhouse sink may seem daunting, but with the right techniques, you can have it installed in no time. In this section, we will guide you step-by-step on how to install your drop-in farmhouse sink.
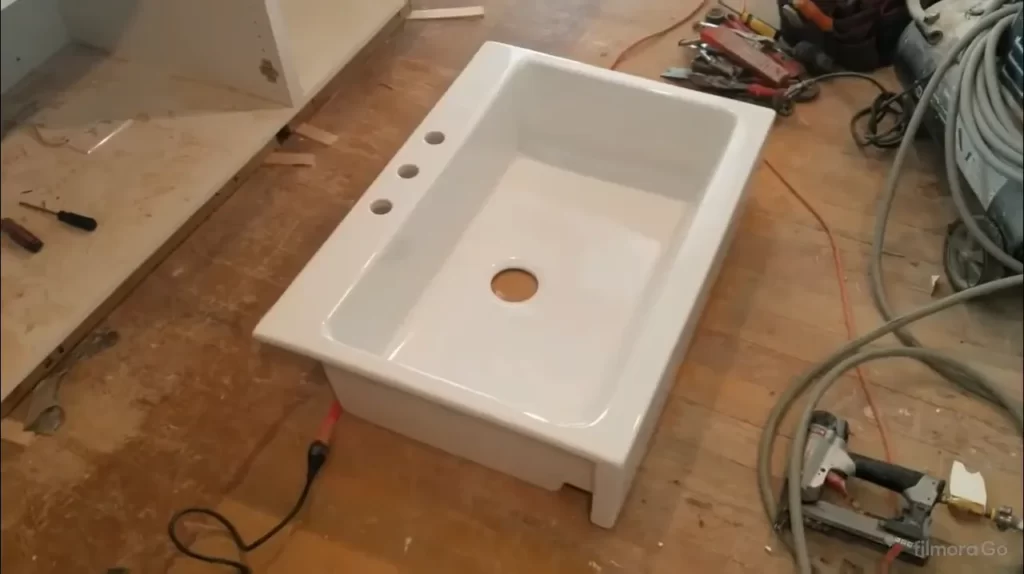
Dry Fitting the Sink into the Countertop
Before diving into the installation process, it is crucial to ensure that your sink fits perfectly into the countertop. To do this, start by dry fitting the sink into the countertop opening. Carefully place the sink into the designated spot, making sure it sits flush with the countertop surface.
Applying Caulk or Sealant to the Sink Rim
To prevent any water leakage, it is essential to apply a bead of caulk or sealant to the rim of the sink. This will create a watertight seal between the sink and the countertop. Be sure to use a high-quality caulk or sealant that is suitable for kitchen and bathroom installations. Apply the caulk evenly around the entire rim of the sink, ensuring full coverage.
Lowering the Sink into the Countertop Opening
Once the caulk or sealant is applied, carefully lower the sink into the countertop opening. Make sure to align it properly and ensure that the sink is perpendicular to the countertop surface. Take your time during this step to avoid damaging the sink or the countertop.
Aligning the Sink Properly
After lowering the sink into the countertop opening, it is crucial to align it properly. Ensure that the sink is centered and level with the surrounding countertop. Use a tape measure or level to confirm that all sides of the sink are evenly aligned with the countertop edges. This will not only enhance the visual appeal but also guarantee optimal functionality of the sink.
Securing the Sink with Clips or Brackets
Finally, to secure the sink in place, use clips or brackets. These accessories are designed to hold the sink firmly to the countertop, preventing any movement or instability. Follow the manufacturer’s instructions to place the clips or brackets at designated points around the sink rim. Tighten them gently with a screwdriver to ensure a secure fit.
By following these steps, you can successfully install a drop-in farmhouse sink in your kitchen or bathroom. Remember to take your time and be cautious during the installation process. Happy installing!

Reconnecting The Plumbing
After successfully installing your drop-in farmhouse sink, the next crucial step is reconnecting the plumbing. This ensures that your sink will be fully functional and ready for everyday use. In this section, we will guide you through the process of installing a new faucet and drain assembly (if desired), connecting the water supply lines, and checking for leaks and proper functionality.
Installing New Faucet and Drain Assembly (If Desired)
If you’re looking to upgrade your sink’s appearance or replace worn-out fixtures, installing a new faucet and drain assembly is a great choice. Here’s how to go about it:
- Start by removing the existing faucet and drain assembly, if applicable. Use a wrench to detach the supply lines and loosen the retaining nuts.
- Once the old fixtures are removed, clean the area thoroughly to ensure a smooth surface for the new installation. Wipe away any residual debris or caulk.
- Next, take your new faucet and drain assembly and follow the manufacturer’s instructions for installation. Pay close attention to any required seals or gaskets and ensure a tight fit.
- Tighten the retaining nuts underneath the sink to secure the faucet and drain assembly in place. Take care not to overtighten, as this can damage the fixtures or cause leaks.
Connecting Water Supply Lines
Now that the faucet and drain assembly are installed, it’s time to connect the water supply lines. Follow these steps:
- Locate the hot and cold water supply valves beneath your sink. Turn them off by rotating them clockwise.
- Take the new supply lines included with your faucet and connect them to the corresponding valves. Ensure a tight fit by using a wrench to secure the connections.
- Attach the other end of the supply lines to the faucet’s hot and cold water inlets. Again, make sure the connections are secure but avoid overtightening.
- Once everything is properly connected, slowly turn on the water supply valves. Check for any leaks at the connections or underneath the sink. If you notice any leaks, tighten the connections further until they stop.
Checking for Leaks and Proper Functionality
After connecting the water supply lines, it’s crucial to check for any leaks and ensure that everything is functioning properly. Follow these steps:
- Fill the sink with water and let it drain while observing the drain assembly. Check for any leaks around the drain, as well as underneath the sink where the connections are located.
- Test the faucet by turning on the hot and cold water. Ensure that water flows smoothly without any leaks or drips.
- Inspect the water supply lines and connections for any signs of leaks or loose fittings. If necessary, tighten any connections or replace faulty parts.
By following these steps and checking for leaks and proper functionality, you can ensure that your drop-in farmhouse sink is properly connected and ready for use. Enjoy the added charm and functionality of your farmhouse sink in your kitchen or utility room.

Sealing And Finishing Touches
Sealing and Finishing Touches
Once you have successfully dropped your farmhouse sink into place and leveled it, it’s time to focus on sealing and adding the final touches. This step ensures that your sink is properly secured to the countertop and that no water can leak through the gaps.
Applying Silicone Sealant to the Sink Edges
One crucial step in sealing your drop-in farmhouse sink is applying a silicone sealant to the edges. Here’s how you can do it:
- Clean the edges of your sink and countertop thoroughly to remove any dust or debris.
- Apply a thin and even layer of silicone sealant along the edges of the sink where it meets the countertop.
- Smooth out the sealant using a caulking tool or your finger to ensure it fills any gaps and creates a watertight seal.
- Wipe away any excess sealant with a damp cloth before it dries.
Cleaning the Sink and Countertop
After sealing the edges, it’s important to clean both the sink and countertop to remove any residue or fingerprints. Here’s how you can do it:
- Use a non-abrasive cleaner specifically designed for your sink material.
- Apply the cleaner to a soft cloth and gently scrub the sink surfaces.
- Rinse the sink thoroughly with warm water to remove any cleaner residue.
- Dry the sink and countertop with a clean, lint-free cloth to prevent water spots.
Final Inspections and Adjustments
Once the sink is sealed and clean, it’s time for the final inspections and adjustments to ensure everything is functioning correctly. Here are a few things you can check:
| Inspection | Adjustment |
|---|---|
| Check for any leaks around the edges of the sink. | If you notice any leaks, reapply silicone sealant and repeat the sealing process. |
| Test the faucet and drain connections for any leaks. | If there are leaks, tighten the connections or apply plumber’s tape as needed. |
| Ensure the sink is level and securely attached to the countertop. | Make any necessary adjustments using shims or brackets to achieve a stable installation. |
By following these steps for sealing and adding the finishing touches, you can ensure that your drop-in farmhouse sink is properly installed and ready to use. Take the time to complete each step carefully, and enjoy the beauty and functionality of your new sink for years to come.
Extra Tips And Considerations
Installing a drop-in farmhouse sink can be a wonderful addition to your kitchen, bringing a touch of rustic charm and functionality to your space. While the installation process may seem straightforward, there are some extra tips and considerations to keep in mind to ensure a successful and long-lasting installation.
Choosing the Right Sink Size and Shape
Before diving into the installation process, it’s essential to choose the right size and shape of the drop-in farmhouse sink. Consider the dimensions of your existing kitchen cabinet and countertop to ensure that the sink fits seamlessly into your space. Additionally, think about your specific needs and preferences. Do you require a larger sink for washing large pots and pans or multiple basin compartments for multitasking? Keep in mind that the size and shape of your sink can significantly impact its functionality.
Proper Maintenance and Care for a Drop-in Farmhouse Sink
Proper maintenance and care are crucial for preserving the beauty and longevity of your drop-in farmhouse sink. To prevent scratches and dullness, it’s important to clean your sink regularly using a mild non-abrasive cleanser and a soft cloth or sponge. Avoid using harsh chemicals or abrasive materials that can damage the sink’s surface. Additionally, consider using a sink mat or grid to protect the bottom surface from scratches caused by dishes and utensils. Regularly drying your sink after use can also help prevent water spots and mineral build-up.
Common Installation Mistakes to Avoid
When it comes to installing a drop-in farmhouse sink, there are a few common mistakes that should be avoided:
| Mistake | Consequence |
|---|---|
| Not properly measuring the sink dimensions | The sink may not fit properly into the countertop, resulting in gaps or uneven installation. |
| Not adequately sealing the sink | This can lead to water leakage and potential damage to the surrounding areas, such as cabinets. |
| Over-tightening or under-tightening the mounting clips | This can cause the sink to shift over time or even crack under excessive pressure. |
| Using improper tools or techniques | Using the wrong tools or incorrect installation techniques can result in damage to the sink or surrounding areas. |
By avoiding these common mistakes and following the correct installation procedures, you can ensure a successful and durable installation of your drop-in farmhouse sink.
Frequently Asked Questions
Can You Do A Drop-In Farmhouse Sink?
Yes, we can install a drop-in farmhouse sink for you. Let us handle the installation and enhance the aesthetic appeal of your kitchen.
How Should A Farmhouse Sink Be Installed?
To install a farmhouse sink, follow these steps: 1. Measure and mark the cabinet for the sink’s dimensions. 2. Cut an opening in the countertop to fit the sink. 3. Install support braces to hold the weight of the sink. 4.
Attach the sink to the countertop with adhesive or mounting clips. 5. Connect the plumbing and secure the sink in place.
How Do You Support A Farmhouse Sink In A Cabinet?
To support a farmhouse sink in a cabinet, use support brackets or a support frame to distribute the weight evenly and reinforce the structure. Ensure that the cabinet is strong enough to handle the weight and seek professional assistance if needed.
Does Farmhouse Sink Get Installed Before Or After Countertop?
Install the farmhouse sink before the countertop for proper fitting and alignment.
Conclusion
Installing a drop-in farmhouse sink is a fairly simple process that can transform the look and functionality of your kitchen. By following the step-by-step instructions outlined in this blog post, you can successfully complete the installation on your own. Remember to prepare the area, measure and cut the countertop, secure the sink, and connect the plumbing.
With a little patience and the right tools, you’ll be enjoying the beauty and convenience of your new farmhouse sink in no time. Happy installation!