
To install a drop-in bathroom sink, start by turning off the water supply and disconnecting the plumbing. Then, place the sink into the countertop cutout and secure it with clips.
Finally, reattach the plumbing and turn the water supply back on. A drop-in bathroom sink can enhance the appearance and functionality of your bathroom. Whether you’re remodeling or building a new bathroom, installing a drop-in sink is a straightforward process.
In this guide, we will walk you through the steps to install a drop-in bathroom sink, ensuring that you can complete the task with ease. By following these instructions, you can achieve a professional-looking installation and enjoy a stylish and functional sink in your bathroom. Let’s dive into the details of installing a drop-in bathroom sink and transform your bathroom today.
Factors To Consider Before Installation
Before you start installing a drop-in bathroom sink, it’s important to consider a few key factors that will ensure a successful and hassle-free installation process. By taking the time to assess the existing bathroom layout, choosing the right sink size and dimensions, and selecting a suitable sink material, you can create a stylish and durable bathroom sink that meets your needs. Let’s dive deeper into each of these factors to ensure a smooth installation process.
Assessing the Existing Bathroom Layout
The first step in installing a drop-in bathroom sink is to assess the existing bathroom layout. Start by examining the location of the plumbing and water supply lines to ensure they align with the new sink’s requirements. Take measurements of the countertop and the space available for the sink, considering any cabinets or fixtures that may impact the sink’s positioning.
Choosing the Right Sink Size and Dimensions
Once you have assessed the bathroom layout, it’s time to choose the right sink size and dimensions for your space. Measure the width and depth of the countertop to determine the maximum size of the sink that can comfortably fit. Consider the number of people using the bathroom and the primary purpose of the sink to determine if a single or double sink is more suitable.
Selecting a Suitable Sink Material for Durability and Style
Another important factor to consider is the sink material. The material not only affects the durability of the sink but also plays a major role in the overall style of the bathroom. Options such as porcelain, ceramic, stainless steel, and stone each offer unique benefits and aesthetics. Consider factors such as maintenance requirements, durability, and the overall aesthetic you want to achieve in your bathroom when selecting the sink material.

Gather The Necessary Tools And Materials
To install a drop-in bathroom sink, you will need a set of essential tools and materials. These are necessary to ensure a successful and efficient installation process. In this section, we will discuss the important tools, plumbing supplies, accessories, and sink installation kits that you must gather before starting the installation.
Essential tools for a successful installation
Before you begin the installation process, make sure you have the following tools on hand:
- Tape Measure
- Hacksaw
- Adjustable Wrench
- Screwdriver Set
- Putty Knife
- Caulking Gun
Required plumbing supplies and accessories
In addition to the tools mentioned above, it is important to have the necessary plumbing supplies and accessories. These include:
- Drain Pipe
- Water Supply Lines
- Plumber’s Putty or Caulk
- Plumbing Tape
- P-Trap
- Plumbing Wrench
Understanding sink installation kits and their components
Sink installation kits are specifically designed to simplify the installation process. These kits typically include the following components:
| Component | Description |
|---|---|
| Mounting Brackets | These brackets help secure the sink to the countertop. |
| Template | A template is provided to help you accurately mark the sink’s position on the countertop before installation. |
| Clips | Clips are used to hold the sink in place and provide additional support. |
| Hardware | The kit includes screws and other necessary hardware for attaching the sink to the brackets and countertop. |
By understanding the components of the sink installation kit, you can ensure that you have all the necessary parts and tools to complete the installation successfully.
Now that you know what tools, supplies, and accessories you need for installing a drop-in bathroom sink, you are ready to move on to the next step: Preparing the installation area.

Clearing The Bathroom Countertop
Before you embark on installing a drop-in bathroom sink, it is crucial to clear the bathroom countertop to ensure a smooth and hassle-free installation. This step is essential as it allows you to assess the condition of the countertop and ensures a stable and secure foundation for your new sink. In this section, we will discuss two crucial steps to follow: removing any items and accessories from the countertop and cleaning the surface thoroughly for a seamless installation.
Removing any items and accessories from the countertop
Prior to installing a drop-in bathroom sink, it is important to remove any items and accessories from the countertop. This includes soap dispensers, toothbrush holders, tissue boxes, and any other objects that may be sitting on the countertop. By doing so, you create a clear and open space to work with, making the installation process easier and allowing you to focus on the task at hand.
Cleaning the surface thoroughly for a smooth installation
Once you have cleared the countertop, the next step is to clean the surface thoroughly. This step is crucial as it ensures a smooth and secure installation. Start by removing any dust, dirt, or debris from the countertop using a soft cloth or a vacuum cleaner. Be thorough in your cleaning, paying close attention to corners and edges.
Next, prepare a mixture of mild soap or a bathroom cleaner with warm water. Using a soft sponge or cloth, carefully scrub the countertop surface, ensuring all areas are cleaned effectively. Rinse the countertop with clean water to remove any residue from the cleaning solution.
After cleaning, dry the countertop completely to prevent moisture buildup, which could potentially lead to damage or mold growth over time. Use a clean, absorbent cloth or paper towels to ensure all moisture is eliminated.
By clearing the bathroom countertop and cleaning the surface thoroughly, you create a pristine canvas for the installation of your drop-in bathroom sink. Following these steps will not only ensure a seamless installation process but also promote the longevity and durability of your new sink.
Shutting Off The Water Supply
Locating the water shut-off valves underneath the sink
Before you begin installing your drop-in bathroom sink, it’s important to locate the water shut-off valves underneath the sink. These valves are typically located on the water supply lines, which connect directly to your faucet. In most cases, you’ll find separate valves for the hot and cold water supply.
Turning off both the hot and cold water supply
Once you’ve located the shut-off valves, it’s time to turn off both the hot and cold water supply. This step is crucial to prevent any potential leaks or water damage during the installation process.
- Start by locating the valve for the hot water supply. Rotate the valve clockwise until it is completely closed. This will shut off the flow of hot water to your sink.
- Next, locate the valve for the cold water supply. Just like with the hot water valve, rotate it clockwise until it is fully closed. This will stop the flow of cold water to your sink.
Once you have turned off both the hot and cold water supply valves, it’s a good idea to test them to ensure they are fully closed. Simply turn on the faucet to see if any water continues to flow. If you notice any water coming out, double-check that the valves are completely closed.
By shutting off the water supply before installing your drop-in bathroom sink, you can avoid unnecessary mess and potential water damage. Following these simple steps will ensure a smooth and hassle-free installation process, allowing you to enjoy your new sink in no time.

Removing The Old Sink (If Applicable)
If you’re planning to install a new drop-in bathroom sink, the first step is to remove the old sink. This ensures a clean surface for the installation of the new sink. In this step-by-step guide, we will walk you through the process of safely removing the existing sink.
Step-by-step guide to safely remove the existing sink
Follow these simple steps to safely remove your old bathroom sink:
- Start by turning off the water supply to the sink. Locate the shut-off valves under the sink and turn them clockwise until they are fully closed.
- Next, place a bucket or a towel under the sink to catch any water that might still be in the supply lines or drain pipes.
- Using an adjustable wrench or pliers, disconnect the water supply lines from the shut-off valves. Loosen the nuts by turning them counterclockwise until they are fully detached.
- Once the supply lines are disconnected, use the same wrench or pliers to loosen the nuts that hold the drain pipes in place. Again, turn them counterclockwise until they are fully detached.
- Gently pull the sink away from the wall or countertop, taking care not to damage any surrounding fixtures or plumbing.
- If your sink is secured with adhesive or caulking, carefully cut through it using a utility knife or a caulk removal tool. Gradually work your way around the sink until it becomes loose enough to remove.
Disconnecting water supply lines and drain pipes
To disconnect the water supply lines and drain pipes, follow these steps:
- Locate the shut-off valves under the sink.
- Using an adjustable wrench or pliers, turn the shut-off valves clockwise until they are fully closed.
- Place a bucket or a towel under the sink to catch any remaining water.
- Using the wrench or pliers, loosen the nuts that connect the supply lines to the shut-off valves. Turn them counterclockwise until they are fully detached.
- Repeat the same process for the nuts connecting the drain pipes to the sink.
Removing any adhesive or caulking to ensure a clean surface
To ensure a clean surface for the installation of the new sink, follow these steps to remove any adhesive or caulking:
- Use a utility knife or a caulk removal tool to carefully cut through the adhesive or caulking around the edges of the sink.
- Work your way around the sink, gradually detaching it from the countertop or wall.
- Once the sink is free from any adhesive or caulking, carefully lift it away from the installation surface.
By following this step-by-step guide, you’ll be able to safely remove your old bathroom sink, leaving you with a clean surface ready for the installation of your new drop-in sink.
Placing The Sink Into Position
Determining the exact position for the new sink
Before installing a drop-in bathroom sink, it is important to determine the exact position where the sink will be placed. This step will ensure that the sink fits perfectly and provides a seamless look in your bathroom countertop. To determine the position, start by measuring the size of the sink and the cutout in the countertop. Use a measuring tape to measure the length, width, and depth of the sink and compare it to the dimensions of the countertop cutout.
Once you have the measurements, measure the distance from the back wall to the front edge of the countertop where you want to place the sink. This will help you determine the perfect location for the sink. Additionally, take into consideration any plumbing connections that need to be made and ensure that there is enough space for them behind the sink.
Ensuring proper alignment and fit within the countertop cutout
After determining the exact position for the sink, the next step is to ensure proper alignment and fit within the countertop cutout. This will help to prevent any gaps or uneven edges around the sink, providing a professional and polished finish.
Begin by placing the sink upside down on a flat surface to access the mounting clips or brackets. These clips or brackets will secure the sink to the countertop, keeping it in place. Position the clips or brackets in the designated areas on the sink, following the manufacturer’s instructions.
Next, carefully lift the sink and place it into the countertop cutout. Ensure that the sink aligns perfectly with the edges of the cutout. Use a level to check if the sink is balanced and adjust as necessary.
Securing the sink in place
Once the sink is properly aligned within the countertop cutout, it’s time to secure it in place. Refer to the manufacturer’s instructions to determine the appropriate method of securing the sink, as it may vary depending on the sink model and design.
In most cases, the sink will come with mounting clips or brackets that need to be tightened to secure the sink to the countertop. Use a screwdriver or a wrench to tighten the mounting clips or brackets evenly. Be cautious not to overtighten, as this can cause damage to the sink or countertop.
After securing the sink, test to ensure it is secure and doesn’t wiggle or move. If the sink feels loose, recheck the alignment and tighten the mounting clips or brackets accordingly. Additionally, clean any excess caulk or sealant around the edges of the sink to give it a neat and finished appearance.
In conclusion, properly placing a drop-in bathroom sink into position involves determining the exact position, ensuring proper alignment and fit within the countertop cutout, and securing the sink in place. By following these steps, you can achieve a seamless and professionally installed bathroom sink that enhances the overall look of your space.
Securing The Sink With Mounting Clips
In order to properly install a drop-in bathroom sink, one crucial step is securing the sink with mounting clips. Mounting clips play a vital role in keeping the sink securely in place, preventing any movement or wobbling. Understanding the purpose and installation process of these clips is essential to ensure a stable and long-lasting installation.
Understanding the purpose and installation process of mounting clips
Mounting clips are hardware components specifically designed to secure a drop-in bathroom sink to the countertop. They provide stability and support to keep the sink in place, even with regular use. To install the sink, you will need to position the clips underneath the sink’s rim and attach them to the underside of the countertop.
Here’s a step-by-step guide to installing the mounting clips:
- Start by determining the appropriate location for installing the clips. Refer to the sink manufacturer’s instructions for specific guidelines on clip placement.
- Using a measuring tape, ensure that the distance between the clips is in accordance with the sink manufacturer’s specifications.
- Place the mounting clips on the underside of the sink’s rim, aligning them with the predetermined locations. Make sure the clips are evenly spaced to provide equal support.
- Secure the mounting clips to the underside of the countertop using screws or bolts, as recommended by the sink manufacturer. Ensure that the clips are tight and firmly holding the sink in place.
- Check the stability of the sink by gently applying pressure and verifying if it remains secure. If there is any movement or wobbling, readjust the mounting clips as needed.
Properly positioning and securing the sink with mounting clips
Proper installation of the sink mounting clips is crucial to ensure a solid and stable attachment. When positioning the clips, take into consideration the sink’s design and weight distribution. Ensure that the clips are evenly spaced and properly aligned with the sink’s rim.
When securing the clips, make sure to tighten the screws or bolts securely, but be cautious not to overtighten as it may damage the sink or the countertop. A balanced and secure attachment will prevent any future issues, such as leaks or sink movement.
Remember, if you are unsure about any aspect of the sink installation process or need further guidance, it is always recommended to consult the sink manufacturer’s instructions or seek professional assistance.
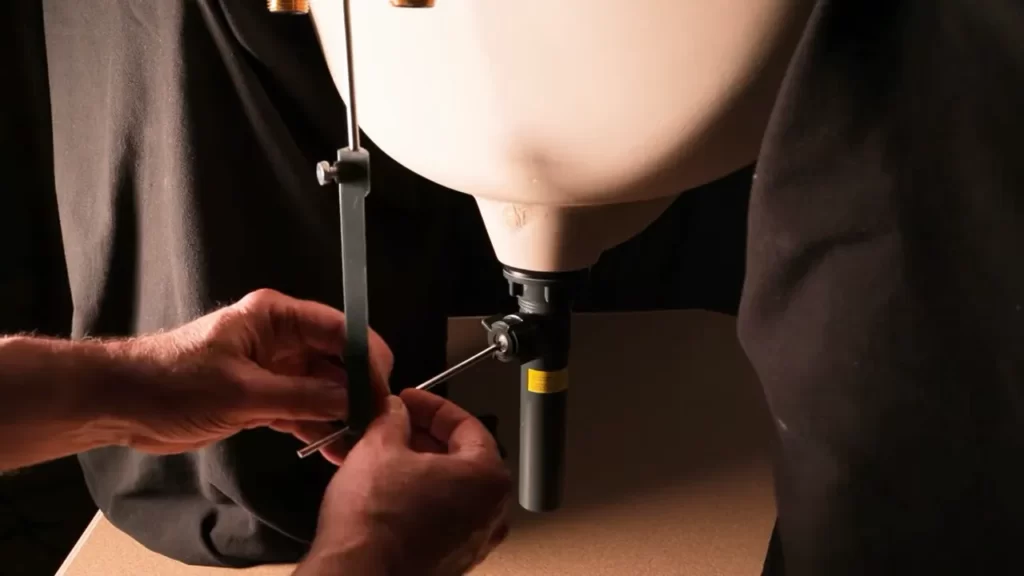
Connecting The Water Supply Lines
Connecting the water supply lines is a crucial step when installing a drop-in bathroom sink. It ensures a seamless and efficient flow of water to your sink fixtures. In this section, we will discuss the proper alignment and connection of the hot and cold water supply lines, as well as how to ensure tight and leak-free connections. By following these steps, you can confidently complete the installation of your drop-in bathroom sink.
Properly Aligning and Connecting the Hot and Cold Water Supply Lines
When connecting the water supply lines for your drop-in bathroom sink, it is important to properly align the hot and cold lines to ensure the right temperature control. Here is a step-by-step guide to help you with this process:
- Start by identifying the hot and cold water supply lines coming from your wall. The hot water supply line is usually marked with a red tag, while the cold water supply line is marked with a blue tag. If there are no color indicators, you can check the temperature by carefully touching the pipes with the back of your hand. The hot water supply line will be warmer than the cold water supply line.
- Once you have identified the hot and cold water supply lines, ensure that they are properly aligned with the corresponding valves beneath your sink. The hot water line should align with the hot water valve, while the cold water line should align with the cold water valve.
- Using a wrench, carefully tighten the nuts on the water supply lines to secure them to the valves. Avoid over-tightening, as it can result in damaged threads or leaks. Ensure that the lines are straight and not kinked, as this can impede water flow.
- Remember: Always refer to the manufacturer’s instructions for specific guidelines on connecting the water supply lines. They may have additional recommendations or specifications for your particular drop-in bathroom sink.
Ensuring Tight and Leak-Free Connections
To prevent any leaks and ensure tight connections between the water supply lines and your drop-in bathroom sink, follow these steps:
- Apply plumber’s tape or thread sealant to the threaded ends of the water supply lines. This helps create a watertight seal and prevents leaks.
- Attach the water supply lines to the corresponding faucet supply inlets beneath your sink. Hand-tighten the nuts to begin with, ensuring they are snug.
- Using a wrench, carefully tighten the nuts on the water supply lines, but be cautious not to overtighten as it can damage the connections. Check for any leaks by turning on the water and inspecting the connections. If you notice any leaks, gently tighten the nuts a little more until the leaks stop.
- Tip: It’s always a good idea to have a bucket nearby during this process, just in case there are any minor drips or leaks that need to be caught.
By properly aligning and connecting the hot and cold water supply lines of your drop-in bathroom sink, you can ensure a hassle-free installation with no leaks or loose connections. This will not only save you time and effort but also provide you with a fully functional bathroom sink that meets your needs.
Installing The Drain Assembly
Assembling and installing the sink drain components
When it comes to installing a drop-in bathroom sink, one crucial step is the installation of the drain assembly. This includes assembling and installing the sink drain components, as well as properly sealing the drain to prevent any leaks. Follow these simple steps to ensure a smooth installation process:
1. Start by gathering all the necessary sink drain components. These typically include the drain flange, rubber gasket, plastic washer, and locknut.
2. Place the rubber gasket on the bottom of the drain flange. This gasket helps create a watertight seal between the sink and the drain.
3. Insert the drain flange into the drain opening on the sink, making sure it sits flush against the bottom of the sink.
Properly sealing the drain to prevent any leaks
Properly sealing the drain is crucial to prevent any future leaks that could cause water damage or mold growth. Follow these steps to ensure a tight seal:
- Carefully position the plastic washer on top of the rubber gasket, ensuring it covers the entire opening of the drain flange.
- Screw the locknut onto the drain flange, tightening it as much as possible by hand.
- Use pliers or a wrench to tighten the locknut even further, creating a secure and watertight seal. Be careful not to overtighten, as this could damage the sink or drain components.
- Double-check the tightness of the locknut to ensure it is securely fastened.
By following these steps, you can confidently install a drop-in bathroom sink and properly seal the drain to prevent any leaks or water damage. Remember to test the drain for any leaks before finishing the installation process to ensure a successful outcome.
Applying Caulk To The Sink Edges
Choosing the Right Caulk for a Professional Finish
Before applying caulk to the edges of your drop-in bathroom sink, it’s crucial to choose the right caulk to achieve a professional finish. With a wide range of caulks available in the market, picking the right one can seem daunting. However, when it comes to bathroom sinks, a silicone-based caulk is the best choice.
Silicone-based caulk offers excellent adhesion and flexibility, ensuring a watertight seal around the sink edges. The flexibility of this caulk allows for natural expansion and contraction that occurs with temperature changes, preventing cracks or gaps from forming over time. Additionally, silicone caulk is resistant to mold and mildew growth, making it ideal for the moist bathroom environment.
When choosing a silicone-based caulk, look for a product specifically designed for bathroom use. These types of caulks are formulated to resist water and provide long-lasting durability. Additionally, opt for a caulk that matches the color of your sink or bathroom fixtures for a seamless and professional look.
Applying Caulk Around the Edges of the Sink
Once you have selected the right caulk, it’s time to apply it around the edges of your drop-in bathroom sink. Follow these steps for a successful application:
- Clean the area: Before applying caulk, ensure that the sink edges are clean and dry. Remove any dirt, grime, or old caulk using a mild detergent and a sponge. Allow the area to dry completely before proceeding.
- Prepare the caulk: Cut off the tip of the caulk tube at a 45-degree angle using a utility knife. Pierce the foil seal inside the tube using a nail or another sharp object. Then, attach the caulk tube to a caulk gun for easy and precise application.
- Apply the caulk: Start by applying a thin and even bead of caulk along the edge of the sink. Hold the caulk gun at a 45-degree angle for better control. Move the caulk gun steadily along the entire edge, applying consistent pressure. Be sure to fill any gaps or spaces between the sink and the countertop.
- Smooth the caulk: Once you have applied the caulk, use a caulk smoother or your finger to smooth the bead of caulk. Wetting your finger slightly can help prevent the caulk from sticking to your skin. Smooth the caulk in a continuous motion along the entire length to create a neat and professional finish. Remove any excess caulk using a damp cloth.
- Cure the caulk: Allow the caulk to cure as per the manufacturer’s instructions. This typically takes 24-48 hours. Avoid using the sink during this time to ensure the caulk sets properly.
By following these steps and using the right caulk, you can ensure a watertight seal around the edges of your drop-in bathroom sink. This not only prevents water damage but also adds a polished and professional touch to your bathroom installation.
Reconnecting The Water Supply And Testing For Leaks
Once you have successfully installed your drop-in bathroom sink and secured it in place, it’s time to reconnect the water supply and ensure there are no leaks. This crucial step will not only allow you to use your new sink, but also give you peace of mind knowing that your installation was completed correctly. Follow these simple steps to reconnect the water supply and conduct a thorough inspection.
Turning the Water Supply Back On
To begin, locate the shut-off valves for your water supply. These are typically located beneath the sink or near the main water line in your bathroom. Once you have located the valves, turn them counterclockwise to open them fully. This will restore the water flow to your sink. Take note that it may take a few minutes for the water to fully reach the faucet, so be patient.
Checking for Any Leaks
After the water supply has been turned back on, it’s time to check for any leaks. Leaks can occur in several areas, including the connections between the water supply lines and the faucet, as well as around the drain area. A leaky connection can result in water damage and should be addressed immediately.
Begin by carefully inspecting each connection point. Feel along the connections for any moisture or drips. If you notice any, use an adjustable wrench to tighten the fittings. Be cautious not to overtighten, as this can damage the connections. If the leak persists, you may need to replace the faulty fitting.
In addition to the connections, closely examine the drain area. Feel around the drain for any moisture or dampness. This could indicate a leak in the drain pipe or the sealant around the drain. If you detect a leak, consider applying plumber’s putty or silicone caulking around the drain to create a watertight seal.
Once you have inspected and addressed any potential leaks, it’s important to conduct a final test to confirm that your installation is successful.
Conducting a Thorough Inspection
Before declaring your sink installation complete, conduct a thorough inspection to ensure everything is in proper working order. Here are some key areas to focus on during your inspection:
- Test the functionality of the faucet handles and knobs. Ensure they turn smoothly and that there are no leaks when the faucet is turned on or off.
- Verify that the drainage is efficient. Fill the sink with water and observe how quickly it drains. If it drains slowly, you may need to check the drainpipe for any clogs or obstructions.
- Inspect the caulk or sealant around the edges of the sink. Make sure it is securely in place and free from any gaps or cracks that could lead to leaks.
- Check the overall stability of the sink. Gently push and pull on the sink to ensure it is firmly in place and does not move or wobble.
By conducting this comprehensive inspection, you can confidently confirm that your drop-in bathroom sink has been successfully installed and is ready for use. Enjoy your newly upgraded bathroom fixture, knowing that you completed the installation with care and attention to detail.
Frequently Asked Questions
What Holds A Drop-In Bathroom Sink In Place?
A drop-in bathroom sink is held in place by its rim, which rests on the countertop. The weight of the sink and the sealant around the rim ensure stability and prevent it from moving.
How Easy Is It To Install A Drop-In Sink?
Installing a drop-in sink is quick and easy. You just need to follow a few steps: cut the hole in the countertop, place the sink into the hole, secure it with clips or adhesive, connect the plumbing, and you’re done.
It’s a straightforward process that anyone can handle!
What Kind Of Sealant Do You Use For A Sink Drop?
For a sink drop, use a silicone-based sealant. It is durable, water-resistant, and helps prevent leakage. Choose a high-quality brand for long-lasting results.
How Do You Secure A Bathroom Sink To A Countertop?
To secure a bathroom sink to a countertop, you can follow these steps: 1. Place the sink upside down on the countertop. 2. Apply a bead of silicone caulk around the edge of the sink. 3. Flip the sink back over and position it on the countertop.
4. Press the sink firmly to ensure proper adhesion. 5. Add clips or brackets if provided by the manufacturer. Remember to let the caulk dry completely before using the sink.
Conclusion
Installing a drop-in bathroom sink is a straightforward process that can bring a fresh new look to your bathroom. By following the steps outlined in this post, you can easily accomplish this task on your own. Remember to gather all the necessary tools and materials, prepare the space, and carefully follow the manufacturer’s instructions.
With a little patience and attention to detail, you’ll have a beautifully installed drop-in sink in no time. Say goodbye to the old and hello to the new!