To install a drain pump to a pedicure chair, follow these steps: First, disconnect the power supply. Then, locate the existing drain hose and remove it from the drain pipe.
Install the drain pump in line with the drain hose, making sure to connect the hoses securely. Finally, connect the pump to the power supply and test it to ensure proper functionality. Introducing a drain pump to a pedicure chair can greatly enhance its efficiency and convenience.
By effectively draining the water used during a pedicure, the drain pump prevents water buildup and reduces the risk of contamination. In this guide, we will walk you through the process of installing a drain pump to your pedicure chair, ensuring a seamless transition and optimal performance. Follow our step-by-step instructions to effectively install a drain pump, allowing you to provide a clean and enjoyable experience for your customers.
Understanding The Importance Of A Drain Pump In A Pedicure Chair
Why a Drain Pump is Necessary for a Pedicure Chair
A drain pump is an essential component of a pedicure chair that helps to efficiently and effectively remove water from the basin after a pedicure treatment. It is a vital plumbing feature that serves multiple purposes. Understanding the importance of a drain pump in a pedicure chair is crucial for salon owners and technicians.
Benefits of Using a Drain Pump
Using a drain pump in a pedicure chair offers numerous benefits that enhance both the client’s experience and the overall efficiency of the salon. Here are some of the key advantages:
- Efficient Water Drainage: A drain pump ensures quick and thorough drainage of the pedicure basin, saving time between appointments and ensuring a hygienic environment.
- Prevents Cross-Contamination: By efficiently draining the water, a drain pump helps to minimize the risk of cross-contamination between clients, ensuring a safe and sanitary pedicure experience.
- Easy Maintenance: With a drain pump, maintaining the pedicure chair becomes much simpler. Cleaning and sanitizing the basin becomes easier as there is no residual water left behind.
- Improved Salon Efficiency: The use of a drain pump allows for a more streamlined workflow, enabling salon technicians to attend to more clients in less time.
Common Problems Without a Drain Pump
Without a drain pump in place, salon owners and technicians may encounter several challenges that can hinder the smooth operation of their pedicure services. These problems include:
- Slow Water Drainage: Lack of a drain pump can lead to slow water drainage, resulting in longer wait times between clients and potentially reducing the overall number of customers that can be served in a day.
- Increased Risk of Contamination: When water is not efficiently drained, there is a higher risk of contamination and the spread of bacteria and germs, compromising the hygiene standards of the salon.
- Difficult Maintenance: Without a drain pump, cleaning and maintaining the pedicure chair becomes time-consuming and challenging, as the lingering water can attract dirt and grime.
Therefore, it is crucial for salon owners to invest in a reliable and high-quality drain pump for their pedicure chairs. By doing so, they not only ensure the safety and satisfaction of their clients but also maintain a smooth and efficient salon operation.

Necessary Tools And Equipment For Installing A Drain Pump
Installing a drain pump to your pedicure chair can greatly enhance its functionality and efficiency. To ensure a successful installation, it is important to have the right tools and equipment handy. Here is a list of the necessary tools required for installing a drain pump:
List of tools required for the installation
| Tool | Description |
|---|---|
| Adjustable wrench | An adjustable wrench is essential for loosening and tightening fittings. |
| Pipe cutter | A pipe cutter allows you to cut precise lengths of piping for connecting the drain pump to your pedicure chair. |
| Teflon tape | Teflon tape is used to create a tight seal on threaded connections, preventing leaks. |
| Screwdriver | A screwdriver is needed for securing screws or removing panels for accessing the inner components of the pedicure chair. |
| Plumbers’ putty | Plumbers’ putty is used to create a watertight seal around the drain fittings. |
| Measuring tape | A measuring tape helps ensure precise measurements for cutting pipes and positioning the drain pump. |
| Hacksaw | A hacksaw is necessary for cutting plastic or metal piping to the desired length. |
Types of drain pumps available in the market
Different types of drain pumps are available in the market, each with its own unique features and capabilities. These include:
- Submersible drain pumps: These pumps are designed to be installed underwater and are suitable for pedicure chairs with built-in foot basins.
- In-line drain pumps: In-line drain pumps are installed outside the foot basin and are ideal for pedicure chairs with separate basins.
- Air-powered drain pumps: These pumps operate by using compressed air and are suitable for pedicure chairs that do not have access to electricity.
- Electric drain pumps: Electric drain pumps are powered by electricity and are commonly used in modern pedicure chairs.
Choosing the right drain pump for your pedicure chair
When choosing a drain pump for your pedicure chair, there are a few factors to consider to ensure a suitable match:
- Capacity: Determine the volume of water your pedicure chair’s basin can hold and choose a drain pump with a similar or greater capacity.
- Compatibility: Check the specifications of the drain pump to ensure it is compatible with your pedicure chair’s plumbing system.
- Noise level: If noise is a concern, opt for a drain pump that operates quietly to provide a more pleasant pedicure experience.
- Brand reputation: Research different brands and read customer reviews to choose a reliable and reputable drain pump.
By having the necessary tools and selecting the right drain pump, you can successfully install a drain pump to your pedicure chair, improving its functionality and efficiency.
Step 1: Preparing The Pedicure Chair For Installation
Step 1: Preparing the Pedicure Chair for Installation
<h3>Properly cleaning and disinfecting the chair</h3>
Before installing a drain pump to your pedicure chair, it is crucial to ensure that the chair is properly cleaned and disinfected. Cleaning the chair thoroughly will help remove any dirt, debris, or bacteria that may be present, providing a clean base for the installation process. Disinfecting the chair will help eliminate any harmful microorganisms, ensuring a safe and hygienic environment for your clients. Here are the steps to follow for cleaning and disinfecting your pedicure chair:
- Remove any visible debris: Start by removing any visible debris such as nail clippings, hair, or leftover pedicure products from the chair. Use a soft brush or vacuum cleaner to clean the surface effectively.
- Prepare the cleaning solution: Mix a mild detergent with warm water in a bucket or basin. Ensure that the detergent is suitable for use on salon equipment and won’t damage the chair’s material.
- Clean the chair: Dip a clean cloth or sponge into the cleaning solution and gently scrub the chair’s surfaces, including the footrest, armrests, and basin. Pay extra attention to any areas with stubborn stains or residue.
- Rinse with clean water: Once you have thoroughly cleaned the chair, rinse it off with clean water to remove any soap residue. Ensure that all cleaning solution is completely removed.
- Disinfect the chair: After rinsing, apply a suitable disinfectant to the chair according to the manufacturer’s instructions. Let the disinfectant sit for the recommended time to effectively kill any remaining bacteria or viruses.
- Dry the chair: Finally, use a clean towel or let the chair air dry completely before moving on to the next step.
<h3>Removing any existing drainage components</h3>
After ensuring that the chair is clean and disinfected, the next step is to remove any existing drainage components that may be in place. This is important to ensure a smooth installation process and prevent any complications. Follow these steps to remove the existing drainage components:
- Turn off the power: Before working on the chair, make sure to turn off the power to prevent any accidents or electrical issues.
- Locate the existing drainage components: Generally, you will find the drainage components at the base of the chair or underneath the basin. Take note of the connections and how the components are fixed in place.
- Disconnect the components: Carefully disconnect all the components, including the drain pipe, drain hose, and any other connecting parts. Use appropriate tools if necessary and be cautious not to cause any damage to the chair or surrounding areas.
- Remove the components: Once disconnected, remove the drainage components from the chair completely. Set them aside for proper disposal or future use if applicable.
- Clean the area: Take a moment to clean the area where the components were attached. Remove any dirt or residue to ensure a clean surface for the new drain pump installation.
<h3>Checking the chair’s compatibility with a drain pump</h3>
Lastly, before proceeding with the drain pump installation, it is important to check the compatibility of your pedicure chair with a drain pump. Not all chairs are designed to accommodate drain pumps, so it’s crucial to ensure compatibility to avoid any complications during the installation. Here’s how you can check the chair’s compatibility:
- Review the chair’s specifications: Consult the chair’s manual or specifications to determine if it is compatible with a drain pump. Look for any specific instructions or requirements mentioned by the manufacturer.
- Inspect the chair’s plumbing: Examine the chair’s plumbing system to see if it has the necessary connections and plumbing access points for installing a drain pump. Look for existing holes or openings that can be utilized for the drain pump installation.
- Consult a professional: If you are unsure about the compatibility of your chair or need assistance with the installation, it is best to consult a professional technician who specializes in pedicure chair installations. They will be able to assess the chair’s compatibility and provide guidance on the installation process.
By properly cleaning and disinfecting your pedicure chair, removing any existing drainage components, and checking compatibility with a drain pump, you are ensuring a smooth and successful installation process. Each of these steps is crucial to ensure a clean, safe, and functional pedicure chair that meets the highest standards of hygiene and customer satisfaction.
Step 2: Locating The Optimal Position For The Drain Pump
Factors to consider when choosing the placement
1. Height and accessibility:
When determining the optimal position for the drain pump of your pedicure chair, it’s crucial to consider the height and accessibility of the pump. The pump should be placed at a height that allows for easy access during maintenance and repairs. A convenient height ensures that technicians won’t have to strain or bend over excessively, reducing the risk of injury and ensuring efficient servicing.
2. Space availability:
You should also take into account the available space around the pedicure chair when choosing the placement for the drain pump. Ensure that there is enough space to accommodate the pump without obstructing the movement of technicians or clients. A clutter-free and well-organized workspace not only enhances efficiency but also improves the overall aesthetic appeal of the salon.
3. Proximity to the plumbing outlet:
One of the crucial factors to consider when positioning the drain pump for your pedicure chair is its alignment with the existing plumbing system. The pump should be located in close proximity to the plumbing outlet to minimize the length of the connecting pipes. Shorter pipes not only reduce the risk of leaks and blockages but also optimize the drainage process, ensuring smooth and efficient operation.
Ensuring accessibility for maintenance and repairs
Accessibility is key when it comes to maintaining and repairing the drain pump of your pedicure chair. To ensure ease of access, follow these guidelines:
- Choose a location for the pump that allows technicians to reach it without any hindrances or obstacles.
- Leave an adequate amount of space around the pump to allow for easy maneuvering during maintenance and repairs.
- Consider installing the pump in a position that can be easily reached from multiple angles, providing versatility during servicing.
Proper alignment with the existing plumbing system
Proper alignment of the drain pump with the existing plumbing system is crucial to ensure the efficient function of your pedicure chair’s drainage system. Here are some tips for achieving proper alignment:
- Locate the position for the pump as close as possible to the plumbing outlet to minimize the length of connecting pipes.
- Make sure the pump is positioned in a way that allows for a smooth flow of wastewater without any sharp bends or obstructions.
- Consider consulting a professional plumber to ensure that the drain pump is aligned correctly with the plumbing system to prevent any potential issues in the future.
Step 3: Installing The Drain Pump
Once you have prepared the necessary tools and successfully connected the drain hoses to the pedicure chair, it’s time to move on to the next crucial step – installing the drain pump. This vital component ensures an efficient and seamless drainage system in your pedicure chair. In this section, we will guide you through the process of connecting the drain pump to the pedicure chair, securing it in its designated position, and checking for any leaks or loose connections. Follow these steps carefully to ensure a hassle-free and fully functional drain pump installation.
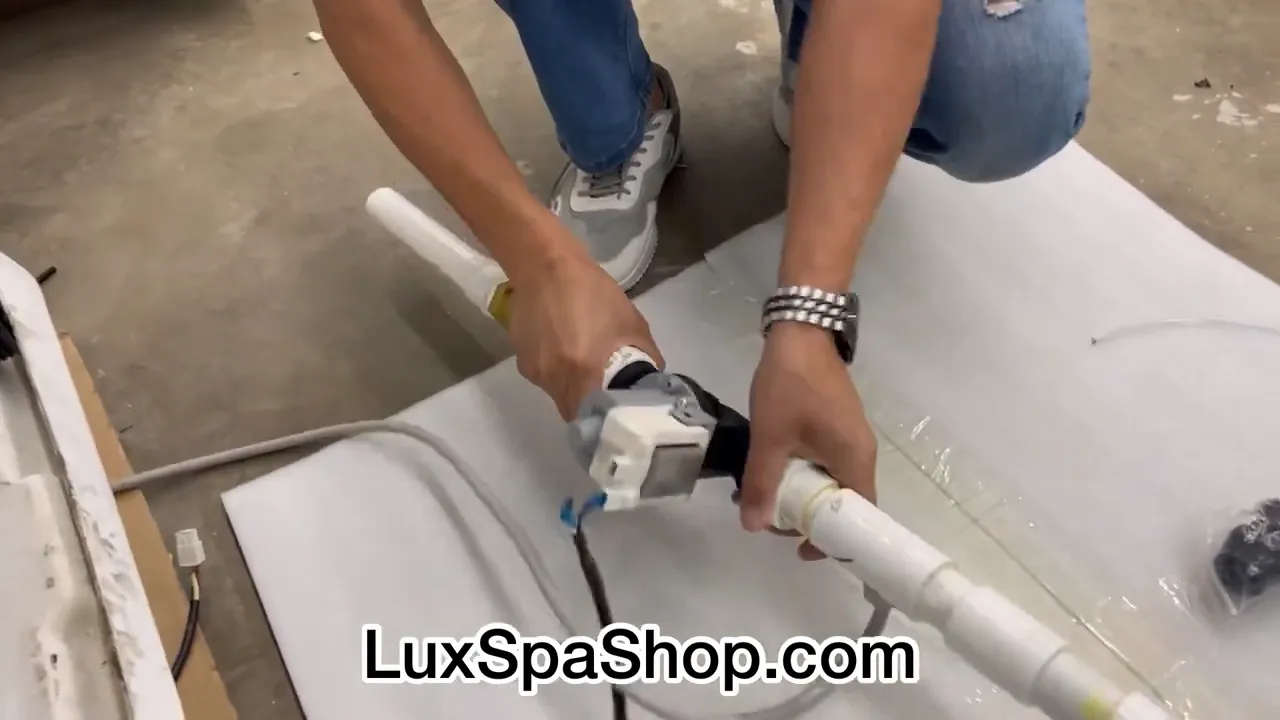
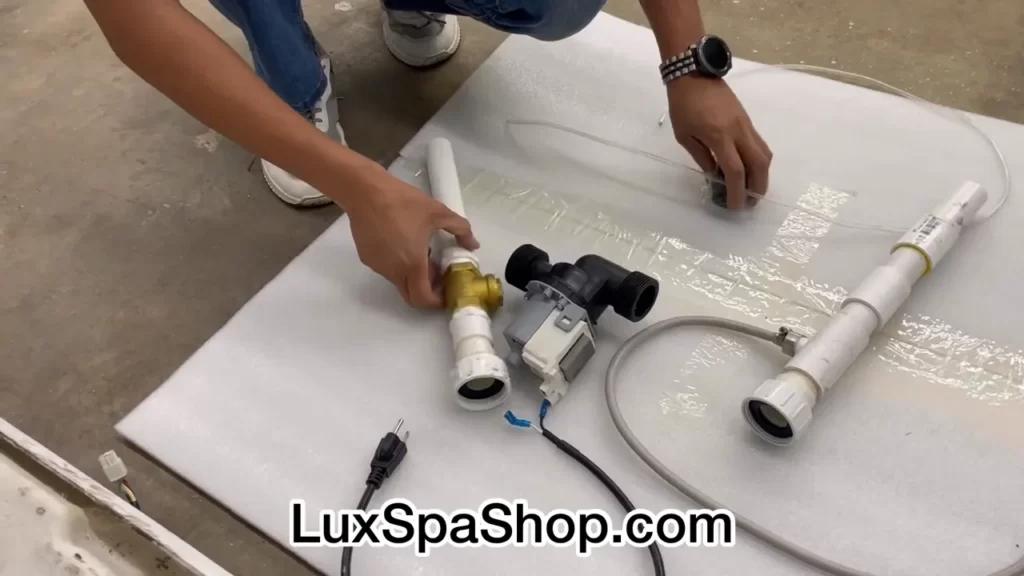
Connecting the drain pump to the pedicure chair
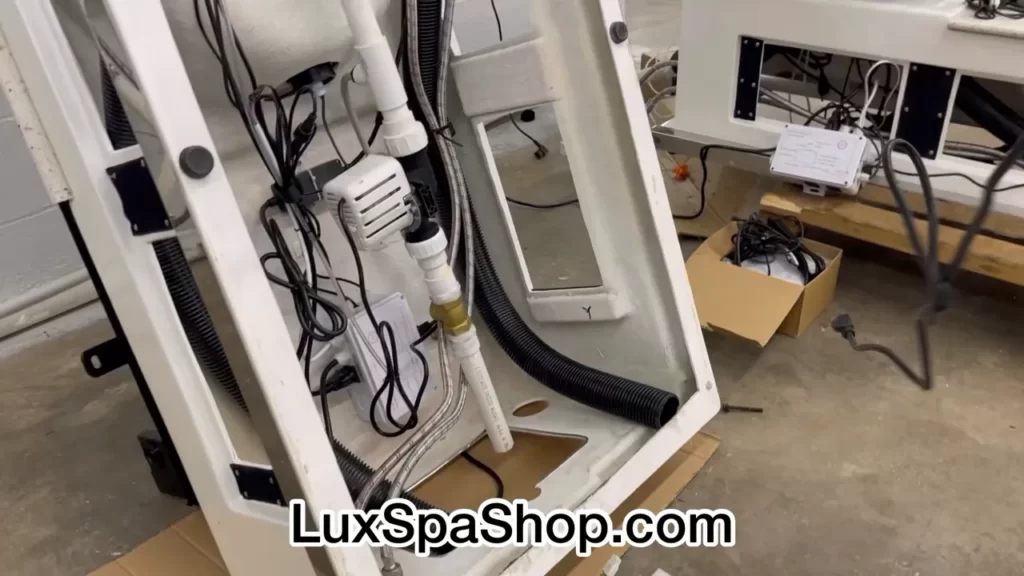
To begin, locate the designated area on the pedicure chair where the drain pump will be installed. This area is usually situated at the bottom or back of the chair, near the drainage outlets. Once you have identified the spot, follow these steps:
- Carefully align the drain pump with the installation area.
- Refer to the manufacturer’s instructions to determine the proper orientation of the drain pump.
- Securely attach the drain pump to the pedicure chair using the provided mounting brackets or screws. Make sure the pump is tightly fastened to prevent any movement or potential damage during operation.
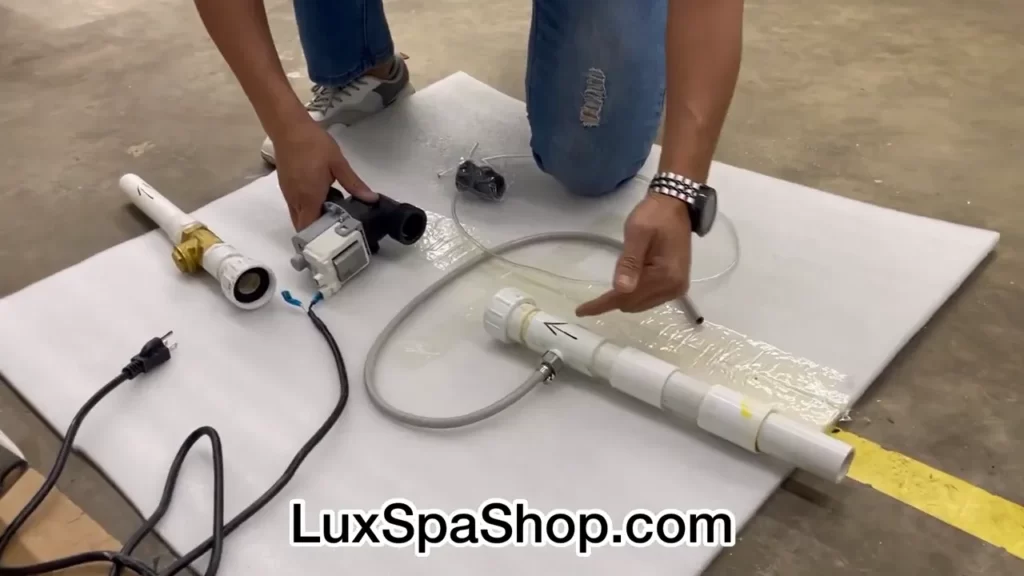
Securing the drain pump in its designated position
After connecting the drain pump to the pedicure chair, it’s crucial to ensure that it is securely held in its designated position. Follow these steps to properly secure the drain pump:
- Double-check the tightness of the mounting brackets or screws that hold the drain pump in place. Make any necessary adjustments to ensure a snug fit.
- If additional support is required, consider using rubber or foam pads to prevent any vibrations or movement of the pump.
- Ensure that the drain hoses are properly connected to the pump and securely tightened. This will prevent any leaks or disconnections during operation.
Checking for any leaks or loose connections
Once the drain pump is securely installed, it’s crucial to test for any potential leaks or loose connections. Follow these steps to perform a thorough check:
- Inspect all the connections between the drain pump and the pedicure chair carefully.
- Check for any visible signs of leaks, such as water dripping or pooling around the connections.
- Ensure that all the connections are tight and secure. If necessary, use a wrench or pliers to tighten any loose fittings.
- Turn on the pedicure chair and run water through the drain system to check for any leaks or abnormalities.
- If you notice any leaks or loose connections, immediately address the issue by re-tightening the fittings or seeking professional assistance.
By following these steps, you can confidently install the drain pump to your pedicure chair. Remember to always refer to the manufacturer’s instructions for specific guidance and safety precautions. Once you have completed this step, you will be one step closer to enjoying a fully functional and efficient pedicure chair with a reliable drain system.
Step 4: Testing The Drain Pump
Once you have successfully installed the drain pump to your pedicure chair, it is time to test its functionality. This step is crucial to ensure that your pedicure chair will drain smoothly and efficiently after each use. Follow these simple steps to test the drain pump and address any potential issues that may arise:
Filling the pedicure chair basin with water
1. Fill the pedicure chair basin: Begin testing the drain pump by filling the pedicure chair basin with water. Make sure to fill it to the desired level, similar to an average pedicure session. This will simulate a real-world scenario and provide an accurate assessment of the drain pump.
Activating the drain pump and observing its performance
2. Locate the drain pump control panel: Most pedicure chairs have a control panel that includes a designated button or switch to activate the drain pump. Locate the control panel and familiarize yourself with its layout.
3. Activate the drain pump: Press the button or switch that is labeled for drain pump activation. Once activated, carefully observe the drain pump’s performance. Note the speed of the draining process and any abnormalities in its operation.
4. Monitor the water level: As the drain pump is running, monitor the water level in the pedicure chair basin. It should steadily decrease, indicating that the drain pump is functioning properly.
5. Assess the sound and vibration: While the drain pump is operating, pay attention to any unusual sounds or excessive vibration. A properly functioning drain pump should generate minimal noise and vibration.
Troubleshooting common issues during testing
6. Low draining speed: If the water is draining slowly, consider checking for any blockages or restrictions in the drain pipe or pump. Clear any debris or obstructions that may hinder the drain pump’s performance.
7. Leakage: If you notice any water leaks during the testing, inspect the connections between the drain pump and the pedicure chair. Ensure that all connections are securely tightened and there are no damaged or worn-out seals.
8. Intermittent operation: In case the drain pump works intermittently or stops abruptly, examine the power source and electrical connections. Check for loose wiring or faulty components that may cause irregular pump operation.
9. Consulting the manufacturer: If you encounter persistent issues or are unsure about troubleshooting, consult the manufacturer’s instructions or contact their customer support for guidance. They can offer expert advice and assistance in resolving any technical difficulties.
By following these steps for testing the drain pump on your pedicure chair, you can ensure a smooth and reliable draining process. Addressing any potential issues promptly will help maintain the chair’s functionality and provide an optimal experience for both you and your clients.
Step 5: Maintenance And Care Of The Drain Pump
Once you have successfully installed a drain pump to your pedicure chair, it is important to implement a regular maintenance and care routine to ensure its optimal performance and longevity. By following these maintenance steps, you can prevent any potential issues and keep your drain pump running smoothly for years to come.
Regular cleaning and sanitization procedures
Regular cleaning and sanitization of the drain pump is essential to prevent the buildup of dirt, debris, and bacteria that can impede its functionality. To maintain a clean and hygienic drain pump, follow these steps:
- Start by turning off the power to the pedicure chair and unplugging it from the electrical outlet.
- Remove any removable parts of the drain pump, such as filters or strainers, and rinse them thoroughly under warm water to remove any debris.
- Mix a solution of mild detergent and warm water in a bucket and use a soft brush to scrub the interior and exterior surfaces of the drain pump. Pay extra attention to areas prone to buildup, such as corners and crevices.
- Rinse the drain pump with clean water until all detergent residue is gone, and then dry it thoroughly with a clean cloth.
- Disinfect the drain pump by using a sanitizing solution recommended by the manufacturer. Follow the instructions provided with the sanitizer to ensure proper application and contact time.
- Once the drain pump is dry and sanitized, reassemble any removable parts and reinstall them in the correct positions.
- Lastly, plug the pedicure chair back into the electrical outlet and ensure that the drain pump is functioning properly.
Inspecting the drain pump for any signs of wear or damage
Regular inspections of the drain pump are crucial to identify any signs of wear or damage that may affect its performance. Perform the following checks periodically:
- Visually inspect the exterior of the drain pump for any cracks, leaks, or abnormal wear.
- Check all electrical connections to ensure they are secure and free from corrosion.
- Listen for any unusual sounds or vibrations during the operation of the drain pump, as they may indicate internal issues.
- Inspect the drain pipe and hoses for any blockages or leaks.
Troubleshooting and addressing common maintenance issues
Despite proper maintenance, drain pumps may encounter occasional issues that need to be addressed promptly. Here are some common maintenance problems and their solutions:
| Issue | Solution |
|---|---|
| The drain pump is not functioning at all | Check the power connection and ensure the pedicure chair is plugged in. If the power supply is not the issue, consult a professional technician. |
| The drain pump is running, but the water is not draining properly | Inspect the drain pipe for any clogs or obstructions. Clear any blockages using a plumber’s snake or a similar tool. If the issue persists, consider calling a technician. |
| There is a foul odor coming from the drain pump | Flush the drain pump with a mixture of water and white vinegar to remove any unpleasant odors. Repeat the process if necessary. If the odor persists, seek professional assistance. |
By incorporating these maintenance steps into your pedicure chair care routine, you can ensure the longevity and proper functioning of your drain pump, providing a sanitary and comfortable experience for both you and your clients.
Additional Tips For Efficiently Operating A Pedicure Chair With A Drain Pump
Efficiently operating a pedicure chair with a drain pump is crucial to ensure a smooth and hassle-free experience for both the technician and the client. In addition to installing the drain pump correctly, there are a few additional tips that can help optimize the performance of your pedicure chair. From proper water level management to using appropriate cleaning agents and regularly servicing the drain pump, these tips will ensure the longevity and efficiency of your equipment. Let’s delve into them:
Proper Water Level Management
Properly managing the water levels in your pedicure chair is essential for the efficient operation of the drain pump. Too much water can cause overflow and potential damage to the pump, while too little water can result in inadequate suction. It is crucial to maintain the optimum water level recommended by the manufacturer.
Here are a few tips for managing water levels effectively:
- Start by filling the basin with the recommended amount of water according to the chair’s specifications.
- Regularly monitor the water level during the pedicure session and adjust as needed to prevent overflow. It is better to err on the side of caution and maintain a slightly lower water level to avoid any mishaps.
- Ensure the drain pump is submerged in water at all times. This will help maintain a steady and efficient flow of water during the draining process.
Using Appropriate Cleaning and Disinfecting Agents
Cleanliness and hygiene are of utmost importance in a salon or spa environment. Using appropriate cleaning and disinfecting agents not only ensures a safe and healthy environment for your clients but also helps in maintaining the optimal performance of the drain pump.
Follow these guidelines when selecting cleaning and disinfecting agents:
- Choose cleaning and disinfecting agents that are specifically recommended by the chair manufacturer.
- Read and follow the instructions provided by the cleaning agent manufacturer to ensure maximum effectiveness.
- Avoid using harsh chemicals or abrasive cleaners that could potentially damage the drain pump or other components of the chair.
- Regularly clean and disinfect the basin, jets, and other surfaces to prevent the buildup of bacteria, mold, and other contaminants that can hinder the drain pump’s performance.
Regularly Servicing the Drain Pump to Ensure Optimal Performance
Regular servicing and maintenance of the drain pump are vital to ensure its optimal performance and longevity. By following a proactive maintenance routine, you can minimize the risk of breakdowns and malfunctions.
The following tasks should be included in your drain pump servicing routine:
- Follow the manufacturer’s guidelines for regular maintenance, such as cleaning or replacing filters, checking connections, and lubricating moving parts.
- Periodically inspect the drain pump for any signs of wear or damage and address any issues promptly.
- Consult a professional technician or the chair manufacturer’s customer support if you encounter any persistent issues or if the drain pump requires extensive repairs or replacement.
By adhering to these additional tips, you can efficiently operate your pedicure chair with a drain pump, ensuring a seamless experience for both you and your clients while prolonging the lifespan of your equipment.
Frequently Asked Questions
How Do Pedicure Chairs Drain?
Pedicure chairs drain through a built-in plumbing system that connects to a drainage pipe. The chairs are equipped with jets and filters that help remove debris and water, ensuring a clean and hygienic environment for the pedicure.
Do You Need Plumbing For Pedicure Chairs?
Yes, plumbing is necessary for pedicure chairs as they require water supply and drainage for the foot soak and cleaning process.
What Does Pipeless Pedicure Chair Mean?
A pipeless pedicure chair is a chair that does not require pipes for water circulation during a pedicure. It uses advanced technology to provide a hygienic and comfortable pedicure experience.
How To Choose A Pedicure Chair?
To choose a pedicure chair, follow these guidelines: 1. Consider the size and features that meet your salon’s needs. 2. Look for chairs made with durable materials for longevity. 3. Ensure the chair is comfortable for clients with adjustable settings.
4. Check for easy-to-clean surfaces and hygienic features. 5. Set a budget and compare prices to find the best option for your salon.
Conclusion
Installing a drain pump to a pedicure chair is a simple yet essential task that ensures efficient water drainage and a clean salon environment. By following the step-by-step instructions provided in this blog post, you can easily install a drain pump yourself and eliminate the hassle of manually emptying the pedicure basin.
Remember to regularly maintain and clean the drain pump to prolong its lifespan and ensure optimal performance. With a functional drain pump in place, you can provide a comfortable and hygienic experience for your clients. Happy pedicuring!