To install a drain in a shower pan, first, remove the old drain and clean the area thoroughly. Then, install the new drain according to the manufacturer’s instructions, ensuring a tight and secure fit.
A properly functioning drain is essential for a well-maintained shower pan. Whether you’re replacing an old drain or installing a new one, following the correct steps is crucial. In this guide, we’ll provide you with clear instructions on how to install a drain in a shower pan.
By carefully following the steps outlined here, you’ll be able to ensure proper drainage in your shower and prevent potential water damage. So, let’s get started on installing that drain for a safely functioning shower pan.
Understanding The Importance Of A Properly Functioning Drain
When it comes to installing a drain in a shower pan, many people may overlook the importance of doing it correctly. However, a properly functioning drain is crucial for the overall functionality and durability of your shower. In this article, we will delve into the importance of a well-installed shower drain and how it can help eliminate potential water damage and mold growth.
Importance of a well-installed shower drain
A well-installed shower drain is essential for maintaining the integrity of your shower pan and preventing costly water damage. Let’s explore some of the key reasons why a properly functioning drain is so important:
Eliminating potential water damage and mold growth
One of the main reasons why a well-installed shower drain is crucial is because it helps eliminate the risk of water damage and mold growth. When water seeps through cracks or gaps in the drain installation, it can penetrate the surrounding areas, leading to issues such as rotting subfloors, weakened structural integrity, and the growth of mold and mildew.
To mitigate the risk of water damage and mold growth, it’s crucial to ensure that the drain is properly sealed and securely installed. This means using the right materials and techniques to create a watertight seal around the drain, preventing any moisture from seeping through.
Ensuring proper drainage and preventing clogs
A properly installed drain in a shower pan ensures proper drainage, preventing standing water and potential clogs. When the drain is installed at the correct angle and height, it allows water to flow smoothly down the drain, effectively removing it from the shower area.
Additionally, a well-designed drain helps prevent clogs by capturing debris and directing it away from the drain pipe. This prevents blockages that could lead to water backup and potential overflow, keeping your shower clean and functional.
Maintaining the longevity of your shower pan
By installing a drain correctly, you are contributing to the overall longevity and durability of your shower pan. A poorly installed drain can lead to water damage, which can compromise the integrity of the shower pan construction materials.
When water finds its way into areas it shouldn’t, it can cause corrosion, rot, and decay, significantly reducing the lifespan of your shower pan. A well-installed drain minimizes the risk of these issues, ensuring that your shower pan remains in excellent condition for years to come.
In conclusion, a properly functioning drain is vital to the health and durability of your shower. By understanding the importance of a well-installed shower drain and taking the necessary steps to ensure it is done correctly, you can eliminate potential water damage and mold growth, promote proper drainage, and maintain the longevity of your shower pan.
Choosing The Right Drain For Your Shower Pan
When it comes to installing a drain in your shower pan, choosing the right one is essential. The drain not only plays a vital role in draining water efficiently but also contributes to the overall aesthetics of your shower area. Factors such as functionality, design, and compatibility with your shower pan are important to consider when selecting a drain.
Factors to consider when selecting a shower drain
Here are some key factors you should keep in mind when choosing a drain for your shower pan:
- Size and Style: The size and style of the drain should complement the design of your shower pan. Consider the shape and size of your pan and choose a drain that fits seamlessly into the space.
- Drainage Capacity: The drainage capacity of the drain is crucial for efficient water flow. Look for drains that have a high flow rate to prevent any potential clogging issues.
- Material: The material of the drain should be durable and resistant to corrosion. Stainless steel and brass are popular choices as they can withstand the constant exposure to water and cleaning products.
- Grate Options: The grate is the visible part of the drain and can enhance the overall appearance of your shower. Choose a grate style that suits your personal preferences and complements the look of your shower pan.
- Easy Maintenance: Opt for a drain that is easy to clean and maintain. This will save you time and effort in the long run.
Popular types of drains in the market
There are several types of drains available in the market, each with its own unique features and benefits. Here are some popular options:
| Type | Description |
|---|---|
| Traditional Center Drain | This type of drain is positioned at the center of the shower pan and is the most common choice. It offers a simple and effective drainage solution. |
| Linear Drain | A linear drain is a sleek and modern option that runs along one side of the shower pan. It provides a seamless look and allows for a larger shower surface area. |
| Curbless or Barrier-Free Drain | This type of drain is designed for accessible showers and eliminates the need for a raised curb. It allows for easy entry and exit and is ideal for those with mobility challenges. |
| Tile Insert Drain | A tile insert drain offers a concealed look by allowing you to incorporate your shower tiles directly into the drain cover. This creates a seamless and aesthetically pleasing finish. |
Ensuring compatibility with your shower pan
Before finalizing your choice of drain, it’s important to ensure compatibility with your shower pan. Consider these points:
- Size and Shape: Measure the dimensions of your shower pan and ensure that the drain you select fits properly.
- Installation Method: Different drains may have specific installation requirements. Ensure that the drain’s installation method is compatible with your shower pan.
- Manufacturers Recommendation: Check the manufacturer’s recommendations or guidelines to ensure that the drain you choose is compatible with your specific shower pan model.
By considering these factors, exploring different drain options, and ensuring compatibility with your shower pan, you can choose the right drain that not only functions efficiently but also enhances the overall look and feel of your shower area.

Step 1: Preparing The Shower Pan And Drain Area
Before installing a drain in your shower pan, it is essential to properly prepare the area to ensure a seamless and functional installation. This involves a few key steps, including cleaning the shower pan surface, removing any debris or old drain components, and ensuring proper drainage slope to prevent water buildup. Let’s dive into each of these steps in detail:
Cleaning the Shower Pan Surface
To start, it is crucial to have a clean and debris-free surface on which to install the drain. Use a brush or sponge soaked in warm, soapy water to scrub the shower pan thoroughly. Pay close attention to any areas where dirt, grime, or mold may have accumulated. Rinse the pan with clean water, ensuring all soap residue is removed. This will provide a clean foundation for the drain installation and help to promote a watertight seal.
Removing any Debris or Old Drain Components
Next, it is essential to remove any debris or old drain components that may be present in the shower pan. This includes removing any existing drain covers, strainers, or grates. Use a screwdriver or pliers to carefully detach these components and set them aside. Additionally, inspect the drain area for any loose or broken pieces that may need to be replaced before proceeding with the installation. Ensuring a clean and debris-free drain area is vital for the proper functioning of the new drain.
Ensuring Proper Drainage Slope
The final step in preparing the shower pan and drain area is to ensure proper drainage slope. This prevents water from pooling in the shower and promotes efficient drainage. Ideally, the pan should slope towards the drain at a rate of 1/4 inch per foot. To check the slope, use a level or straightedge to determine if the shower pan surface is even or sloping towards the drain. If adjustments are needed, consider using thinset or a self-leveling compound to create the proper slope. Proper drainage slope is essential for preventing water buildup and keeping your shower area clean and hygienic.
By following these steps and properly preparing the shower pan and drain area, you can ensure a successful installation of the drain. Once the preparation is complete, you can move on to the next steps of installing the drain components and sealing the connection for a leak-free and functional shower.

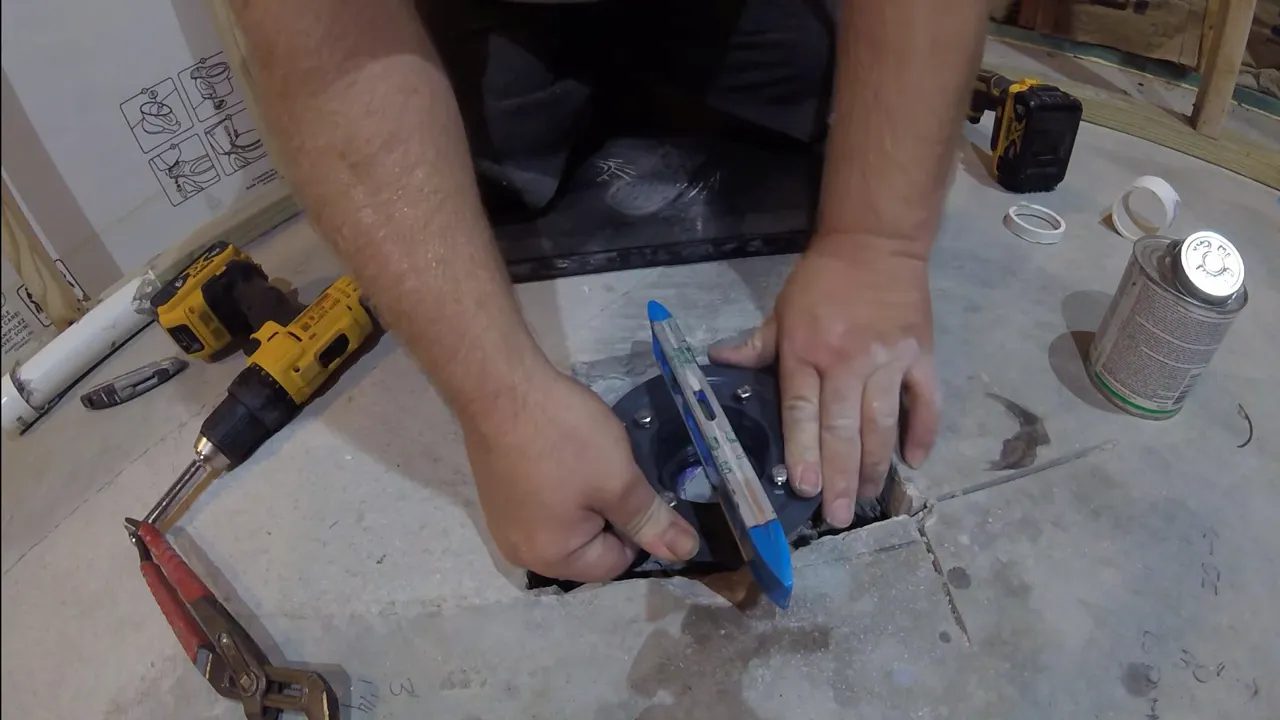
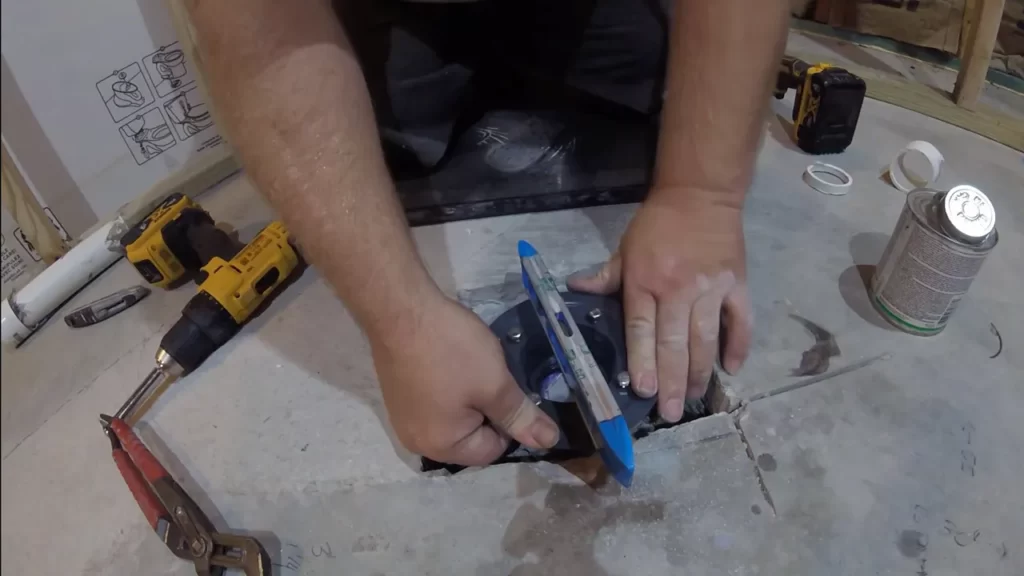
Step 2: Installing The Drain Base
Now that you have prepared your shower pan, it is time to move on to the next step: installing the drain base. This crucial step ensures that water is properly drained from your shower, preventing any potential water damage or leaks.
Choosing the correct drain base type
Before you begin the installation process, it is important to choose the correct drain base type for your shower. There are different types available, including PVC, ABS, and cast iron. Consider the material of your shower pan and choose a drain base that is compatible with it. This will ensure a secure and lasting installation.
Ensuring a proper fit within the shower pan
Once you have chosen the appropriate drain base, it is essential to ensure a proper fit within the shower pan. This involves measuring the dimensions of the drain hole in your shower pan and comparing it to the size of the drain base. The drain base should fit snugly into the drain hole, without any gaps or loose areas.
If necessary, use a silicone or plumber’s putty to create a watertight seal between the drain base and the shower pan. This will further ensure that no water escapes or leaks into the subfloor.
Securing the drain base in place
After ensuring a proper fit, it’s time to secure the drain base in place. This is crucial to prevent any movement or shifting during regular use. There are several methods to secure the drain base, such as using screws or adhesive.
If your drain base comes with screw holes, use appropriate screws to secure it to the shower pan. Make sure to align the drain base properly and tighten the screws evenly to ensure a secure attachment. Alternatively, if your drain base does not have screw holes, you can use a strong adhesive specifically designed for this purpose.
Allow the adhesive to dry completely before proceeding to the next step. This will ensure the drain base remains securely in place, with no risk of leaks or damage.
By following these steps to install the drain base in your shower pan, you can ensure a proper and secure drainage system. This will not only prevent any potential water damage but also provide you with a long-lasting showering experience.
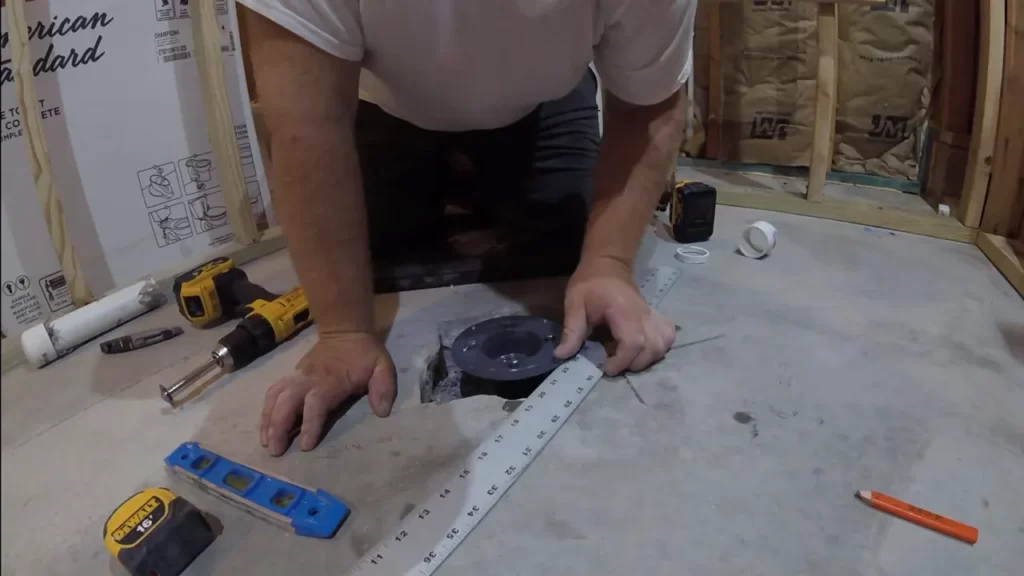
Step 3: Connecting The Drain Pipe
Connecting the drain pipe is an essential step in the installation of a shower pan drain. This step ensures that water is properly drained and prevents any leaks or water damage. Let’s take a look at the process of connecting the drain pipe in detail.
Cutting and preparing the drain pipe
The first step in connecting the drain pipe is to cut it to the required length and prepare it for installation. Here’s how:
- Carefully measure the distance between the shower pan drain and the main waste pipe to determine the length of the drain pipe needed.
- Using a hacksaw or a pipe cutter, cut the drain pipe to the measured length.
- Smooth out any rough edges using a deburring tool or sandpaper to ensure a proper fit.
Making the necessary connections
Once the drain pipe is prepared, it’s time to make the necessary connections. Follow these steps:
- Apply PVC primer to the inside edge of the drain pipe and the outside edge of the drain fitting.
- Apply PVC cement to the primed areas.
- Insert the drain pipe into the drain fitting, making sure it is fully seated.
- Hold the pipe and fitting together for a few seconds to allow the cement to bond.
- Wipe off any excess cement using a clean cloth.
Ensuring proper alignment and sealing
Proper alignment and sealing of the drain pipe are crucial to prevent any leaks. Here’s what you need to do:
- Ensure that the drain pipe aligns correctly with the shower pan drain and the main waste pipe. Use a level to check for proper alignment.
- Tighten any necessary connections using PVC pipe wrenches or adjustable pliers.
- Apply plumber’s tape to the threaded connections to provide an additional seal.
- Inspect the connections for any signs of leakage by running water into the shower pan and checking for drips or puddles.
By following these steps, you can successfully connect a drain pipe in a shower pan. Remember to double-check for any leaks and make sure the connections are properly sealed. This will ensure that your shower pan effectively drains water, preventing any potential damage or issues in the future.
Step 4: Testing The Drain
Filling the shower pan with water
Once the drain installation is complete, it is crucial to test the drain to ensure it is working properly. To begin, start by filling the shower pan with water. This step will help you identify any leaks or drainage issues that need to be addressed before finalizing the installation.
Checking for leaks or drainage issues
After filling the shower pan with water, carefully inspect the area around the drain for any signs of leaks. Look for water seeping through the drain or pooling at the base of the shower. Additionally, take note of any slow drainage or standing water in the pan. These could be indications of a drainage issue that requires attention.
If you notice any leaks or drainage problems, it’s vital to address them promptly to prevent further damage. Leaks can lead to water damage, mold growth, and structural issues if left untreated. Take the time to locate the source of the problem and make the necessary repairs or adjustments.
Making any necessary adjustments or repairs
If you find leaks or drainage issues during the testing phase, you’ll need to make adjustments or repairs before finalizing the installation. This may involve tightening or resealing the drain components, ensuring a proper fit and secure connection.
Inspect the area around the drain and check the waterproofing to ensure it is intact and preventing any water from seeping into the subfloor. Replace any damaged or worn-out waterproofing materials, such as shower pan liners or sealants, and verify that the drain assembly is correctly installed and aligned.
Once the necessary repairs or adjustments have been made, repeat the testing process to verify that any issues have been resolved. This step is crucial to ensure the drain functions properly and to minimize the risks of water damage or drainage problems in the future.
In conclusion, testing the drain is a vital step in the installation of a shower pan drain. By filling the shower pan with water and thoroughly checking for leaks or drainage issues, you can identify and address any problems before they escalate. Take the time to make any necessary adjustments or repairs to ensure a reliable and efficient drain system for your shower.
Additional Tips And Considerations
Installing a drain in a shower pan can seem like a daunting task, but with the right approach and attention to detail, it can be a straightforward process. While we have covered the main steps in the previous sections, there are a few additional tips and considerations to keep in mind to ensure a successful installation and long-lasting performance. This section will outline proper maintenance and regular cleaning as well as common mistakes to avoid during installation.
Proper maintenance and regular cleaning
Proper maintenance and regular cleaning are essential for the longevity and efficiency of your shower pan drain. Neglecting these tasks can lead to clogs and costly repairs down the line. Here are some key maintenance and cleaning tips to keep in mind:
- Regularly remove any debris or hair that may accumulate in the drain. This can be done using a drain snake or a specialized drain cleaning tool.
- Use a mild, non-abrasive cleaner to clean the drain and surrounding area. Avoid using harsh chemicals as they can damage the drain components.
- Inspect the drain cover regularly and remove any built-up soap scum or residue. This will help maintain proper water flow and prevent clogs.
- If you notice slow drainage or foul smells, it may be a sign of a clog. Address the issue promptly to prevent further damage.
Common mistakes to avoid during installation
When installing a drain in a shower pan, there are some common mistakes that should be avoided. These mistakes can compromise the functionality and integrity of the drain system. Here are a few to watch out for:
- Incorrect measurement of the drain location and size can lead to misalignment and leakage. Take accurate measurements and double-check before cutting into the shower pan.
- Improper sealing of the drain can result in water leakage. Use a high-quality, waterproof sealant specifically designed for shower pans to ensure a watertight seal.
- Over-tightening the drain components can cause cracks or damage to the shower pan. Be cautious and use the manufacturer’s recommended torque specifications.
- Using incompatible materials or tools during installation can lead to corrosion or improper fit. Always use materials and tools that are recommended by the drain manufacturer.
By following these additional tips and considerations, you can ensure a successful installation of a drain in your shower pan. Don’t overlook the importance of regular maintenance and cleaning to keep your drain functioning optimally. Avoiding common installation mistakes will help you achieve a leak-free and long-lasting drain system. With proper attention to detail, you can enjoy a trouble-free shower experience for years to come.
Frequently Asked Questions
How Do You Attach A Shower Drain To A Shower Pan?
To attach a shower drain to a shower pan, follow these steps: 1. Locate the drain hole on the shower pan. 2. Apply a layer of plumber’s putty around the underside of the drain flange. 3. Insert the drain flange into the drain hole and press down firmly.
4. Secure the drain flange with screws or clips provided. 5. Connect the drain pipe to the drain flange, ensuring a watertight seal. Done! Your shower drain is now securely attached to the shower pan.
How High Should A Drain Pipe Be For A Shower Pan?
The drain pipe for a shower pan should be positioned at a height that allows for proper drainage and prevents water backup. It is typically recommended to have the drain pipe situated 2 to 3 inches above the shower pan floor.
How Far From The Wall Is A Drain In A Shower Pan?
The drain in a shower pan is typically located about 12 inches away from the wall.
Where Should A Shower Pan Drain Be Placed?
The shower pan drain should be placed in the center of the shower floor for optimal drainage. Proper placement ensures efficient water flow and prevents pooling or leakage.
Conclusion
To sum it up, installing a drain in a shower pan may seem like a daunting task, but with the right tools and guidance, it can be accomplished easily. By following the steps outlined in this blog post, you can ensure a proper and efficient drainage system for your shower.
Remember to pay attention to details, ensure a secure connection, and test the drain thoroughly before finishing up. With these tips in mind, you’ll be well on your way to a smoothly functioning shower.