To install a dishwasher with a garbage disposal, first ensure that you have all the necessary tools and materials. Then, carefully follow the manufacturer’s instructions for connecting the dishwasher and the garbage disposal to the sink’s drain line and electrical supply.
Preparing For Installation
Before installing a dishwasher with a garbage disposal, there are a few important steps you need to take to ensure a smooth and successful installation. In this article, we will walk you through the process of evaluating the available space for the dishwasher and garbage disposal, gathering the necessary tools and materials, and shutting off the water and electricity supply. By following these steps and adhering to proper HTML syntax, you can effortlessly install your dishwasher and enjoy its convenience in no time.
Evaluate Available Space for Dishwasher and Garbage Disposal
Choosing the right location for your dishwasher and garbage disposal is the first crucial step in the installation process. Evaluate the available space in your kitchen to ensure there is enough room for both appliances. Measure the width, height, and depth of the area where you plan to install these units. Consider any cabinets or obstacles that might impact the installation.
Once you have determined the location, make sure there is sufficient clearance around the area. Both the dishwasher and garbage disposal require enough space for proper operation and maintenance. Refer to the manufacturer’s specifications for the recommended clearance dimensions.
Gather Necessary Tools and Materials
Before you start the installation, gather all the necessary tools and materials. Having everything on hand will save you time and prevent unnecessary delays. Here is a list of items you’ll need:
| Tools | Materials |
|
|
Make sure you have all these tools and materials ready before proceeding with the installation.
Shut Off Water and Electricity Supply
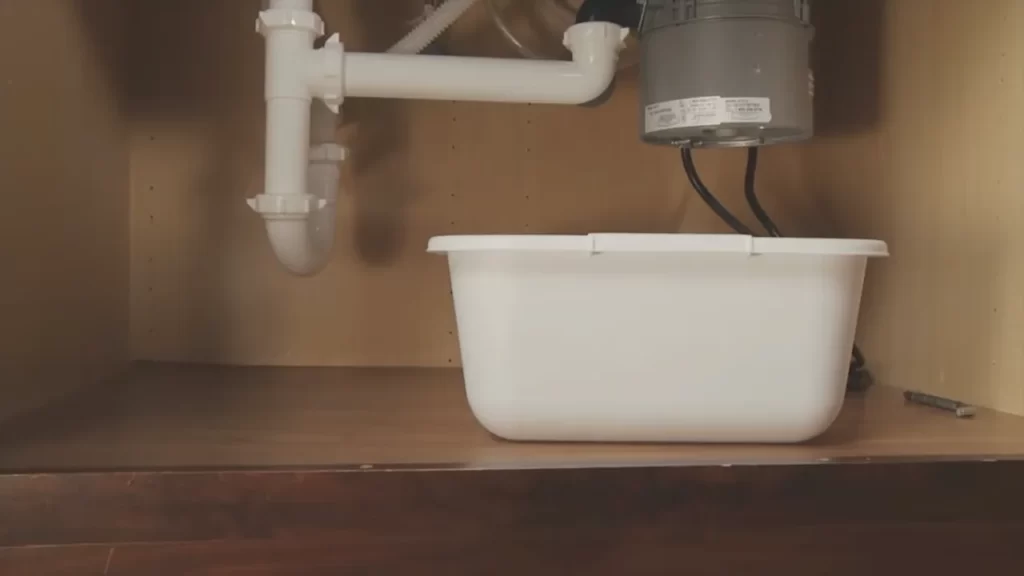
For a safe and hassle-free installation, it’s important to shut off the water and electricity supply. Before working with any plumbing or electrical components, turn off the water valve located under the sink to stop the flow of water. Additionally, switch off the electricity supply to the disposal unit and dishwasher at the circuit breaker. This step will prevent any accidents or damage during the installation process.
Ensure that the water and electricity supply remains switched off until the installation is complete and you have tested the dishwasher and garbage disposal to ensure they are functioning correctly.
By evaluating the available space, gathering the necessary tools and materials, and shutting off the water and electricity supply, you have now prepared for the installation of your dishwasher with a garbage disposal. In the next section, we will guide you through the installation process to help you achieve a successful outcome.

Installing The Garbage Disposal
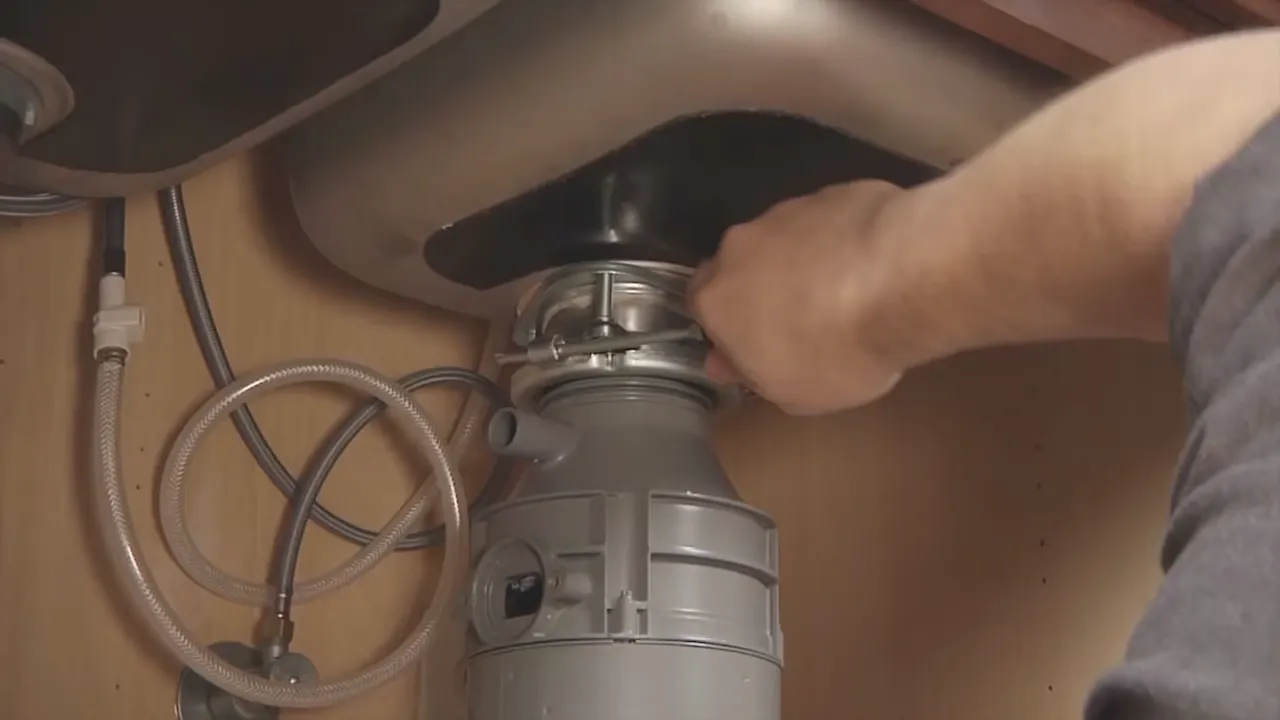
When it comes to installing a dishwasher with a garbage disposal, one crucial step is properly installing the garbage disposal unit itself. The garbage disposal is responsible for shredding food waste and allows it to flow through the drain pipe without clogging. In this section, we will guide you through the process of mounting the garbage disposal unit under the sink, connecting it to the drain pipe, and wiring it up.
Mounting the garbage disposal unit under the sink
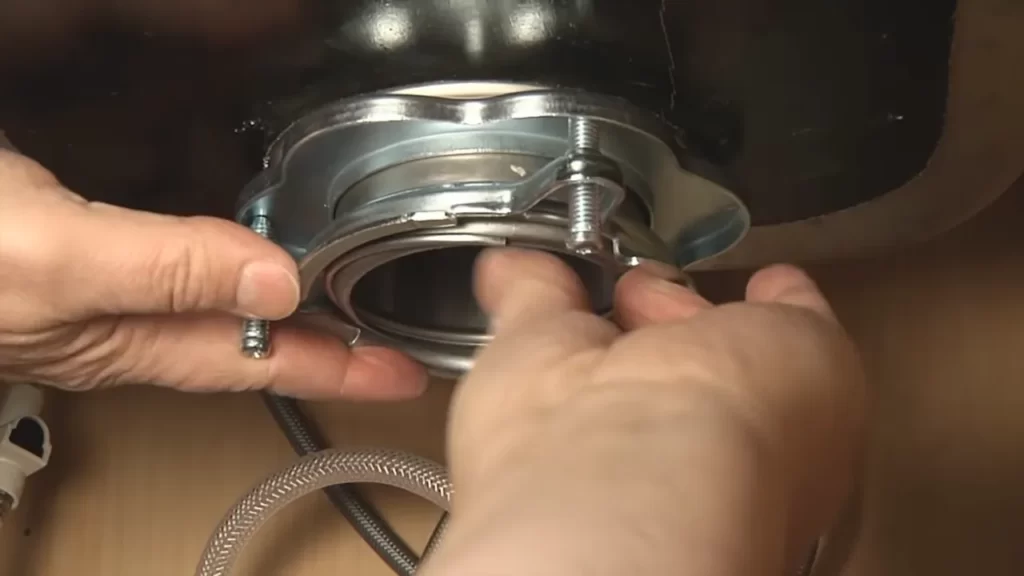
To install the garbage disposal, you first need to mount it securely under your sink. Here’s how to do it:
- Start by disconnecting the sink drain pipes.
- Place the garbage disposal unit upside down on a stable surface.
- Remove the knockout plug located at the dishwasher inlet on the garbage disposal.
- Apply a small amount of plumber’s putty to the sink flange and then press it firmly into the drain opening of the sink. Ensure that the flange is aligned properly.
- Secure the mounting assembly by twisting it onto the sink flange. Tighten the mounting screws until the disposal unit is locked in place.
- Attach the power cord to the disposal unit according to the manufacturer’s instructions.
Once you have successfully mounted the garbage disposal under the sink, you can move on to connecting it to the drain pipe.
Connecting the disposal to the drain pipe
Now that the garbage disposal is securely mounted, it’s time to connect it to the drain pipe. Follow these steps:
- Remove the drain trap from the sink
- Measure and cut a section of the drain pipe to fit between the disposal unit and the drain trap.
- Attach one end of the newly cut pipe to the drain trap and the other end to the disposal outlet tube.
- Secure the connections with the provided fittings or clamps to ensure leak-free operation.
- Reinstall the drain trap and tighten any necessary connections to complete the installation.
With the garbage disposal now effectively connected to the drain pipe, the final step is to wire the disposal unit to ensure it functions properly.
Wiring the disposal unit
Proper wiring is essential for the garbage disposal to receive power and operate safely. Follow these guidelines:
- Turn off the power supply at the circuit breaker box.
- Consult the manufacturer’s instructions for the specific wiring requirements of your disposal unit.
- Connect the wires from the power cord to the corresponding terminals on the disposal unit. Make sure the connections are secure.
- Carefully tuck the wires into the electrical compartment and securely fasten the cover.
- Turn the power back on and test the garbage disposal to ensure it is functioning correctly.
By properly mounting the garbage disposal, connecting it to the drain pipe, and wiring it according to the manufacturer’s instructions, you can ensure a well-functioning dishwasher setup with a garbage disposal. Now you are one step closer to enjoying the convenience and efficiency of a dishwasher with a garbage disposal!
Connecting The Dishwasher To The Garbage Disposal
One important step in installing a dishwasher with a garbage disposal is connecting the dishwasher to the disposal unit. This ensures that the dishwasher can properly drain its wastewater, making your kitchen cleanup a breeze. In this section, we will discuss the different methods for connecting the dishwasher drain hose to the disposal unit, as well as securing the connection to prevent any leaks or mishaps.
Determining the dishwasher connection method
Before you start connecting the dishwasher drain hose to the garbage disposal, you need to determine the appropriate connection method for your specific dishwasher model. There are typically two options: a direct connection or through an air gap.
If your dishwasher has a direct connection, it means that the drain hose will run straight from the dishwasher to the garbage disposal without any additional components. This is the most common method and requires a simple connection.
Alternatively, if your dishwasher has an air gap, it means that there is an additional component installed on your sink or countertop. The air gap prevents any backflow from the garbage disposal into the dishwasher, providing an extra layer of protection. In this case, you will need to connect the dishwasher drain hose to the air gap and then to the garbage disposal.
Connecting the dishwasher drain hose to the disposal unit
Once you have determined the appropriate connection method, it’s time to connect the dishwasher drain hose to the garbage disposal. Follow these steps:
- Locate the dishwasher drain outlet on the side or back of the dishwasher. This is typically a small plastic or rubber tube.
- Attach one end of the dishwasher drain hose to the dishwasher drain outlet. Ensure that it fits securely and is tightly fastened.
- Next, locate the dishwasher inlet port on the garbage disposal. This is usually located on the side or top of the disposal unit.
- Connect the other end of the dishwasher drain hose to the dishwasher inlet port on the garbage disposal. Again, make sure it is securely attached.
Securing the connection with a hose clamp
To ensure a tight and leak-free connection between the dishwasher drain hose and the garbage disposal, it’s important to secure the connection with a hose clamp. Here’s how:
- Slide a hose clamp onto the dishwasher drain hose.
- Position the clamp over the area where the hose connects to the dishwasher drain outlet or the dishwasher inlet port on the garbage disposal.
- Use a screwdriver or a suitable tool to tighten the clamp, ensuring it is snugly secured. Be careful not to overtighten, as it may cause damage to the hose or the connection point.
With the dishwasher drain hose securely connected to the garbage disposal and the connection properly secured with a hose clamp, you have completed the important task of connecting the dishwasher to the garbage disposal. This ensures that your dishwasher will effectively drain its wastewater into the disposal, making your dishwashing experience more convenient and efficient.
Testing The Dishwasher-Garbage Disposal Connection
Once you have successfully installed your dishwasher with a garbage disposal, it’s time to test the connection to ensure everything is working as it should. In this step, you will be checking for leaks and proper drainage, as well as running a cycle to ensure smooth operation. Follow the steps below to properly test the dishwasher-garbage disposal connection.
Checking for Leaks and Proper Drainage
To start, you need to check for any leaks and ensure that the dishwasher is draining properly into the garbage disposal. Follow the steps below to perform this check:
- Run a cycle on your dishwasher without any dishes or detergent. This will allow you to focus solely on checking for leaks and drainage.
- Monitor the area beneath the dishwasher and the garbage disposal for any signs of water leakage. Look for any puddles, drips, or unusual moisture.
- If you notice any leaks, turn off the dishwasher immediately and investigate the source of the problem. It could be a loose connection or a faulty seal that needs to be addressed before using the dishwasher.
- In addition to leaks, make sure that the dishwasher is draining properly into the garbage disposal. Open the garbage disposal and check if water is flowing into it during the cycle.
- If there is no water flow or if you notice any clogs or blockages, you may need to troubleshoot the drainage system. This could involve checking the drain hose for any obstructions, ensuring it is properly connected to both the dishwasher and the garbage disposal, and inspecting the garbage disposal for any build-up or debris that may be hindering the drainage process.
Running a Cycle to Ensure Smooth Operation
Once you have checked for leaks and proper drainage, it’s time to run a cycle on your dishwasher to ensure smooth operation. Follow these steps to perform this test:
- Load the dishwasher with a few dirty dishes, making sure not to overload it.
- Add the appropriate amount of dishwasher detergent according to the manufacturer’s instructions.
- Start the dishwasher cycle according to your preferred settings.
- Monitor the dishwasher throughout the cycle to ensure proper functioning. Pay attention to any unusual noises, excessive vibrations, or error messages displayed on the control panel.
- After the cycle is complete, open the dishwasher and inspect the dishes for cleanliness. If the dishes are not thoroughly cleaned, you may need to adjust the detergent amount or cycle settings.
By following these steps to test the dishwasher-garbage disposal connection, you can ensure that your installation is successful and that your dishwasher will function properly. If you encounter any issues during the testing process, don’t hesitate to troubleshoot and address them promptly to avoid any further complications.
Securing The Dishwasher And Cleaning Up
Securing the dishwasher and cleaning up after installation are crucial steps to ensure proper functioning and a tidy kitchen. By following these steps, you can ensure that your newly installed dishwasher will stay secure and that any debris or spills are properly cleaned up. Let’s explore how to secure the dishwasher and clean up any remaining mess.
Securing the dishwasher in place
Once you have successfully connected the dishwasher to the garbage disposal, it’s time to secure it in place. This step is essential to prevent any unwanted movement or potential damage to the appliance. Follow the steps below to securely fasten your dishwasher:
- Adjust the dishwasher feet: Check the dishwasher’s feet to ensure they are properly adjusted for a stable installation. Use a wrench or pliers to adjust the feet by turning them clockwise or counterclockwise until the dishwasher is level and firmly in place.
- Attach the mounting brackets: Most dishwashers come with mounting brackets that need to be attached to the countertop or cabinet. Secure the brackets using screws and ensure they are tight enough to hold the dishwasher securely in place.
- Secure the dishwasher to the countertop: Once the mounting brackets are in place, carefully slide the dishwasher into its final position. In some cases, you may need to adjust the position to align it correctly. Once aligned, use a screwdriver to secure the brackets to the underside of the countertop or cabinet.
- Test the dishwasher’s stability: After securing the dishwasher, give it a gentle shake to make sure it doesn’t move or wobble. If necessary, make any further adjustments to the feet or brackets until the dishwasher feels solid and stable.
Cleaning up any remaining debris or spills
With the dishwasher securely in place, it’s time to clean up any debris, spills, or mess left behind during the installation process. Follow these steps to ensure a clean and tidy finish to your dishwasher installation:
- Wipe down the surrounding area: Use a damp cloth or sponge to wipe down the area around the dishwasher. Pay particular attention to any visible dirt, dust, or grime.
- Remove any protective covering: If you used any protective covering, such as plastic sheets or tape, during the installation, make sure to remove them. Dispose of them properly to avoid any potential hazards.
- Clean the dishwasher interior: Before using the dishwasher for the first time, it’s a good idea to run a short cycle without any dishes. This will help remove any dust or debris that may have accumulated during the installation process.
- Check for leaks: Once you’ve cleaned up the surrounding area, check for any leaks around the dishwasher and garbage disposal connection. Look for signs of water or moisture and fix any issues promptly to prevent water damage.
By securing your dishwasher and cleaning up properly, you can enjoy a smoothly running appliance and a clean kitchen. Following these steps will ensure your dishwasher installation is successful and hassle-free.
Troubleshooting Common Installation Issues
While installing a dishwasher with a garbage disposal can greatly simplify your kitchen clean-up routine, it’s not uncommon to encounter a few hiccups during the installation process. In this section, we’ll address some of the common installation issues you may face and provide some troubleshooting tips to help you overcome them.
Addressing leaks or water flow problems
One of the most common issues that homeowners experience when installing a dishwasher with a garbage disposal is leaks or water flow problems. Leaks can occur due to improper connection of the water supply line or drain hose. Here’s how you can address these issues:
- Check the water supply line connections: Inspect the water supply line connections at both ends, ensuring that they are securely tightened. If you notice any leaks, tighten the connections further. If the leak persists, you may need to replace the water supply line.
- Inspect the drain hose: Ensure that the drain hose is properly connected and not kinked. A kinked hose can restrict water flow and result in leaks. Additionally, check if there are any cracks or holes in the hose. If you find any, replace the hose immediately.
- Inspect the garbage disposal connection: The dishwasher drain hose should be connected to the garbage disposal inlet. Ensure that the connection is secure and there are no leaks. Tightly secure the clamp around the hose to prevent any leaks from occurring.
Fixing electrical or wiring issues
Another common installation issue you may face is electrical or wiring problems. These can range from faulty connections to a lack of power supply. Here’s how you can tackle these issues:
- Check the power supply: Ensure that the power supply to the dishwasher and garbage disposal is turned off before starting any electrical work. Double-check that the circuit breaker or fuse controlling the power to these appliances is not tripped or blown. If it is, reset the circuit breaker or replace the blown fuse.
- Inspect the electrical connections: Carefully examine the electrical connections to ensure they are properly connected. Look for any loose wires or frayed insulation. If you find any issues, gently tighten the connections or replace any damaged wires.
Note: If you’re not confident in handling electrical work, it’s always best to consult a professional electrician to ensure your safety and proper installation.
By following these troubleshooting tips, you can overcome common installation issues when installing a dishwasher with a garbage disposal. Remember to take the necessary precautions and consult a professional when needed to ensure a smooth and problem-free installation process.
Conclusion And Maintenance Tips
Congratulations! You have successfully installed a dishwasher with a garbage disposal, adding convenience and functionality to your kitchen. However, the journey doesn’t end here. Regular maintenance is crucial to keep both appliances performing optimally. In this section, we will provide a recap of the installation process and share valuable maintenance tips that will prolong the lifespan of your dishwasher and garbage disposal.
Recap of the Installation Process
Let’s quickly recap the step-by-step installation process to ensure you have a clear understanding:
- Before you begin, gather all the necessary tools, including a screwdriver, pliers, adjustable wrench, and Teflon tape.
- Turn off the power and water supply to the dishwasher and garbage disposal.
- If your garbage disposal does not have an inlet port for the dishwasher, you will need to install a dishwasher connector kit.
- Remove the knockout plug from the garbage disposal inlet port.
- Connect the dishwasher drain line to the garbage disposal.
- Secure all the connections using hose clamps and ensure there are no leaks.
- Turn on the water supply and test the dishwasher for any leaks.
- Plug in the dishwasher and garbage disposal, and you’re good to go!
By following these steps, you can ensure a smooth and hassle-free installation process.
Maintenance Tips for Optimal Dishwasher and Garbage Disposal Performance
Regular maintenance is essential to keep your dishwasher and garbage disposal working efficiently. Here are some valuable tips:
Dishwasher Maintenance Tips:
- Regularly clean the dishwasher filter to prevent food particles from clogging the drain.
- Inspect the spray arms for blockages and clean them if necessary.
- Run an empty dishwasher cycle with vinegar or a dishwasher cleaning solution to remove any built-up residue.
- Avoid overloading the dishwasher, as this can affect its performance and efficiency.
- Check the door seal regularly for any damages and replace if necessary to prevent leaks.
Garbage Disposal Maintenance Tips:
- Avoid putting large or hard food scraps into the disposal to prevent clogs.
- Run cold water before and after using the garbage disposal to flush out any remaining debris.
- Occasionally grind ice cubes to help clean the blades and remove any odors.
- Avoid pouring grease or oil down the disposal, as it can solidify and cause blockages.
- Inspect the disposal’s blades for any signs of wear and tear and replace if necessary.
Following these maintenance tips will not only extend the lifespan of your dishwasher and garbage disposal but also ensure optimal performance for years to come.
That wraps up our guide on installing a dishwasher with a garbage disposal. We hope you found this information helpful and that your new appliances make your kitchen chores a breeze. Remember to regularly perform maintenance tasks to keep your dishwasher and garbage disposal in top shape. Enjoy the convenience and efficiency they bring to your kitchen!
Frequently Asked Questions
Can I Connect My Dishwasher Directly To My Garbage Disposal?
Yes, you can connect your dishwasher directly to your garbage disposal.
Do You Need An Air Gap For A Dishwasher If You Have A Garbage Disposal?
Yes, an air gap is necessary for a dishwasher even if you have a garbage disposal. It helps prevent dirty water from the sink and disposal from flowing back into the dishwasher, ensuring proper drainage and avoiding contamination.
How Do You Vent A Dishwasher Through A Garbage Disposal?
To vent a dishwasher through a garbage disposal, connect the drain hose from the dishwasher to the garbage disposal inlet. Remove the knockout plug in the disposal inlet (if present) and secure the hose with a clamp. Run the disposal to ensure proper drainage.
What Are The Steps To Install A Dishwasher With A Garbage Disposal?
Installing a dishwasher with a garbage disposal involves several steps:
1. Prepare the area by measuring, cleaning, and ensuring all necessary connections are available. 2. Connect the drain line from the dishwasher to the disposal unit. 3. Connect the water supply line to the hot water supply under the sink. 4. Install the electrical connection for the dishwasher. 5. Test the dishwasher to ensure it is properly functioning.
Conclusion
Installing a dishwasher with a garbage disposal may seem daunting, but with the right steps, it can be a smooth process. By properly preparing the area, connecting the plumbing, and ensuring electrical safety, you can have your dishwasher up and running in no time.
Remember to consult the manufacturer’s instructions for specific guidelines and always prioritize safety. With this guide, you can confidently tackle the task of installing a dishwasher with a garbage disposal. Happy dishwashing!