To install a Delta tub spout, first remove the old spout by unscrewing the set screw underneath, then apply plumber’s tape to the threaded end of the new spout and tighten it onto the pipe until it is secure. Installing a new tub spout can be a simple and straightforward process.
Whether you need to replace a worn-out spout or want to upgrade to a new Delta tub spout, this guide will provide you with the necessary steps to get the job done. By following these instructions, you can easily install a Delta tub spout and enjoy a refreshed look in your bathroom.
Read on to learn how to install a Delta tub spout in just a few easy steps.
Gather The Necessary Tools And Materials
Before you begin the installation process of your new Delta tub spout, it’s important to gather the necessary tools and materials. By having everything prepared and within reach, you can ensure a smooth and efficient installation.
Choose the Right Delta Tub Spout for Your Needs
The first step in gathering the necessary tools and materials is to choose the right Delta tub spout for your needs. Delta offers a wide range of tub spouts with different styles and functionalities. Whether you’re looking for a traditional or modern design, a diverter spout, or a non-diverter spout, Delta has options to suit your preferences.
Check for Existing Plumbing Compatibility
Once you have determined the type of Delta tub spout you require, the next step is to check for existing plumbing compatibility. This ensures that the new spout will be compatible with your current plumbing setup. You can do this by examining the existing spout and the connection behind it. Take note of the type of connection, whether it is a threaded or slip-on spout.
Ensure You Have the Necessary Tools
After checking for plumbing compatibility, it’s time to gather the necessary tools. Here is a list of essential tools you may need for installing a Delta tub spout:
| Tool | Description |
|---|---|
| Adjustable wrench | To loosen and tighten connections |
| Plumber’s tape | To create a watertight seal |
| Threaded pipe compound | To lubricate and seal threaded connections |
| Bucket or container | To catch any water that may leak during the installation |
With these tools and materials ready, you’ll have everything you need to successfully install your new Delta tub spout. Make sure to have them easily accessible before you begin the installation process.
In conclusion, gathering the necessary tools and materials is crucial for a hassle-free installation of your Delta tub spout. Choose the right spout for your needs, check for plumbing compatibility, and ensure you have the essential tools at hand. By doing so, you’ll be well-prepared to embark on this DIY project.
Preparing The Tub Spout Installation Area
Before you start installing a Delta tub spout, it is important to prepare the installation area properly. This will ensure a smooth and hassle-free installation process. In this section, we will guide you on how to shut off the water supply, remove the existing tub spout (if applicable), and clean and prepare the installation area.
Shut Off the Water Supply
The first step in preparing the tub spout installation area is to shut off the water supply. It is essential to do this to avoid any accidental water flow while you are working on the installation. To shut off the water supply, follow these steps:
- Locate the main water valve in your house. It is usually found in the basement or near the water meter.
- Turn the valve clockwise until it is fully closed. This will stop the water flow to the tub and ensure a safe installation process.
Remove the Existing Tub Spout (if applicable)
If you already have a tub spout installed, you will need to remove it before installing the new Delta tub spout. Here’s how you can remove the existing tub spout:
- Inspect the tub spout for any visible screws or fasteners. These are usually located underneath the spout or on its sides.
- Using a screwdriver or an appropriate tool, loosen and remove the screws or fasteners.
- Once the screws or fasteners are removed, gently pull the tub spout away from the wall. It should come off easily.
Clean and Prepare the Installation Area
After removing the old tub spout, it is crucial to clean and prepare the installation area to ensure proper fitting and longevity of the new Delta tub spout. Follow these steps to clean and prepare the area:
- Use a mild bathroom cleaner or soap and water to clean the area where the tub spout was installed. Remove any debris, grime, or buildup that may be present.
- If there is any corrosion or roughness on the pipe threads, use a wire brush or sandpaper to smooth them out. This will aid in a secure fitting of the new tub spout.
- Inspect the pipe threads for any damage or wear. If necessary, consider replacing the pipe or seeking professional help before proceeding with the installation.
By following these steps to prepare the tub spout installation area, you will ensure a well-prepared surface for a seamless installation of your new Delta tub spout. Remember, proper preparation is vital for a secure and long-lasting installation. Proceed to the next step once you have completed these preparations.
Step 1: Apply Teflon Tape To The Pipe Nipple
When it comes to installing a Delta tub spout, the first step is to apply Teflon tape to the pipe nipple. This important step ensures a tight and secure fit, preventing any leaks or water damage. By properly applying Teflon tape to the pipe nipple, you can ensure a smooth installation process and long-lasting results.
Ensure the Pipe Nipple is Clean and Dry
Before applying the Teflon tape, it is essential to ensure that the pipe nipple is clean and dry. Use a clean cloth or paper towel to wipe away any dirt, grease, or moisture from the surface of the pipe nipple. This will help the Teflon tape adhere properly and provide a solid seal.
Wrap Teflon Tape Clockwise around the Pipe Nipple
Take the Teflon tape and start wrapping it around the pipe nipple in a clockwise direction. Make sure to hold the end of the tape securely so that it does not unravel. As you wrap the tape, apply slight tension to ensure a tight fit. Continue wrapping the tape until the entire length of the pipe nipple is covered, overlapping the tape slightly with each turn.
Remember, it is important to wrap the Teflon tape in the clockwise direction to ensure that it does not unravel when you tighten the tub spout later on. This will help create a watertight seal and prevent any leaks.
Once you have wrapped the Teflon tape around the pipe nipple, use your fingers to press it firmly into place. This will help the tape adhere to the surface and create a secure seal. Avoid using excessive force, as this can cause the tape to tear or become misaligned.
In conclusion, applying Teflon tape to the pipe nipple is an essential step in installing a Delta tub spout. By ensuring the pipe nipple is clean and dry before wrapping the tape in a clockwise direction, you can ensure a tight and secure fit. Taking the time to properly apply Teflon tape will result in a successful installation and a spout that functions flawlessly for years to come.
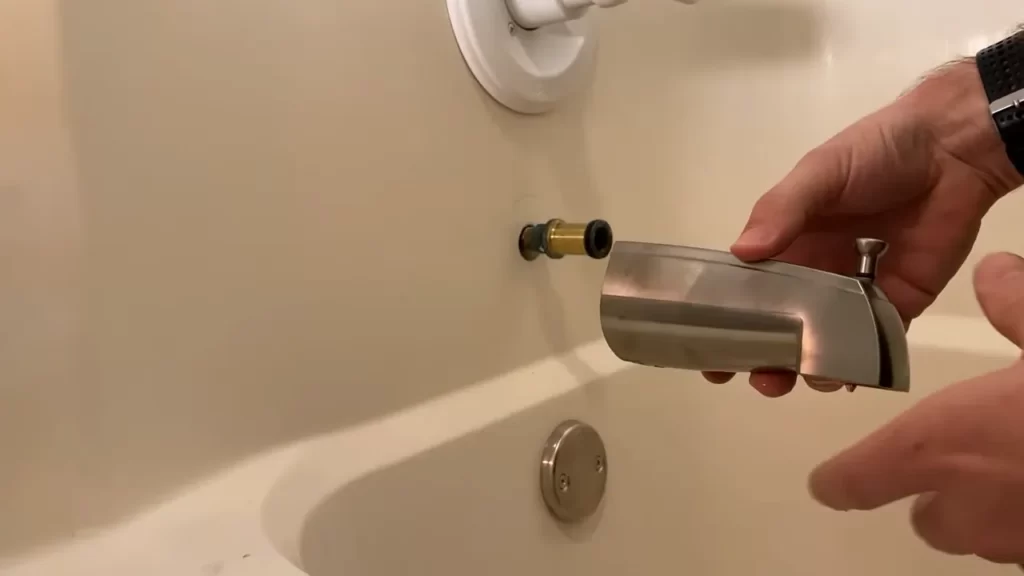
Step 2: Insert The Tub Spout Onto The Pipe Nipple
When it comes to installing a Delta tub spout, inserting it onto the pipe nipple is the crucial second step. This step ensures that your tub spout is securely in place, allowing it to function properly and efficiently. Follow these simple instructions to align and push the tub spout onto the pipe nipple, ensuring a successful installation.
Align the Tub Spout with the Pipe Nipple
To begin, aligning the tub spout with the pipe nipple is essential. This ensures proper fit and prevents any leakage or damage in the future. Follow these steps to align the tub spout correctly:
- Locate the pipe nipple sticking out from the wall.
- Inspect the tub spout for any manufacturer instructions or indicators for proper alignment.
- Position the tub spout above the pipe nipple and make sure they are directly aligned.
- Once aligned, prepare to push the tub spout onto the pipe nipple securely.
Push the Tub Spout onto the Pipe Nipple until it is Securely in Place
Now that the tub spout and pipe nipple are properly aligned, it’s time to push the tub spout onto the pipe nipple securely. This step ensures a snug fit and prevents any potential issues down the line. Follow these steps to push the tub spout onto the pipe nipple:
- Apply a small amount of lubricant, like plumber’s grease, to the pipe nipple to facilitate the insertion process.
- With a firm grip, hold the tub spout and place it over the pipe nipple.
- Using moderate pressure, push the tub spout onto the pipe nipple gradually.
- Continue pushing until you feel the tub spout is securely in place.
- Double-check the alignment to ensure the tub spout is properly fitted onto the pipe nipple.
Remember, it’s important to avoid using excessive force while pushing the tub spout onto the pipe nipple. This can cause damage to the plumbing system. Take your time and ensure a snug, but not overly tight, fit.
Installing a Delta tub spout can be a straightforward process when you follow the correct steps. By aligning the tub spout with the pipe nipple and pushing it securely into place, you can enjoy a properly functioning tub spout that adds functionality and style to your bathroom.
Step 3: Tighten The Tub Spout With A Tub Spout Wrench Or Adjustable Wrench
Once you have successfully removed the old tub spout and applied plumber’s putty to the threads of your new Delta tub spout, it is time to securely attach it to the pipe.
Use a Tub Spout Wrench or Adjustable Wrench for a Secure Fit
To ensure a secure fit, it is recommended to use a tub spout wrench or an adjustable wrench. These tools provide the necessary grip and leverage to tighten the tub spout effectively. Additionally, they help prevent any damage to the spout during the installation process.
Tighten the Tub Spout Clockwise until it is Firm
Position the wrench over the tub spout, ensuring it is securely in place. With a firm grip on the wrench, turn it clockwise to tighten the spout onto the pipe. Apply steady pressure while turning the wrench until the spout feels firm and secure.
It’s important to note that over-tightening can cause damage to the spout or the pipe. Therefore, be cautious and stop tightening once the spout feels securely attached.
By using a tub spout wrench or an adjustable wrench and following the clockwise tightening technique, you can ensure that your Delta tub spout is properly installed and will function optimally.
Step 4: Check For Proper Alignment And Functionality
Step 4: Check for Proper Alignment and Functionality
Once you have successfully installed the Delta tub spout in the previous steps, it is crucial to check for proper alignment and functionality. This step ensures that your tub spout is straight and aligned with the wall, and that the water supply is working correctly. Follow the instructions below to complete Step 4.
Ensure the Tub Spout is Straight and Aligned with the Wall
After installing the tub spout, visually inspect it to ensure it is straight and aligned properly with the wall. Use a leveling tool, if necessary, to make any adjustments. This step is important to ensure the overall aesthetic appeal of your bathroom and prevent any water leakage issues.
Turn on the Water Supply to Test the Tub Spout
Next, you need to turn on the water supply to test the tub spout and ensure it functions properly. Follow these simple steps:
- Locate the shutoff valve for the water supply near your tub or in your basement.
- Turn the valve counterclockwise to open the water supply.
- Slowly turn on the tub spout by pulling up on the diverter or lever. You should hear the water flowing and see it coming out of the spout.
If the water flows smoothly without any leakage, your tub spout is functioning correctly. However, if you notice any leaks, it is essential to make necessary adjustments or seek professional help to fix the issue.
Congratulations! You have successfully completed Step 4 of installing a Delta tub spout. By ensuring proper alignment and functionality, you can enjoy a beautifully installed tub spout without any water leakage concerns.
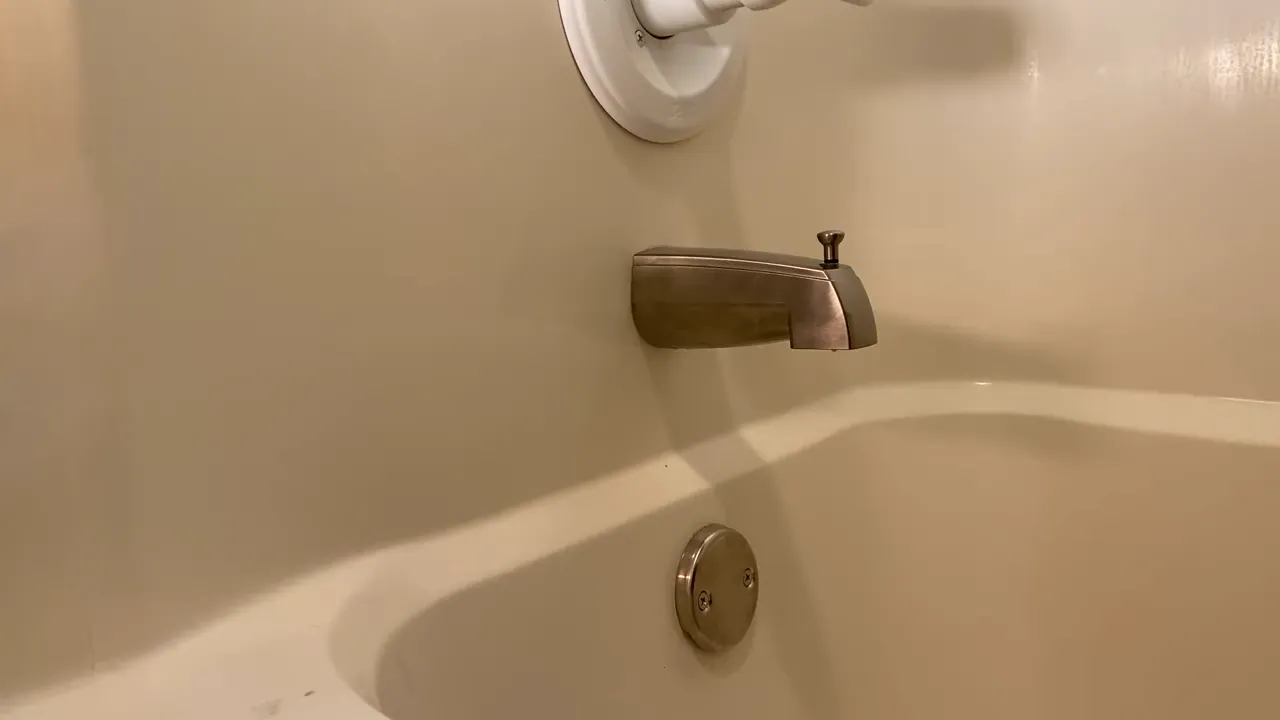
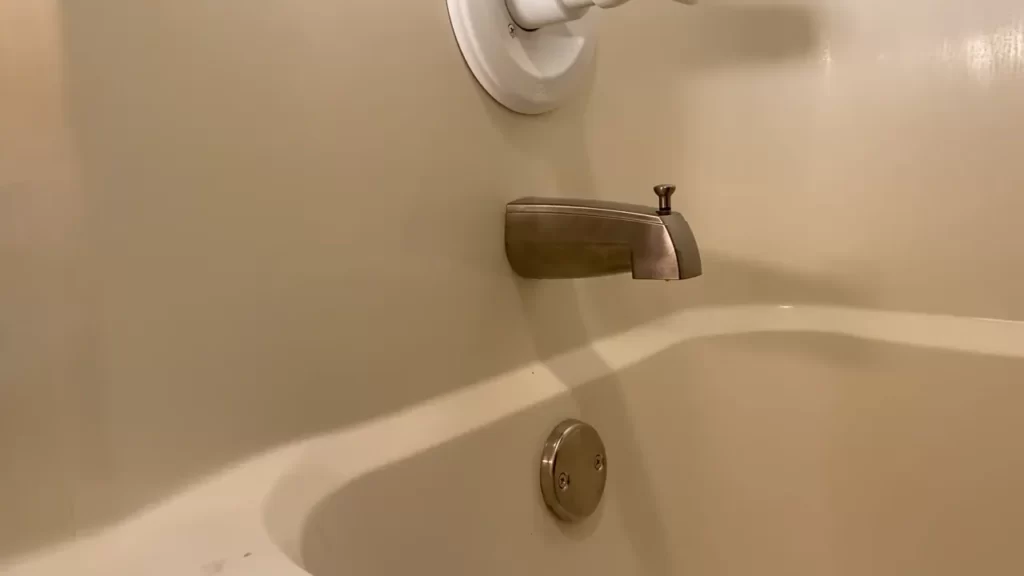
Tub Spout Leaking At The Connection Point
If you’ve noticed that your tub spout is leaking at the connection point, you’re not alone. This is a common issue that many homeowners face. Fortunately, it’s usually a simple fix that you can do yourself without the need to call a plumber. In this section, we’ll guide you through the steps to troubleshoot and resolve a leaking tub spout connection.
Check for Loose Tub Spout Installation
The first thing you should do is to check whether the tub spout is properly installed. Over time, the connection between the spout and the pipe can become loose due to regular use. To check for loose installation, follow these steps:
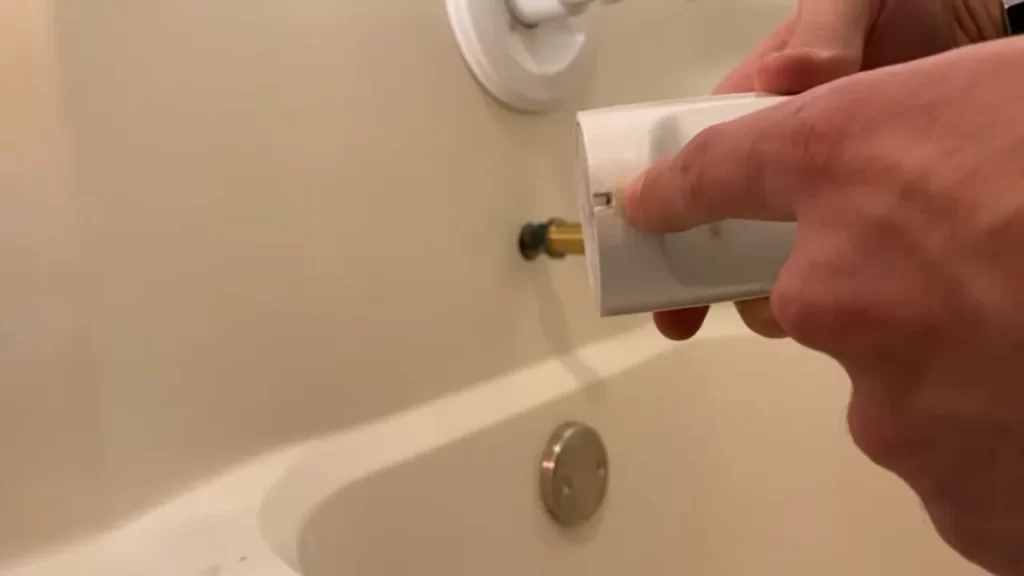
- Start by turning off the water supply to the tub.
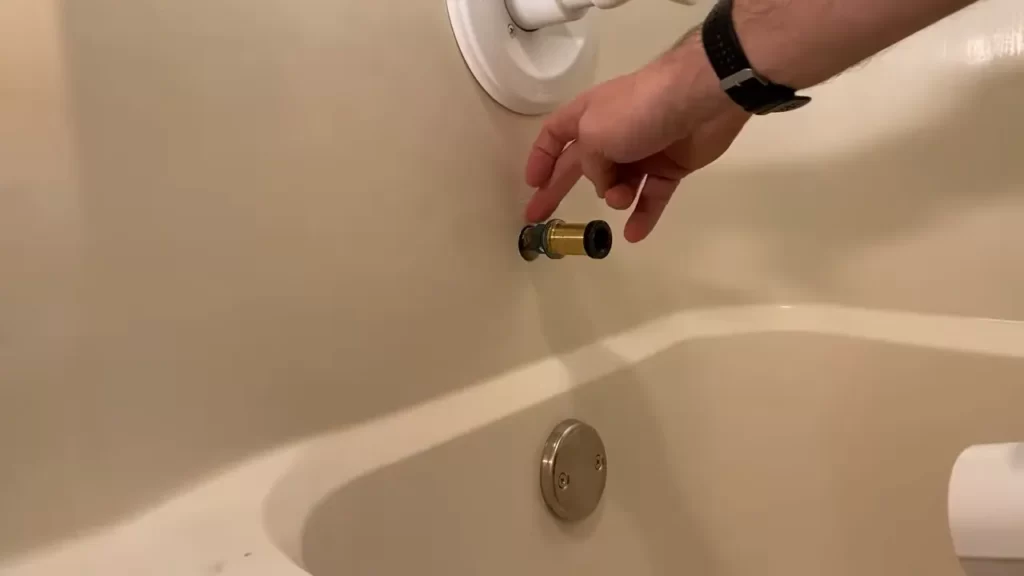
- Locate the set screw on the bottom of the tub spout. Use a screwdriver to unscrew it and remove the spout from the pipe.
- Inspect the threaded pipe and the inside of the tub spout for any debris or buildup. Clean them if necessary.
- Apply a thin layer of plumber’s tape or Teflon tape to the threads of the pipe. This will help create a watertight seal.
- Reinsert the tub spout onto the pipe and hand-tighten it as much as possible.
- Finally, use a wrench to give the tub spout an extra quarter turn to ensure a secure connection.
By following these steps, you’ll be able to check for a loose tub spout installation and fix it accordingly.
Reapply Teflon Tape and Retighten the Tub Spout
If checking for loose installation doesn’t resolve the issue, the next step is to reapply Teflon tape and retighten the tub spout. Teflon tape is a thin, white tape that is commonly used to create a watertight seal between threaded connections. Here’s how to do it:
- Start by removing the tub spout from the pipe using the steps mentioned earlier.
- Carefully remove the old Teflon tape from the pipe threads. Ensure that the threads are clean and free from any debris.
- Take a fresh piece of Teflon tape, about 3-4 wraps, and wrap it tightly around the threads in a clockwise direction.
- Once the tape is applied, reinstall the tub spout onto the pipe and hand-tighten it.
- Using a wrench, give the tub spout an additional quarter turn to ensure a snug and secure connection.
By reapplying Teflon tape and retightening the tub spout, you’ll be able to create a tighter seal and prevent any leaks at the connection point.
Remember, a leaking tub spout at the connection point can lead to water damage and an increase in your water bill. By following these simple steps, you can fix the issue yourself and save money on calling a plumber. If, after trying these solutions, the problem still persists, it may be best to consult a professional to assess the situation further.
Tub Spout Not Aligned Or Straight
Loosen the Tub Spout and Adjust its Position
If your tub spout is not aligned or straight, there are a few simple steps you can take to fix the problem. First, you need to loosen the tub spout to allow for adjustment. To do this, follow these steps:
- Locate the setscrew on the underside of the tub spout. This setscrew is usually located at the back of the spout.
- Using an Allen wrench, turn the setscrew counterclockwise to loosen it. Be careful not to unscrew it completely.
- Once the setscrew is loose, hold the tub spout firmly with one hand while using your other hand to twist and adjust the position of the spout.
By loosening the setscrew and adjusting the position of the tub spout, you will be able to align it properly with your bathtub.
Tighten the Tub Spout Again to Secure its Alignment
After adjusting the position of the tub spout, the next step is to securely tighten it to ensure proper alignment. Follow these simple steps:
- Hold the tub spout firmly in the desired position to align it with the bathtub.
- Using the Allen wrench, turn the setscrew clockwise to tighten it. Make sure to tighten it snugly, but be careful not to overtighten and damage the spout.
- Check the alignment of the tub spout and make any necessary adjustments if needed.
By tightening the setscrew, you will secure the tub spout in its aligned position, preventing any further movement or misalignment.
Installing a Delta tub spout can be a straightforward process, but sometimes the tub spout may not be aligned or straight. By following these steps to loosen, adjust, and tighten the tub spout, you can easily correct any misalignment issues and enjoy a properly aligned and aesthetically pleasing tub spout.
Tub Spout Functioning Incorrectly After Installation
After successfully installing a Delta tub spout, you might encounter situations where it does not perform as expected. Whether it’s a lack of water flow, leaking, or other issues, it’s essential to address these problems promptly. In this article, we will go over the steps you can take to verify the proper installation of the tub spout and resolve any potential functioning issues. By following these guidelines, you can ensure a smooth and hassle-free experience with your Delta tub spout.
Verify Proper Installation of the Tub Spout
When the tub spout is not functioning correctly after installation, it’s crucial to double-check the installation to identify any potential errors. Here are a few steps to follow:
- Inspect the Connection: Start by examining the connection between the tub spout and the pipe behind it. Ensure that it is securely fastened and that there are no visible gaps or leaks.
- Check for Debris: Sometimes, debris or dirt can obstruct the water flow, causing the tub spout to function incorrectly. Clean any debris from the spout using a soft cloth or by rinsing it with water.
- Inspect the O-ring: The O-ring is an essential component that helps create a watertight seal. Check if the O-ring is placed correctly and doesn’t show any signs of damage. If necessary, replace it with a new O-ring.
If the tub spout is still not functioning properly after following these steps, it is recommended to contact Delta Customer Support for further assistance.
Contact Delta Customer Support for Further Assistance
If you have completed the verification process and the tub spout continues to have issues, it is advisable to reach out to Delta Customer Support. They have a team of knowledgeable professionals who can offer guidance and assistance in resolving the problem. Delta Customer Support can provide expert advice related to installation, troubleshooting, and potential solutions to ensure the tub spout functions correctly.
To contact Delta Customer Support, you can visit their official website or call their helpline. Make sure to provide them with as much information as possible regarding your tub spout installation and the specific issues you are encountering. This will help them provide you with more accurate and tailored assistance.
Remember, Delta is committed to ensuring customer satisfaction, and their support team is dedicated to helping you overcome any challenges you may face with their products. So, don’t hesitate to reach out for assistance.
Cleaning And Removing Buildup From The Tub Spout
Cleaning and Removing Buildup from the Tub Spout
Use Mild Soap and Water to Clean the Tub Spout
One of the simplest and most effective ways to clean your tub spout is by using mild soap and water. This gentle cleaning solution will help remove dirt, grime, and soap scum that can accumulate on the surface of the tub spout over time. To clean the spout, you will need:
- Mild soap
- Warm water
- Soft cloth or sponge
Here’s how you can clean your tub spout:
- Fill a bucket or basin with warm water.
- Add a small amount of mild soap to the water and mix gently.
- Dip the soft cloth or sponge into the soapy water.
- Gently scrub the tub spout, focusing on areas with visible dirt or residue.
- Rinse the spout with clean water to remove any remaining soap.
- Dry the spout thoroughly with a clean cloth.
Remove Mineral Deposits with Vinegar Solution
In addition to dirt and grime, mineral deposits can also accumulate on the tub spout, leaving behind unsightly stains. To remove these mineral deposits, you can use a vinegar solution. Here’s what you’ll need:
- Vinegar
- Water
- Soft cloth or sponge
Follow these steps to remove mineral deposits from your tub spout:
- Fill a small bowl or container with equal parts vinegar and water.
- Soak the soft cloth or sponge in the vinegar solution.
- Wrap the cloth or sponge around the tub spout, ensuring that the mineral deposit areas are covered.
- Leave the vinegar solution on the spout for about 20-30 minutes to allow the acid to dissolve the mineral deposits.
- Gently scrub the spout with the cloth or sponge to remove any remaining deposits.
- Rinse the spout thoroughly with water to remove any vinegar residue.
- Dry the spout with a clean cloth.
Cleaning and maintaining your tub spout not only improves its appearance but also helps prolong its lifespan. By regularly removing buildup and keeping it clean, you can ensure that your tub spout functions properly and provides a pleasant bathing experience.
Regular Inspection For Wear And Tear
Regular inspection of your Delta tub spout is crucial to ensure its proper functioning and prevent any potential damage or wear that may occur over time. By performing these simple checks, you can identify any signs of wear and tear and take appropriate actions to maintain the functionality of your tub spout.
Check for Any Signs of Damage or Wear
Begin by visually inspecting your Delta tub spout for any visible signs of damage or wear. Look out for cracks, dents, or rust that may affect its performance. Check the metal finish for any discoloration or chipping, as these may indicate potential problems.
If your tub spout has a diverter, ensure it moves smoothly without any resistance. Any stiffness or difficulty in operation could be a sign of wear and may require immediate attention. Additionally, check for any leakage around the spout connection to the wall.
Replace the Tub Spout as Needed to Maintain Functionality
If you notice significant damage or wear during your inspection, it’s important to replace the tub spout promptly to maintain its functionality. Delaying replacement can lead to further complications, such as water leakage or reduced water flow.
To replace the tub spout, follow these simple steps:
- Turn off the water supply to the tub to avoid any accidental flow during the installation process.
- Locate the set screw on the underside of the existing tub spout and use an Allen wrench to remove it.
- Gently twist and pull the old spout in a counterclockwise direction to detach it from the pipe.
- Clean any debris or residue from the pipe thread using a soft cloth.
- Apply plumber’s tape to the threads of the new tub spout to ensure a watertight seal.
- Align the new spout with the pipe and firmly hand-tighten it in a clockwise direction.
- Use the Allen wrench to secure the set screw underneath the spout.
- Turn on the water supply and test the functionality of the new tub spout to ensure proper installation.
By regularly inspecting your Delta tub spout for wear and tear and promptly replacing it when necessary, you can maintain its functionality and enjoy a satisfying bathing experience. Remember to turn to a professional plumber if you encounter any difficulties during the installation process or if you need assistance in determining the root cause of any issues you may be experiencing.
Additional Tips And Tricks For Delta Tub Spout Care
In addition to knowing how to properly install a Delta tub spout, there are a few important tips and tricks to keep in mind for ongoing care. By following these additional steps, you can ensure the longevity and cleanliness of your tub spout. Read on to learn more about these tips and tricks.
Avoid Using Abrasive Cleaners on the Tub Spout
When it comes to cleaning your Delta tub spout, it’s important to stay away from abrasive cleaners. These harsh chemicals can damage the finish of the spout, leaving it looking dull and worn. Instead, opt for gentle cleaners that are specifically designed for bathroom fixtures. These cleaners will effectively remove any dirt or grime without causing any harm to the spout’s surface.
Keep the Tub Spout Dry Between Uses to Prevent Mold or Mildew
To prevent the growth of mold or mildew on your Delta tub spout, it’s essential to keep it dry between uses. After each use, take a soft cloth or towel and thoroughly wipe down the spout to remove any moisture. This will help to prevent any lingering water from accumulating and creating the perfect breeding ground for mold or mildew. By making this a regular habit, you can keep your tub spout looking clean and free from any unwanted growth.
If you notice any signs of mold or mildew on your tub spout despite your best efforts, it’s important to address the issue immediately. Ignoring these growths can lead to further damage and potentially impact the functionality of your tub spout. In such cases, it may be necessary to consult a professional to properly clean or replace the affected parts.
Frequently Asked Questions
How Do You Install A Tub Spout With A Set Screw?
To install a tub spout with a set screw, follow these steps: 1. Remove your old spout by twisting counterclockwise. 2. Clean and dry the pipe. 3. Slide the new spout onto the pipe. 4. Tighten the set screw with an Allen wrench to secure the spout.
5. Test the spout for leaks. Done!
How Do You Remove A Delta Monitor Tub Spout?
To remove a Delta monitor tub spout, follow these steps: 1. Locate the set screw at the bottom of the spout. 2. Using an Allen wrench, turn the screw counterclockwise to loosen it. 3. Once loose, pull the spout straight out to remove it from the wall pipe.
How Do You Install A Universal Tub Spout Adapter?
To install a universal tub spout adapter, follow these steps: 1. Remove the existing spout. 2. Clean the pipe and remove any debris. 3. Apply plumber’s tape to the pipe threads. 4. Attach the adapter by screwing it onto the pipe.
5. Tighten the adapter securely. Enjoy your new tub spout!
How Do You Put A Tub Spout Back On?
To put a tub spout back on, follow these steps: 1. Remove any old caulk or debris from the pipe threads. 2. Apply plumber’s tape clockwise on the pipe threads. 3. Slide the spout onto the pipe and twist it clockwise until it’s snug.
4. Use a wrench to tighten it slightly, being careful not to overtighten. 5. Remove any excess plumber’s tape.
Conclusion
Installing a Delta tub spout is a simple task that can enhance your bathroom experience. By following the step-by-step guide provided in this blog post, you can successfully install the spout without any hassle. Remember to gather the necessary tools and materials beforehand to ensure a smooth installation process.
With the right techniques and careful consideration, you’ll be able to enjoy a functional and stylish tub spout in no time.