To install a deep well pump and pressure tank, you need to follow a few steps. First, choose an appropriate location for the pump and tank, ensuring it is close to the well and meets safety regulations.
Next, prepare the area by clearing any debris and digging a hole for the pump. Install the pump and connect it to the well using pipes and fittings. Then, install the pressure tank near the pump, making sure the connections are secure.
Finally, test the system to ensure it is working properly and check for any leaks. With these steps, you can successfully install a deep well pump and pressure tank.
Understanding The Components
When it comes to installing a deep well pump and pressure tank system, it’s important to have a clear understanding of the components involved. By properly familiarizing yourself with each component and how they work together, you can ensure a successful installation and future operation. In this section, we will provide an overview of a deep well pump and pressure tank, as well as explain how these two vital components work in harmony to deliver a consistent water supply.
Overview of a deep well pump and pressure tank
Deep well pumps and pressure tanks are indispensable for households that rely on well water for their water needs. These systems work together to pump water from deep underground and store it in a pressure tank for convenient use. Let’s take a closer look at each component:
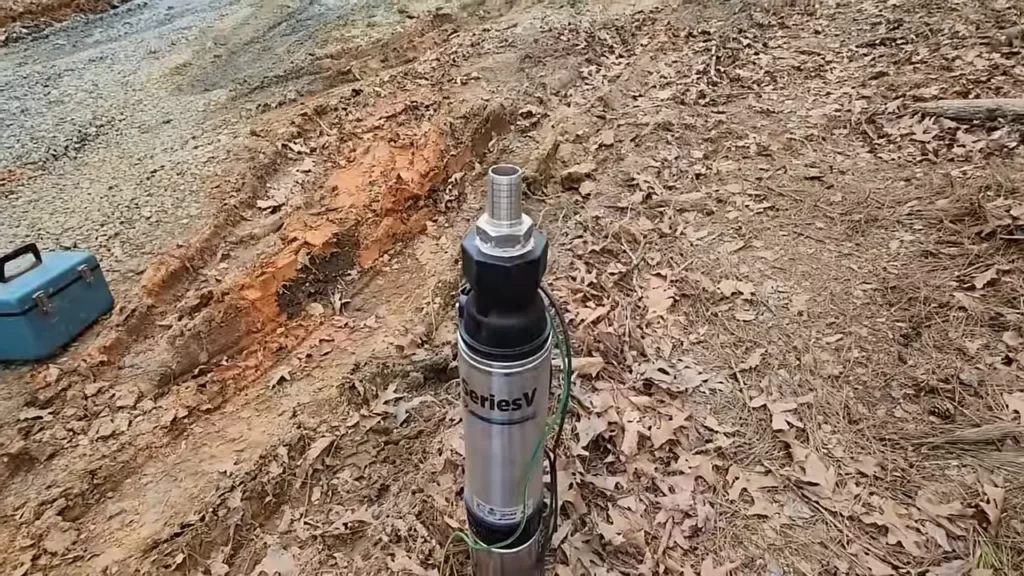
The deep well pump
- A deep well pump is a submersible device that is placed deep underground, usually around 100 to 400 feet.
- It is equipped with a motor that drives the pump, allowing it to draw water from the well.
- The pump is designed to push water up through a pipe and into the pressure tank.
- Most deep well pumps are made of durable materials like stainless steel to withstand the harsh conditions underground and ensure longevity.
The pressure tank
The pressure tank is an essential component that works hand in hand with the well pump. It serves multiple functions to regulate water pressure and maintain a steady water supply:
- Water storage: The pressure tank stores water pumped from the well by the deep well pump. This ensures a readily available water supply for your household’s needs, even during times when the well pump may not be actively pumping water.
- Pressure control: The pressure tank utilizes a pressure switch to control the operation of the pump. When the pressure in the tank drops below a certain level, the switch activates the pump to start drawing water from the well and refilling the tank.
- Pressure regulation: The pressure tank has an air-filled bladder or diaphragm inside. As water enters the tank, it compresses the air, building pressure. This compressed air acts as a cushion, allowing the tank to regulate and maintain a consistent water pressure throughout the system.
By understanding the functions and interplay of the deep well pump and pressure tank, you can ensure a properly functioning water supply system for your household. In the next section, we will delve deeper into how these components work together to deliver a reliable water supply. Stay tuned!
Determining The Right Type And Size Of Pump And Tank
Installing a deep well pump and pressure tank is a crucial step in ensuring a reliable and efficient water supply for your home or property. To maximize the effectiveness of your system, it’s essential to determine the right type and size of pump and tank for your specific needs. In this section, we will explore two key factors to consider – calculating water demand and assessing water quality and depth.
Calculating Water Demand
Before choosing a deep well pump and pressure tank, it’s crucial to accurately calculate your water demand. This calculation will help you determine the appropriate flow rate and capacity required for your system. Here are some steps to guide you through the process:
- Identify all the water outlets in your home or property, including taps, showers, toilets, and appliances.
- Estimate the average flow rate for each outlet. You can do this by using a flow meter or referring to the manufacturer’s specifications.
- Multiply the flow rate by the number of outlets to get the total water demand.
- Consider any future expansions or additions to your water system to ensure your pump and tank can accommodate potential increases in demand.
Assessing Water Quality and Depth
Another crucial factor to consider when determining the right pump and tank is the quality and depth of your water source. The characteristics of your water will affect the type of pump you need, as well as any additional filtration or treatment systems. Here’s what you should consider:
- Water Quality: Test your water for any contaminants, such as bacteria, iron, or sediment. This will help you determine if additional treatment systems, such as a filtration or chlorination system, are necessary.
- Water Depth: Measure the depth of your well to ensure you select a pump that can reach the water source effectively. Different pumps are designed for different depths, so accurate measurement is crucial.
By considering your water demand and the quality and depth of your water source, you can make an informed decision about the type and size of pump and tank that will best meet your needs. Investing time in this initial assessment will contribute to the longevity and reliability of your deep well pump and pressure tank system.
Gathering The Necessary Tools And Materials
Before you begin installing a deep well pump and pressure tank, it’s essential to gather all the necessary tools and materials. This will ensure that you have everything you need to complete the installation successfully. By being prepared, you can minimize interruptions and make the process smoother. In this section, we will discuss the tools needed for the installation as well as the materials required for a successful installation.
Tools needed for the installation
When it comes to installing a deep well pump and pressure tank, having the right tools is crucial. Here is a list of the essential tools you will need:
- Tape Measure: Used for measuring distances and dimensions accurately.
- Adjustable Wrench: Ideal for loosening and tightening nuts and bolts.
- Pipe Wrench: A must-have tool for working with pipes and fittings.
- Hacksaw: Used for cutting pipes to the desired length.
- Screwdriver Set: Consisting of different types and sizes, these are useful for various tasks.
- Plumbers’ Tape: Also known as thread seal tape, it helps create a watertight seal.
- Multimeter: Used for testing electrical connections and troubleshooting.
- Allen Wrench Set: Essential for tightening or loosening hexagonal screws and bolts.
- Pump Puller: A tool designed specifically for removing well pumps from deep wells.
- Wire Strippers: Necessary for stripping insulation from electrical wires.
Materials required for a successful installation
In addition to the tools, you’ll also need various materials to ensure a successful installation of your deep well pump and pressure tank. Here are the materials you should have on hand:
- Pump and Pressure Tank: These are the main components of a deep well water system.
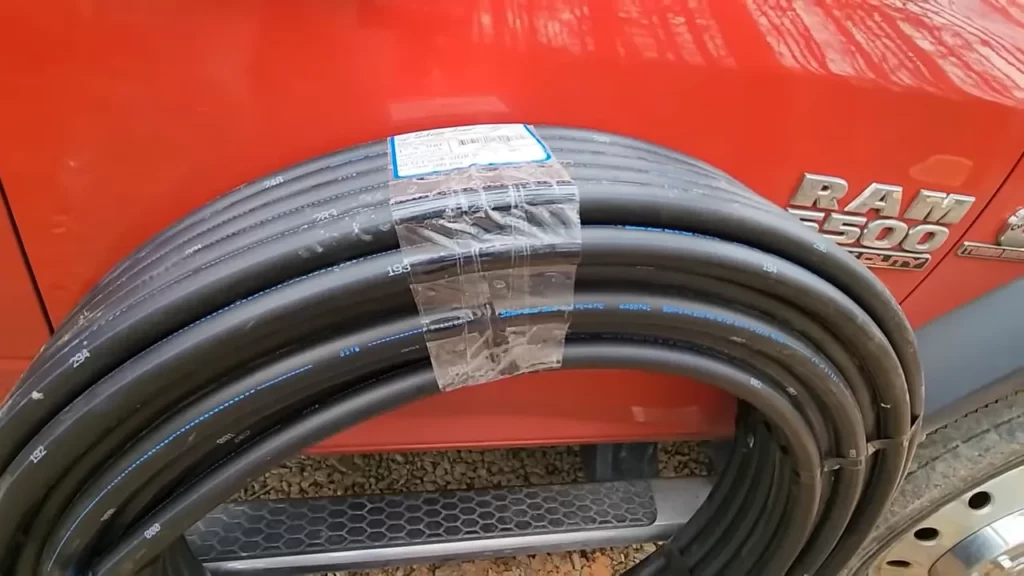
- Pipes and Fittings: Required for connecting the pump, pressure tank, and other components together.
- Electrical Wire: Used to provide power to the pump and pressure tank.
- Thread Seal Tape: Helps create a watertight seal between threaded connections.
- Well Cap: Covers the well opening and protects it from debris and contaminants.
- Concrete or Sand: Used for backfilling the well after installing the pump.
- Pipe Insulation: Helps prevent heat loss and freezing issues in colder climates.
- Check Valve: Ensures that water flows in only one direction, preventing backflow.
- Pressure Switch: Controls the on/off operation of the well pump.
- Well Seal: Provides a watertight seal around the well casing and electrical connections.
By gathering these tools and materials before you start the installation process, you can save time and avoid any unnecessary delays. Having everything on hand will allow you to focus on the installation itself and complete it more efficiently.
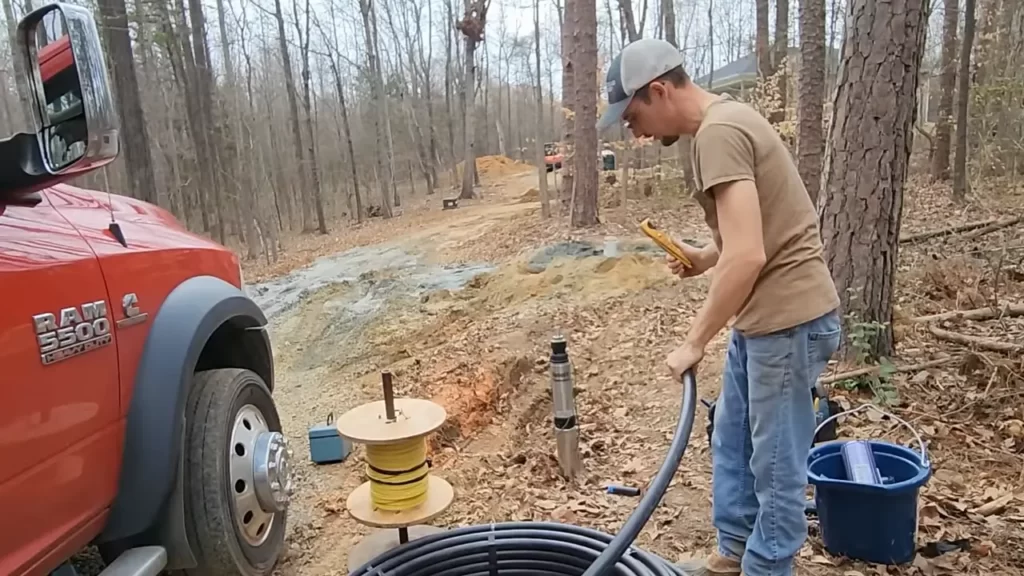
Locating The Well And Setting Up The Pump
Before you can begin installing a deep well pump and pressure tank, it is crucial to find the best location for the pump. This may require some detective work and careful consideration of various factors. Once you have determined the optimal spot, you can move on to setting up the pump and connecting it to the well. Following a systematic approach and ensuring all the necessary connections are made correctly will help you get your well pump up and running smoothly.
Finding the Best Location for the Pump
When it comes to finding the best location for your well pump, it is essential to consider a few key factors:
- The well depth and location: Locate your well and identify the depth at which water is present. Consider accessibility and whether the pump will be submerged or above ground.
- Proximity to power source: Ensure that the location you choose is close to a power source to avoid complications in wiring the pump.
- Pump protection: Choose a spot that offers protection from the elements and is secure to prevent damage to the pump.
- Noise concerns: If noise is a concern, consider placing the pump away from common living areas or insulated to minimize sound.
Once you have considered these factors and determined the prime location for your pump, you can proceed with setting up the pump and connecting it to the well.
Setting up the Pump and Connecting It to the Well
Now that you have located the ideal spot for your pump, it’s time to set it up and connect it to the well. Follow these steps:
- Prepare the wellhead: Clean the wellhead and remove any debris or soil build-up around it. This will ensure smooth installation and prevent any interference.
- Inspect the well casing and seal: Check the well casing for any damage or wear that could affect the pump’s performance. Also, inspect the seal to ensure it is in good condition and properly fitting.
- Attach the pump to the drop pipe: Use a pipe wrench or pliers to attach the pump to the drop pipe. Ensure it is firmly secured to prevent any leaks or disconnects.
- Prime the pump: Follow manufacturer instructions to prime the pump and remove any air from the system. This step is crucial for the pump’s proper functioning.
- Connect electrical wiring: Consult the manufacturer’s guidelines and local electrical codes to connect the pump to the power supply. Make sure all connections are tight and properly insulated.
- Test the pump: After connecting all the required components, turn on the power and test the pump for proper functioning and water flow. Monitor for any leaks or unusual noises.
By following these steps, you can effectively install a deep well pump and pressure tank while ensuring that all connections are correctly made. It’s important to consult the manufacturer’s instructions and local regulations to ensure compliance and safety throughout the installation process.
Proper Placement And Connections For Optimal Performance
When it comes to installing a deep well pump and pressure tank, proper placement and connections are crucial for optimal performance. Choosing the right location for the pressure tank and ensuring accurate connections to the pump and water supply are essential steps in setting up a well-functioning system.
Choosing the right location for the pressure tank
Choosing the right location for your pressure tank is important for efficient operation and easy maintenance. Here are a few tips to help you make the right choice:
- Find a location that is easily accessible for inspection and maintenance.
- Ensure the area is well-ventilated to prevent any potential overheating issues.
- Avoid installing the pressure tank in direct sunlight, as this can cause the water inside to become hot, affecting its overall performance.
- Keep the pressure tank away from any potential sources of damage or moisture, such as leaky pipes or nearby appliances that may leak water.
- Ensure the location allows for easy connections to the pump and the water supply.
Connecting the pressure tank to the pump and the water supply
Once you have chosen the ideal location for your pressure tank, it’s time to connect it to the pump and the water supply. Follow these steps to ensure a proper connection:
- First, ensure the pump is turned off and the power supply is disconnected to avoid any accidents.
- Identify the inlet and outlet connections on the pressure tank. The inlet should be connected to the well pump, and the outlet should be connected to the plumbing system.
- Use Teflon tape or pipe joint compound to create a tight seal between the connections. This will prevent any leaks and ensure optimal performance.
- Once you have made the connections, turn on the pump and check for any leaks or irregularities in water flow.
- Make sure to follow the manufacturer’s guidelines and recommendations for specific connections and fittings.
By following these steps, you can ensure proper placement and connections for your deep well pump and pressure tank, enabling optimal performance and longevity of your system.
Safely Wiring The Pump And Pressure Tank
Properly wiring the pump and pressure tank is crucial for the safe and efficient functioning of your deep well system. In this section, we will discuss the electrical requirements and guide you step-by-step on how to wire the pump and pressure tank. Follow these instructions carefully to ensure a successful installation.
Understanding Electrical Requirements
Before proceeding with the wiring process, it is essential to understand the electrical requirements for your deep well pump and pressure tank. The voltage and amperage specifications may vary depending on the specific model and capacity of your pump.
To determine the electrical requirements, refer to the manufacturer’s manual or consult a qualified electrician. Ensure that your electrical supply can handle the load and is equipped with the necessary circuit breakers and wiring.
Properly Wiring the Pump and Pressure Tank for Power
Now that you have a good understanding of the electrical requirements, let’s dive into the wiring process. Follow these steps to safely wire your deep well pump and pressure tank:
- Turn off the power supply to the well system by flipping the appropriate circuit breaker.
- Locate the wiring terminal on your well pump. This terminal may be labeled “L1” and “L2” or “Line” and “Neutral”. Refer to the manufacturer’s manual to identify the correct terminals.
- Strip the insulation off the wires coming from your power supply, exposing about half an inch of bare copper.
- Connect the black wire (hot wire) from your power supply to the terminal labeled “L1” or “Line”. Tighten the terminal securely using a screwdriver.
- Next, connect the white wire (neutral wire) from your power supply to the terminal labeled “L2” or “Neutral”. Again, use a screwdriver to tighten the terminal securely.
- If your well pump requires a ground wire, connect the green or bare copper wire from your power supply to the designated grounding terminal. This terminal is often marked with the symbol for ground.
- Inspect all connections to ensure they are tight and secure. Loose connections can lead to electrical hazards and malfunctioning of your system.
- Once the pump is wired, proceed to wire the pressure tank. Locate the control box or pressure switch that regulates the operation of the pump.
- Strip the insulation from the wires going to the control box, exposing about half an inch of bare copper.
- Connect the corresponding wires from the control box to the terminals marked “Pump” or “Pressure” on the pressure switch. Follow the color codes specified in the manufacturer’s manual or adhere to the standard wire color conventions.
- Again, inspect all connections to ensure they are tight and secure.
- After double-checking all connections, turn on the power supply to your well system by flipping the circuit breaker.
- Test the system to ensure it is functioning correctly. Monitor the pressure gauge on the pressure tank to ensure it reaches the desired pressure range, and the pump starts and stops as expected.
It is always recommended to consult a licensed electrician or a well pump professional if you are unsure about any aspect of the wiring process. Safety should be the top priority when working with electricity.
By following these guidelines and adhering to the electrical requirements of your deep well pump and pressure tank, you can safely and confidently install your system. Enjoy a reliable and efficient water supply for years to come!
Ensuring The Pump And Tank Are Working Correctly
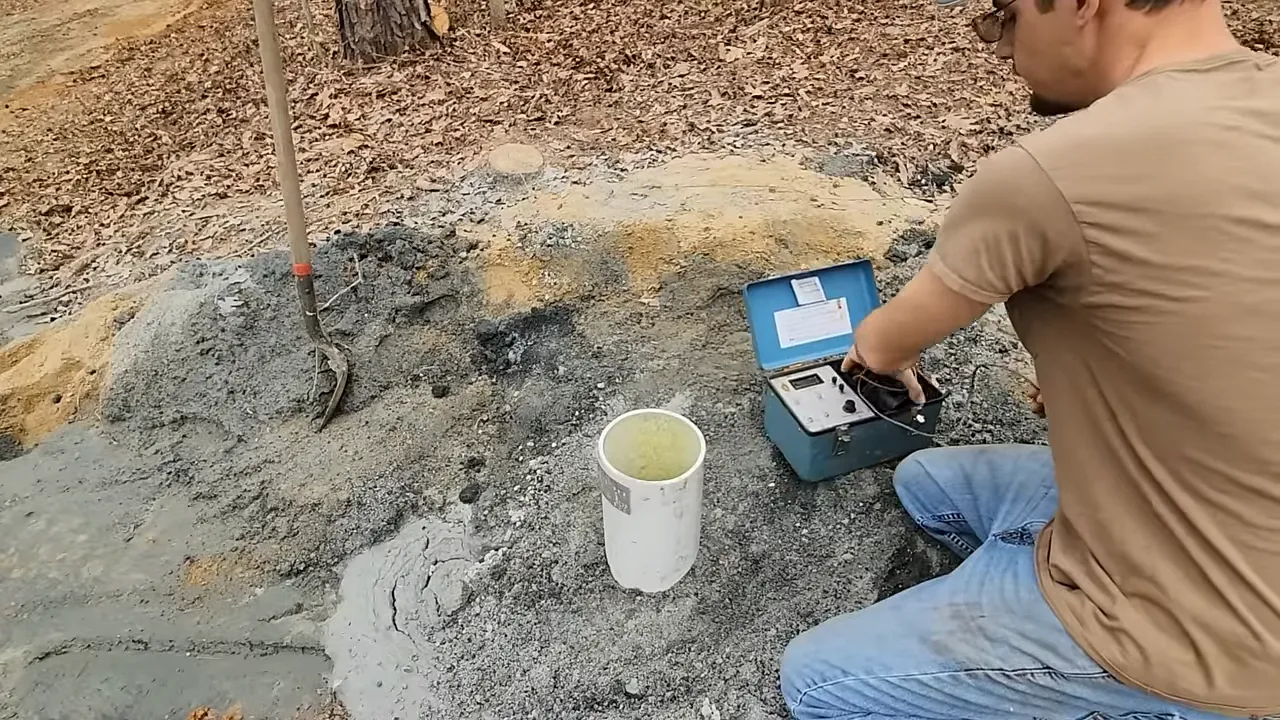
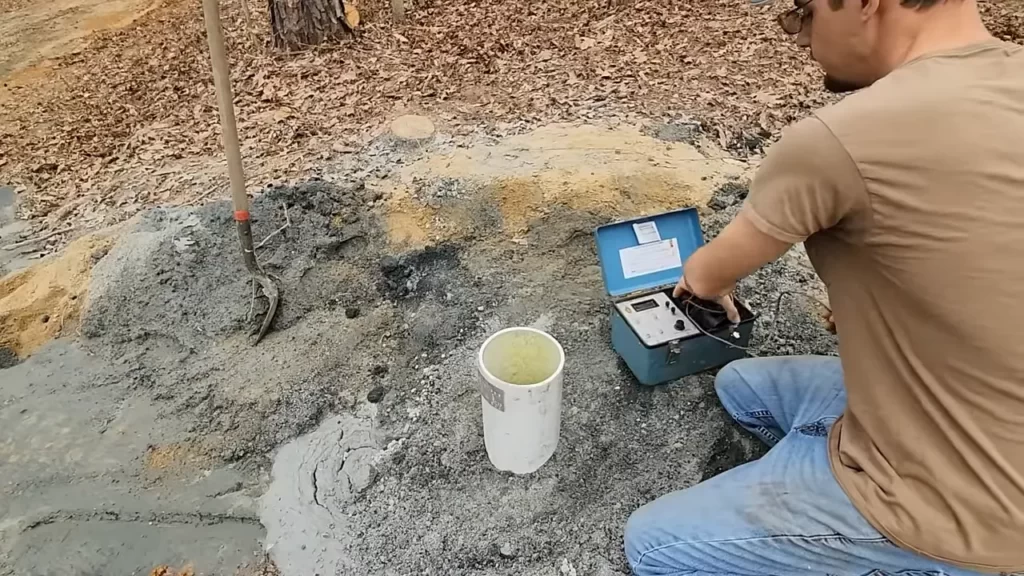
Checking for leaks
One important step in ensuring your deep well pump and pressure tank are working correctly is to check for any leaks. Even a small leak can lead to a decrease in efficiency and may cause damage to the system over time. To check for leaks, follow these steps:
- Inspect all the connections in the pump and tank system, including the pipes, fittings, and valves.
- Look for any signs of water dripping, pooling, or moisture around these connections.
- If you notice any leaks, tighten the connections using appropriate tools or replace any faulty parts.
- Consider using thread seal tape or pipe sealant to ensure a tight seal.
Note: It’s crucial to address any leaks promptly to prevent further issues and potential water damage.
Adjusting pressure settings
Another important aspect of proper deep well pump and pressure tank installation is setting the pressure correctly. This ensures that the system operates efficiently and provides consistent water pressure throughout your home. Follow these steps to adjust the pressure settings:
- Refer to the manufacturer’s instructions for your specific pump and pressure tank model to determine the recommended pressure range.
- Locate the pressure switch, which controls the on/off cycle of the pump.
- Using a pressure gauge, measure the current pressure and compare it to the recommended range.
- If the pressure is too low, locate the adjustment screw on the pressure switch and turn it clockwise to increase the pressure.
- Conversely, if the pressure is too high, turn the adjustment screw counterclockwise to decrease the pressure.
- Perform multiple adjustments as needed, checking the pressure with the gauge after each adjustment until it falls within the recommended range.
Tip: It’s advisable to make small adjustments and test the pressure before making further adjustments.
Conducting a flow test to verify proper operation
Once you have checked for leaks and adjusted the pressure settings, it’s essential to conduct a flow test to ensure the proper operation of your deep well pump and pressure tank. A flow test measures the gallons per minute (GPM) of water flowing from the system. Follow these steps to conduct a flow test:
- Turn off all faucets, appliances, and other devices that use water in your home.
- Locate the pressure tank and drain valve.
- Open the drain valve and collect the water in a container for one minute.
- Measure the amount of water collected in gallons.
- Calculate the flow rate by dividing the gallons collected by the test duration in minutes. For example, if you collect 5 gallons in 1 minute, the flow rate is 5 GPM.
- Compare the obtained flow rate with the specifications provided by the manufacturer. If it falls within the acceptable range, your deep well pump and pressure tank are operating correctly.
Note: If the flow rate is significantly lower than expected or falls outside the recommended range, you may need to troubleshoot and address any underlying issues.
Keeping Your Deep Well Pump And Pressure Tank In Good Condition
Regular maintenance is essential to ensure your deep well pump and pressure tank operate smoothly and efficiently. By following a few simple tasks, you can extend the lifespan of your equipment and prevent costly repairs. In this section, we will discuss regular maintenance tasks and troubleshooting common issues to keep your deep well pump and pressure tank in top-notch condition.
Regular maintenance tasks
Maintaining your deep well pump and pressure tank involves a few key tasks that you should perform on a regular basis. These tasks will help you identify and address any issues before they become major problems. Here are some important maintenance tasks to keep in mind:
- Inspecting the components: Regularly inspect the pump, pressure tank, and associated components for any signs of wear, damage, or corrosion. Pay close attention to the pump motor, pressure switch, pressure relief valve, and gauges.
- Cleaning the intake screen: The intake screen can accumulate debris over time, affecting the pump’s performance. Clean the screen to ensure proper water flow and prevent clogs.
- Checking the pressure: Periodically check the pressure in the tank using a pressure gauge. If the pressure is too low, it may indicate an issue with the pump or pressure switch. Adjust the pressure as necessary within the recommended range.
- Inspecting the pressure tank: Check the pressure tank for any air leaks. If you notice any leaks or signs of damage, it’s crucial to address them promptly to prevent further issues.
- Testing the pump’s performance: Run the pump periodically to ensure it is functioning properly. Listen for unusual noises or vibrations, which may signal a problem that requires attention.
Troubleshooting common issues and finding solutions
Even with regular maintenance, you may encounter occasional issues with your deep well pump and pressure tank. Troubleshooting these problems promptly can save you time and money. Here are some common issues you may face along with their possible solutions:
| Issue | Solution |
|---|---|
| No water flow | Check the power supply to ensure the pump is getting electricity. Inspect the pressure switch and make sure it is functioning properly. If necessary, replace the switch. |
| Low water pressure | Check the pressure tank for proper air pressure. Adjust or recharge the tank as needed. If the issue persists, you may need to clean or replace the pump’s impeller. |
| Frequent cycling | Examine the pressure switch and make sure it is set correctly. If necessary, adjust the cut-in and cut-out pressure settings. You may also need to replace the switch if it is faulty. |
| Strange noises or vibrations | Inspect the pump motor and bearings for any signs of damage or wear. Lubricate the motor bearings if needed. If the issue persists, you should contact a professional for further inspection and repair. |
By performing regular maintenance tasks and troubleshooting common issues, you can keep your deep well pump and pressure tank in optimal condition for years to come. Remember to consult the manufacturer’s guidelines and seek professional assistance if needed. Taking care of your equipment will not only save you money but also ensure a reliable water supply for your household or business.
Frequently Asked Questions
Do You Need A Well Pump With A Pressure Tank?
Yes, you need a well pump with a pressure tank. The pump is responsible for drawing water from the well, while the pressure tank ensures a steady supply of water by maintaining the water pressure in your plumbing system.
What Size Pressure Tank Do I Need For My Well Pump?
To determine the size of pressure tank you need for your well pump, consider the application, water usage, and pump capacity. In general, a 20-gallon tank is sufficient for a 1-2 bathroom residence, while a 30-gallon tank may be better for larger households.
How Do You Prime A Deep Well Pump With A Pressure Tank?
To prime a deep well pump with a pressure tank, follow these steps: 1. Make sure the pump is turned off. 2. Open the prime valve and fill the well casing with water. 3. Close the valve and turn on the pump.
4. Monitor the pressure gauge until it reaches the cutoff point. 5. Your deep well pump is now primed and ready to use.
How Does A Well Pump And A Pressure Tank Work Together?
A well pump and pressure tank work together by pumping water from the well into the tank, where it is stored under pressure. When a faucet is opened, the pressure tank delivers water to the house, and the pump kicks in to refill the tank as needed.
Conclusion
Installing a deep well pump and pressure tank may seem daunting, but with the right guidance, it can be a manageable task. By following the step-by-step instructions in this blog post, you now have the knowledge and resources to successfully complete the installation process.
Remember to prioritize safety, consult professionals when needed, and ensure proper maintenance for optimal functioning. With your newly installed deep well pump and pressure tank, you can enjoy a reliable and efficient water supply for your household needs.