
To install a curved shower rod without screws, use tension-mount brackets and follow the manufacturer’s instructions for setup. This method allows for easy installation and removal while still providing stability for the rod.
Enhancing the look and functionality of your bathroom doesn’t always require complex and time-consuming tasks. If you’re looking to upgrade your shower space with a curved shower rod but prefer not to use screws, there’s a simple and convenient alternative.
By using tension-mount brackets, you can easily install a curved shower rod without the need for any drilling or permanent fixtures. This hassle-free method offers the advantage of flexibility and stability while allowing for quick installation and removal. We will explore how to install a curved shower rod without screws, providing you with a comprehensive guide to achieve this transformation effortlessly.
Improving Shower Space And Comfort
A shower is a place where we seek relaxation and rejuvenation. It should provide ample space to move freely and a comfortable ambiance to unwind. However, outdated shower setups can often feel cramped and restrict our ability to enjoy a luxurious shower experience. Thankfully, there are simple solutions available, such as installing a curved shower rod without using screws. Not only does this solution maximize shower space, but it also reduces the risk of the shower curtain sticking to our bodies and enhances the overall comfort and functionality of the bathroom.
Maximizing shower space for a more enjoyable experience
When it comes to showering, space is a crucial factor that directly affects our comfort. A cramped shower space not only limits our movements but can also make us feel claustrophobic. By installing a curved shower rod without screws, you can instantly transform your shower area into a more spacious and enjoyable environment.
Reducing the risk of shower curtain sticking to the body
We’ve all experienced the annoyance of a shower curtain clinging to our bodies. Not only does it interrupt the flow of our shower routine, but it also feels uncomfortable. With a curved shower rod, you can eliminate this issue altogether. By curving the rod outward, the shower curtain stays further away from your body, reducing the risk of it sticking to you during your shower.
Enhancing the overall comfort and functionality of the bathroom
A bathroom should be a sanctuary, a space where one can relax and rejuvenate. By installing a curved shower rod, you not only improve the comfort and functionality of your shower area but also enhance the overall ambiance of the bathroom. The gentle curve of the rod adds a touch of elegance and sophistication, making your bathroom feel more inviting and stylish.
Avoiding The Use Of Screws
Installing a curved shower rod without screws can be a game-changer when it comes to bathroom renovations. Not only does it eliminate the need for drilling holes in the wall, but it also ensures the integrity of your bathroom tiles or walls. Let’s explore the advantages of opting for a screwless installation method for your curved shower rod.
Advantages of installing a curved shower rod without screws
When it comes to upgrading your bathroom, finding a way to avoid drilling holes in the wall can save you time, effort, and potential headaches. Here are some of the advantages of installing a curved shower rod without screws:
- Eliminating the need for drilling holes in the wall: One of the biggest advantages of a screwless installation method is that it eliminates the need for drilling holes in the wall. This means you don’t have to worry about damaging the structure of your bathroom or dealing with the hassle of repairing holes in the future. Instead, you can simply install the curved shower rod without any permanent alterations to your bathroom walls.
- Maintaining the integrity of the bathroom tiles or walls: Another benefit of avoiding screws is that it helps maintain the integrity of your bathroom tiles or walls. Drilling holes in the wall can potentially cause cracks or chips in the surrounding tiles or compromise the stability of the wall. By opting for a screwless installation method, you can ensure that your bathroom remains in pristine condition.
By considering these advantages of installing a curved shower rod without screws, you can make a well-informed decision about the right installation method for your bathroom. Whether you’re a homeowner looking to upgrade your bathroom or a renter who wants to add a touch of luxury without violating your lease agreement, a screwless installation method can provide you with a hassle-free solution. Remember, maintaining the integrity of your bathroom tiles or walls and avoiding the need for drilling holes are key factors in your decision-making process.
Necessary Tools And Materials
Identifying the items needed for the installation process
Before you begin installing a curved shower rod without screws, it’s crucial to gather all the necessary tools and materials. Having everything at hand ensures a smooth installation process and helps you avoid delays or interruptions. Here are the essentials you’ll need:
- Curved shower rod without screws
- Tape measure
- Pencil or marker
- Level
- Adjustable wrench or pliers
- Mounting brackets or adhesive
- All-purpose cleaner and rag (for prepping the installation area)
By ensuring you have these items ready, you’ll be well-prepared to tackle the installation and enjoy a beautifully curved shower rod without the need for screws.
Choosing the appropriate curved shower rod without screws
When selecting a curved shower rod without screws, it’s essential to consider a few factors to ensure a secure and stable installation. Here are a few key points to keep in mind:
- Length: Measure the width of your shower area to determine the appropriate length for the curved shower rod. Most models are adjustable to accommodate different sizes.
- Material: Look for a curved shower rod made of high-quality, durable materials such as stainless steel or aluminum. These materials are resistant to rust and corrosion, ensuring longevity.
- Weight capacity: Consider the weight capacity of the curved shower rod to ensure it can support your chosen shower curtain or liner without sagging or bending.
- Design and finish: Choose a curved shower rod that complements your bathroom decor and aesthetic preferences. There are various designs and finishes available, allowing you to find the perfect match.
By carefully selecting the appropriate curved shower rod without screws, you’ll enhance the overall appearance of your bathroom while enjoying the convenience of an easy, hassle-free installation process.
Ensuring you have the right tools for a seamless installation
Having the right tools for the installation of a curved shower rod without screws is vital for achieving a seamless outcome. Here are the tools necessary for a successful installation:
- Tape measure: Accurately measure the width and length of the shower area to ensure precise placement of the curved shower rod.
- Pencil or marker: Mark the positions where the mounting brackets or adhesive will be attached for easy and accurate installation.
- Level: Use a level to ensure the curved shower rod is properly aligned and not sloping or uneven.
- Adjustable wrench or pliers: Tighten and secure any connections or fittings as required during the installation process.
- Mounting brackets or adhesive: Depending on the specific curved shower rod you’ve chosen, you’ll need either mounting brackets or adhesive to secure it to the wall without the need for screws.
- All-purpose cleaner and rag: Clean the installation area thoroughly to ensure proper adhesion and an aesthetically pleasing final result.
By having these tools readily available, you’ll be equipped to effortlessly install a curved shower rod without screws and enjoy the benefits of a stylish and functional addition to your bathroom.
Preparing The Installation Area
Before you begin the installation process of a curved shower rod without screws, it is crucial to properly prepare the area. This will ensure a smooth and hassle-free installation, allowing you to enjoy your new shower rod in no time. The following steps will guide you through this preparatory stage:
Measuring the space and determining the ideal placement
The first step in preparing the installation area involves measuring the space in your shower to determine the ideal placement for your curved shower rod. Measure the length of the shower area and take note of any obstacles such as fixtures or shelves that may affect the placement of the rod. This will help you find the perfect spot for your rod, ensuring optimal functionality.
Clearing the shower area for easy access
Next, make sure to clear the shower area of any items that may hinder access. Remove all shampoo bottles, loofahs, and other shower accessories to create a open space. This will give you enough room to maneuver during the installation process and make the overall experience easier and more efficient.
Preparing the walls or tiles for the installation process
Now that you have measured the space and cleared the shower area, it’s time to prepare the walls or tiles for the installation of your curved shower rod. Take a close look at the surface where the rod will be mounted. If you have tiles, ensure they are clean and dry. If there are any loose or damaged tiles, consider repairing or replacing them to provide a solid foundation for the installation.
For walls, it’s essential to make sure they are clean and free from dirt, dust, or any other debris. You can use a mild cleaner and a soft cloth to wipe down the surface and remove any impurities that might affect the adhesion of the rod.
To enhance the adhesion of the rod and prevent any damage to your walls or tiles, it’s a good idea to consider using adhesive mounting brackets or tension-mounted rod options. These alternatives eliminate the need for screws and are excellent choices for those who are looking for a non-permanent or non-damaging installation method.
By following these steps and properly preparing the installation area, you’ll be one step closer to successfully installing your curved shower rod without screws. The next stage will involve positioning the rod and securing it in place, which we will cover in the next section.
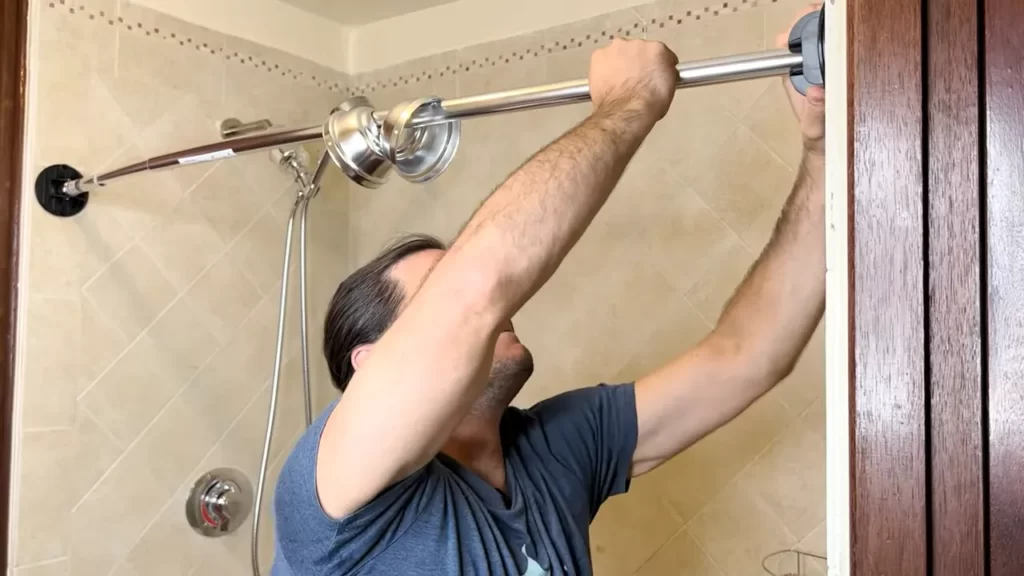
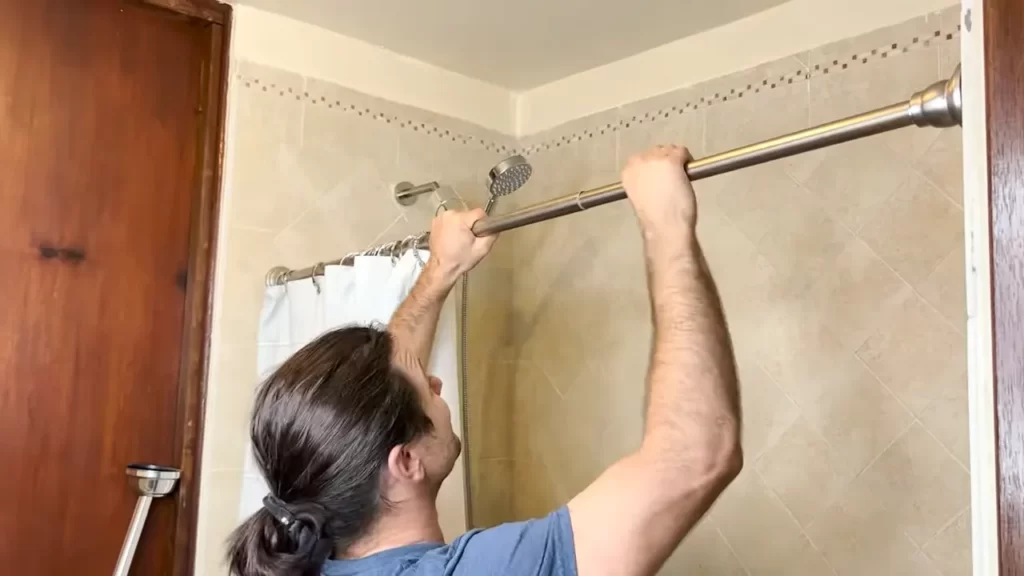
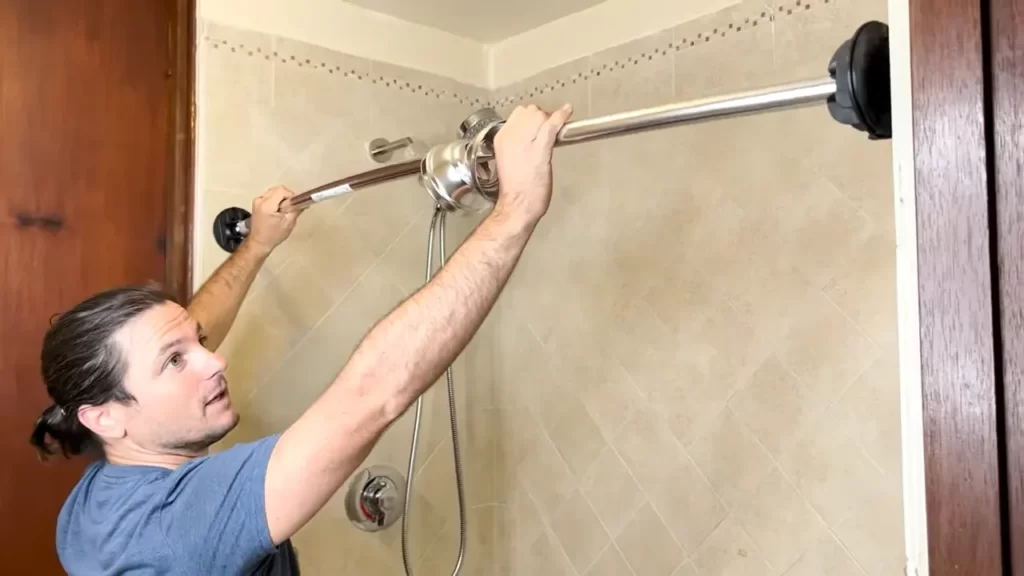
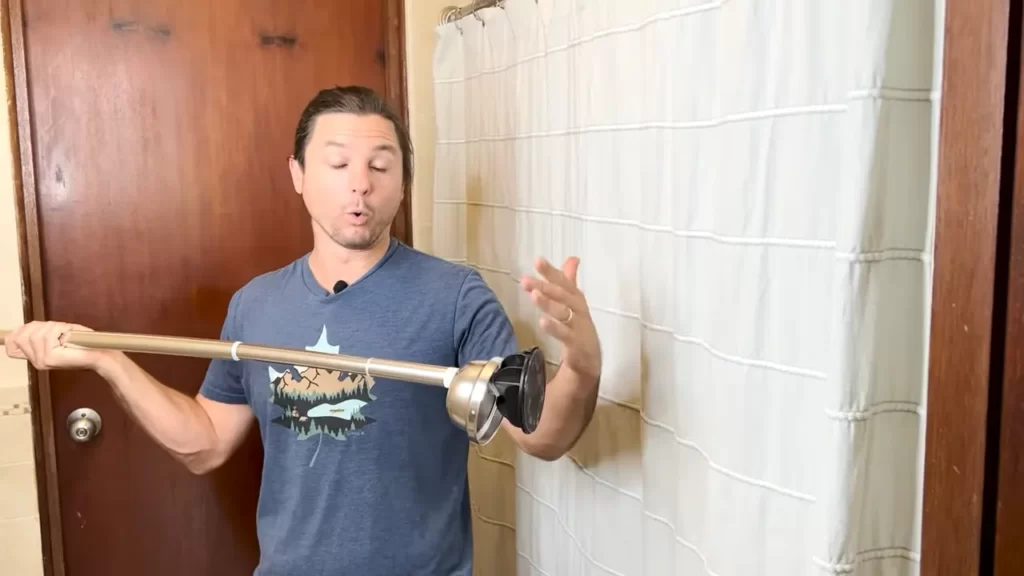
Installing A Tension-Mounted Curved Shower Rod
Welcome to our guide on installing a tension-mounted curved shower rod without screws! If you’re looking to add a touch of elegance and functionality to your bathroom, a curved shower rod is a great choice. Not only does it provide more space in your shower, but it also creates a luxurious and inviting atmosphere. In this section, we’ll walk you through the process of installing a tension-mounted curved shower rod without the need for any screws. Let’s get started!
Understanding the Concept and Benefits of Using Tension-Mounted Rods
Tension-mounted curved shower rods are designed to stay in place through tension, using adjustable spring-loaded mechanisms. They offer several benefits compared to traditional screw-mounted rods. Firstly, they are incredibly easy to install and remove, requiring no drilling or damage to your walls. This makes them a great option for renters or those who prefer a non-permanent solution. Additionally, tension-mounted rods are highly adjustable, allowing you to customize the fit to your specific shower area. They are also known for their durability and stability, ensuring your rod stays securely in place.
Step-by-Step Instructions on Installing a Tension-Mounted Curved Shower Rod Without Screws
- Start by measuring the width of your shower area to determine the appropriate length for your curved shower rod. Most tension-mounted rods are adjustable, so choose a size that fits your shower’s dimensions.
- Once you’ve selected the right size, extend the rod fully to its maximum length. This will help ensure a snug fit when installed.
- Position the rod at the desired height along the shower wall. It’s recommended to have the rod slightly higher than the showerhead to prevent water from splashing outside.
- Gently twist the rod clockwise to tighten it against the walls. The tension rod should remain in place securely without any wobbling.
- Adjust the rod’s length as needed to create the ideal curvature for your shower curtain.
- Hang your shower curtain and test the rod’s stability. Make any necessary adjustments to the tension by twisting it slightly until you feel it securely in place.
Adjusting the Tension for a Secure and Stable Installation
Ensuring the proper tension is crucial for a secure and stable installation of your curved shower rod. If the rod feels loose or wobbly, it may not be under enough tension. Follow these steps to adjust the tension:
- Loosen the rod by twisting it counterclockwise slightly.
- Extend the rod’s length as much as possible.
- Gently twist the rod clockwise again, this time with a bit more force.
- Continue tightening until you feel a secure and stable fit against the walls.
Remember to test the rod’s stability after making adjustments and ensure it stays securely in place. Adjusting the tension may require a few attempts to achieve the perfect fit, so be patient in the process.
Installing a tension-mounted curved shower rod without screws is a simple and hassle-free way to upgrade your bathroom. By following these step-by-step instructions and adjusting the tension for a secure fit, you’ll be able to enjoy the benefits of a stylish and functional curved shower rod in no time.
Installing An Adhesive-Backed Curved Shower Rod
A curved shower rod can add both style and functionality to your bathroom. Typically, installing one involves drilling screws into the wall, which may not be an option for everyone. However, with the advent of adhesive-backed shower rods, you can now achieve a secure and screw-free installation. In this article, we will guide you through the step-by-step process of installing an adhesive-backed curved shower rod and provide tips for maximizing its adhesive strength and longevity.
Utilizing adhesive backing for a secure and screw-free installation
Adhesive-backed curved shower rods offer a convenient alternative to traditional screw-mounted rods. The adhesive is specifically designed to create a strong bond between the rod and the shower wall, ensuring stability and durability. By using this installation method, you can avoid drilling into the wall and causing any potential damage. Follow the step-by-step instructions below to install your adhesive-backed curved shower rod with ease.
Step-by-step instructions on installing an adhesive-backed curved shower rod
Installing a curved shower rod without screws is a straightforward process that can be completed in a few simple steps:
- Clean the wall surface: Before applying the adhesive, ensure that the wall surface is clean, dry, and free of any dust or residue. Use a mild cleaner and a cloth or sponge to remove any dirt or grime.
- Measure and mark the placement: Take measurements to determine the ideal position for your curved shower rod. Use a pencil or a marker to make small marks on the wall to indicate where the adhesive pads will be placed.
- Prepare the adhesive: Carefully follow the instructions provided with your adhesive-backed curved shower rod to activate the adhesive. Some adhesives require mixing or shaking, while others may come pre-mixed.
- Apply the adhesive: Apply a sufficient amount of adhesive to the backing pads provided with your curved shower rod. Ensure that the adhesive is evenly spread, covering the entire surface of the pads.
- Attach the adhesive pads: Press the adhesive pads firmly onto the marked areas of the wall, aligning them with the measurements you made earlier. Apply steady pressure to ensure that the pads adhere securely.
- Secure the curved shower rod: Attach the curved shower rod to the adhesive pads by gently pressing the rod against the pads. Hold it in place for a few seconds to allow for proper bonding.
- Allow the adhesive to cure: Follow the recommended curing time specified by the adhesive manufacturer. This will ensure that the bond between the adhesive pads and the wall is strong and secure.
Maximizing the adhesive’s strength and longevity
To ensure a long-lasting and secure installation, consider the following tips:
- Choose a high-quality adhesive: Opt for a reputable brand that is specifically formulated for shower rod installation. This will ensure the adhesive’s strength and longevity.
- Read and follow the manufacturer’s instructions: Each adhesive product may have specific instructions, curing times, and weight limitations. Adhering to these guidelines will help maximize the adhesive’s effectiveness.
- Avoid excessive weight on the rod: While adhesive-backed curved shower rods are designed to be sturdy, it is advisable not to hang heavy items on them. This will help prevent unnecessary strain on the adhesive bond.
- Regularly inspect the installation: Check the adhesive pads and the overall stability of the curved shower rod periodically. If you notice any signs of loosening or damage, address them promptly to maintain a secure installation.
By following these step-by-step instructions and tips, you can install an adhesive-backed curved shower rod without the need for screws while ensuring a secure and long-lasting installation.
Other Screw-Free Installation Options
When it comes to installing a curved shower rod without screws, there are various options to choose from. Not everyone wants to drill holes into their bathroom walls or tiles, and luckily, there are alternative methods available. In this blog post, we will explore some of these screw-free installation options that offer convenience and versatility.
1. Exploring alternative methods of installing a curved shower rod without screws
If you are looking for an option that doesn’t require screws, there are a few alternatives to consider. These methods offer a temporary or versatile installation that can be easily removed or adjusted when needed. By exploring these options, you can find the best fit for your bathroom and personal preferences.
2. Using tension straps or hooks for temporary installations
Tension straps or hooks are an excellent choice for those who prefer a temporary installation without the need for screws. These options work by securely attaching the shower rod to the walls through tension, eliminating the need for drilling. To install using tension straps or hooks:
- Measure the desired height and width for your curved shower rod.
- Extend the tension straps or hooks across the shower area, ensuring they are securely anchored on each side.
- Place the curved shower rod onto the tension straps or hooks, ensuring it is properly aligned.
- Tighten the tension straps or hooks until the shower rod feels secure.
This method allows for easy installation and removal, making it a popular choice for those who frequently change their bathroom setups or live in rental properties.
3. Considering magnetic or suction cup-based options for versatility
If you are looking for versatility in your curved shower rod installation, magnetic or suction cup-based options may be suitable. These options offer a secure hold without the need for screws, making them easy to install and remove as needed. Here are some steps to follow when considering magnetic or suction cup-based options:
- Choose a curved shower rod that is compatible with magnetic or suction cup-based installation.
- Ensure that the surface you will be attaching the rod to is smooth and clean.
- Place the magnetic or suction cup-based attachments onto the wall surface, following the manufacturer’s instructions.
- Securely attach the curved shower rod to the magnetic or suction cup-based attachments.
These options offer the flexibility to adjust or reposition the curved shower rod, allowing you to find the perfect fit for your bathroom without the need for permanent screws.
By exploring these screw-free installation options, you can find a method that suits your preferences and bathroom requirements. Whether you prefer a temporary installation using tension straps or hooks or desire the versatility of magnetic or suction cup-based options, there are alternatives available to help you install your curved shower rod without screws.
Maintenance And Troubleshooting
Proper care and maintenance are essential to extend the lifespan of your curved shower rod. By following these guidelines, you can ensure a secure and functional installation for years to come.
Proper care and maintenance to extend the lifespan of the curved shower rod
To keep your curved shower rod in optimal condition, consider the following maintenance tips:
- Regular cleaning: Clean the rod with a mild soap and water solution to remove any soap scum or dirt buildup. Avoid using abrasive cleaners as they may scratch the surface.
- Avoid excessive weight: Do not hang heavy objects from the shower rod as it may cause sagging or damage. This includes wet towels or clothing.
- Inspect for rust or corrosion: Periodically check the rod for any signs of rust or corrosion. If you notice any, gently remove it using a soft cloth and a rust remover.
- Tighten fittings regularly: Over time, the fittings on the curved shower rod may loosen. To prevent slippage or loosening, regularly check and tighten the fittings using a wrench or pliers.
- Keep the area dry: Excessive moisture can lead to mold and mildew growth on the shower rod. After each use, make sure to wipe down the rod to keep it dry.
Addressing common issues, such as slippage or loosening
If you experience slippage or loosening of the curved shower rod, consider the following solutions:
- Check the fittings: Ensure that all fittings are securely tightened. If they are loose, use a wrench or pliers to tighten them.
- Add anti-slip pads: To prevent slippage, consider adding anti-slip pads to the ends of the rod where it comes into contact with the wall.
- Replace worn-out fittings: If the fittings are worn out or damaged, consider replacing them with new ones to ensure a secure fit.
- Consult a professional: If you have tried these troubleshooting techniques and the issue persists, it may be necessary to consult a professional for further assistance.
Troubleshooting techniques to ensure a secure and functional installation
If you encounter any issues during the installation process, be sure to address them promptly to ensure a secure and functional shower rod installation. Consider the following troubleshooting techniques:
- Double-check measurements: Make sure that the measurements for the curved shower rod are accurate before installation. Incorrect measurements can result in an unstable or ill-fitting rod.
- Use proper installation techniques: Follow the manufacturer’s instructions carefully to install the curved shower rod correctly. Improper installation techniques can lead to slippage or other issues.
- Securely fasten the brackets: Ensure that the brackets are securely fastened to the wall using the provided hardware. Use a level to ensure they are straight and aligned properly.
- Test the stability: Once the rod is installed, give it a gentle tug to ensure that it is stable and secure. If it moves or feels loose, recheck the installation and make any necessary adjustments.
- Seek professional help if needed: If you are unsure about any aspect of the installation or encounter difficulties, do not hesitate to seek professional help. A professional can ensure a secure and functional installation.
By following these maintenance tips and troubleshooting techniques, you can enjoy a secure and functional curved shower rod installation without the need for screws. Keep your bathroom stylish and your shower experience enjoyable.
Enhancing Your Shower Experience
A curved shower rod not only adds a touch of elegance to your bathroom but also enhances your shower experience. The unique design of the curved rod provides additional space, allowing you to move freely while showering. In this blog post, we will explore various ways to enhance your shower experience with a curved shower rod, including implementing additional accessories, selecting the perfect shower curtain, and creating a spa-like atmosphere.
Implementing additional accessories, such as shower curtain rings or hooks
Adding accessories to your curved shower rod can make a significant difference in both functionality and style. Shower curtain rings or hooks are an excellent way to streamline the installation process and prevent your curtains from falling off. These accessories slide effortlessly onto the rod, ensuring a secure and hassle-free showering experience.
Tips for selecting the perfect shower curtain to complement your curved rod
When it comes to selecting a shower curtain for your curved rod, it’s essential to consider both style and functionality. Here are a few tips:
- Measure the length and width of your curved rod to ensure the curtain will provide adequate coverage.
- Choose a curtain made of water-resistant material to prevent water from leaking onto your bathroom floor.
- Consider the color and pattern of the curtain to complement your bathroom decor.
- Opt for a curtain with reinforced holes or grommets for added durability.
Creating a spa-like atmosphere with the right shower curtain and rod combination
Transforming your bathroom into a spa-like retreat is easy with the right combination of shower curtain and rod. Consider these essentials:
- Choose a sheer or light-colored curtain to allow natural light to filter through, creating a serene ambiance.
- Select a shower rod with an adjustable length feature, allowing you to customize the height and position according to your preference.
- Pair your curved rod with a soft fabric or textured curtain for a luxurious and inviting look.
- Include additional elements like scented candles or bath oils for a truly indulgent shower experience.
In conclusion, installing a curved shower rod without screws can significantly enhance your shower experience. By implementing additional accessories, selecting the perfect shower curtain, and creating a spa-like atmosphere, you can transform your daily shower routine into a revitalizing and luxurious escape.
Frequently Asked Questions
How Do You Install A Shower Curtain Rod Without Drilling?
To install a shower curtain rod without drilling, you can try using tension rods. These rods can be adjusted to fit between the walls of your shower. Simply twist or extend the rod until it fits securely, then hang your curtain.
No drilling required!
How Do You Secure A Curved Shower Rod?
To secure a curved shower rod, first measure and mark the placement of the brackets. Drill pilot holes and attach the brackets with screws. Align the rod with the brackets and secure it in place with screws or tension mounts.
Finally, adjust the rod’s length and ensure it is level before using.
Do You Need Screws For Shower Rod Installation?
Yes, you need screws for shower rod installation. They secure the rod to the wall.
How Far In Do You Install A Curved Shower Rod?
Install a curved shower rod approximately 6-12 inches into the wall, ensuring a secure and sturdy fit.
Conclusion
Installing a curved shower rod without screws can be a simple and effective way to upgrade your bathroom. With just a few basic tools and some easy-to-follow steps, you can achieve a sleek and modern look without the need for complicated drilling or hardware.
By utilizing tension and adhesive options, you can customize your shower space without compromising your walls. So say goodbye to unsightly screw holes and hello to a stylish and functional bathroom!