To install a commercial toilet, first, locate the water supply and shut it off. Then, remove the old toilet, place the wax ring on the flange, and position the new toilet over it, securing it with bolts and nuts.
Secondly, attach the water supply line and turn on the water. Finally, test the toilet by flushing and checking for any leaks. Installing a commercial toilet may seem like a daunting task, but with a few simple steps, you can complete the process efficiently.
Whether you’re replacing an old toilet or installing a new one, this guide will walk you through the installation process, ensuring you have a properly functioning toilet in no time. By following the steps outlined here, you’ll be able to tackle this project with confidence and minimal hassle. So, let’s dive into the details and learn how to install a commercial toilet effectively.
Understanding Commercial Toilets: A Brief Overview
Commercial toilets are an essential component of any business or commercial space. These toilets are specifically designed to withstand heavy usage and meet the demands of high-traffic environments. Understanding the different types of commercial toilets available can help you make an informed decision when it comes to installing one in your space. In this article, we will provide a brief overview of the different types of commercial toilets, including wall-mounted toilets, floor-mounted toilets, and dual-flush toilets.
Types of Commercial Toilets
Wall-Mounted Toilets
Wall-mounted toilets are a popular choice in commercial spaces, thanks to their space-saving design and sleek appearance. As the name suggests, these toilets are mounted directly on the wall, rather than resting on the floor. This design allows for easy cleaning of the floor area, as well as provides a modern and streamlined look to the restroom. Additionally, wall-mounted toilets are often more durable and easier to maintain compared to traditional floor-mounted toilets.
Floor-Mounted Toilets
Floor-mounted toilets, also known as floor-standing toilets, are the more traditional option found in many commercial spaces. These toilets are directly attached to the floor and often feature a exposed plumbing, which can be covered with a decorative base or pedestal. Floor-mounted toilets are typically sturdier and provide a classic aesthetic to the restroom. They are also easier to install, making them a convenient choice for many commercial establishments.
Dual-Flush Toilets
Dual-flush toilets are becoming increasingly popular in commercial spaces due to their water-saving capabilities. These toilets offer two flushing options: a full flush for solid waste and a reduced flush for liquid waste. This dual-flush system helps conserve water, making it an eco-friendly option for businesses looking to reduce their water consumption. In addition to being environmentally friendly, dual-flush toilets are also cost-effective in the long run, as they lower water bills without sacrificing performance.
In conclusion, understanding the different types of commercial toilets available can help you choose the best option for your business or commercial space. Whether you opt for the sleek and space-saving wall-mounted toilets, the classic floor-mounted toilets, or the water-efficient dual-flush toilets, investing in a high-quality commercial toilet is crucial to ensure the comfort and convenience of your customers and employees.

Preparing For Installation: Checklist And Safety Measures
Assessing the Installation Area
Before installing a commercial toilet, it is important to carefully assess the installation area to ensure a smooth and successful installation process. By conducting a thorough assessment, you can identify any potential issues or obstacles that may need to be addressed beforehand. Here is a comprehensive checklist to guide you through the assessment process:
- Check the flooring: Ensure that the floor is level and sturdy enough to support the weight of the toilet.
- Measure the dimensions: Determine the dimensions of the installation area to ensure that the toilet will fit properly.
- Consider accessibility: Make sure there is enough space around the toilet for comfortable use and any necessary accessibility requirements.
- Inspect the plumbing: Assess the existing plumbing connections to ensure they are in good condition and compatible with the commercial toilet.
- Check for obstructions: Look for any pipes, electrical outlets, or other obstructions that may interfere with the installation process.
Ensuring Proper Plumbing Connections
Proper plumbing connections are crucial for the successful installation and functioning of a commercial toilet. Follow these steps to ensure that the plumbing connections are in order:
- Inspect the water supply: Check if the water supply line is in good condition and properly aligned with the toilet’s inlet.
- Consider shut-off valves: Determine if there are shut-off valves present near the installation area, allowing for easy water supply control.
- Apply plumber’s tape: Use plumber’s tape to seal the threaded connections and prevent any leaks.
- Test the connections: Prior to installation, turn on the water supply momentarily to check for any leaks or malfunctions.
- Ensure proper drainage: Make sure that the drainage system is clear and functioning properly to avoid any potential blockages.
Measuring the Space for the Toilet
Accurate measurements are crucial when it comes to installing a commercial toilet. Make sure to measure the space available in the installation area to ensure a proper fit. Here’s how you can do it:
- Measure the width and depth: Use a measuring tape to determine the width and depth of the available space for the toilet.
- Consider clearances: Leave enough space between the toilet and surrounding walls or fixtures for convenient usage.
- Check for centered alignment: Ensure that the toilet is centered properly in the installation area to maintain balance and stability.
- Review manufacturer’s specifications: Refer to the manufacturer’s instructions for any specific measurements or requirements.
Gathering the Necessary Tools
Before beginning the installation process, gather all the necessary tools to ensure smooth progress. Having the right tools on hand can save you time and frustration. Here are the essential tools you will need:
- Adjustable wrench: An adjustable wrench will be useful for tightening bolts and nuts during the installation process.
- Screwdriver: A screwdriver is necessary for securing various components of the toilet.
- Plumber’s tape: Plumber’s tape will help you create watertight connections between different plumbing components.
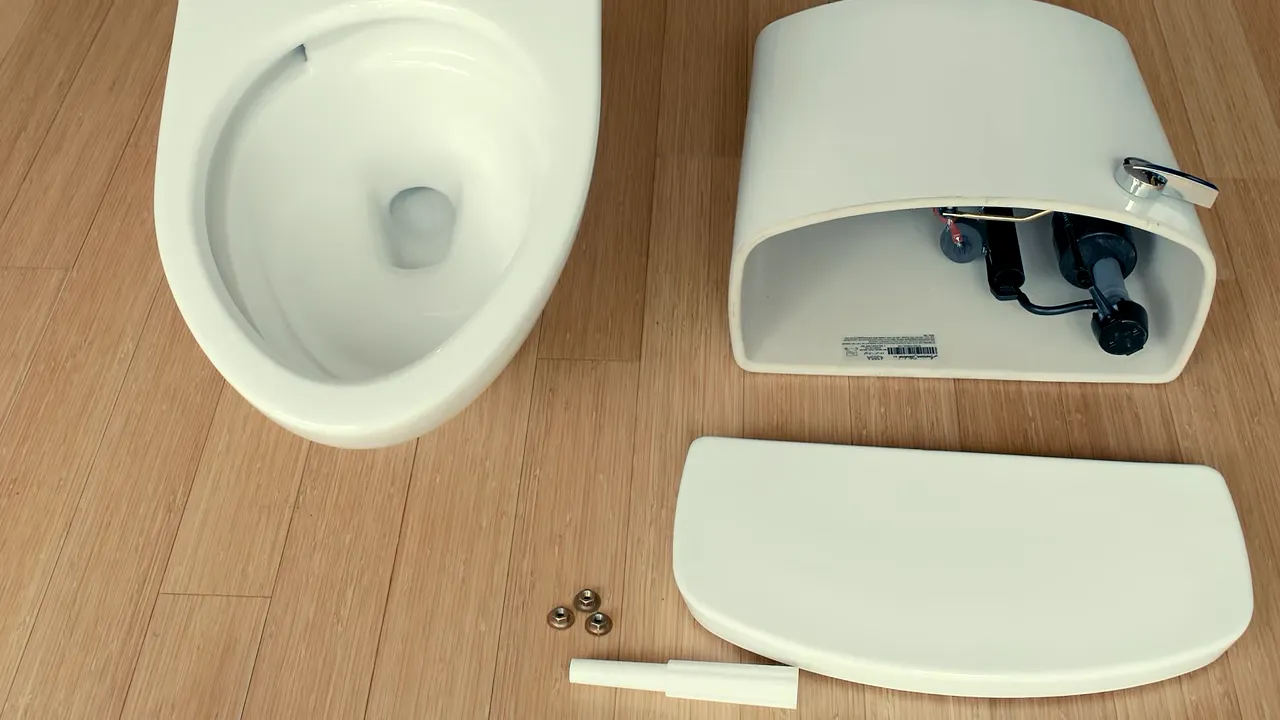
- Wax ring: A wax ring is essential for sealing the connection between the toilet and the floor drain.
- Bolts and nuts: These hardware items are crucial for securing the toilet to the floor flange.
By following these checklist items and safety measures, you can ensure a smooth and successful installation of a commercial toilet. Remember to always prioritize safety and accuracy during the installation process to avoid any potential issues or complications.
Step-By-Step Installation Process
Installing a commercial toilet may seem like a daunting task, but with the right knowledge and tools, you can tackle it successfully. In this step-by-step guide, we will walk you through the installation process, from start to finish, ensuring your new commercial toilet is installed correctly and ready for use. Let’s get started!
Removing the old toilet
The first step in the installation process is to remove the old toilet. Start by shutting off the water supply and draining the toilet tank. Disconnect the water supply line and remove the toilet bolts that secure the toilet to the floor.
Shutting off the water supply
To shut off the water supply, locate the shut-off valve typically located behind the toilet near the floor. Turn the valve clockwise until it is fully closed. This will prevent water from flowing into the toilet during the installation process.
Draining the toilet tank
To drain the toilet tank, flush the toilet and hold down the flush lever until all the water has emptied from the tank. You may need to use a sponge or towel to remove any remaining water.
Disconnecting the water supply line
Use an adjustable wrench to loosen the nut connecting the water supply line to the bottom of the toilet tank. Once loosened, you can remove the supply line from the tank.
Preparing the installation area
Before installing the new toilet, it’s important to prepare the installation area. Remove any debris or old wax from the flange, ensuring it is clean and level.
Cleaning the flange
Using a putty knife or scraper, gently clean the flange, which is the pipe fitting on the floor that connects to the toilet. Remove any old wax or residue to create a clean surface for the new wax ring.
Installing the wax ring
Take the new wax ring and place it over the flange, ensuring it is centered. Press down firmly to create a seal between the flange and the toilet.
Installing the new toilet
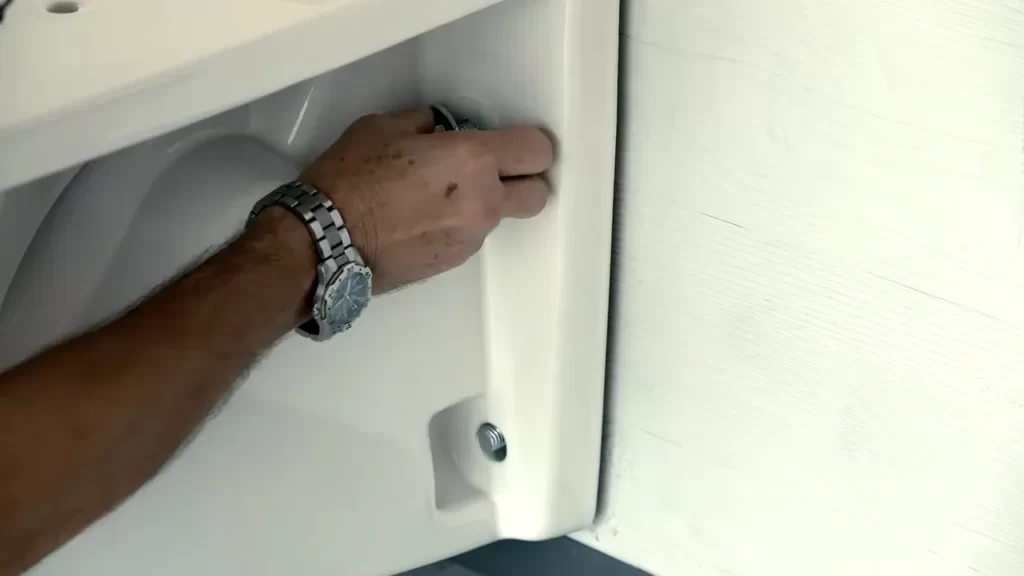
Now it’s time to install the new toilet. Carefully lift the toilet bowl and align it with the wax ring and toilet bolts. Lower the bowl onto the wax ring, ensuring it is centered and level.
Securing the toilet bolts
Once the toilet bowl is in place, secure it by tightening the toilet bolts. Use a wrench to tighten the nuts, but be careful not to overtighten, as this can damage the toilet.
Connecting the water supply line
Reconnect the water supply line to the bottom of the toilet tank. Use an adjustable wrench to tighten the nut and ensure a secure connection.
Testing for leaks
Before finishing the installation, it’s important to test for leaks. Turn on the water supply valve and allow the tank to fill. Check for any signs of water leakage around the base of the toilet or at the connection points.
Securing the toilet seat
Once you have confirmed there are no leaks, you can secure the toilet seat. Attach the seat and lid according to the manufacturer’s instructions, ensuring they are aligned properly.
Adjusting the seat for comfort
Finally, adjust the seat for comfort. Make sure it is level and secure, considering the needs of your users. This is an important step to ensure the toilet is user-friendly and comfortable for all who will be using it.

Additional Tips And Troubleshooting
Installing a commercial toilet may seem like a daunting task, but with the right knowledge and techniques, you can do it successfully. However, even after installation, there are some important tips to keep in mind and potential troubleshooting issues to be aware of. In this section, we will discuss how to properly maintain the commercial toilet, including regular cleaning and sanitizing, checking for leaks and cracks, dealing with common installation issues, uneven toilet installation, proper sealing of the wax ring, and resolving water pressure problems.
Maintaining the commercial toilet
Maintaining a commercial toilet is crucial for its longevity and optimal performance. Regular cleaning and sanitizing can prevent the build-up of dirt, grime, and bacteria. Here are some key points to remember:
- Clean the toilet bowl, seat, and lid with a suitable disinfectant cleaner.
- Remove any stains or mineral deposits using a mild abrasive cleaner.
- Regularly clean the exterior of the toilet, including the tank and base.
- Replace worn-out parts such as toilet flappers or handles to prevent leaks and malfunctions.
Checking for leaks and cracks
Leaks and cracks can cause significant damage if not detected and addressed promptly. Regularly inspect your commercial toilet for any signs of leaks or cracks by following these steps:
- Check for water seepage around the base of the toilet or pooling water on the floor.
- Listen for the sound of running water when the toilet is not in use.
- Examine the toilet bowl and tank for any visible cracks or damage.
- Tighten any loose connections or fittings that may be causing leaks.
Dealing with common installation issues
Occasionally, you may encounter some installation issues with your commercial toilet. Here are two common problems and their solutions:
- Uneven toilet installation: If your toilet feels wobbly or unstable, it may not be properly leveled. To fix this, place shims under the toilet base until it is stable and level.
- Proper sealing of the wax ring: The wax ring provides a watertight seal between the toilet and the floor. Ensure the wax ring is installed correctly and is not damaged or misaligned. This will prevent leaks and odors from escaping.
Resolving water pressure problems
Water pressure issues can affect the flushing efficiency and overall performance of your commercial toilet. To resolve these problems, consider the following:
- Check the water supply valve to ensure it is fully open.
- Inspect the fill valve for any clogs or debris that may hinder water flow.
- If the water pressure is consistently low, contact a professional plumber to assess and fix the issue.
By following these additional tips and troubleshooting techniques, you can ensure that your commercial toilet remains in optimal condition and provides reliable performance for years to come.
Frequently Asked Questions
Can You Install A Commercial Toilet In A Home?
Yes, you can install a commercial toilet in a home. Commercial toilets are designed for high-traffic areas, but they can be installed in residential settings if desired. However, keep in mind that they may be larger and more expensive than standard residential toilets.
Is There A Difference Between A Commercial Toilet And A Residential Toilet?
Yes, there is a difference between a commercial toilet and a residential toilet. Commercial toilets are designed for high-traffic areas, like offices or restaurants, and are more durable and efficient. Residential toilets, on the other hand, are designed for home use and may have different features and aesthetics.
What Is Standard Rough In For Commercial Toilet?
Standard rough in for commercial toilets is commonly 12 inches. This refers to the distance between the finished wall and the centerline of the toilet drain opening.
How Do Commercial Toilet Flush Valves Work?
Commercial toilet flush valves work by using a pressurized water source to flush waste and refill the toilet bowl. When the toilet handle is pushed, it opens a valve that releases the water, creating a powerful flush. The valve then shuts off, allowing the tank to refill for the next use.
Conclusion
To wrap up, installing a commercial toilet may seem like a daunting task, but with the right guidance and tools, it can be a smooth process. Make sure to prepare the area beforehand, carefully follow the manufacturer’s instructions, and take all necessary safety precautions.
By doing so, you’ll have a functional and reliable toilet that meets the demands of a commercial environment. Happy installing!