To install a channel drain in concrete, mark the desired location on the surface and use a saw to cut a trench. Then, select the appropriate channel drain and securely place it in the trench, making sure it is level.
(21 words) Installing a channel drain in concrete is a straightforward process that can help to prevent water pooling and potential damage. By following a few simple steps, you can effectively redirect excess water away from your property and keep your surroundings dry and safe.
In this guide, we will outline the steps needed to successfully install a channel drain in a concrete surface. From marking the location to securing the drain, you’ll learn everything you need to know to complete the installation with ease. So, let’s get started on creating a more efficient drainage system for your concrete area. (120 words)
The Role Of Channel Drains In Preventing Water Accumulation
Explanation of how water accumulation can lead to damage in concrete structures
Water accumulation can have serious consequences on concrete structures. When water is allowed to accumulate and pool, it can seep into the pores and cracks of the concrete, causing it to weaken and deteriorate over time. This can lead to a variety of issues, such as:
- Cracking: Excess moisture can cause the concrete to expand and contract, resulting in cracks that compromise the structural integrity of the surface.
- Erosion: Over time, the constant presence of water can erode the concrete, wearing it down and creating uneven surfaces.
- Discoloration: Water accumulation can also lead to unsightly stains and discoloration, marring the appearance of the concrete.
- Mold and mildew growth: Moisture creates a damp environment that is conducive to the growth of mold and mildew. This can not only be unsightly but also pose health risks.
To prevent these issues and ensure the longevity of concrete structures, it is crucial to address water accumulation effectively.
Introduction to the concept of channel drains as a solution
Channel drains offer an effective solution to combat water accumulation and mitigate the potential damage it can cause. They are designed to divert excess water away from concrete surfaces, preventing it from pooling and infiltrating the structure.
Channel drains consist of a u-shaped trench that is installed in concrete, along with a grate to cover the trench. The trench collects and channels the water away, while the grate allows for surface drainage.
By installing channel drains strategically, you can create an efficient drainage system that helps to maintain the integrity of your concrete structures. These drains are particularly useful in areas prone to heavy rainfall, such as driveways, patios, and walkways.
How Channel Drains Prevent Water Accumulation
Channel drains function by creating a path for water to flow away from the concrete surface. When it rains or when excess water is present, the water naturally flows into the trench through the grate. From there, it is directed towards a proper drainage system, such as a storm drain or a designated area designed for water runoff.
The installation of channel drains in concrete involves cutting a trench to the desired length and width, applying a concrete bonding agent to ensure a secure fit, and placing the channel drain into the trench. Once installed, the channel drain and the surrounding concrete are typically sealed to provide optimal performance and prevent damage.
Installing channel drains in concrete is a cost-effective and reliable way to prevent water accumulation and protect your concrete structures from potential damage. With proper installation and regular maintenance, channel drains can ensure that water is effectively drained away, preserving the integrity and appearance of your concrete surfaces for years to come.

Benefits Of Installing A Channel Drain In Concrete
When it comes to protecting your property from potential water damage, a channel drain installed in concrete can be an effective solution. This drainage system not only helps to prevent water accumulation but also offers a range of other benefits. In this section, we will discuss the advantages of installing a channel drain in concrete, focusing on how it improves safety, efficiency, and durability.
Overview of the advantages of channel drains in terms of preventing water damage
1. Prevents water accumulation: One of the primary benefits of a channel drain is its ability to prevent water accumulation on your property. By redirecting the flow of water away from sensitive areas such as your basement, garage, or outdoor living spaces, it helps to minimize the risk of water damage.
2. Reduces the potential for flooding: During heavy rain or storms, water can quickly accumulate and cause flooding. By installing a channel drain, you can effectively manage the flow of water and reduce the potential for flooding, keeping your property safe and dry.
3. Protects the foundation: Excessive water accumulation near the foundation can lead to structural damage over time. A channel drain installed in concrete helps to direct water away from the foundation, ensuring its stability and longevity.
Discussion of improved safety, efficiency, and durability
1. Enhanced safety: By preventing the accumulation of water, a channel drain significantly reduces the risk of slips, trips, and falls. It keeps your walkways, driveways, and other areas free from standing water, providing a safer environment for you and your loved ones.
2. Increased efficiency: Channel drains efficiently collect and redirect water to designated drainage areas. By efficiently managing the flow of water, they prevent clogs and blockages, reducing the need for frequent maintenance and ensuring smooth functioning.
3. Long-lasting durability: Channel drains installed in concrete are built to last. The material’s strength and resilience make it resistant to wear and tear, enabling the drain to withstand heavy loads and the constant flow of water without losing its effectiveness.
To summarize, the installation of a channel drain in concrete offers multiple benefits. It prevents water accumulation, reduces the potential for flooding, protects the foundation, enhances safety, increases efficiency, and ensures long-lasting durability. Whether you are looking to safeguard your property from water damage or improve overall functionality, a channel drain in concrete is a valuable addition.
Assessing The Drainage Needs And Selecting The Right Channel Drain
Steps to Evaluate the Existing Drainage Issues and Determine the Type of Channel Drain Required
When it comes to installing a channel drain in concrete, assessing your drainage needs is crucial. By evaluating the existing drainage issues in your outdoor space, you can determine the type of channel drain that will effectively address the problem. Follow these steps to ensure a successful installation:
- Identify the areas in your yard that experience excessive water accumulation. Look for signs of ponding or pooling, as well as areas where water flows towards your home or structure.
- Observe how water is currently being drained in your outdoor space. Are there existing drainage systems or gutters in place? Note any inefficiencies or areas where the drainage is inadequate.
- Measure the amount of water that accumulates during heavy rainfall or when irrigation systems are in use. This will help determine the capacity of the channel drain required to handle the water volume.
- Inspect the type of surface where the channel drain will be installed. Is it concrete, asphalt, pavers, or another material? The surface material will influence the installation process and the type of channel drain that can be used.
Factors to Consider When Choosing the Material, Size, and Design of the Channel Drain
Selecting the right channel drain involves considering various factors that contribute to its effectiveness. Keep the following considerations in mind to ensure you choose the most suitable material, size, and design for your channel drain:
- Material: The material of the channel drain should be durable, corrosion-resistant, and able to withstand the elements. Common materials include polymer, stainless steel, and fiberglass.
- Size: The size of the channel drain should be determined based on the anticipated water volume and the surface area to be drained. Consider the width, depth, and flow rate capacity of the channel drain when making your selection.
- Design: The design of the channel drain should complement your outdoor space while effectively capturing and redirecting water. Choose from options such as grate style, slotted channels, or decorative grates, ensuring they are compatible with your surface material.
By evaluating the existing drainage issues and carefully selecting the right material, size, and design of the channel drain, you can ensure efficient water management in your outdoor space. Take the time to assess your needs and make an informed decision to prevent future drainage problems and protect your property.
Gathering The Necessary Tools And Materials
Before you embark on the task of installing a channel drain in concrete, it’s important to gather all the essential tools and materials you’ll need for a smooth and efficient installation process. By ensuring that you have everything readily available, you can save yourself time and frustration during the installation.
List of essential tools and materials needed for the installation process
To get started, here is a comprehensive list of the tools and materials you’ll need:
- Measuring tape or ruler
- Chalk or marking paint
- Hammer
- Masonry drill bit
- Circular saw or concrete cutter
- Trowel
- Level
- Rubber mallet
- Wire brush
- Broom
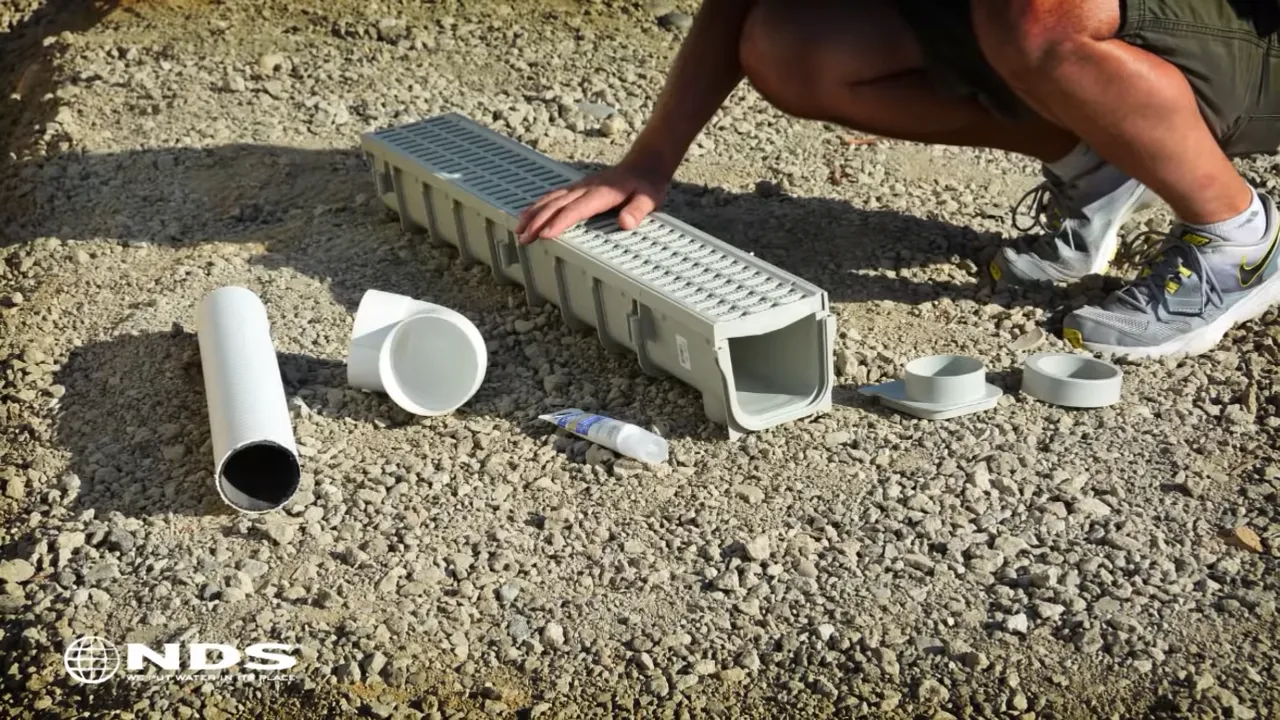
- Channel drain kit
- Concrete mix
- Water
- Protective gloves
- Safety goggles
Tips for ensuring all the required items are readily available
Now that you have a clear idea of the tools and materials needed, here are some tips to ensure that you have everything readily available before you start the installation:
- Make a checklist: Create a checklist based on the list provided above to ensure that you don’t miss out on any items.
- Double-check quantities: Verify that you have the necessary quantity of each item, especially items like concrete mix and water which are crucial for the installation.
- Organize your workspace: Set up your workspace in an organized manner, keeping all the tools and materials in one place. This will make it easier for you to locate them when needed.
- Purchase in advance: If you find that you’re missing any items from the list, make sure to purchase them in advance so that you don’t have to interrupt the installation process.
- Check for any additional requirements: Depending on the specific channel drain kit you’re using, there may be additional tools or materials required. Read the instructions provided with the kit to ensure that you have everything you need.
By following these tips and ensuring that all the required tools and materials are readily available, you’ll be well-prepared to install a channel drain in concrete. This preparation will not only make the installation process smoother but also help you complete the task efficiently.
Preparing The Concrete Surface For Channel Drain Installation
Before installing a channel drain in concrete, it is crucial to properly prepare the surface to ensure a smooth and successful installation. By following the steps below, you can ensure that the concrete surface is clean and ready for the channel drain.
Steps to Properly Clean and Prepare the Concrete Surface
- Start by clearing the area surrounding the concrete surface. Remove any debris, rocks, or dirt that may obstruct the installation process.
- Next, thoroughly clean the concrete surface to remove any dust, dirt, or grease that may interfere with the adhesion of the channel drain. You can use a pressure washer for a deep clean, or a mixture of water and mild detergent for a more gentle approach.
- After cleaning, inspect the surface for any cracks or uneven areas. Use a wire brush or chisel to remove any loose concrete or debris in these areas.
- Once the surface is clean and free from debris, it is important to ensure that the concrete is dry before proceeding with the installation. Allow sufficient time for the concrete to dry completely, as moisture can compromise the adhesion of the channel drain.
- Finally, if there are any existing coatings or sealants on the concrete surface, it is advisable to remove them prior to installation. This can be done using a concrete grinder or chemical sealant remover.
Techniques for Measuring and Marking the Installation Area Accurately
Accurate measurement and marking of the installation area are vital to ensure the channel drain is correctly positioned and aligned. Follow these techniques to achieve precise measurements:
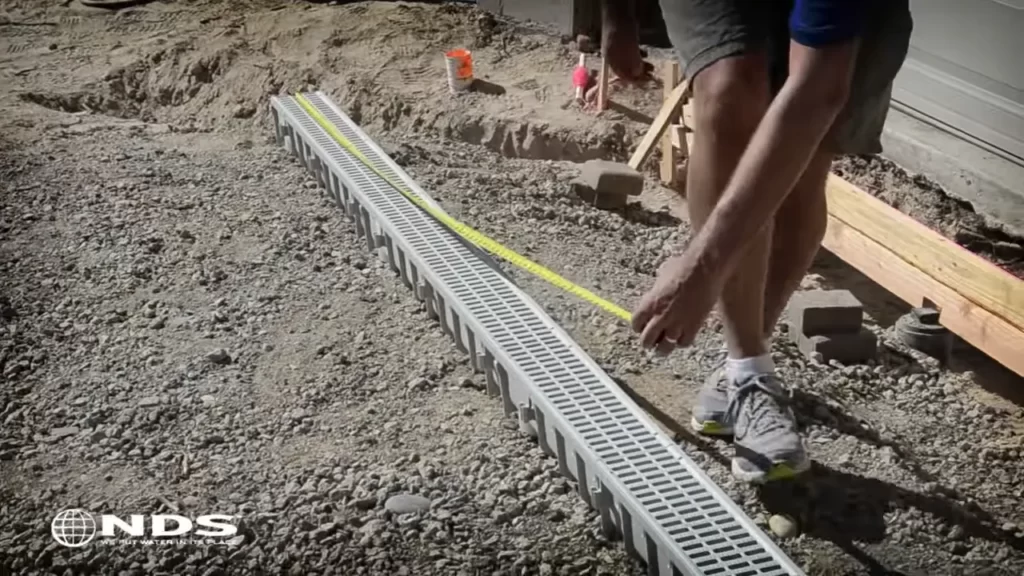
- Measure Twice: Use a measuring tape to accurately determine the length and width of the installation area. Double-check the measurements to avoid any errors.
- Marking the Installation Area: Once the measurements are confirmed, mark the corners and edges of the installation area using spray paint or chalk. This will provide a visual guide during the installation process.
- Aligning the Channel Drain: Use a string line or level to ensure the channel drain is straight and aligned with the marked area. Make necessary adjustments until the alignment is precise.
By diligently following these steps and techniques, you can ensure that the concrete surface is properly prepared for channel drain installation. This will lead to a seamless installation process and ultimately contribute to the functionality and longevity of your channel drain.
Excavating The Trench For The Channel Drain
Properly excavating the trench for your channel drain is crucial to ensure efficient drainage and prevent water accumulation. In this section, we will discuss the depth and width requirements for the trench, as well as techniques for excavating in a precise and efficient manner.
Proper depth and width requirements for the trench
When it comes to the depth and width of the trench, it is important to follow the manufacturer’s guidelines for your specific channel drain. These guidelines will ensure that the trench is suitable for installing the drain and allows proper water flow.
The depth of the trench should be sufficient to accommodate the channel drain and leave enough space for a solid concrete base. Generally, a depth of around 6-8 inches is recommended, but this may vary depending on the specific drain system you are using.
As for the width, it should be wide enough to provide adequate space for the drain, ensuring it fits securely and allows water to flow freely. Typically, a width of around 4-6 inches should be sufficient, but it is important to consult the manufacturer’s specifications for your particular channel drain.
Techniques for excavating the trench in a precise and efficient manner
To ensure the trench is excavated in a precise and efficient manner, you can employ various techniques that will make the process easier and more effective. Here are a few tips to help you get started:
- Mark the trench: Before digging, use spray paint or stakes with string to mark the outline of the trench. This will provide a clear visual guide and help you maintain the desired depth and width.
- Use a trenching shovel: A trenching shovel is a specialized tool designed for digging trenches. Its long, narrow blade allows for more precise excavation and minimizes the chances of damaging underground utilities.
- Remove the soil incrementally: Rather than trying to dig the entire trench at once, remove the soil incrementally. This will make the process more manageable and allow you to adjust the depth and width as needed.
- Check the depth and width regularly: Use a tape measure or a dedicated trench depth gauge to check the depth and width of the trench regularly. This will ensure that you stay within the specified requirements and make any necessary adjustments along the way.
- Keep the excavated soil organized: As you dig the trench, keep the excavated soil in a separate pile nearby. This will make backfilling easier and prevent any debris from getting into the drain during installation.
By following these techniques, you can excavate the trench for your channel drain with precision and efficiency, setting the stage for a successful installation.
Installing The Channel Drain In The Trench
Steps for securely placing the channel drain in the excavated trench
Once you have excavated the trench for your channel drain and made sure it has the proper slope for drainage, it’s time to securely place the drain in the trench. This step is crucial to ensure that the drain functions effectively and efficiently.
- Clean the trench: Before placing the channel drain, it’s essential to clean the trench of any debris or dirt. This will ensure a smooth and stable surface for installation.
- Measure and cut the drain: Carefully measure the length of the trench to determine the required length of the channel drain. Use a saw or appropriate cutting tool to trim the drain to the correct size. Be sure to follow the manufacturer’s instructions for cutting the drain.
- Apply adhesive: Depending on the type of channel drain you are using, you may need to apply adhesive to the underside of the drain. This will help secure the drain to the trench and prevent any unwanted movement or shifting over time. Follow the manufacturer’s instructions for applying the adhesive.
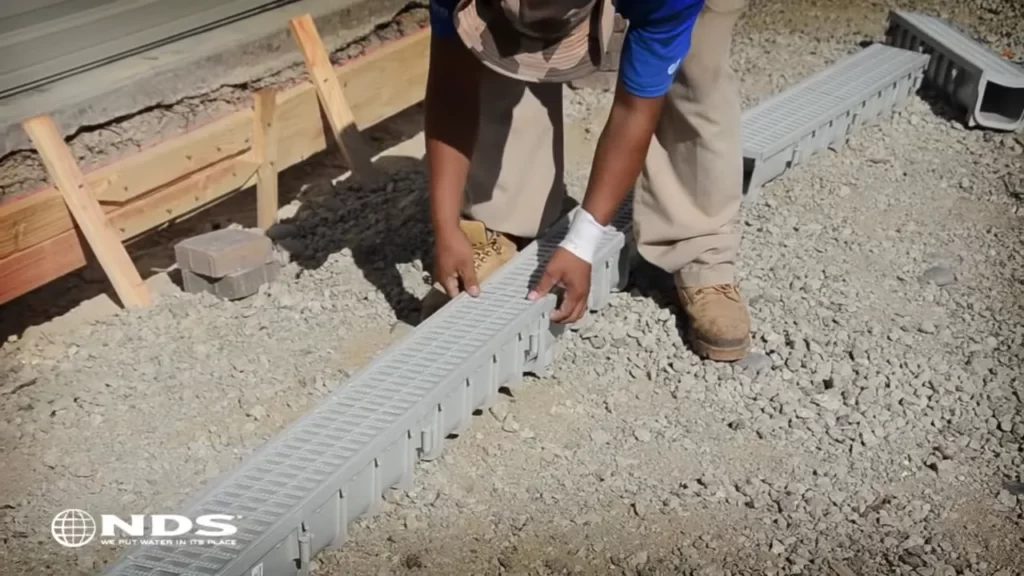
- Place the drain in the trench: Position the channel drain in the excavated trench, making sure it fits snugly. This step requires careful attention to alignment and leveling to ensure proper function. Use a level to ensure the drain is level from side to side and front to back. Make any necessary adjustments to achieve the proper alignment and levelness.
- Secure the drain: Once the drain is properly aligned and leveled, it’s time to secure it in place. Use the appropriate fasteners, such as screws or anchor bolts, to secure the drain to the surrounding concrete. Again, refer to the manufacturer’s instructions for the correct type and placement of fasteners.
By following these steps, you can ensure that the channel drain is securely placed in the excavated trench, providing effective drainage for your concrete surface. Taking the time to properly align, level, and secure the drain will result in a functional and long-lasting drainage system.
Connecting The Channel Drain To The Existing Drainage System
Once you have properly installed the channel drain in your concrete, the next crucial step is connecting it to the existing drainage system. This step ensures that the collected water is efficiently directed away from your property, preventing any potential flooding or water damage.
Methods for linking the channel drain to the underground pipes or collection box
To connect the channel drain to the existing underground pipes or collection box, you have a few options:
- Direct connection: This method involves connecting the channel drain directly to an existing underground pipe. It is the most straightforward and efficient way to link the channel drain to the existing drainage system. When using this method, ensure that the pipe is correctly aligned with the channel drain outlet and that a watertight connection is achieved.
- Using a collection box: In situations where a direct connection is not possible or preferable, using a collection box is a viable alternative. The collection box acts as an intermediary between the channel drain and the underground pipes. It collects the water from the channel drain and then directs it into the existing drainage system through an outlet. When installing a collection box, it is important to ensure that it is positioned correctly and securely connected to both the channel drain and the underground drainage pipes.
- Redirecting the flow: In some cases, it may be necessary to redirect the flow of water from the channel drain to a different area of the property. This can be achieved by installing additional underground pipes or using a distribution box. Proper planning and understanding of the property’s drainage requirements are essential when opting for this method.
Importance of using appropriate connectors and seals for a watertight connection
When connecting the channel drain to the existing drainage system, it is crucial to use appropriate connectors and seals to ensure a watertight connection. Failing to do so can result in water leakage, negating the purpose of the drain and potentially causing damage to your property. Here are a few reasons why using the right connectors and seals is essential:
- Preventing water infiltration: Using high-quality connectors and seals helps to prevent water from infiltrating the connection points. This ensures that all collected water is efficiently directed towards the existing drainage system.
- Reducing maintenance and repair: A watertight connection minimizes the need for frequent maintenance and repairs. By investing in proper connectors and seals, you can avoid costly issues caused by water leaks and subsequent damage to the drainage system or surrounding concrete.
- Preserving the structural integrity: Water leakage can compromise the structural integrity of both the channel drain and the surrounding concrete. By using appropriate connectors and seals, you can protect the long-term stability and durability of the entire drainage system.
When installing a channel drain and connecting it to the existing drainage system, remember that the quality of the connection is just as crucial as the installation itself. Take the time to choose the right connectors and seals, ensuring a watertight connection that will serve you well for years to come.
Backfilling And Finishing The Installation
Proper Techniques for Backfilling the Trench and Compacting the Soil
Once you have successfully installed the channel drain in your concrete, the next crucial step is backfilling the trench and compacting the soil around it. Proper backfilling and soil compaction ensure the stability and longevity of your channel drain. Here are some important techniques to follow:
- Backfill with care: Start by carefully backfilling the trench with the excavated soil. To avoid damaging the drain or causing uneven settling, backfill in thin layers, approximately 6 inches at a time. Gradually tamp down each layer using a hand tamper or a mechanical compactor.
- Use the right soil: Ensure that the soil you use for backfilling is well-compacted and free from organic matter. Opt for granular materials like crushed stone or gravel, which provide excellent drainage and stability.
- Compact the soil: Compact the backfilled soil thoroughly to eliminate any voids or air pockets. Proper compaction prevents settling and shifting of the soil, which can lead to structural issues over time. Use a compactor with appropriate plate size and compaction force to achieve adequate density.
- Pay attention to the edges: Be sure to compact the soil around the edges of the trench as well. This helps prevent any gaps or voids between the concrete and the backfilled soil, minimizing the risk of water seepage or erosion.
- Check for proper slope: Throughout the backfilling process, monitor the slope of the trench and ensure it follows the recommended drainage gradient. This helps water flow efficiently towards the channel drain, preventing any pooling or flooding issues.
Instructions for Creating a Smooth and Seamless Finish on the Concrete Surface
Now that you have completed the backfilling process, it’s time to focus on creating a smooth and seamless finish on the concrete surface surrounding the channel drain. A clean and professional-looking finish not only enhances the aesthetic appeal but also improves functionality. Follow these instructions to achieve a flawless concrete finish:
- Clean the concrete: Before starting, ensure that the concrete surface is clean and free from any debris or loose materials. Use a broom or a blower to remove dirt, dust, and small particles that could affect the finish.
- Prepare the concrete mixture: Mix the concrete according to the manufacturer’s instructions. Use a high-quality concrete mix that is suitable for the intended application. Consistency is key here, so aim for a smooth and workable mixture.
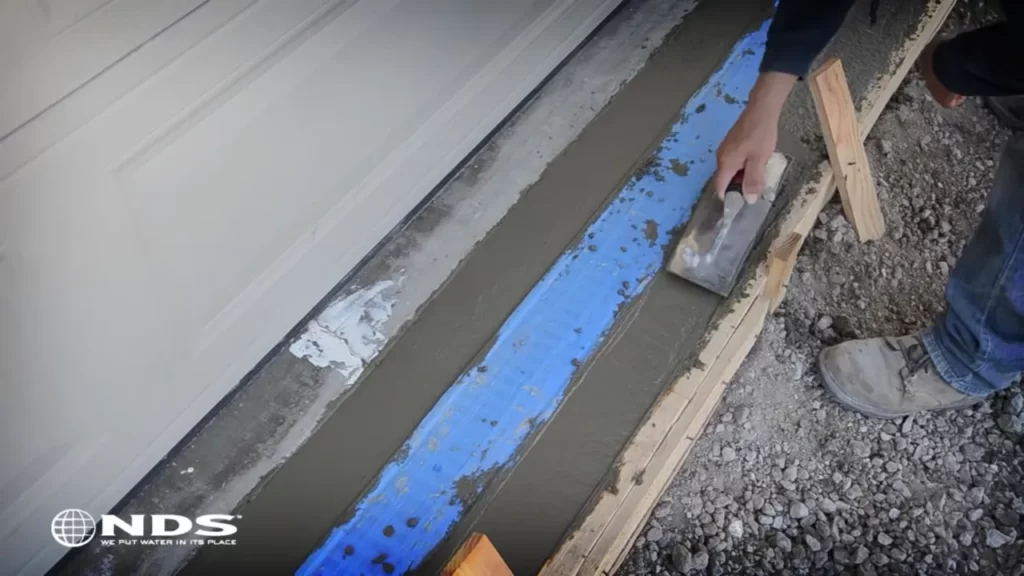
- Apply the concrete: Carefully pour the prepared concrete mixture onto the surface around the channel drain. Spread it evenly using a trowel or a float, working towards achieving a uniform thickness. Be sure to cover the entire area and fill any gaps or low spots.
- Smooth and level: Use a screed board or a straightedge to level the concrete and create a smooth surface. Move the screed board back and forth in a sawing motion, filling any depressions and removing excess material. Repeat this process until you achieve a perfectly level surface.
- Finish with a concrete float: Once the concrete is level, use a concrete float to further smooth and refine the surface. Move the float in circular motions to eliminate any trowel marks or imperfections. This helps create a seamless and professional finish.
- Cure and protect: Finally, follow the manufacturer’s recommendations for curing and protecting the concrete. This typically involves keeping the surface moist for a certain period and applying a concrete sealer to enhance durability and resist staining.
By following these techniques and instructions, you can ensure a successful backfilling and finishing process when installing a channel drain in concrete. Remember, proper backfilling and a smooth concrete finish contribute to the overall effectiveness and visual appeal of your drainage system.
Regular Cleaning And Debris Removal
Regular cleaning and debris removal are crucial for maintaining the efficiency and functionality of your channel drain in concrete. Failure to keep the drain clear can lead to clogs and blockages, resulting in water pooling, flooding, and potential damage to your property. In this section, we will explore the importance of cleaning the channel drain and provide tips for effectively removing debris and maintaining a clear drainage path.
Importance of Cleaning the Channel Drain to Prevent Clogs and Blockages
Ensuring that your channel drain is free from debris is essential to prevent clogs and blockages. Over time, leaves, twigs, dirt, and other debris can accumulate in the drain, obstructing the flow of water. When this happens, water may not be able to properly drain away, leading to puddling or even flooding.
To avoid such issues, regular cleaning is necessary. By proactively preventing clogs and blockages, you can maintain a clear drainage path and minimize the risk of water-related damage to your property. Regular cleaning also extends the lifespan of your channel drain, ensuring it continues to function optimally for years to come.
Tips for Effectively Removing Debris and Maintaining a Clear Drainage Path
To effectively remove debris and maintain a clear drainage path, consider the following tips:
- Inspect the drain regularly: Perform routine visual inspections of your channel drain to identify any accumulation of debris. Regularly checking for obstructions allows you to address them promptly and avoid potential issues.
- Remove visible debris manually: If you notice leaves, grass, or other debris on the surface of the drain, use gloved hands or a small garden tool to remove them. Be cautious when handling sharp objects and ensure you dispose of the debris properly.
- Utilize a hose for deeper cleaning: To remove debris that may have lodged deeper within the drain, use a garden hose with a high-pressure nozzle. Direct the water flow towards the drain, aiming to dislodge and flush out any accumulated dirt or particles.
- Consider using a drain cleaning solution: In cases where stubborn debris or organic material is causing a blockage, you may want to use a drain cleaning solution specifically designed for channel drains. These solutions can help dissolve the debris, facilitating its removal.
- Regular maintenance schedule: Create a regular maintenance schedule to ensure that cleaning and debris removal are done consistently. By integrating this routine into your maintenance plan, you can effectively prevent clogs and blockages, keeping your channel drain in prime condition.
By following these tips and maintaining a regular cleaning routine, you can keep your channel drain clear and functioning optimally. Remember, a proactive approach to cleaning and debris removal is key to avoiding costly repairs and ensuring the longevity of your channel drain.
Inspecting And Repairing The Channel Drain
Guidance on Regular Inspection to Identify Any Damages or Wear
Regular inspection of the channel drain is essential to identify any damages or wear that may require repair or replacement. By inspecting the channel drain at least twice a year, you can ensure its optimal functionality and prevent potential problems. Here are a few steps to guide you through the inspection process:
- Start by clearing any debris or dirt that may have accumulated on the drain.
- Examine the grates or covers for any signs of damage, such as cracks or breakage. Replace them if needed, as damaged grates can reduce the effectiveness of the drain.
- Inspect the channel itself for any signs of cracks, corrosion, or deterioration. These issues can affect the drain’s ability to redirect water properly and may require immediate attention.
- Check for any obstructions or blockages within the channel. Leaves, twigs, or other debris can clog the drain and lead to water pooling or flooding.
- Ensure that the channel drain is securely fastened to the concrete. Loose or unstable drains can result in water leakage or uneven surfaces.
- If you have a trench-style channel drain, make sure that the sides are intact and free from any damage.
- Finally, verify that the drain slopes away from the desired area to ensure proper water flow.
By following these inspection steps regularly, you can identify any potential issues with the channel drain and take appropriate measures to address them promptly.
Steps for Repairing and Replacing Components of the Channel Drain as Needed
Over time, various components of the channel drain may require repair or replacement to maintain its functionality. Here are the steps you can follow to repair or replace these components:
Repairing Components:
- If you discover any cracks in the channel, clean the affected area thoroughly with a brush or hose.
- Apply a concrete epoxy or sealant to fill the cracks, following the manufacturer’s instructions. Ensure that the epoxy or sealant is compatible with the channel drain material.
- Smooth out the filled cracks, removing any excess sealant or epoxy.
- Allow the repaired section to cure as per the product’s instructions to achieve maximum strength.
Replacing Components:
- If the grates or covers of the channel drain are damaged beyond repair, remove the old ones carefully.
- Measure the dimensions of the opening to ensure the new grates or covers fit properly.
- Choose replacement grates or covers that are suitable for your specific channel drain model and material.
- Install the new grates or covers securely in place, ensuring they are level and flush with the surrounding concrete surface.
Remember to consult the manufacturer’s instructions and seek professional assistance if needed for specific repair or replacement tasks. Regular maintenance and timely repairs or replacements will help prolong the lifespan of your channel drain and ensure efficient water drainage in your concrete surfaces.
Implementing Preventative Measures For Proper Drainage
Introduction to Additional Measures for Proper Drainage
Installing a channel drain in concrete is a great way to eliminate standing water and prevent potential damage to your property. However, to ensure optimal drainage efficiency, it’s essential to implement additional preventative measures. By taking steps to enhance the overall drainage system, you can maintain a dry and safe environment. Let’s explore some suggestions for landscaping and grading techniques that can help you prevent water accumulation and improve your drainage system’s performance.
Suggestions for Landscaping and Grading Techniques
Proper landscaping and grading play a crucial role in maintaining excellent drainage around your property. By following these suggestions, you can prevent future water accumulation and protect your investments.
- Consider the slope: One of the essential aspects of effective drainage is ensuring that the landscape slopes away from structures. This helps direct water flow away from your foundation and toward proper drainage areas.
- Create swales or berms: Swales are shallow channels or ditches designed to direct water away from specific areas, while berms are raised mounds that divert water around structures. By implementing these features strategically, you can control water flow and prevent pooling.
- Utilize permeable surfaces: Using permeable materials like gravel or porous concrete for driveways, walkways, and patio areas allows water to penetrate the surface, reducing runoff. This approach helps recharge the groundwater while preventing water accumulation.
- Install French drains: French drains are underground trenches filled with gravel and a perforated pipe. They effectively capture and divert excess water away from your property, easing pressure on your channel drain and improving overall drainage efficiency.
It’s important to note that each property may have unique drainage challenges. Consulting with a professional landscaper or drainage specialist can provide valuable insights tailored to your specific needs. By investing in proper landscaping and grading techniques, you’ll ensure that your channel drain functions optimally, and water is efficiently drained away from your property.
Frequently Asked Questions
Can You Install A Channel Drain In Existing Concrete?
Yes, a channel drain can be installed in existing concrete. It is possible to cut a trench in the concrete and install the channel drain to redirect water flow.
What Do You Put Under A Channel Drain?
Channel drains are designed to collect and drain excess water from surfaces. Under a channel drain, you typically place a bed of gravel or stone to facilitate water flow and filtration. This helps prevent clogs and allows for proper drainage.
Can You Install Drain In Concrete Slab?
Yes, you can install a drain in a concrete slab. It is possible to create a channel in the concrete to accommodate a drain system, ensuring proper drainage and preventing water damage.
How Much Fall Does A Channel Drain Need?
A channel drain needs to have a fall of at least 1/4 inch per foot to ensure proper drainage.
Conclusion
Installing a channel drain in concrete may seem daunting, but with the right steps and tools, it can be a straightforward process. By following the guidelines outlined in this blog post, you can successfully install a channel drain that will effectively manage water flow and prevent potential damage.
Remember to adequately prepare the site and carefully follow each step to ensure a long-lasting and functional drainage solution. So, go ahead and tackle that channel drain installation project with confidence!