
Installing a cast iron sink is a straightforward process that requires some basic steps. First, make sure to measure the sink and cabinet space to ensure a proper fit.
Then, position the sink in the desired location and mark the holes for installation. Next, drill pilot holes and install the mounting brackets and clips. Finally, secure the sink by tightening the mounting brackets and connecting the drain and water supply lines.
Why Choose A Cast Iron Sink?
Choosing the right sink for your kitchen can be a daunting task. With so many options available, it’s important to consider the benefits of each type. One option that stands out among the rest is the cast iron sink. Not only does it offer durability and longevity, but it also has a classic and timeless design. Additionally, cast iron sinks are heat and stain resistant, making them an excellent choice for any kitchen. Read on to discover more about the reasons why a cast iron sink should be at the top of your list.
Durability and Longevity
A cast iron sink is the epitome of durability and longevity. Made with a solid cast iron core, these sinks are built to last. They are resistant to cracks, chipping, and scratching, ensuring that they will maintain their original appearance for years to come. Whether you have a bustling household or simply want a sink that can withstand the test of time, a cast iron sink is the perfect choice.
Classic and Timeless Design
One of the main reasons why homeowners choose a cast iron sink is for its classic and timeless design. These sinks have a distinct aesthetic that effortlessly blends into any kitchen style, whether it be modern, rustic, or traditional. The smooth, glossy finish gives the sink an elegant look that never goes out of style. With a cast iron sink, you can achieve a beautiful and sophisticated kitchen design that will be admired by guests for years to come.
Heat and Stain Resistant
Another advantage of cast iron sinks is their exceptional heat and stain resistance. These sinks can withstand high temperatures without warping or discoloration, making them ideal for handling hot pots and pans directly from the stove. Additionally, the non-porous enamel coating on the sink’s surface prevents stains and makes it easy to clean. Say goodbye to stubborn coffee or red wine stains – a cast iron sink will always maintain its pristine appearance.
Advantages Of Installing A Cast Iron Sink
Advantages of Installing a Cast Iron Sink
When it comes to selecting the perfect sink for your kitchen, there are numerous options available. One material that has stood the test of time is cast iron. Cast iron sinks have been a staple in kitchens for decades, and for good reason. Their durability, easy maintenance, and wide range of styles and finishes make them a top choice for discerning homeowners.
Easy to clean and maintain
One of the key advantages of installing a cast iron sink is how easy it is to clean and maintain. Unlike other sink materials that require special cleaning agents or tedious scrubbing, cast iron sinks can be effortlessly cleaned with mild soap and water. Its smooth surface prevents food particles, grime, and stains from sticking, making cleaning a breeze. Simply wipe away any spills or messes, and your cast iron sink will look as good as new.
Resistant to chips and scratches
A cast iron sink is known for its exceptional durability. This material is highly resistant to chips and scratches, ensuring that your sink stays in excellent condition for years to come. Even with regular use, cast iron sinks can withstand the rigors of daily life in the kitchen without showing signs of wear and tear. Whether you’re washing dinner plates or pots and pans, your cast iron sink will maintain its pristine appearance.
Wide variety of styles and finishes
When it comes to aesthetics, cast iron sinks offer a wide range of styles and finishes to suit any kitchen design. Whether you prefer a traditional farmhouse look or a sleek modern vibe, you can find a cast iron sink that fits your vision. From glossy white to matte black, these sinks come in various colors and textures, allowing you to customize your kitchen to reflect your personal style.
Furthermore, cast iron sinks can be found in different shapes and configurations, including single or double bowls, undermount or drop-in installation, and even apron-front designs. With such versatility, you can easily find a cast iron sink that not only enhances the functionality of your kitchen but also adds an element of charm and sophistication.
In conclusion, choosing a cast iron sink for your kitchen comes with several advantages. Its easy-clean surface, resistance to chips and scratches, and vast selection of styles and finishes make it a fantastic investment for any homeowner looking to upgrade their kitchen. With proper care and maintenance, a cast iron sink can withstand the demands of everyday life while adding a touch of elegance to your culinary space.
Things To Consider Before Installation
Installing a cast iron sink can be a challenging yet rewarding project. Before you dive into the installation process, it’s important to consider a few key factors that will ensure a successful outcome. By taking the time to measure the sink area, check for proper support, and understand the plumbing requirements, you’ll be well-prepared to tackle this installation with confidence.
Measuring the Sink Area
Accurate measurements are essential when installing a cast iron sink. Before purchasing your new sink, it’s important to carefully measure the dimensions of the space where it will be installed. Start by measuring the width, depth, and height of the sink area. Additionally, take note of any obstructions or features that may impact the installation, such as pipes or cabinet doors.
Once you have precise measurements, you can select a sink that fits perfectly in the available space. Remember to account for any clearance requirements, ensuring that there is ample room around the sink for easy access and functionality.
Checking for Proper Support
A cast iron sink is heavy, so it’s crucial to ensure that your countertop and cabinetry can provide adequate support. Before installing the sink, carefully inspect the area to identify any weak spots or potential issues. If you notice any signs of instability, such as sagging or loose screws, it’s important to address these issues before proceeding with the installation.
In some cases, additional support may be necessary to accommodate the weight of a cast iron sink. This can be achieved by reinforcing the countertop or utilizing support brackets or beams. By taking these steps, you can ensure that your sink remains secure and stable for years to come.
Plumbing Requirements
Understanding the plumbing requirements is essential for a successful cast iron sink installation. Before beginning the installation process, familiarize yourself with the location of the existing plumbing connections. Take note of the number and size of the drain openings, as well as the positioning of the hot and cold water supply lines.
If the plumbing connections do not align with the new sink’s requirements, you may need to make adjustments. This could involve relocating or extending the plumbing lines, as well as installing new drain pipes or supply lines. To ensure a watertight seal, it’s critical to follow local plumbing codes and use the appropriate materials and techniques for connecting the sink to the plumbing system.
By considering these factors before installing your cast iron sink, you can avoid common pitfalls and ensure a successful installation. Taking the time to measure the sink area accurately, check for proper support, and understand the plumbing requirements will help you complete this project with confidence and enjoy the beauty and durability of your new sink for years to come.
Preparing For Installation
If you’re ready to give your kitchen a fresh new look, installing a cast iron sink can be a great choice. Not only are they durable and stylish, but they also add a touch of vintage charm to any kitchen space. However, before you go ahead with the installation process, there are a few things you need to do to properly prepare. In this section, we’ll walk you through the steps of gathering necessary tools and materials, removing the existing sink, and prepping the countertop to ensure a seamless installation.
Gathering necessary tools and materials
Before diving into any home improvement project, it’s essential to gather all the necessary tools and materials to make the process smooth and efficient. Here are the items you’ll need for installing a cast iron sink:
| Tools | Materials |
|---|---|
|
|
Removing the existing sink
Before you can begin installing your new cast iron sink, you’ll first need to remove the existing sink. Follow these steps to ensure a safe and successful removal process:
- Turn off the water supply to the sink by shutting off the main water valve.
- Disconnect the water supply lines and the drainpipe from the sink using an adjustable wrench.
- Remove any mounting clips or brackets that hold the sink in place.
- Gently lift the sink from the countertop and set it aside.
- Thoroughly clean the countertop and the surrounding area to prepare for the installation of the new sink.
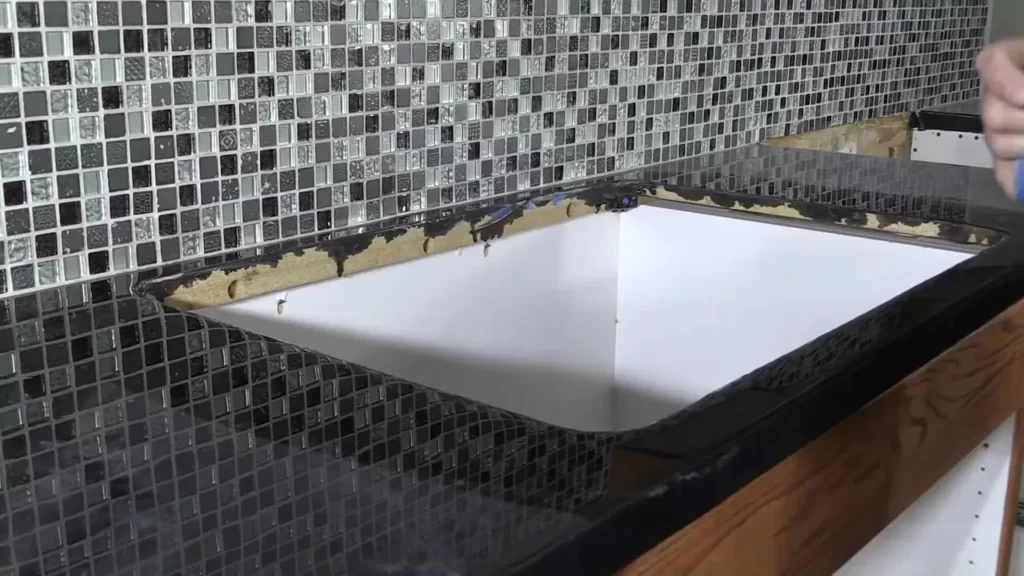
Prepping the countertop
Now that you’ve successfully removed the old sink, it’s time to prepare the countertop for the installation of the cast iron sink. Follow these steps to ensure a sturdy and secure base for your new sink:
- If the new sink is larger than the existing cutout, measure and mark the countertop accordingly.
- Use a hacksaw to carefully cut along the marked lines, following the manufacturer’s instructions.
- Test fit the new sink into the cutout to ensure a proper fit.
- Apply a thin layer of plumber’s putty along the edge of the sink’s flange to create a watertight seal.
- Secure the sink in place using mounting brackets or clips, following the manufacturer’s instructions.
- Apply a bead of silicone caulk around the edge of the sink to further secure and seal it to the countertop.
By following these steps to prepare for the installation of your cast iron sink, you’ll be one step closer to achieving the kitchen of your dreams. Stay tuned for the next section, where we’ll guide you through the actual installation process, ensuring a professional-looking finish that will last for years to come!
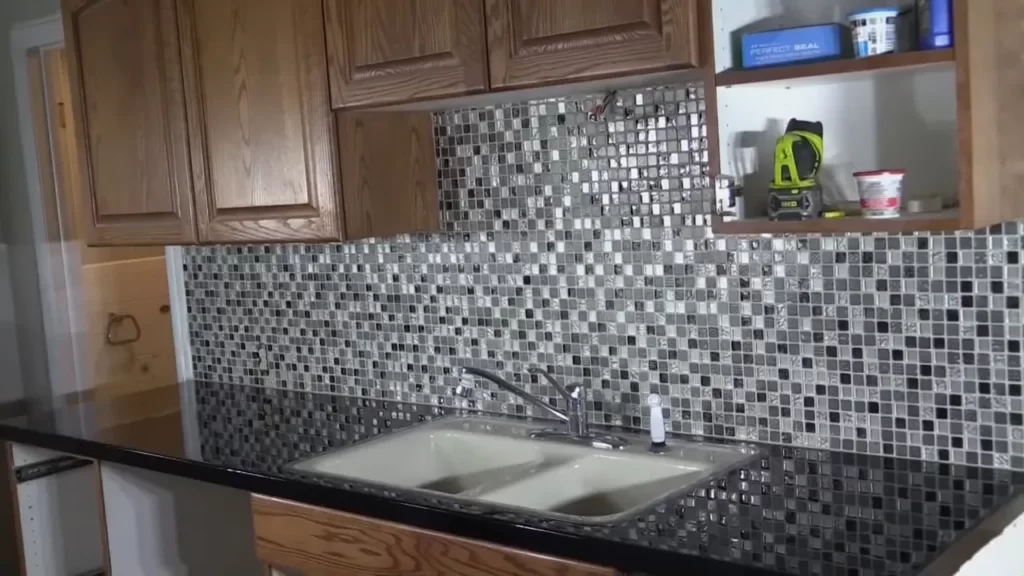
Installing The Sink
Installing a cast iron sink can be a great addition to your kitchen, adding both functionality and style to your space. Proper installation is key to ensure that your sink is secure and functioning properly. In this article, we will guide you through the step-by-step process of installing a cast iron sink, including positioning the sink, attaching it to the countertop, and connecting the plumbing.
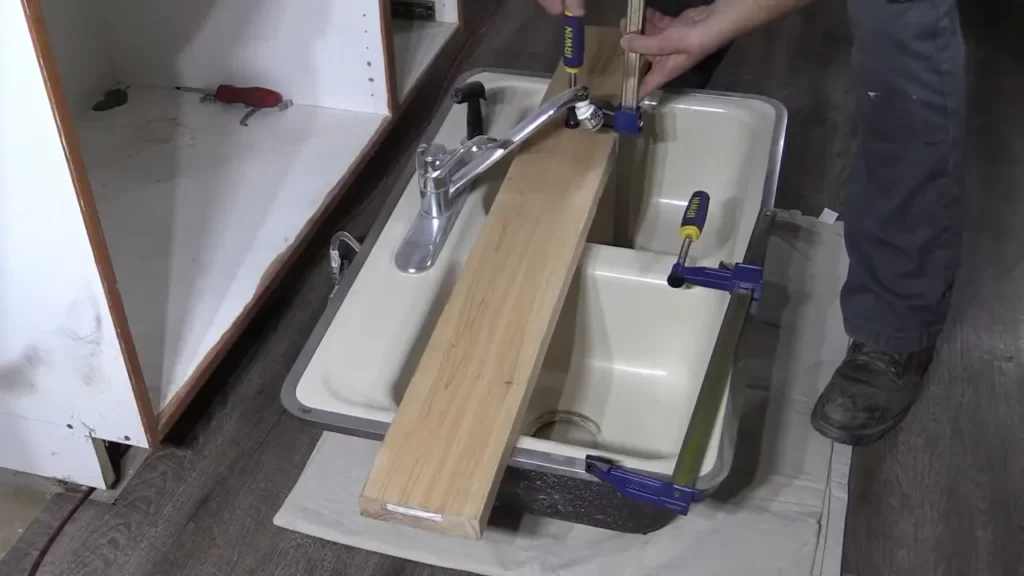
Positioning the sink
Before attaching the sink to the countertop, it is important to position it correctly. Start by measuring the dimensions of the sink and marking the placement on the countertop using a pencil. Make sure to leave enough space for the sink to fit comfortably, including any additional accessories such as faucet holes or soap dispensers.
Once you have marked the placement, carefully place the sink upside down on the countertop. Align it with the marked lines and ensure that it is level. This can be done using a carpenter’s level or by eyeballing it. Adjust the position as needed, making sure that the sink is centered and well-balanced.
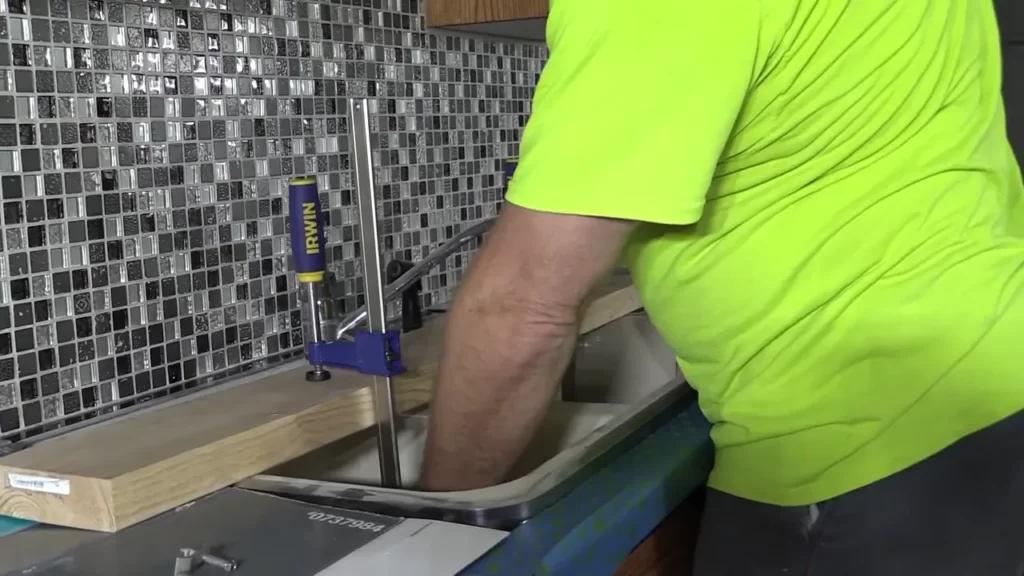
Attaching the sink to the countertop
Once the sink is positioned correctly, it’s time to secure it to the countertop. Start by applying a thin bead of adhesive around the outer rim of the sink. This will help create a watertight seal and prevent any water from leaking into the cabinets below.
Next, carefully lower the sink into the marked placement on the countertop. Press it firmly to ensure proper adhesion. Wipe away any excess adhesive using a damp cloth. For additional support, you can also use mounting clips or brackets to secure the sink to the countertop. Follow the manufacturer’s instructions for proper installation of these clips or brackets.
Connecting the plumbing
Now that the sink is securely attached to the countertop, it’s time to connect the plumbing. Start by installing the drain assembly. This typically involves attaching the drain flange to the sink using plumber’s putty or silicone sealant. Tighten the flange using a wrench to ensure a snug fit.
Once the drain assembly is in place, connect the water supply lines to the faucet. It is important to use the appropriate fittings and connectors to ensure a tight and leak-free connection. Tighten the connections using an adjustable wrench, being careful not to over-tighten and damage the plumbing.
Finally, turn on the water supply and check for any leaks. Run water through the sink to ensure proper drainage and functionality. Make any necessary adjustments or repairs if needed.
By following these steps, you can easily install a cast iron sink in your kitchen. Remember to take your time and double-check each step to ensure a proper and secure installation. Enjoy your new sink and the added functionality and style it brings to your space!
Sealing And Finishing
Applying Silicone Sealant
After properly aligning the cast iron sink in place, the next crucial step is applying silicone sealant. This sealant acts as a protective barrier against water damage, ensuring a watertight seal and preventing any leakage beneath the sink.
To begin, gather your supplies: a tube of high-quality silicone sealant, a caulking gun, and a utility knife. Start by loading the sealant tube into the caulking gun, puncturing the tube’s seal with the knife. Make sure to cut the tip of the tube at a 45-degree angle for optimal application.
Next, carefully apply a generous bead of silicone sealant along the edge of the sink where it meets the countertop. Ensure that the entire perimeter of the sink is covered, creating a complete seal. Use a smooth, steady motion as you squeeze the trigger on the caulking gun, applying an even amount of sealant along the edge.
Once the sealant is applied, use your finger or a caulk smoothing tool to smooth and shape the sealant line. This will create a neat and professional-looking finish. Wipe away any excess sealant using a damp cloth or sponge. Be sure to follow the manufacturer’s recommendations regarding drying time for the sealant.
Checking for Leaks
After applying the silicone sealant, it’s essential to thoroughly check for any potential leaks. This step ensures that your cast iron sink is properly installed and prevents any future water damage.
First, fill the sink with water and let it sit for a few minutes. Observe the area under the sink and surrounding cabinets for any signs of leakage. Look for water droplets, dampness, or discoloration, as these may indicate a leak.
If you notice any signs of leakage, it’s crucial to address them promptly. Empty the sink and inspect the sealant line for any gaps or cracks. If necessary, reapply silicone sealant to the affected areas and repeat the checking process until no leaks are detected.
Cleaning and Finishing Touches
Once you have ensured that the cast iron sink is properly sealed and free of leaks, it’s time to clean and add the finishing touches to complete the installation.
Start by wiping down the sink and surrounding countertops with a mild detergent or cleaning solution. This will remove any residue or debris from the installation process, leaving your sink sparkling clean.
Next, check the faucet connections and tighten any loose nuts or connections if necessary. This will ensure that the water supply is properly connected and prevent any future leaks.
Finally, inspect the overall installation and make any adjustments needed to achieve a seamless look. Take a step back and admire your newly installed cast iron sink. Enjoy its durability, timeless beauty, and the satisfaction of a job well done.
Care And Maintenance Tips
Proper care and maintenance are essential to keep your newly installed cast iron sink looking its best for years to come. By following a regular cleaning routine, avoiding abrasive cleaners, and knowing how to deal with stains and scratches, you can ensure the longevity and beauty of your cast iron sink. Let’s explore these care and maintenance tips in more detail:
Regular Cleaning Routine
A regular cleaning routine is crucial to prevent dirt, grime, and stains from building up on your cast iron sink. Here’s a simple step-by-step guide to follow:
- Start by filling the sink with warm water and adding a few drops of mild dish soap.
- Using a non-abrasive sponge or cloth, gently scrub the surface of the sink, paying extra attention to areas with stubborn stains or debris.
- Rinse the sink thoroughly with warm water to remove all traces of soap.
- Dry the sink using a soft cloth to prevent water spots and mineral deposits.
For daily maintenance, wiping the sink with a damp cloth after each use can help prevent the accumulation of dirt and grime.
Avoiding Abrasive Cleaners
When it comes to cleaning your cast iron sink, it’s important to avoid using abrasive cleaners. These can scratch and damage the delicate surface of the sink. Instead, opt for non-abrasive cleaning solutions specifically designed for cast iron sinks. These gentle cleaners will effectively remove stains without causing any harm.
Dealing with Stains and Scratches
Despite your best efforts, stains and scratches may occasionally occur on your cast iron sink. Here are some tips to help tackle these issues:
- For light stains, create a paste by mixing baking soda with water and gently scrub the affected area using a soft cloth.
- If you’re dealing with tougher stains or mineral deposits, try using a mixture of equal parts white vinegar and water. Apply the solution to the stained area and let it sit for a few minutes before scrubbing and rinsing.
- For scratches, you can use a porcelain touch-up kit to fill in the damaged area. Follow the instructions provided with the kit for best results.
Remember to always test any cleaning or repair products on a small, inconspicuous area of the sink first to ensure they don’t cause any further damage.
By following these care and maintenance tips, you can keep your cast iron sink in pristine condition and enjoy its beauty for many years. Remember, regular cleaning, avoiding abrasive cleaners, and appropriate stain and scratch remedies are key to protecting and maintaining your cast iron sink.
Troubleshooting
When installing a cast iron sink, it’s not uncommon to come across a few hiccups along the way. However, with a little troubleshooting, you can overcome these challenges and ensure a successful installation. In this section, we’ll address some common installation issues, provide tips for leak detection and repair, and discuss when it may be necessary to seek professional help.
Common Installation Issues
Despite following the installation instructions diligently, you may encounter a few common issues. Let’s take a look at some of these challenges and how to tackle them:
- Uneven countertop: If the countertop isn’t level, it can affect the placement and stability of the sink. To resolve this issue, use a level to check the flatness of the countertop. If it’s uneven, you may need to shim the sink to ensure it sits level.
- Poor seal: A key factor in preventing leaks is creating a watertight seal between the sink and countertop. If you notice water seeping through, it’s likely due to an inadequate seal. To fix this, carefully remove the sink, clean the area, and apply a fresh bead of silicone caulk before reattaching the sink.
- Inaccurate measurements: Taking accurate measurements is crucial for a seamless installation. If the sink doesn’t fit properly within the cutout, you may need to make adjustments. Double-check your measurements and use a jigsaw to trim the countertop if necessary, ensuring a precise fit.
Leak Detection and Repair
Even with proper installation, leaks can occur over time due to wear and tear. If you notice any signs of a leak, it’s essential to address the issue promptly. Here are some steps to help detect and repair leaks:
- Inspect the pipes: Start by checking the pipes underneath the sink for any visible leaks or loose connections. Tighten any loose fittings or replace them if necessary.
- Check the drain: A common source of leaks is a faulty drain assembly. Remove the drain plug and inspect the gasket or o-ring for any damage or deterioration. Replace as needed.
- Test the water supply lines: Turn on both the hot and cold water faucets and observe for any leaks. If you notice water dripping from the supply lines, tighten the connections or replace them if required.
If you’ve followed these steps and are still unable to identify or fix the leaks, it may be time to seek professional help.
Seeking Professional Help
While many installation issues can be resolved independently, there are situations where professional assistance is necessary. Here are a few instances where seeking professional help is crucial:
- Persistent leaks: If you’ve tried multiple DIY methods to fix leaks but the problem persists, it’s best to consult a professional plumber. They have the expertise to pinpoint the exact cause of the leak and provide a long-lasting solution.
- Complex installation: If you’re dealing with a complex installation, such as a double-basin sink or unique countertop material, professional help can ensure the job is done correctly. They have the experience and specialized tools required for these types of installations.
- Lack of confidence: If you lack the necessary skills or confidence to tackle the installation, it’s always better to seek professional assistance. They can ensure the sink is installed safely and efficiently, giving you peace of mind.
Remember, troubleshooting any installation issues promptly is important to avoid further damage and ensure the longevity of your cast iron sink. By being proactive and seeking professional help when needed, you can enjoy a fully functional and leak-free sink for years to come.
Frequently Asked Questions
Do You Need Extra Support For A Cast Iron Sink?
Yes, extra support is needed for a cast iron sink due to its heavy weight. Proper installation and support will help prevent damage and ensure the longevity of the sink.
Do Cast Iron Sinks Need Clips?
Cast iron sinks do not necessarily need clips for installation. They are heavy and typically supported by a base cabinet or countertop. However, if your sink is undermounted, clips may be used to secure it in place.
What Is The Downside Of Cast Iron Sink?
The downside of a cast iron sink is its weight, making installation difficult. It can chip or crack if heavy objects are dropped on it. Rust may develop if not properly cared for. Regular maintenance and careful handling are necessary to prevent damage.
How Do You Support A Heavy Sink?
To support a heavy sink, ensure that the wall and floor can handle the weight. Install reinforcement brackets or use a vanity cabinet with a sturdy base. Make sure to consult a professional to determine the appropriate support needed for your specific sink.
Conclusion
To summarize, installing a cast iron sink can be a straightforward process if you follow these steps carefully. From preparing the countertop to securing the sink in place, each step plays a crucial role in ensuring a successful installation. By using the right tools and techniques, you can enhance both the durability and aesthetic appeal of your kitchen or bathroom.
So, don’t hesitate to take on this DIY project and enjoy the benefits that a cast iron sink can bring to your space.