
To install a bidet toilet, first, turn off the water supply, remove the existing toilet seat, attach the bidet seat, connect the water supply, and secure the bidet seat in place. Are you thinking about upgrading your bathroom experience with the installation of a bidet toilet?
Bidets are gaining popularity for their hygienic benefits and eco-friendliness. In this guide, we will walk you through the step-by-step process of installing a bidet toilet. By following these simple instructions, you’ll be able to enjoy the comfort and cleanliness that a bidet provides in no time.
So, let’s get started with the installation process!
Essential Items For Bidet Toilet Installation
Introduction:
When it comes to installing a bidet toilet, having the right tools and materials is essential for a successful installation. In this blog post, we will discuss the essential items you will need to install a bidet toilet. From an adjustable wrench to a bidet kit, each item plays a crucial role in ensuring a smooth and efficient installation process. So let’s dive in and explore these must-have tools and materials.
Essential items for bidet toilet installation
1. Adjustable Wrench:
An adjustable wrench is a versatile tool that allows you to tighten or loosen nuts and bolts of various sizes. When installing a bidet toilet, an adjustable wrench will come in handy for securing the water supply connections and other fittings. So make sure to have an adjustable wrench on hand before you begin the installation process.
2. Screwdriver:
A screwdriver is another essential tool you’ll need for bidet toilet installation. It is used to tighten or loosen screws in the bidet seat or attachment, as well as other parts of the toilet. Make sure to use the appropriate type and size of screwdriver for the task at hand to ensure a secure installation.
3. Plumbers Tape:
Plumbers tape, also known as thread seal tape, is a thin white tape that is used to create a tight seal between threaded connections. It prevents leaks and ensures a watertight connection. Apply plumbers tape to the threaded ends of the hoses and fittings to ensure a secure and leak-free installation.
4. Bidet Kit (including bidet seat or attachment, hoses, and fittings):
A bidet kit is the heart of the installation process. It typically includes a bidet seat or attachment, hoses for water supply and connection, and various fittings. Follow the manufacturer’s instructions on how to assemble and install the bidet components. Ensure that all hoses and fittings are securely connected to prevent any water leaks.
5. Bucket or Towel for Water Containment:
During the installation process, it’s essential to have a bucket or towel on hand for water containment. This will help avoid any spillage or mess that may occur when disconnecting the existing toilet or connecting the bidet components. Place the bucket or towel strategically to catch any water and prevent it from damaging your floors or surrounding areas.
By having these essential items for bidet toilet installation, you’ll be well-prepared to tackle the task with confidence. Remember to follow the manufacturer’s instructions for your specific bidet model and take all necessary safety precautions throughout the installation process. With the right tools and materials, you’ll have your bidet toilet up and running in no time!
Shutting Off The Water Supply And Emptying The Tank
Before installing a bidet toilet, it is crucial to shut off the water supply and empty the tank. This step ensures a smooth installation process and minimizes any chances of water leakage or damage. In this section, we will guide you on how to locate and shut off the water supply valve and how to properly flush the toilet to empty the tank.
Locate and shut off the water supply valve
The first step in shutting off the water supply is to locate the water supply valve. This valve is usually located behind the toilet, near the bottom. It is typically a small knob or lever that you can turn clockwise to shut off the water flow.
Flush the toilet to empty the tank
Once you have located and shut off the water supply valve, it’s time to flush the toilet to empty the tank. Flushing the toilet will remove any remaining water in the tank and make it easier to install the bidet.
Follow these simple steps to flush the toilet:
- Stand next to the toilet and locate the flush handle.
- Grasp the flush handle firmly.
- Push the flush handle down in a firm and steady motion.
Ensure that you push the flush handle all the way down to completely empty the tank. You may need to hold the flush handle down for a few seconds to ensure all the water drains out.
By shutting off the water supply and emptying the tank, you are now ready to proceed with the installation of your bidet toilet. This ensures a safe and seamless installation process, allowing you to enjoy the benefits of a bidet with ease.
Detaching The Old Seat And Cleaning The Toilet
Detaching the old seat and cleaning the toilet is an essential step when installing a bidet toilet. Before you can install the bidet properly, you need to remove the existing toilet seat and ensure that the toilet bowl is thoroughly cleaned. This process involves unscrewing the bolts or nuts holding the seat in place, lifting and removing the old seat, and then cleaning the toilet bowl.
Unscrew the bolts or nuts holding the seat in place
To start detaching the old seat, you will need to locate the bolts or nuts that are holding it in place. These are usually found on the underside of the toilet bowl, underneath the seat. Use a wrench or pliers to loosen and unscrew these bolts or nuts. Make sure to turn them counterclockwise until they are fully removed. If there are plastic covers over the bolts or nuts, gently pry them open using a flathead screwdriver or your fingers.
Lift and remove the old seat
Once the bolts or nuts are unscrewed, you can lift and remove the old seat from the toilet bowl. Grab the seat firmly and lift it straight up, trying to avoid touching any dirty surfaces. Be careful not to drop the seat or damage the toilet bowl during this process. Place the removed seat aside in a safe area.
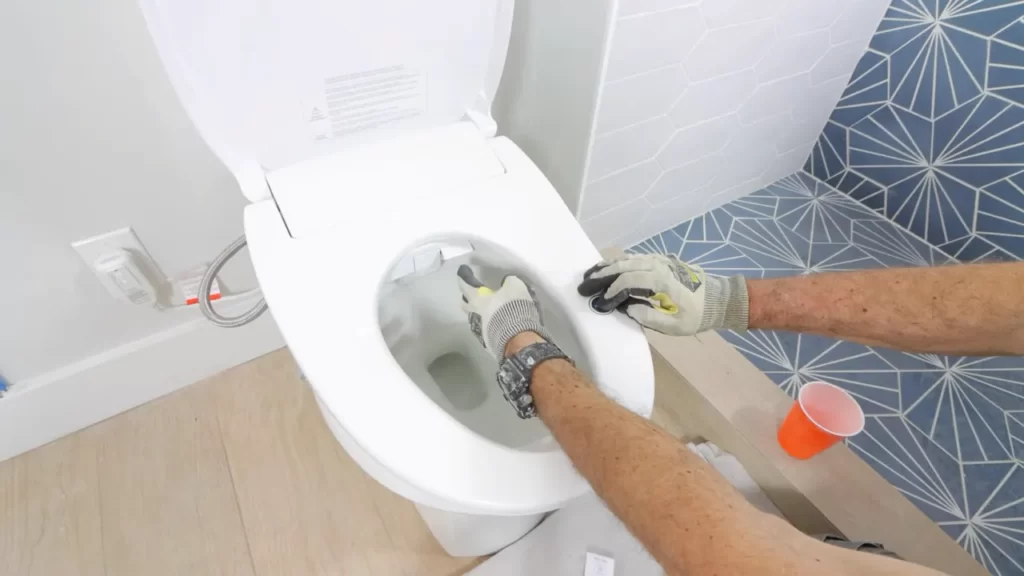
Thoroughly clean the toilet bowl
After the old seat is removed, it’s time to thoroughly clean the toilet bowl. Start by using a toilet brush to scrub the inner surfaces of the bowl, including the rim, sides, and bottom. Pay attention to any stains or marks, and apply cleaning solution if necessary. Use a toilet bowl cleaner or a mixture of vinegar and water for effective cleaning.
Once you have scrubbed the toilet bowl, flush it to rinse away any dirt or cleaning solution. If there are stubborn stains, you may need to repeat the process or use a more potent cleaner. Wipe the seat mounting area and the rim of the toilet bowl with a clean cloth to ensure they are free from any residue.
Your toilet bowl should now be clean and ready for the installation of the bidet. Remember to follow the manufacturer’s instructions for the specific bidet model you are installing to ensure a proper and secure installation.
Connecting The Necessary Components
Connecting the necessary components is a crucial step when installing a bidet toilet. Follow these steps to ensure a proper installation.
Read the bidet kit instructions carefully
Before connecting the components, it’s essential to familiarize yourself with the bidet kit instructions. Each bidet model or attachment may have specific instructions unique to its installation process. By carefully reading the instructions, you’ll have a better understanding of the necessary components and the correct way to connect them.
Attach the hose to the bidet seat or attachment
The next step is to attach the hose to the bidet seat or attachment. The hose is responsible for delivering the water supply needed for the bidet to function properly. It’s crucial to ensure a secure and tight connection to prevent any leaks or malfunctions.
To attach the hose, locate the connection point on the bidet seat or attachment. This connection point is generally located at the rear part of the bidet. Insert one end of the hose into the connection point and tighten it clockwise until it is firmly secured. Make sure not to overtighten as it may damage the components.
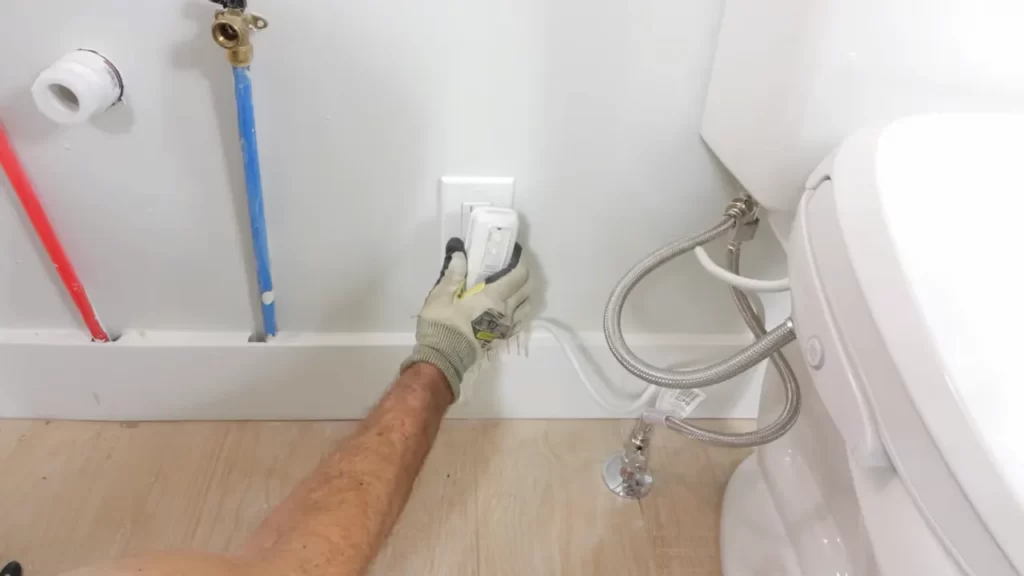
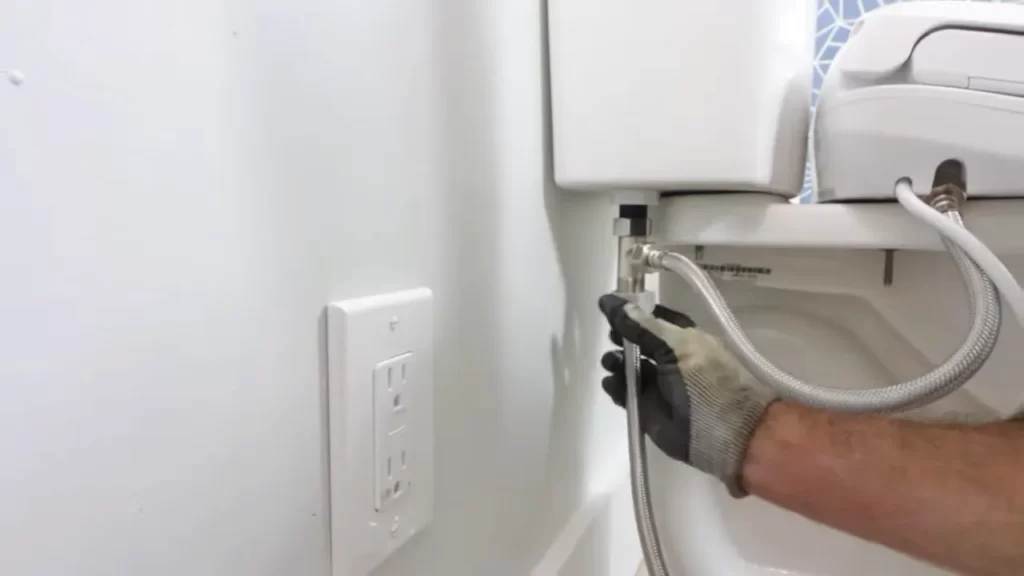
Connect the other end of the hose to the water supply valve
With the hose securely attached to the bidet seat or attachment, the next step is to connect the other end to the water supply valve. The water supply valve is typically located near the toilet tank or beneath the sink.
Before connecting the hose, ensure that the water supply valve is turned off to prevent any water leakage. Insert the other end of the hose into the water supply valve and tighten it clockwise until it is firmly secured.
Once all the necessary components are connected, turn on the water supply valve and check for any leaks or drips. A visual inspection will help identify any potential issues. If there are no leaks, you are now ready to use your newly installed bidet toilet!
Attaching The Bidet To The Toilet
Attaching the bidet to the toilet is the crucial step that will bring you one step closer to experiencing the luxury and cleanliness a bidet provides. By following a few simple steps, you can successfully attach the bidet seat or attachment to your toilet bowl. Let’s dive in and explore how to accomplish this with ease.
Position the bidet seat or attachment correctly on the toilet bowl
Before securing the bidet in place, it’s essential to ensure that it is positioned correctly on the toilet bowl. Begin by removing the toilet seat if you have one installed. Clean the toilet bowl surface thoroughly, removing any dirt or debris that may hinder the smooth attachment of the bidet.
Next, align the bidet seat or attachment with the bolt holes on the toilet bowl. Keep in mind that different bidets may have varying mounting systems, so refer to the manufacturer’s instructions for specific guidance.
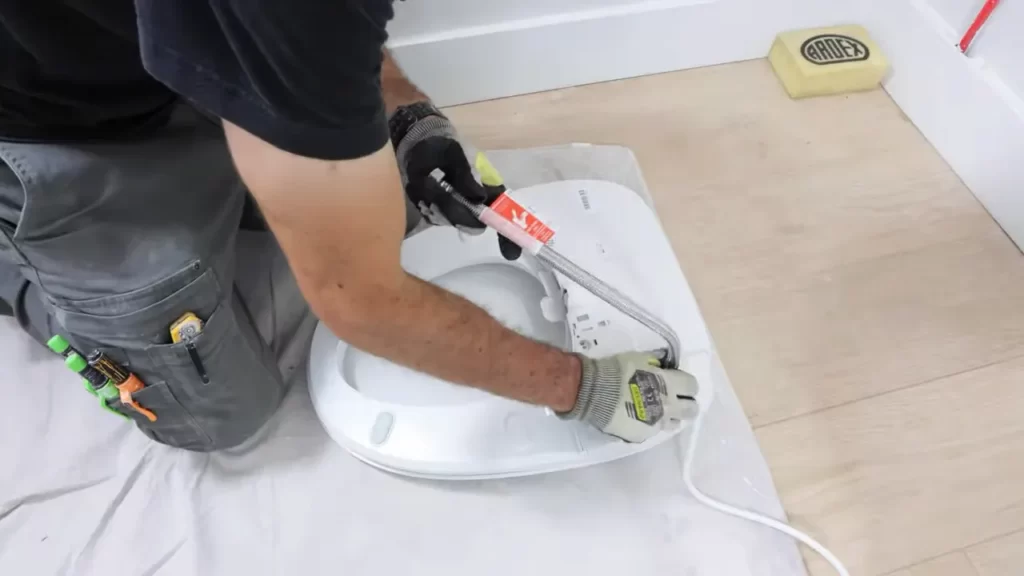
Secure the bidet in place using the provided hardware
Once the bidet is correctly positioned, it’s time to secure it in place using the provided hardware. Typically, this will include bolts, washers, and nuts. Insert the bolts through the appropriate holes on the bidet seat or attachment and through the corresponding holes on the toilet bowl.
Then, place the washers over the bolts to ensure a tight and stable fit. Finally, fasten the nuts onto the bolts and tighten them securely using a wrench. It’s important to strike a balance between tightening the nuts enough to prevent movement but avoiding overtightening, which can damage the bidet or toilet bowl.
Make sure all connections are tight and leak-free
To ensure optimal functionality and avoid any unwelcome surprises, it’s crucial to double-check that all connections are tight and leak-free. Give each connection a gentle tug to ensure stability. If you notice any loose connections, revisit the tightening process and make adjustments as necessary.
Additionally, to prevent leakage, inspect the water supply line connection and ensure it is firmly attached. If you discover any signs of leakage, such as drips or wetness, promptly address the issue by tightening the corresponding fittings or contacting a professional for assistance.
By following these simple steps, you can confidently attach the bidet to your toilet and embark on a new level of cleanliness and comfort.
Restoring The Water Flow And Checking For Functionality
Once you have successfully installed your bidet toilet, the next step is to restore the water flow and check for functionality. This crucial step ensures that your bidet is working properly and ready to provide you with a refreshing and hygienic experience. In this section, we will guide you through the necessary steps to ensure a smooth restoration process.
Turn on the water supply valve
Before you can begin testing your bidet toilet, you need to turn on the water supply valve. Locate the valve, typically positioned near the floor behind the toilet, and turn it counterclockwise to open it. This will allow the water to flow into the bidet and its associated components.
Allow the tank to fill and check for leaks
After opening the water supply valve, it’s important to give the bidet toilet tank enough time to fill up. This process may take a few minutes, depending on your water pressure. While the tank is filling, keep a keen eye out for any leaks. Inspect all the joints and connections to ensure that there are no visible signs of water leakage. If you notice any leaks, tighten the connections or adjust the fittings as needed.
Test the bidet functions and adjust settings as needed
Once the tank is filled and there are no leaks, it’s time to test the bidet functions. Sit on the toilet seat and activate the bidet by pressing the corresponding buttons or switches. Pay attention to the water pressure, temperature, and direction of the water spray. Adjust the settings as needed to suit your preferences. Some bidets offer customizable options such as water temperature, spray intensity, and even different types of spray patterns. Take the time to familiarize yourself with these settings and find the perfect combination that suits your comfort.
As you test the bidet functions, make sure that the water spray is aimed correctly and covers the desired area. If necessary, adjust the position of the bidet nozzle to ensure optimal coverage. Additionally, be mindful of the water pressure to ensure it is neither too strong nor too weak. Finding the right balance will enhance your bidet experience and leave you feeling clean and refreshed.
By following these steps, you can confidently restore the water flow and check for functionality of your newly installed bidet toilet. Remember to always read and follow the manufacturer’s instructions for your specific bidet model to ensure proper installation and usage. Now, you can enjoy the many benefits that a bidet toilet has to offer – improved cleanliness, reduced toilet paper waste, and a touch of luxury in your bathroom routine.
Experience The Comfort And Cleanliness
Installing a bidet toilet can bring a new level of comfort and cleanliness to your bathroom routine. Say goodbye to the traditional way of cleaning yourself with toilet paper and welcome the convenience and hygiene of a bidet. With its advanced features and settings, a bidet toilet ensures a thorough cleanse and a refreshing experience each time you use it. Not only does it provide superior cleanliness, but it also offers additional comfort that you never knew you needed. So, if you’re ready to enhance your bathroom experience, let’s dive into the world of bidet toilet installation.
Familiarize Yourself with the Bidet Features and Settings
Before you begin installing your bidet toilet, it’s important to familiarize yourself with its features and settings. Bidet toilets come with a range of personalized options, allowing you to tailor your cleansing experience to your preferences.
Water Temperature: Many bidet toilets offer adjustable water temperature settings, ensuring your wash is as warm or cool as you desire. This feature allows you to find the perfect temperature for your comfort.
Water Pressure: Control the intensity of your wash with adjustable water pressure settings. Whether you prefer a gentle cleanse or a more invigorating spray, the bidet toilet can accommodate your needs.
Nozzle Position: The position of the wash nozzle can vary on different bidet toilets. Some models allow you to adjust the nozzle position, ensuring accurate cleaning for people of all sizes and body types.
Additional Features: Depending on the model, bidet toilets may come with additional features such as a warm air dryer, a deodorizer, or even a night light. These features add an extra touch of luxury and convenience to your bathroom experience.
Enjoy the Improved Hygiene and Additional Comfort
Once you have familiarized yourself with the bidet toilet’s features and settings, it’s time to enjoy the enhanced hygiene and comfort it provides. Bidet toilets utilize a stream of water to cleanse, effectively removing bacteria and ensuring a thorough cleanse every time.
Not only does a bidet toilet provide superior cleanliness, but it also offers additional comfort that can make a noticeable difference in your daily routine. The adjustable water temperature and pressure settings allow you to create a personalized wash experience that leaves you feeling clean and refreshed. No more discomfort or irritation that can often be associated with using toilet paper alone.
Experience the utmost comfort as you say goodbye to the cold, abrasive feel of toilet paper, and hello to the gentle touch of warm water. The bidet toilet’s advanced features and settings can transform your bathroom routine into a spa-like experience, while also reducing the amount of toilet paper waste produced.
So, why settle for an ordinary toilet when you can elevate your bathroom experience with a bidet? Install a bidet toilet today and experience the comfort, cleanliness, and convenience it offers. Upgrade your bathroom routine and enjoy the refreshing feeling of a bidet wash.
Addressing Common Issues And Ensuring Proper Upkeep
When it comes to installing a bidet toilet, addressing common issues and ensuring proper upkeep are essential for maintaining its performance and functionality for years to come. In this section, we will discuss how to identify and troubleshoot any bidet-related problems, as well as give you tips on regularly cleaning the bidet seat or attachment, and keeping an eye on water pressure and temperature for optimal performance.
Identify and troubleshoot any bidet-related problems
If you encounter any issues with your bidet toilet, it’s important to identify and troubleshoot them promptly. Here are some common problems you may face and their possible solutions:
| Issue | Solution |
|---|---|
| Low water pressure | Check if the water supply valve is fully open. Remove any debris or sediment that may be blocking the water inlet. If the problem persists, contact a professional plumber. |
| Nozzle not functioning | Make sure the bidet seat or attachment is properly connected to the water supply. Check if the nozzle is clogged and clean it if necessary. If the nozzle is damaged, consider replacing it. |
| Unusual noise during operation | Inspect the bidet toilet for any loose parts or connections. Tighten as needed. If the noise persists, contact the manufacturer or a professional technician for further assistance. |
Regularly clean the bidet seat or attachment
To maintain hygiene and extend the lifespan of your bidet toilet, it’s crucial to clean the bidet seat or attachment on a regular basis. Follow these steps for effective cleaning:
- Turn off the water supply and unplug the bidet seat or attachment from the power source.
- Use a mild, non-abrasive cleaner and a soft cloth to clean the exterior of the bidet. Avoid using harsh chemicals or abrasive materials that can damage the surface.
- Remove the nozzle cap and clean the nozzle using a toothbrush or a small brush. Avoid using sharp objects that can scratch or damage the nozzle.
- Flush the bidet seat or attachment with clean water to remove any remaining residue.
- Allow the bidet to air-dry completely before reconnecting it to the water supply and power source.
Keep an eye on water pressure and temperature for optimal performance
Proper water pressure and temperature are crucial for the optimal performance of your bidet toilet. Here are a few things to keep in mind:
- Check the water pressure regulator valve to ensure it is set within the recommended range for your bidet. Adjust it if necessary.
- Monitor the water temperature settings and make adjustments if the water feels too hot or too cold. Refer to the manufacturer’s instructions for guidance.
- If you notice a significant decrease in water pressure or irregular temperature fluctuations, contact a professional plumber to inspect the water supply and plumbing connections.
By properly addressing common issues and regularly maintaining your bidet toilet, you can ensure its longevity and enjoy the comfort and cleanliness it brings to your bathroom routine.
Frequently Asked Questions
Can You Add A Bidet To A Regular Toilet?
Yes, you can easily add a bidet to a regular toilet. It’s a simple installation process that doesn’t require any special tools or expertise. Adding a bidet offers the benefits of improved hygiene, comfort, and cleanliness. Upgrade your regular toilet with a bidet for a more healthful and refreshing bathroom experience.
Does A Bidet Require Special Plumbing?
No, bidets do not require special plumbing. They can be easily installed in most bathrooms without the need for additional plumbing modifications or changes.
How Do You Drain A Toilet To Install A Bidet?
To drain a toilet for bidet installation, turn off the water supply valve, flush the toilet to empty the tank, and use a sponge to remove any remaining water. Unscrew the water supply hose and disconnect it from the toilet tank.
Do Bidet Toilets Need Hot Water Line?
No, bidet toilets do not necessarily need a hot water line. Some bidet toilets have adjustable temperature settings, while others use room temperature water. The choice of a hot water line depends on personal preference and the model of the bidet toilet.
Conclusion
Installing a bidet toilet is a simple and efficient way to improve your bathroom experience. By following the step-by-step process outlined in this blog post, you can easily install a bidet toilet in your home. From gathering the necessary tools to connecting the water supply, we’ve covered all the essential information to make your installation smooth and successful.
Say goodbye to traditional bathroom routines and welcome the convenience and hygiene benefits of a bidet toilet. Upgrade your bathroom today!