To install a bidet seat, first, shut off the water supply, then remove the existing toilet seat and install the bidet seat according to the manufacturer’s instructions. Now you can enjoy the benefits of a bidet seat in your bathroom.
When it comes to upgrading your bathroom, installing a bidet seat can be a game-changer. Bidet seats offer a more hygienic and comfortable alternative to traditional toilet paper. Plus, they are easy to install and can fit on most standard toilets.
In this guide, we will walk you through the process of installing a bidet seat in just a few simple steps. With a little bit of time and effort, you can transform your bathroom experience and enjoy the cleanliness and comfort of a bidet seat. So, let’s get started!
Factors To Consider
When it comes to installing a bidet seat, there are several factors to consider to ensure a seamless and efficient installation process. These factors include toilet compatibility, water supply options, and features and functionalities. By carefully evaluating these factors, you can make an informed decision and choose the right bidet seat for your needs.
Toilet Compatibility
Before purchasing and installing a bidet seat, it is crucial to check the compatibility with your existing toilet. Not all toilets are designed to accommodate bidet seats, so it is essential to verify if your toilet is compatible.
To determine toilet compatibility, consider the following:
- The shape of your toilet bowl – bidet seats are typically compatible with round and elongated toilet bowls. Measure the length and width of your toilet bowl to ensure a proper fit.
- The availability of mounting holes – bidet seats require mounting holes on the toilet bowl for installation. Check if your toilet has these holes before buying a bidet seat.
- The presence of a water supply connection – bidet seats require a water supply connection to function. Ensure that your toilet has a water supply line nearby or opt for an alternative water supply option.
Water Supply Options
The next factor to consider is the water supply options for your bidet seat. There are three main types of water supply options:
- Rear spray – this option uses freshwater directly from the existing water supply line to provide a rear wash.
- Feminine wash – this option provides a gentler front wash for females, utilizing freshwater from the existing water supply line.
- Warm water wash – if you prefer a warm water wash, you will need a bidet seat with a built-in water heater or an additional connection to a hot water supply line.
Consider your preferences and the availability of water connections when selecting the appropriate water supply option for your bidet seat.
Features and Functionalities
Lastly, it is essential to consider the features and functionalities of the bidet seat. Bidet seats come with a variety of options, including:
- Adjustable water pressure and temperature – choose a bidet seat that allows you to adjust the water pressure and temperature according to your preference.
- Self-cleaning nozzles – some bidet seats offer self-cleaning nozzles that ensure optimal hygiene and cleanliness.
- Air-dry feature – if you prefer a hands-free drying option, consider a bidet seat with an air-dry feature.
- Remote control operation – for added convenience, select a bidet seat that comes with a remote control for easy operation.
Consider your needs and preferences when evaluating the features and functionalities of the bidet seat. Prioritize the features that are important to you to ensure a satisfying user experience.

Measurements And Dimensions
If you’re considering installing a bidet seat in your bathroom, it’s important to take accurate measurements and consider the dimensions of the seat. In this section, we will outline the key aspects you need to know about seat size and shape, fixing points, and clearance space requirements.
Seat Size and Shape
Before purchasing a bidet seat, it’s crucial to check the size and shape of your existing toilet seat. bidet seats come in various sizes and shapes to accommodate different toilet models.
| Seat Shape | Dimensions (in inches) |
|---|---|
| Round | 16.5 x 14.5 |
| Elongated | 18.5 x 14.5 |
| Compact Elongated | 16.5 x 14.5 |
By understanding the shape and size of your existing toilet seat, you can select a bidet seat that will fit seamlessly on your toilet.
Fixing Points
When installing a bidet seat, you need to consider the fixing points. These are specific areas of the toilet bowl where the bidet seat attaches securely. It’s important to ensure that your toilet has the necessary fixing points for the bidet seat you intend to install.
Common fixing points include:
- Two holes at the back of the toilet bowl
- A center hole at the back of the toilet bowl
- Mounting brackets on the sides of the toilet bowl
Make sure to carefully read the installation instructions provided by the bidet seat manufacturer to ensure compatibility with your toilet’s fixing points.
Clearance Space Requirements
Another crucial aspect to consider is the clearance space requirements for the bidet seat. This refers to the space needed between the bidet seat and other fixtures, such as the toilet tank, walls, and other bathroom components.
Here are some general clearance space requirements to keep in mind:
- Front clearance: at least 1.5 inches from the front edge of the toilet bowl to ensure comfortable seating
- Side clearance: typically 1-2 inches on each side for proper installation and operation
- Tank clearance: ensure there is enough space between the bidet seat and the toilet tank to avoid obstruction
By measuring the available space in your bathroom and considering these clearance requirements, you can ensure a hassle-free and proper installation of your bidet seat.
Gathering Tools And Materials
Before you begin installing your bidet seat, it’s important to gather all the necessary tools and materials. Here is a list of items you will need:
Adjustable Wrench
An adjustable wrench is a versatile tool that will come in handy during the installation process. It allows you to easily tighten and loosen nuts and bolts of various sizes. Make sure you have this tool nearby before you start.
Screwdriver
A screwdriver is another essential tool you’ll need for installing a bidet seat. It enables you to securely fasten screws and other small components. Be sure to have both a Phillips and a flathead screwdriver, as different screws may require different types.
Teflon Tape
Teflon tape, also known as plumber’s tape, is a must-have material for preventing leaks in plumbing connections. It’s a thin, white tape that is wrapped around pipe threads to create a watertight seal. You’ll need this to ensure a tight and secure fit when connecting the water supply.
Plumber’s Putty
In addition to Teflon tape, plumber’s putty is another material you’ll want to have on hand. This moldable substance is used to create a water-resistant seal between the bidet seat and the toilet bowl. It helps prevent any leakage and ensures a proper installation.
Gathering these tools and materials beforehand will save you time and frustration during the bidet seat installation process. It’s always better to be prepared, so make sure you have everything you need before getting started.
Shutting Off Water Supply
If you’re looking to install a bidet seat, one of the first steps you’ll need to take is shutting off the water supply. This is an important precautionary measure to ensure a smooth and hassle-free installation process. In this section, we’ll guide you on how to locate the shut-off valve and how to turn off the water supply.
Locating the shut-off valve
The shut-off valve is a small lever or knob that controls the water flow to a specific fixture or area of your house. In the case of your bidet seat installation, you’ll need to locate the shut-off valve that controls the water supply to your toilet. It is usually found on the wall or the floor near the base of the toilet.
To locate the shut-off valve, follow these steps:
- Start by visually inspecting the pipes around the base of your toilet. Look for a small valve that is connected to the water supply pipe.
- If you’re unable to locate the shut-off valve visually, you may need to feel around the pipes with your hand to find it. The valve is typically made of metal and can be turned on or off by twisting it.
- Once you have located the shut-off valve, you can proceed to the next step of turning off the water supply.
Turning off the water supply
To turn off the water supply to your bidet seat, follow these simple instructions:
- With caution, grip the shut-off valve handle or lever firmly.
- Turn the valve clockwise until it stops. This will shut off the water supply to your toilet.
It’s important to note that turning off the water supply will stop the flow of water not only to your bidet seat but also to your toilet. Therefore, it’s recommended to inform other household members to avoid using the toilet during the installation process.
By following these steps to shut off the water supply, you’re now ready to continue with the bidet seat installation. Remember, taking this precautionary measure ensures a hassle-free installation experience and helps prevent any potential water leaks or damage.
Removing The Existing Toilet Seat
Removing the existing toilet seat is the first step in installing a bidet seat and is relatively straightforward. By following a few simple steps, you can easily detach the old seat and prepare the toilet bowl for the new bidet seat. In this section, we will guide you through the process of removing the existing toilet seat and provide you with step-by-step instructions to make it even easier. Let’s get started!
Unscrewing the bolts
The first thing you need to do is locate the bolts that secure the toilet seat to the bowl. These bolts are usually located on the bottom of the bowl, at the back of the seat. Using a wrench or a pair of pliers, carefully unscrew the bolts in a counterclockwise direction. Make sure to hold the bolt steady with one hand while turning the nut to prevent the bolt from spinning.
Detaching the seat from the toilet bowl
Once both bolts have been unscrewed, you can easily detach the seat from the toilet bowl. Grasp the seat firmly with both hands and lift it straight up and away from the bowl. You may need to wiggle it slightly to loosen it from any adhesive or debris that may be holding it in place. Place the old seat aside for disposal or recycling.
Now that you have successfully removed the old toilet seat, you can move on to the next steps of installing your bidet seat. Remember to follow the manufacturer’s instructions for installing your specific bidet seat, as each model may have slight variations in the installation process.
In case you encounter any difficulty or if the bolts are rusted or too tight to unscrew, you can try using a penetrating oil such as WD-40 to loosen the bolts. Apply the oil on the bolt threads and let it sit for a few minutes to penetrate into the rust or debris. Then, use pliers or a wrench to try unscrewing the bolts again.
Remember, safety is of utmost importance, and it’s always a good idea to wear gloves and protective eyewear while working with tools. Take your time, be patient, and follow the instructions carefully to ensure a successful bidet seat installation.
Now that you’ve completed the task of removing the existing toilet seat, you are one step closer to enjoying the many benefits of a bidet seat. In the next section, we will guide you through the installation process, from preparing the toilet bowl to connecting the bidet seat. Stay tuned!
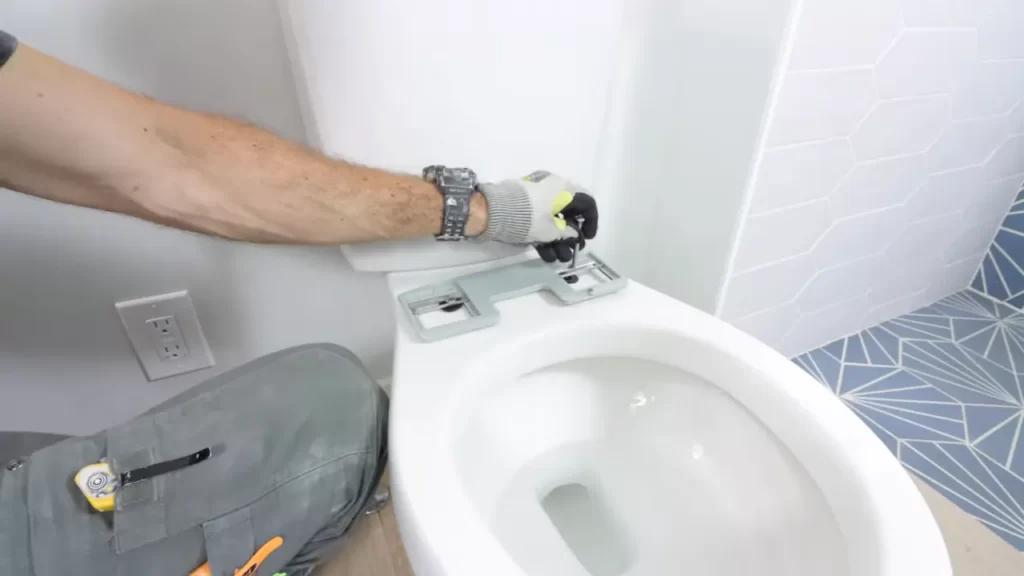
Mounting The Bidet Seat
Positioning the seat on the toilet bowl
When it comes to mounting a bidet seat, properly positioning it on the toilet bowl is key. You want to ensure that the seat is securely attached and aligned with the bowl for a comfortable and efficient bidet experience. Here are the steps to follow:
- Start by removing the existing toilet seat by unscrewing the bolts located at the back of the seat. Keep in mind that bidet seats are designed to be compatible with most standard toilets, so you should have no trouble fitting it.
- Next, inspect the toilet bowl to ensure it is clean and free from any dirt or debris. Clean the bowl thoroughly if necessary.
- Take your bidet seat and position it on the toilet bowl, making sure it is centered and aligned properly.
- Check that the alignment is correct by looking at the holes on the bidet seat and matching them up with the corresponding holes on the toilet bowl.
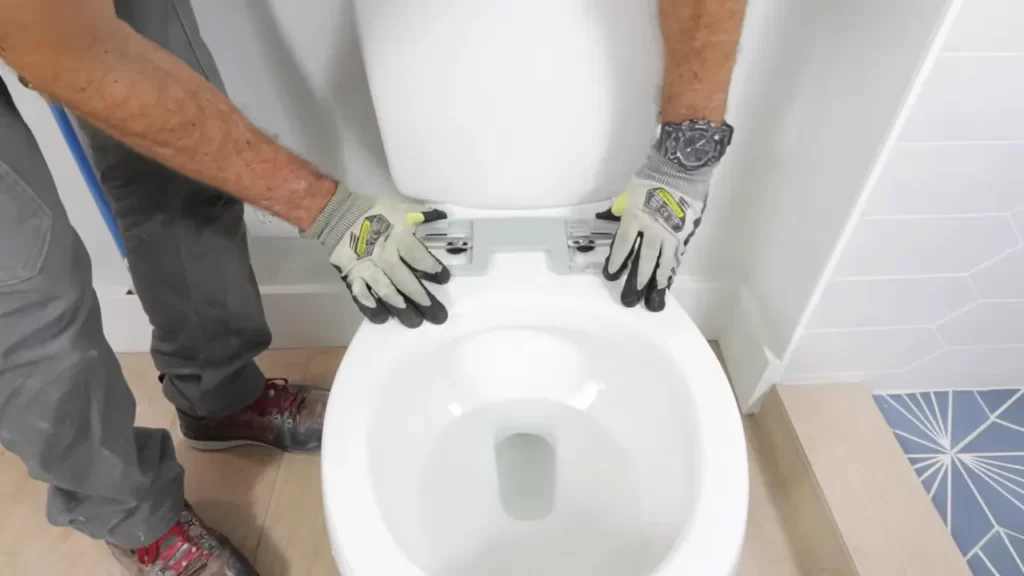
Aligning the fixing points
Once you have positioned the bidet seat on the toilet bowl, the next step is to align the fixing points. This will ensure that the seat is securely fastened and does not move during use. Follow these steps to align the fixing points:
- Tighten the bolts at the back of the bidet seat, ensuring they are aligned with the holes on the toilet bowl.
- Use a screwdriver or wrench to securely tighten the bolts. Make sure not to overtighten, as this could damage the bidet seat or toilet bowl. You want the seat to be snug, but not overly tight.
- Double-check the alignment of the fixing points to ensure that the bidet seat is properly secured.
- Once you are confident that the bidet seat is securely mounted and aligned, give it a gentle shake to confirm its stability.
By following these steps, you can successfully mount a bidet seat on your toilet bowl. Enjoy the comfort and hygiene benefits that a bidet seat can provide!
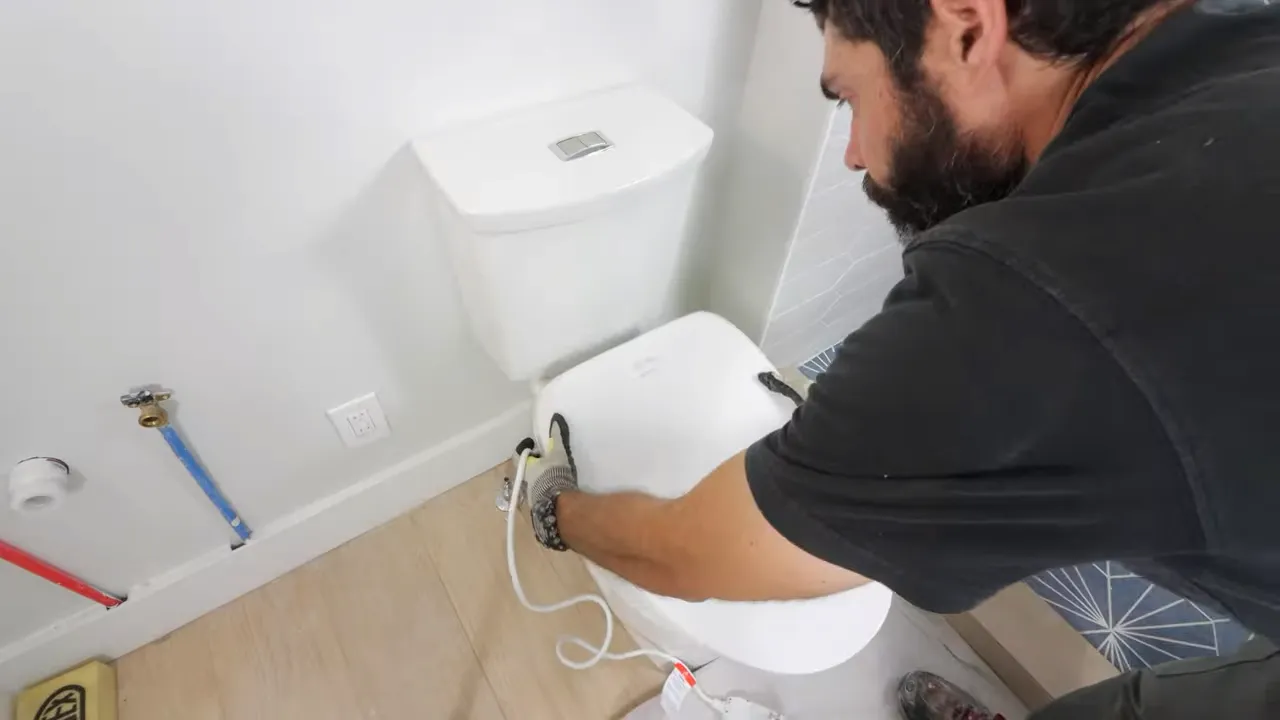
Connecting The Water Supply
Connecting the water supply to your bidet seat is an essential step to ensure its functionality. By following these instructions, you can easily complete this task and enjoy the benefits of a bidet seat in no time.
Attaching the Water Supply Hose
To begin, locate the water supply valve, usually located behind the toilet. This valve controls the water flow to the toilet tank. Make sure to shut off the water supply by turning the valve clockwise.
Next, connect one end of the water supply hose to the bidet seat’s inlet valve. This is typically found at the bottom of the bidet seat. Ensure a secure connection by tightening the hose onto the inlet valve with an adjustable wrench, making sure it is firmly in place.
Once the bidet seat’s inlet valve is connected, identify the other end of the water supply hose. This end should be attached to the water supply valve behind the toilet. Again, use an adjustable wrench to securely fasten the hose to the valve, ensuring there are no leaks.
Applying Teflon Tape to Ensure a Watertight Seal
Before connecting the water supply hose, it is essential to apply Teflon tape to create a watertight seal. Teflon tape, also known as plumber’s tape, helps prevent leaks by filling in the spaces between threaded connections.
To apply the Teflon tape, start at the end of the threads and wrap the tape in a clockwise direction. Be sure to cover all the threads with two to three layers of tape, ensuring a tight seal. Once wrapped, snip off any excess tape.
After applying the Teflon tape, connect the water supply hose to both the bidet seat’s inlet valve and the water supply valve. Tighten the connections with the adjustable wrench to secure them in place.
Testing for Leaks
After connecting the water supply hose and applying the Teflon tape, it is crucial to test for leaks. Slowly turn on the water supply valve, allowing water to flow into the bidet seat.
Inspect the connections for any signs of leaks, such as water dripping or spraying. If you notice any leaks, immediately turn off the water supply valve and double-check the connection’s tightness. You may need to reapply Teflon tape or tighten the connections further.
Once you are confident that there are no leaks, flush the bidet seat to ensure proper water flow and functionality. Congratulations, you have successfully connected the water supply to your bidet seat!
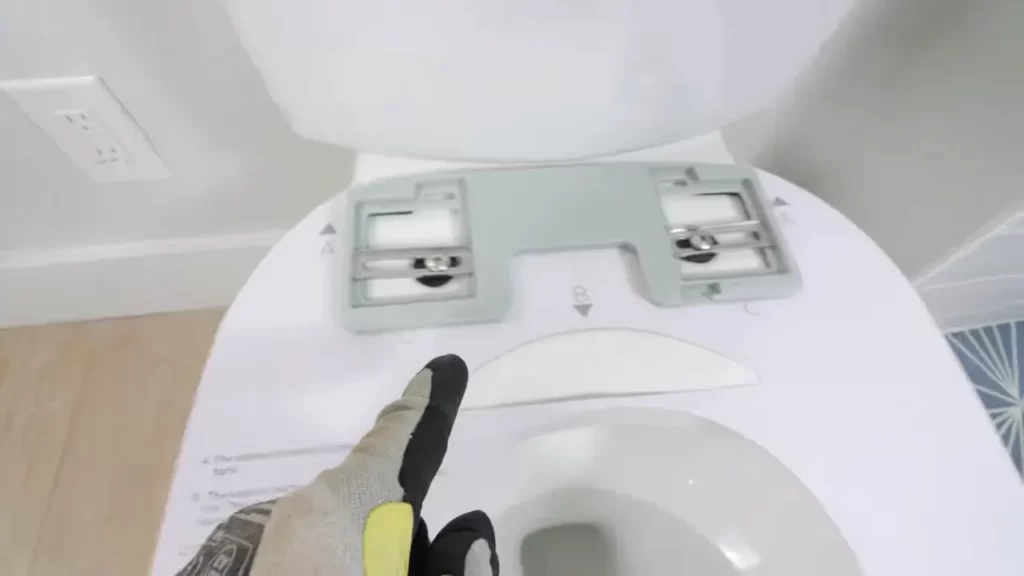
Securing The Bidet Seat
Tightening the Fixing Bolts
When it comes to securing your bidet seat, one of the most important steps is to properly tighten the fixing bolts. These bolts are responsible for keeping the seat securely in place, so it’s crucial to ensure they are tight and secure. To do this, follow these steps:
- Start by placing the bidet seat onto the toilet bowl, aligning it with the mounting holes.
- Once the seat is in position, locate the fixing bolts on the underside of the seat.
- Using a screwdriver or wrench, carefully tighten the bolts. Be sure not to overtighten, as this can cause damage to the seat or the toilet bowl.
- After tightening the bolts, give the seat a gentle shake to test its stability. If it feels loose, continue tightening the bolts until it feels secure.
Ensuring Stability and Proper Alignment
Ensuring the stability and proper alignment of your bidet seat is essential for a comfortable and functional experience. To achieve this, consider the following tips:
- Check that the bidet seat is centered and aligned with the toilet bowl. This will prevent any wobbling or tilting during use.
- Make sure the seat is securely attached to the mounting holes. If it feels unstable, double-check the tightness of the fixing bolts.
- If needed, use additional washers or spacers to achieve the desired alignment and stability.
- Take a moment to sit on the bidet seat and test its stability. If you notice any movement or rocking, go back and adjust the fixing bolts as necessary.
By following these steps and taking the time to properly secure your bidet seat, you can ensure a stable and comfortable experience every time you use it. So don’t overlook this crucial step in the installation process!
Testing The Bidet Seat
Once you have successfully installed the bidet seat on your toilet, it’s time to test its functionality to ensure everything is working properly. Testing the bidet seat not only ensures that you have installed it correctly but also allows you to familiarize yourself with the different features and settings it offers.
Turning on the water supply
To begin testing the bidet seat, turn on the water supply valve located under your toilet tank. Slowly open the valve to allow water to flow into the bidet seat. Ensure that the water pressure is adequate for the bidet seat to function effectively. Adjust the water pressure if necessary, keeping in mind that too high pressure might cause discomfort while too low pressure may not provide the desired cleansing experience.
Checking for leaks and proper functionality
With the water supply turned on, carefully inspect the bidet seat for any leaks. Check the connections between the bidet seat and the water supply line, as well as the connection between the bidet seat and the toilet bowl. If you notice any leaks, tighten the connections as needed. Do not overtighten, as it may damage the fittings.
Once you have confirmed that there are no leaks, test the different functionality of the bidet seat. Activate the cleansing options such as front or rear wash, oscillation, or pulsation, if available. Adjust the water temperature and pressure settings as per your preference. Ensure that all the buttons and controls are functioning correctly and responding promptly.
The bidet seat may also offer additional features such as a heated seat, warm air dryer, or deodorizer. Test these features to ensure they are working properly. Sit on the bidet seat and check if it is comfortable and fits securely on your toilet.
During the testing process, familiarize yourself with the controls and settings of the bidet seat. Read the user manual to fully understand how to use and customize the bidet seat according to your needs. Take your time to experiment with the different options so that you can fully enjoy the benefits it offers.
By diligently testing the bidet seat, you can ensure that it is functioning correctly and meets your expectations for a refreshing and hygienic bathroom experience.
Troubleshooting Common Issues
Installing a bidet seat in your bathroom can bring convenience and comfort to your daily routine. However, like any other home appliance, bidet seats can sometimes encounter common issues. Troubleshooting these issues can help ensure that your bidet seat operates properly and efficiently. In this section, we will discuss some of the most common problems that users might encounter when installing a bidet seat, and provide simple solutions to address them.
Water Pressure Problems
One of the most common issues that users experience with bidet seats is water pressure problems. If you find that the water pressure is too low or inconsistent, there are a few possible reasons for this. Firstly, check if the water supply valve is fully open. Sometimes, the valve may only be partially open, which can restrict the water flow. Make sure that the valve is turned fully counterclockwise to ensure maximum water pressure.
If the water pressure remains low even with the valve fully open, it may be due to a clogged water filter. Bidet seats typically have a built-in filter to prevent debris from entering the spray nozzle. Over time, this filter can become clogged and impede water flow. To clean the filter, first, turn off the water supply by shutting off the valve. Then, remove the bidet seat from the toilet and locate the filter. Carefully remove the filter and clean it under running water to remove any debris or sediment. Once the filter is clean, reassemble the bidet seat and test the water pressure again.
If the issue persists, it may be necessary to check the water pressure coming from your home’s water supply. Low water pressure from the main supply can affect the performance of your bidet seat. You can contact a plumber to assess and increase the water pressure if necessary.
Seat Wobbling or Unsteadiness
An unsteady or wobbling bidet seat can be both annoying and potentially dangerous. If you find that your bidet seat is not securely attached to the toilet, there are a few possible causes. Firstly, check if the mounting bolts are properly tightened. Over time, these bolts can loosen, causing the seat to wobble. Using a wrench or pliers, carefully tighten the bolts to ensure a secure fit.
If tightening the bolts does not solve the issue, it may be necessary to replace the mounting hardware. Over time, the hardware can wear out or become damaged, compromising the stability of the bidet seat. Contact the manufacturer for replacement hardware or consult a professional plumber for assistance.
In some cases, the wobbling may be caused by an uneven toilet bowl surface. If the toilet bowl is not level, it can affect the stability of the bidet seat. To address this, try using shims or wedges to stabilize the toilet bowl. Place the shims under the areas that are uneven, and then reattach the bidet seat. This should help eliminate any wobbling or unsteadiness.
By troubleshooting these common issues, you can ensure that your bidet seat operates smoothly and provides you with the ultimate comfort and cleanliness in your bathroom. Remember to always read the manufacturer’s instructions and seek professional assistance if needed. Enjoy the benefits of your bidet seat and the convenience it brings to your daily hygiene routine!
Adjusting Seat Settings
Adjusting the seat settings of your bidet seat is crucial to ensure a comfortable and personalized experience. With the ability to customize water temperature and modify water pressure, you can tailor your bidet seat to meet your unique preferences. In this section, we will explore how to adjust these settings to achieve maximum comfort and functionality.
Customizing Water Temperature
Customizing the water temperature of your bidet seat is a simple process that can greatly enhance your comfort during use. Most bidet seats offer the option to adjust the water temperature to meet your personal preferences. Here’s how you can do it:
- Locate the control panel situated on the side of your bidet seat.
- Press the temperature settings button to access the water temperature adjustment menu.
- Using the up and down arrows on the control panel, increase or decrease the temperature to your desired level.
- Once you have set your desired temperature, press the save button to confirm and save your settings.
By customizing the water temperature, you can ensure a refreshing, warm cleansing experience every time you use your bidet seat.
Modifying Water Pressure
Modifying the water pressure of your bidet seat allows you to personalize the cleansing sensation according to your preference. Whether you prefer a gentle, soothing spray or a stronger, invigorating cleanse, adjusting the water pressure is effortless. Follow these steps to modify the water pressure:
- Locate the control panel on the side of your bidet seat.
- Press the water pressure settings button to access the pressure adjustment menu.
- Using the up and down arrows on the control panel, increase or decrease the water pressure to your desired level.
- Once you have set your desired pressure, press the save button to confirm and save your settings.
By modifying the water pressure, you can personalize your cleansing experience and ensure optimal comfort and cleanliness.
Regular Cleaning Routine
Using Mild Soap and Water
Regular cleaning is essential to maintain the hygiene and functionality of your bidet seat. When it comes to cleaning, the key is to use mild soap and water. This gentle combination effectively removes dirt, residue, and bacteria without causing any damage to the bidet seat.
Start by diluting a small amount of mild soap in warm water. Avoid using harsh chemicals as they can deteriorate the bidet seat or cause skin irritation. Dip a soft cloth or sponge into the soapy mixture and gently scrub the seat’s surface, paying attention to hard-to-reach areas. Wipe down thoroughly with a clean, damp cloth to remove any soap residue.
It’s important to note that excessive use of soap or abrasive cleaners can lead to discoloration or damage to the bidet seat. Therefore, follow manufacturer guidelines and only use mild soap sparingly.
Avoiding Harsh Chemicals
When it comes to cleaning your bidet seat, it’s crucial to avoid using harsh chemicals. Harsh chemicals not only pose a risk to your health but can also deteriorate the bidet materials over time. Instead, stick to mild, non-abrasive cleaners that are safe for both you and your bidet seat.
For stubborn stains or trapped residue, you can make a natural cleaning solution using ingredients readily available in your kitchen. For example, mixing equal parts vinegar and water creates an effective and eco-friendly cleaning agent. Apply this solution to the affected areas and let it sit for a few minutes. Then, gently scrub and rinse with warm water to remove the stains or residue.
Remember, the goal is to keep your bidet seat clean and in optimum condition without compromising its functionality or longevity. By avoiding harsh chemicals, you not only protect your health but also ensure that your bidet seat remains in top-notch condition for years to come.
Maintaining Proper Hygiene
Maintaining Proper Hygiene
Proper hygiene is essential for everyone, and installing a bidet seat in your bathroom can significantly help in achieving it. Bidet seats offer a more thorough and hygienic way of cleaning yourself after using the toilet, as compared to traditional toilet paper. In this section, we will discuss two important aspects of maintaining proper hygiene when using a bidet seat: cleaning the nozzle and ensuring proper drying.
Cleaning the nozzle
The nozzle of your bidet seat plays a crucial role in providing you with a clean and refreshing experience. Regular cleaning of the nozzle is necessary to prevent any buildup of dirt or bacteria. Follow these steps to clean the nozzle effectively:
1. Start by turning off the water supply to the bidet seat.
2. Gently detach the nozzle from the seat unit. Refer to the manufacturer’s instructions if needed.
3. Use a mild, non-abrasive cleaning solution or a mixture of water and vinegar to clean the nozzle. Avoid using harsh chemicals or abrasive cleaners, as they can damage the nozzle.
4. Carefully wipe the nozzle with a soft cloth or sponge, making sure to reach all areas.
5. Rinse the nozzle with clean water to remove any residue from the cleaning solution.
6. Dry the nozzle thoroughly before reattaching it to the seat unit.
Ensuring proper drying
Proper drying is essential after using a bidet seat to maintain hygiene and prevent moisture-related issues. There are a few ways you can ensure adequate drying when using a bidet seat:
1. Use the built-in drying function, if available. Most bidet seats come with adjustable air-dryers that gently blow warm air to dry your skin. Adjust the temperature and intensity according to your preference.
2. If your bidet seat does not have a drying function, you can use toilet paper or a towel to pat-dry the area gently. Dispose of the used toilet paper hygienically.
3. Wait for a few moments to allow the residual moisture to evaporate naturally. This will ensure that you are completely dry before getting dressed.
By following these simple steps, you can maintain proper hygiene while using a bidet seat. Regular cleaning of the nozzle and ensuring proper drying will help keep you feeling fresh and clean throughout the day.
Remember, proper hygiene is not only important for your well-being but also contributes to your overall health. Installing a bidet seat can be a great investment in maintaining a high standard of cleanliness and hygiene. So, why not give it a try and experience the difference for yourself?
Sources:
– [Bidet Seats: A Hygienic Alternative to Toilet Paper](https://www.healthline.com/health/bidet#installation)
– [How to Clean a Bidet Sprayer or Nozzle](https://www.bidet.org/blogs/bidet-articles/how-to-clean-a-bidet-sprayer-or-nozzle)
Replacing Components
When it comes to bidet seats, there may come a time when you need to replace certain components. Whether it’s a worn-out water filter or upgrading to new features and accessories, the process of replacing these components can be fairly straightforward. In this section, we’ll discuss two key areas of component replacement: changing the water filter and upgrading features and accessories.
Changing the water filter
If you’ve been using your bidet seat for a while, it’s essential to change the water filter regularly to maintain optimal performance. The water filter helps to purify the water and ensure a clean and hygienic washing experience. Follow these simple steps to change the water filter:
- Locate the water filter housing, usually located near the back of the bidet seat.
- Unscrew the housing cover using a wrench or pliers, taking care not to damage the threads.
- Remove the old water filter and dispose of it properly.
- Insert a new water filter into the housing, making sure it is securely in place.
- Screw the housing cover back on tightly, ensuring a watertight seal.
- Run a cleaning cycle to flush out any air and debris.
- Your bidet seat is now ready to provide you with fresh and filtered water for a clean wash.
Upgrading features and accessories
If you’re looking to take your bidet experience to the next level, upgrading features and accessories can be an exciting option. From heated seats to adjustable water pressure and even remote controls, bidet seats offer a range of customizable features. Here’s how you can upgrade your bidet seat:
- Research and choose the features and accessories you want to add to your bidet seat. Some popular choices include heated seats, self-cleaning nozzles, and warm air dryers.
- Check if your current bidet seat model supports the desired upgrades. Consult the manufacturer’s product specifications for compatibility information.
- Purchase the necessary upgrade kits or accessories from a reputable supplier.
- Follow the manufacturer’s instructions to install the new features and accessories. This may involve removing certain components, connecting new parts, and adjusting settings.
- Once the upgrades are installed, test each feature to ensure proper functioning.
- Enjoy the enhanced comfort and convenience of your upgraded bidet seat.
By regularly replacing components and upgrading features and accessories, you can prolong the life of your bidet seat and enhance your overall bathroom experience. Remember to follow the manufacturer’s instructions and consult professional help if needed. With the right maintenance and upgrades, your bidet seat can continue to provide you with a hygienic and luxurious cleansing experience for years to come.
Frequently Asked Questions
Can You Install A Bidet Seat On Any Toilet?
Yes, bidet seats can be installed on any toilet.
Are Bidet Seats Easy To Install?
Bidet seats are easy to install. They can be easily attached to your existing toilet without any special plumbing or professional assistance. The installation process is simple and hassle-free, making it convenient for anyone to enjoy the benefits of a bidet seat in their bathroom.
Do You Need A Plumber To Install A Bidet Seat?
Yes, a plumber is needed to install a bidet seat. Their expertise ensures proper installation and connection to the plumbing system.
How Do You Install A Bidet For Dummies?
To install a bidet for dummies: 1. Turn off the water supply to the toilet. 2. Remove the toilet seat and position the bidet attachment. 3. Connect the bidet hose to the water supply valve and the bidet attachment. 4. Hand-tighten all connections and ensure they are secure.
5. Turn the water supply back on and check for leaks.
Conclusion
Installing a bidet seat is a simple and efficient way to upgrade your bathroom routine. By following the step-by-step instructions in this blog post, you can easily install a bidet seat without any hassle. With its numerous benefits such as improved hygiene and reduced toilet paper usage, it is a practical addition to any bathroom.
So, why wait? Start enjoying the comfort and cleanliness of a bidet seat today!