To install a bathroom sink cabinet, first, measure the available space, then assemble the cabinet, attach it to the wall studs, and connect the plumbing. Installing a bathroom sink cabinet involves measuring, assembling, attaching, and connecting, ensuring a functional and stylish addition to your bathroom.
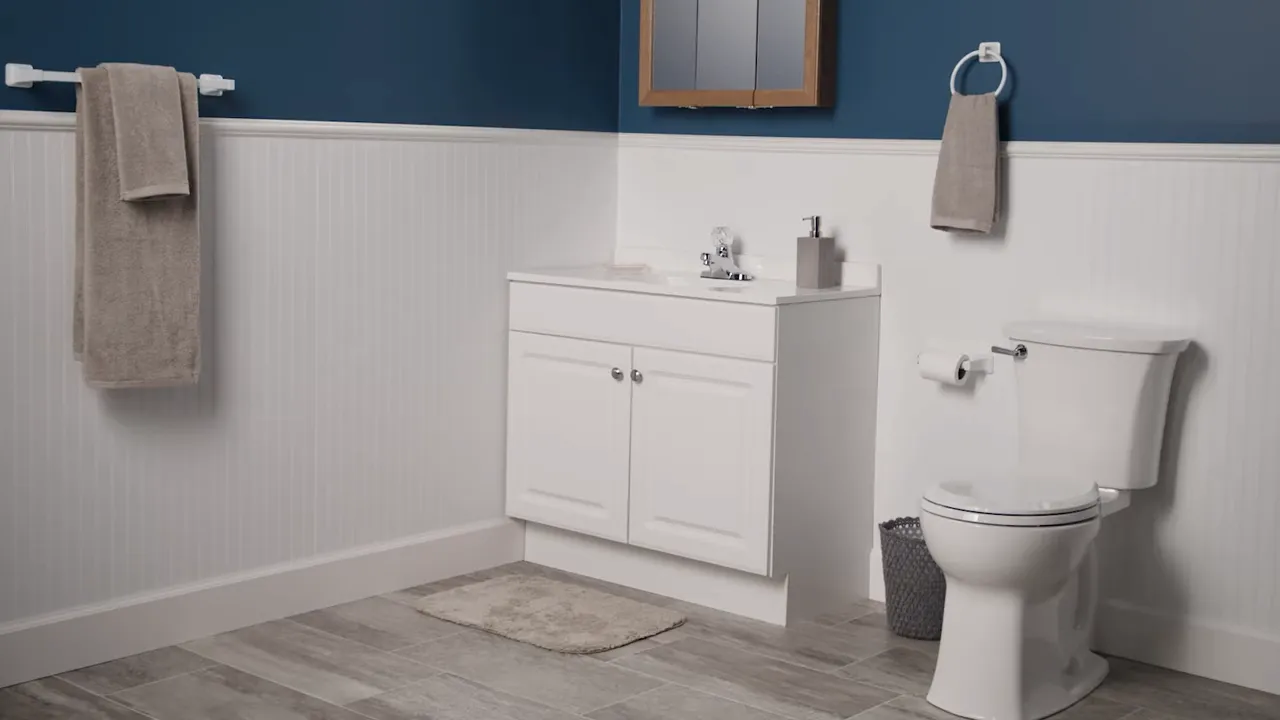
Factors To Consider When Selecting A Bathroom Sink Cabinet
Choosing the right bathroom sink cabinet is essential to create a functional and aesthetically pleasing space. With a wide array of options available, it can be overwhelming to make a decision. However, by considering a few key factors, you can ensure that you select the perfect bathroom sink cabinet that meets your needs and enhances your bathroom’s overall design.
Size and Dimensions
One of the first factors to consider when selecting a bathroom sink cabinet is the size and dimensions. Measure your bathroom space carefully to determine how much room you have available for the cabinet. Pay close attention to the depth, width, and height of the cabinet to ensure it fits your specific requirements. Additionally, consider the size of the sink you desire and choose a cabinet that can accommodate it comfortably. Remember, a well-fitting cabinet will not only maximize your storage space but also prevent any functional issues.
Style and Design
The style and design of the bathroom sink cabinet play a vital role in enhancing the overall look and feel of your bathroom. Consider the existing decor and theme of your space. Are you aiming for a modern, minimalist look or a rustic, vintage vibe? Select a cabinet that complements the overall style and color scheme. Additionally, think about the type of doors and drawers you prefer. Whether you opt for a sleek handleless design or decorative hardware, the style and design of your cabinet should align with your personal taste and the overall ambiance you wish to create.
Material and Durability
The material and durability of the bathroom sink cabinet are crucial factors to consider. As the cabinet will be exposed to moisture and frequent use, it is essential to choose materials that can withstand these conditions. Common materials for bathroom sink cabinets include wood, MDF (Medium-Density Fiberboard), and laminate. While wood adds a natural and warm touch, MDF and laminate offer excellent durability and resistance to water damage. Additionally, consider the quality of construction and craftsmanship to ensure the cabinet will withstand the test of time. Investing in a durable and long-lasting bathroom sink cabinet will save you money and maintenance headaches in the long run.
By carefully considering the size and dimensions, style and design, and material and durability, you can make an informed decision when selecting a bathroom sink cabinet. Remember that this investment goes beyond aesthetics, as it contributes to the functionality and organization of your bathroom. So take your time, explore various options, and choose a cabinet that meets your needs and satisfies your unique taste.

Essential Tools For Installing A Bathroom Sink Cabinet
When it comes to installing a bathroom sink cabinet, having the right tools is essential for a smooth and successful project. These tools will not only make the installation process easier but also ensure that the cabinet is properly secured and level. In this article, we will discuss some of the essential tools you will need to install a bathroom sink cabinet.
Screwdriver
A screwdriver is a must-have tool for any installation project, including installing a bathroom sink cabinet. Whether you are attaching the cabinet to the wall or securing the doors and drawers, a screwdriver will be needed to tighten the screws. Make sure to have both a Phillips and a flat-head screwdriver on hand to accommodate different types of screws.
Drill
A drill is another essential tool that will come in handy during the installation process. You will need a drill to create pilot holes for the screws, especially if you are attaching the cabinet to the wall. Additionally, a drill with a screwdriver bit can make it easier and faster to drive in the screws securely. Be sure to have a drill bit set that includes different sizes to accommodate various screw sizes.
Level
Ensuring that the bathroom sink cabinet is level is crucial for both the aesthetic appeal and functionality of the cabinet. A level tool will help you determine if the cabinet is perfectly level or if it needs adjustments. Place the level on top of the cabinet and adjust the position until the bubble is centered. This will ensure that the cabinet is straight and will prevent any issues with the sink.
Measuring Tape
Precision is key when installing a bathroom sink cabinet, and a measuring tape will help you achieve that. You will need to measure the available space in your bathroom to determine the appropriate size for the cabinet. Additionally, you may need to measure the position of the sink and faucet holes to ensure they align with the cabinet openings. Having a reliable measuring tape will save you time and help you avoid any ill-fitting mishaps.
Adjustable Wrench
An adjustable wrench is a versatile tool that can come in handy during the installation process. You may need it to tighten the nuts and bolts that hold the sink to the cabinet or to connect the water supply lines. This tool allows you to adjust the wrench size to fit different sizes of nuts and bolts, making it a convenient tool to have on hand for various tasks.
Having these essential tools ready before you start installing a bathroom sink cabinet will ensure a smoother and more efficient installation process. Remember to always prioritize safety and consult the manufacturer’s instructions for any specific tool requirements or recommendations.
Steps To Remove The Existing Sink And Cabinet
Before you can install a new bathroom sink cabinet, you’ll need to first remove the existing sink and cabinet. This step-by-step guide will walk you through the process of disconnecting the plumbing, detaching the sink from the wall, and removing the cabinet from the wall. By following these steps, you can ensure a smooth transition to your new bathroom sink cabinet.
Turning Off the Water Supply
Before you begin working on the sink and cabinet, it’s important to turn off the water supply to avoid any potential leaks or water damage. Locate the water shut-off valves under the sink and turn them clockwise until they are fully closed. If there are no individual shut-off valves, you may need to turn off the main water supply to your home. Remember, safety should always be your top priority.
Disconnecting the Pipes and Plumbing
With the water supply turned off, you can now proceed to disconnect the pipes and plumbing that connect the sink to the water source. Place a bucket or a towel under the sink to catch any water that may spill out during this process. Using a wrench or pliers, carefully loosen the nuts and connectors that hold the pipes in place. Once they’re loosened, you can easily remove them from the sink and the wall.
Detaching the Sink from the Wall
Now that the plumbing is disconnected, it’s time to detach the sink from the wall. Start by removing any caulking or adhesive that may be holding the sink in place. Gently pry the sink away from the wall using a putty knife or a pry bar. Be cautious not to damage the wall or any surrounding tiles during this step. Once the sink is free from the wall, carefully lift it up and set it aside.
Removing the Cabinet from the Wall
The final step in removing the existing sink and cabinet is to remove the cabinet from the wall. Start by removing any screws or brackets that may be securing the cabinet to the wall. Using a screwdriver or a drill, carefully unscrew and remove each fastener. Once all the fasteners are removed, gently pull the cabinet away from the wall. If necessary, have someone assist you to prevent any accidents or injuries.
By following these step-by-step instructions, you’ll be able to successfully remove your existing bathroom sink and cabinet, making way for the installation of your new and improved bathroom sink cabinet. Remember to take your time and exercise caution throughout the process.

Preparing The Wall And Floor For The New Cabinet
Before installing a new bathroom sink cabinet, it is essential to prepare the wall and floor to ensure a stable and secure installation. This involves patching and repairing any wall damage, checking and adjusting the level of the floor, and measuring and marking the placement for the new cabinet.
Patching and Repairing Any Wall Damage
To start the installation process, it is crucial to inspect the wall for any damage and make necessary repairs. Here are the steps to follow:
- Inspect the wall for cracks, holes, or other damage. Use a putty knife to remove any loose materials or debris.
- Fill the cracks or holes with spackle or joint compound. Smooth the surface using the putty knife and allow it to dry.
- Sand the patched areas lightly using fine-grit sandpaper to create a smooth surface. Wipe away any dust or debris.
Checking and Adjusting the Level of the Floor
The next step is to ensure that the floor is level, as this will ensure the stability and proper functioning of the new cabinet. Follow these steps:
- Place a carpenter’s level on the floor in different areas of the bathroom. Check the level indicator to determine if the floor is even.
- If the floor is not level, use self-leveling compound to fill in low areas. Follow the manufacturer’s instructions for mixing and applying the compound.
- Allow the self-leveling compound to dry completely. Sand any high spots to level the floor.
Measuring and Marking the Placement for the New Cabinet
Accurate measurements and markings are vital to ensure the new cabinet is aligned properly. Here’s how to do it:
- Measure the width and height of the new cabinet. Use these measurements to determine the placement of the cabinet on the wall.
- Using a pencil and a measuring tape, mark the desired height and width on the wall. Use a level or a straight edge to ensure the markings are straight and level.
- Double-check the measurements and markings to avoid any mistakes or misalignment during the installation process.
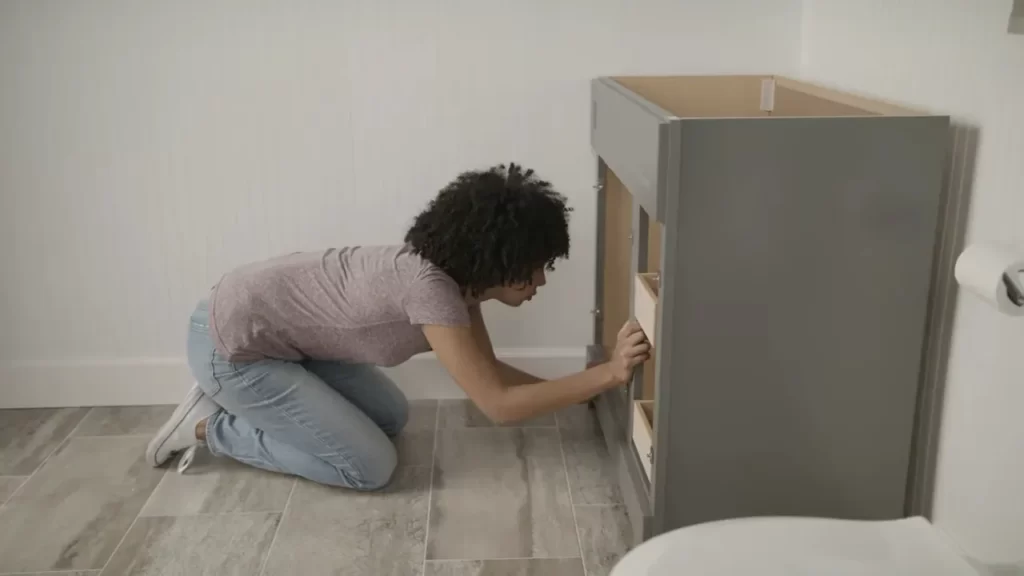
Step-By-Step Guide To Assemble The Cabinet
When it comes to installing a bathroom sink cabinet, it’s important to follow a step-by-step guide to ensure a successful assembly. In this section, we will walk you through the process of assembling the cabinet, from reading and following the manufacturer’s instructions to securing the cabinet backboard. By following these steps, you’ll have a sturdy and functional sink cabinet in your bathroom in no time.
Reading and Following the Manufacturer’s Instructions
Before diving into the assembly process, it’s crucial to carefully read and understand the manufacturer’s instructions. This will give you a comprehensive understanding of the cabinet parts and their corresponding assembly steps. Ensure that you have all the necessary tools and hardware required for the assembly.
Connecting the Cabinet Panels and Structure
Once you have familiarized yourself with the instructions, start by connecting the cabinet panels and structure. Lay out all the panels and identify the corresponding connectors or screws for each joint. Using a screwdriver or a power drill, carefully connect the panels according to the instructions.
It’s recommended to have an assistant hold the panels in place while you secure them, ensuring the cabinet is stable and properly aligned. Take extra care to tighten the screws evenly to prevent any wobbling or misalignment.
Installing the Shelves and Drawers
With the cabinet structure assembled, it’s time to focus on installing the shelves and drawers. Refer to the instructions to identify the correct placement of each shelf and drawer within the cabinet. Most cabinets will have pre-drilled holes for easy installation.
Start by inserting the shelves into their designated slots. For adjustable shelves, ensure they are properly aligned and leveled. Then, place the drawers into their respective slots, sliding them in smoothly. Ensure that the drawers open and close smoothly without any obstructions.
Securing the Cabinet Backboard
Finally, it’s crucial to secure the cabinet backboard to ensure stability and integrity. The backboard can often be a separate piece included in the assembly kit. It serves to provide additional support and prevents the cabinet from leaning backward.
Attach the backboard to the cabinet using the provided screws or nails. Ensure that it is centered and securely fastened, providing a solid backing to the cabinet structure. This step not only enhances the cabinet’s durability but also gives it a finished appearance.
Once you have completed these steps, your bathroom sink cabinet assembly is complete. Take a moment to double-check the stability and alignment of all components. With proper installation and care, your bathroom sink cabinet will provide a functional and aesthetically pleasing addition to your bathroom décor.
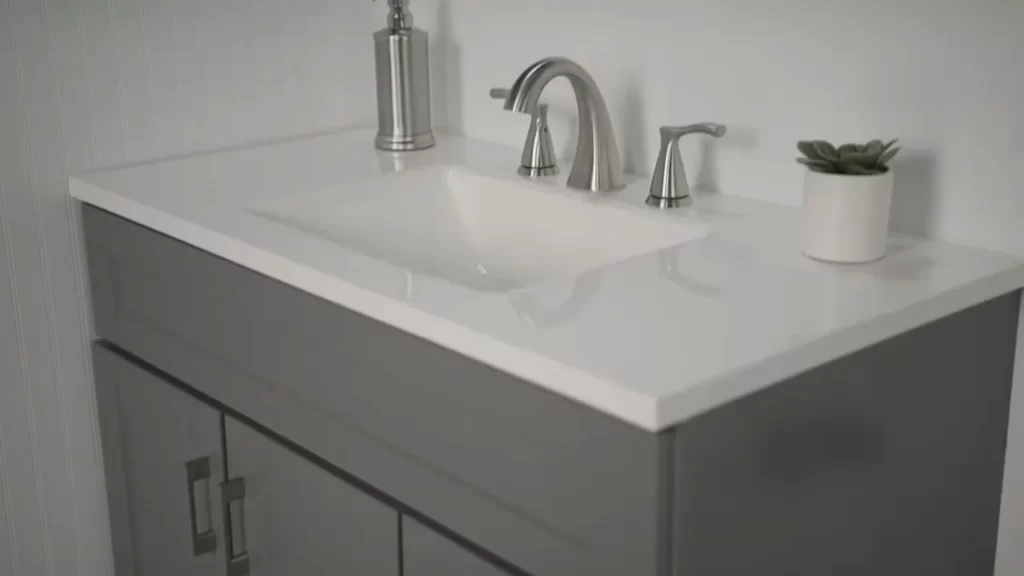
How To Properly Mount And Secure The Sink
Mounting and securing your bathroom sink is a crucial step in the installation process. A properly mounted sink ensures stability and prevents any leaks or damage that may occur over time. In this section, we will walk you through the steps of placing the sink on the cabinet, sealing and caulking around the sink, and connecting the sink drain for a secure installation.
Placing the Sink on the Cabinet
To begin, make sure the cabinet is properly installed and level. Place the sink on top of the cabinet, ensuring it is centered and aligned with the pre-cut hole for the drain. Once the sink is in position, use a level to check that it is perfectly horizontal. Adjust as necessary by adding shims or adjusting the cabinet legs.
Next, secure the sink to the cabinet using mounting brackets or clips. These can typically be found in a sink installation kit or purchased separately. Follow the manufacturer’s instructions for the specific type of mounting hardware you have. Generally, you will need to place the brackets around the edges of the sink and tighten them securely to the cabinet using screws or bolts. This will provide the necessary support and stability for the sink.
Sealing and Caulking Around the Sink
Once the sink is mounted, it is important to properly seal and caulk around the edges to prevent water from seeping into the cabinet. Start by cleaning the area around the sink thoroughly, removing any dirt or debris. Use a mildew-resistant silicone caulk in a color that matches your sink or countertop.
Apply a thin, even bead of caulk along the gaps between the sink and the countertop or cabinet. Use a caulk gun for precise application. Smooth the caulk with a caulk smoothing tool or your finger, ensuring a tight seal. Wipe away any excess caulk with a damp cloth. Allow the caulk to dry according to the manufacturer’s instructions.
Connecting the Sink Drain
Now it’s time to connect the sink drain to the plumbing below. Start by attaching the drain assembly to the sink tailpiece using a locking ring or nut. Tighten it securely, making sure it is properly aligned and centered.
Next, connect the trap to the drainpipe coming out of the wall or floor. Depending on the type of trap you have, this may involve screwing or tightening the trap onto the drainpipe, or using compression fittings. Ensure that all connections are tight and secure.
After connecting the drain, run water through the sink to check for any leaks. Inspect all connections and joints. If you notice any leaks, tighten the connections or make adjustments as needed. Once everything is properly connected and there are no leaks, your sink is securely mounted and ready for use.
By following these steps, you can ensure that your bathroom sink is properly mounted and securely installed. Taking the time to do it right will provide you with a functional and long-lasting sink that enhances the overall look and functionality of your bathroom.
Securing The Cabinet To The Wall
Once you’ve chosen the perfect bathroom sink cabinet and have it positioned in the desired location, it’s time to secure it to the wall. This step is crucial to ensure the stability and safety of your cabinet. We’ll walk you through the process of securing the cabinet to the wall using anchors or brackets, adjusting it for leveling, and securing it to the wall studs. Let’s dive in!
Using Anchors or Brackets to Attach the Cabinet
Before you begin attaching the cabinet to the wall, you’ll need to decide whether you’ll be using anchors or brackets. Both methods have their own advantages, so let’s explore each one:
- Anchors: Anchors are typically used when there is no wall stud available for support. They provide extra stability by anchoring the cabinet directly to the wall. To install anchors, mark the position where you want to attach the cabinet, and drill holes with a masonry bit. Insert the anchors into the holes and then attach the cabinet using screws provided.
- Brackets: Brackets are a great option if you have wall studs available. They help distribute the weight of the cabinet evenly across the studs, ensuring a secure installation. Begin by locating the wall studs using a stud finder. Once you’ve located the studs, mark their positions on the wall. Attach the brackets to the wall studs using screws, following the manufacturer’s instructions. Finally, secure the cabinet to the brackets using the screws provided.
Adjusting the Cabinet for Leveling
Now that you have attached the cabinet to the wall using anchors or brackets, the next step is to ensure it is level. An uneven cabinet not only looks unprofessional but can also affect the functionality of the sink. Here’s how to adjust the cabinet for leveling:
- Use a spirit level to determine if the cabinet is level. Place the level on the top surface of the cabinet and adjust it accordingly.
- If the cabinet is slightly off-level, you can insert shims underneath the cabinet to bring it to the desired level. Shims are thin pieces of material, such as wood or plastic, that can be stacked to provide support and adjust the level of the cabinet.
- Slide the shims between the cabinet and the wall or floor until the cabinet is level in both directions. Once the cabinet is level, you can secure it in place by driving screws through the cabinet back and into the studs or anchors.
Securing the Cabinet to the Wall Studs
Securing the cabinet to the wall studs is the final step in ensuring a sturdy and long-lasting installation. The process will depend on whether you used anchors or brackets to attach the cabinet:
- If you used anchors, you can secure the cabinet to the wall by driving screws through the back of the cabinet and into the anchors.
- If you used brackets, make sure they are securely attached to the wall studs. Then, use screws to fasten the cabinet to the brackets, providing additional stability.
Once you’ve completed these steps, give the cabinet a gentle shake to ensure it is firmly attached to the wall. Congratulations! Your bathroom sink cabinet is now securely installed and ready to be used.
Reconnecting The Water Supply And Drainage
Installing the Faucet and Handles
To complete the reconnection of your bathroom sink cabinet’s water supply and drainage, the next step is to install the faucet and handles. This will give your sink a polished and finished look, while also allowing you to control the water flow. Here’s how to do it:
- First, place the faucet and handles onto the designated holes on top of the sink. Make sure they are aligned properly and secure them in place.
- Next, connect the supply lines of the faucet to the corresponding hot and cold water supply valves. Tighten the connections using an adjustable wrench to ensure a secure fit. Be careful not to overtighten to avoid damaging the connections.
- Once the supply lines are connected, turn on the water supply valves to let the water flow. Check for any leaks around the connections and make sure water flows freely from the faucet.
- Finally, attach the handles to the faucet and check that they are properly aligned and functioning correctly. Adjust as necessary and tighten any loose screws.
Connecting the Hot and Cold Water Supplies
To reconnect the hot and cold water supplies, follow these steps:
- Locate the hot and cold water supply valves, usually located on the wall behind the cabinet or under the sink.
- Ensure the supply valves are closed by turning them in a clockwise direction.
- Connect each supply line from the faucet to the corresponding supply valve. Use an adjustable wrench to tighten the connections, taking care not to overtighten.
- Once the connections are secure, turn on the supply valves by turning them in a counterclockwise direction.
- Check for any leaks at the connection points. If you notice any leaks, tighten the connections further or use plumber’s tape to create a watertight seal.
Checking for Leaks and Proper Functioning
After reconnecting the water supply and drainage for your bathroom sink cabinet, it’s crucial to check for leaks and ensure everything is functioning correctly. Here’s what you should do:
- Turn on the faucet and check for any leaks around the connections, handles, or spout. If you notice any leaks, tighten the connections or replace any faulty components.
- Let the water flow for a few minutes to ensure proper water pressure and temperature. Test the hot and cold water separately to make sure they are functioning correctly.
- Keep an eye out for any unusual noises or vibrations that could indicate a problem. If you notice anything out of the ordinary, consult a professional plumber for further assistance.
- Lastly, check the drainage system by allowing the water to flow freely down the drain. Ensure there are no clogs or slow-draining issues.
By following these steps and thoroughly checking for leaks and proper functioning, you can successfully reconnect the water supply and drainage for your bathroom sink cabinet. This will allow you to enjoy a fully operational and visually appealing sink in your bathroom space.
Tips For A Neat And Successful Installation
When it comes to installing a bathroom sink cabinet, following a few tips can make the process smoother and ensure a neat and successful end result. From cleaning and disposing of debris to checking for secure connections, we’ve got you covered with the necessary steps to achieve a professional installation. Read on to learn more!
Cleaning and Disposing of Any Debris:
Before you begin the installation process, it’s essential to clean the area where the sink cabinet will be installed. Remove any existing debris or dust from the surface and make sure it is dry and free from any loose particles. This will create a clean and stable foundation for your new cabinet.
Checking and Double-Checking for Secure Connections:
Ensure that all connections, such as plumbing lines and faucet fittings, are tightly secured. Check for any leaks or loose connections by turning on the water supply and observing closely. Double-checking these connections will save you from any hassle or potential water damage in the long run.
Applying a Sealer or Protective Coating (if applicable):
If your bathroom sink cabinet requires sealing or a protective coating, it’s crucial to apply it correctly. Follow the manufacturer’s instructions to ensure proper application and allow it to dry completely before using the sink. This step will protect your cabinet from water damage and enhance its longevity.
Enjoying Your Newly Installed Bathroom Sink Cabinet:
Once you have completed the installation process, take a moment to admire your newly installed bathroom sink cabinet. Organize your toiletries, add some decorative touches, and enjoy the enhanced functionality and style it brings to your bathroom space. Sit back and relax, knowing that you have successfully installed your sink cabinet and can now experience its benefits.
Frequently Asked Questions
How Do You Attach A Bathroom Sink Cabinet To The Wall?
To attach a bathroom sink cabinet to the wall, follow these steps: 1. Position the cabinet against the wall, ensuring it’s level. 2. Mark the wall where you’ll attach the cabinet. 3. Drill pilot holes into the wall and cabinet.
4. Secure the cabinet to the wall using screws. 5. Double-check the cabinet’s stability before using it.
Can I Install A Bathroom Vanity Myself?
Yes, you can install a bathroom vanity yourself. Follow the instructions carefully, gather the necessary tools, and ensure proper measurements. It is important to have basic plumbing and carpentry skills.
Are Bathroom Vanities Easy To Install?
Bathroom vanities are easy to install. They require basic tools and skills, making the installation process simple and hassle-free. With clear instructions and proper measurements, you can easily set up a bathroom vanity in no time.
What Kind Of Adhesive To Use For Sink To Vanity?
For attaching a sink to a vanity, it is recommended to use a strong adhesive specifically designed for plumbing fixtures. Make sure to choose an adhesive that is waterproof and capable of bonding ceramic or porcelain surfaces.
Conclusion
Installing a bathroom sink cabinet can enhance the functionality and aesthetic appeal of your bathroom. With our step-by-step guide, you can easily complete this DIY project without any professional help. By following the instructions and tips provided, you will be able to enjoy a clutter-free and organized bathroom space.
Remember, proper measurement, preparation, and secure mounting are essential for a successful installation. So, get ready to transform your bathroom into a stylish and functional oasis with a new sink cabinet!