
To install a bathroom roof vent, start by determining the desired location and measuring the vent area. Then, cut a hole in the roof, attach the vent pipe using roofing sealant, and secure it with screws.
Finally, apply roofing sealant around the edges of the vent to prevent leaks. Proper ventilation is vital for any bathroom to eliminate excess moisture and prevent mold or mildew growth. Installing a bathroom roof vent is an effective way to improve air circulation and maintain a clean and hygienic environment.
This handy guide will walk you through the step-by-step process of installing a bathroom roof vent, ensuring that you can tackle this task with confidence and efficiency. With a few simple tools and materials, you can enjoy a well-ventilated bathroom that enhances your comfort and helps preserve the integrity of your home. Let’s get started!
Factors To Consider When Selecting A Bathroom Roof Vent
Installing a bathroom roof vent is a crucial step in maintaining proper ventilation and preventing issues like mold, mildew, and stale air in your bathroom. However, choosing the right vent can be a daunting task. To ensure you make an informed decision, there are several key factors you need to consider:
Ventilation requirements
When selecting a bathroom roof vent, it’s important to take into account your specific ventilation needs. Consider the size of your bathroom and the frequency of its usage. A larger bathroom or one that experiences heavy usage will require a vent with higher airflow capacity to effectively remove moisture and odors. Additionally, if your bathroom does not have any windows, proper ventilation becomes even more critical.
Roof type compatibility
Not all bathroom roof vents are compatible with every roof type. Different roof materials, such as shingles, metal, or tile, require different venting solutions. It’s crucial to ensure that the vent you choose is suitable for your roof type to avoid any potential leaks or damage. Consulting a professional or researching specific venting options for your roof type can help you make an appropriate selection.
Size and capacity
The size and capacity of the bathroom roof vent play a significant role in its effectiveness. The vent should be appropriately sized to handle the air volume in your bathroom. A vent that is too small may not be able to achieve adequate airflow, while one that is too large may waste energy. Additionally, consider the capacity of the vent, which is measured in CFM (Cubic Feet per Minute). Higher CFM rating indicates a more powerful vent, which is ideal for larger bathrooms or those with higher moisture levels.
Noise levels
Noise levels can be a crucial consideration, especially if your bathroom is located close to bedrooms or living areas. Some bathroom roof vents can produce significant noise while operating, which can be bothersome. Look for vents that are specifically designed to operate quietly or have noise-reducing features, ensuring a peaceful environment while still maintaining proper ventilation.
In conclusion
Selecting the right bathroom roof vent requires careful consideration of various factors. By taking into account your ventilation requirements, roof type compatibility, size and capacity, and noise levels, you can ensure that the vent you choose is effective, efficient, and minimizes any potential issues.
Researching And Comparing Different Bathroom Roof Vents
When it comes to installing a bathroom roof vent, it’s essential to thoroughly research and compare different options available in the market. Choosing the right bathroom roof vent can significantly impact the overall ventilation and air quality in your bathroom. In this section, we will explore three key aspects to consider when researching and comparing bathroom roof vents: online reviews and ratings, manufacturer recommendations, and pricing and warranties.
Online Reviews and Ratings
One of the first steps in researching bathroom roof vents is to check online reviews and ratings. Reading reviews from past customers can provide valuable insights into the performance, durability, and ease of installation of different vents. Look out for specific comments about noise levels, energy efficiency, and overall customer satisfaction. Additionally, pay attention to the overall ratings of the vents to get an idea of their popularity and reliability.
Manufacturer Recommendations
Another important aspect to consider when researching bathroom roof vents is to look for manufacturer recommendations. Manufacturers often provide guidelines and specifications on their websites about which vent models are suitable for different bathroom sizes and roof types. This information can help you identify vents that are specifically engineered for your requirements. Manufacturers may also offer additional accessories or features that can enhance the functionality of the vents, such as built-in humidity sensors or automatic shut-off mechanisms.
Pricing and Warranties
While researching bathroom roof vents, it’s crucial to evaluate the pricing and warranties offered by different manufacturers. Compare the prices of various vents and consider the value for money they provide. Keep in mind that a higher price does not always guarantee better performance, so be sure to assess the features and specifications of each vent in relation to its price. Additionally, check the warranties offered by manufacturers, as longer warranties indicate the manufacturer’s confidence in the durability and reliability of their product.
By thoroughly researching and comparing different bathroom roof vents based on online reviews and ratings, manufacturer recommendations, pricing, and warranties, you can make an informed decision about which vent will be the most suitable for your bathroom. Investing time in this research will ensure that you choose a vent that not only meets your ventilation needs but also provides long-term comfort and peace of mind.
Essential Tools For Installing A Bathroom Roof Vent
Installing a bathroom roof vent can greatly improve the ventilation of your bathroom and help prevent the build-up of moisture and odors. To ensure a successful installation, it’s important to have the right tools on hand. Here are the essential tools you’ll need:
Screwdriver
A screwdriver is a versatile tool that is essential for many home improvement projects, including installing a bathroom roof vent. Make sure you have a screwdriver with both flathead and Phillips head bits in your toolbox. This will allow you to easily remove and secure screws during the installation process.
Measuring Tape
Precision is crucial when it comes to installing a bathroom roof vent. A measuring tape will help you accurately determine the right size and placement of the vent opening. Be sure to measure twice to avoid any mistakes that could lead to leaks or inefficiencies.
Drill
A drill is another essential tool for installing a bathroom roof vent. It will allow you to create the necessary holes for the vent pipe and any mounting brackets. Make sure you have the right drill bit size for your specific installation to ensure a clean and secure hole.
Caulk Gun
Sealing around the edges of the bathroom roof vent is crucial to prevent any water leaks. A caulk gun will help you apply a waterproof sealant such as silicone caulk or roofing cement. This ensures a tight and secure fit between the vent and the roof, keeping water out and maintaining proper ventilation.
Having these essential tools on hand will make the installation process of a bathroom roof vent much smoother and ensure a professional-looking result. With the right tools and a little bit of know-how, you can improve the ventilation in your bathroom and enjoy a fresher and more comfortable space.
Materials Needed For The Installation Process
Installing a bathroom roof vent requires a few essential materials to ensure a proper and effective setup. Here are the key materials you’ll need to gather:
Roof Vent Kit
A roof vent kit is the cornerstone of this installation process. It typically includes the vent hood, flashing, and collar to create a watertight seal. The vent hood allows air to flow in and out, while the flashing and collar protect against leaks. Look for a kit that suits your specific roof type, such as shingle, metal, or tile.
Vent Pipe
The vent pipe is responsible for channeling the moist air from your bathroom to the outdoors. It connects to the roof vent and extends through the ceiling and attic. When choosing a vent pipe, ensure it is the correct diameter and length for your specific needs. Most often, 4-inch diameter pipes are recommended for bathroom exhaust fans.
Roofing Nails or Screws
To securely attach the vent kit and flashing to your roof, you will need roofing nails or screws. These fasteners provide the necessary stability to prevent your vent assembly from shifting or becoming loose over time. Choose nails or screws that are suitable for your roof material, whether it is asphalt shingle, metal, or tile.
Roofing Tar or Sealant
Lastly, it is vital to have roofing tar or sealant on hand to ensure a proper watertight seal around the vent. This sealant acts as an added layer of protection to prevent any water from leaking into your attic or home. Apply the roofing tar or sealant according to the manufacturer’s instructions for a reliable and durable seal.
In summary, the materials needed for installing a bathroom roof vent include a roof vent kit, vent pipe, roofing nails or screws, and roofing tar or sealant. Gathering these materials before starting the installation process will ensure a smoother and more efficient experience.
Measuring And Marking The Installation Location
Measuring and Marking the Installation Location
Installing a bathroom roof vent is an essential step in ensuring proper ventilation and preventing the build-up of moisture and unpleasant odors. Before getting started, it’s important to measure and mark the installation location accurately. This will help ensure the vent is placed in the optimal position for maximum efficiency. In this section, we will discuss how to identify the ideal spot on the roof and how to ensure the proper distance from other vents or obstacles.
Identifying the ideal spot on the roof
When it comes to determining the ideal location for your bathroom roof vent, there are a few factors to consider. Firstly, you’ll want to choose a spot where the vent can effectively expel moist air and odors without causing any damage to the roof or surrounding areas. Ideally, the vent should be situated near the bathroom to minimize the length of ductwork required.
Additionally, take note of the roof structure and any potential obstacles. It’s essential to avoid any obstructions such as rafters or electrical wires which may hinder the installation process or affect the vent’s performance. These obstacles should be carefully identified and marked to ensure a smooth and efficient installation.
Ensuring proper distance from other vents or obstacles
In addition to identifying the ideal spot on the roof, it is crucial to ensure the proper distance between the bathroom roof vent and any other vents or obstacles present. This distance is necessary to prevent any interference between the vent systems and to maintain optimum airflow.
Before proceeding, refer to the building codes and regulations specific to your location to determine the required spacing between vents. These guidelines will ensure compliance and guarantee that your bathroom roof vent functions effectively.
In conclusion, measuring and marking the installation location of your bathroom roof vent is a crucial step in the installation process. By identifying the ideal spot on the roof and ensuring the appropriate distance from other vents or obstacles, you can ensure optimal ventilation and prevent any potential issues down the line.
Preparing The Roof For Vent Installation
Before you can begin installing a bathroom roof vent, it’s crucial to properly prepare the roof to ensure a successful installation. This involves a few important steps, including clearing debris from the installation area, removing shingles or tiles as needed, and creating a pilot hole for the vent pipe.
Clearing Debris from the Installation Area
To ensure a clean and smooth installation process, start by clearing any debris from the area where the vent will be installed. This includes removing any leaves, twigs, or other organic materials that may have accumulated on the roof. You can use a broom or a leaf blower to clear the debris effectively. It’s essential to have a clean and stable surface for the vent to be properly secured.
Removing Shingles or Tiles as Needed
Next, you’ll need to assess whether you need to remove any shingles or tiles from the installation area. If there are any shingles or tiles directly in the path of the vent, they will need to be carefully removed to make way for the vent’s installation. Use a pry bar or a roofing shovel to gently lift and remove the shingles or tiles. Be cautious not to damage surrounding roofing materials as you work.
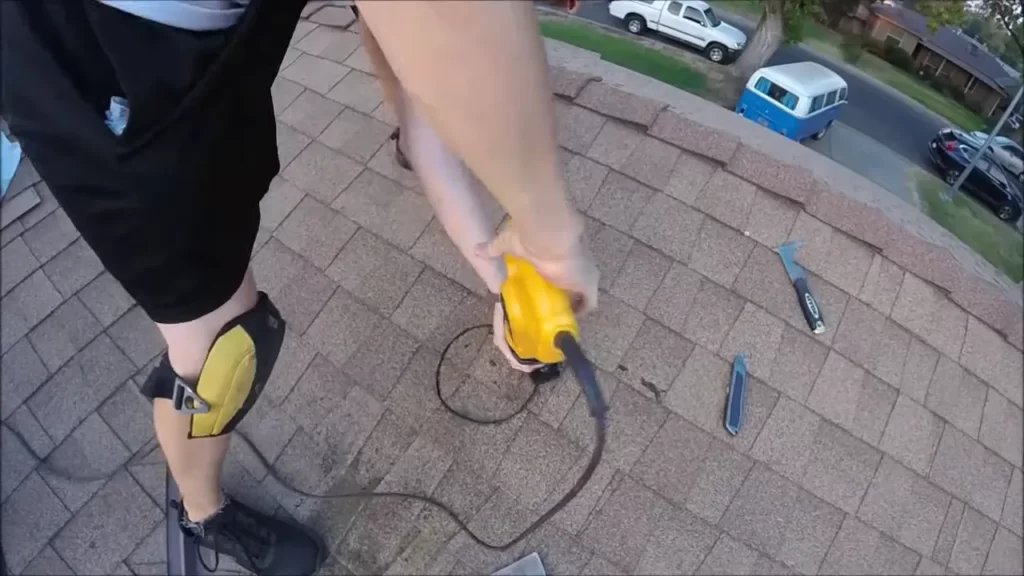
Creating a Pilot Hole for the Vent Pipe
Once the debris is cleared, and any necessary shingles or tiles are removed, you’ll need to create a pilot hole for the vent pipe. This hole will serve as a reference point for the vent’s final installation. Use a drill with a pilot bit to carefully create the pilot hole in the designated area. Make sure the hole is wide enough to accommodate the vent pipe comfortably.
Creating a pilot hole will help ensure accuracy during the installation process. By taking the time to properly prepare the roof, including clearing debris, removing shingles or tiles, and creating a pilot hole, you’ll be well on your way to successfully installing a bathroom roof vent.
Installing The Bathroom Roof Vent
When it comes to proper ventilation in your bathroom, installing a roof vent is a crucial step. It helps to remove excess moisture, odors, and pollutants, keeping the air fresh and preventing the growth of mold and mildew. In this section, we will guide you through the process of installing the bathroom roof vent. Let’s get started!
Inserting and securing the vent pipe
The first step is to insert and secure the vent pipe through the roof. The vent pipe is a cylindrical tube that allows air to flow in and out of the bathroom. Here’s how to do it:
- Locate the spot on the roof where the vent will be installed. Choose a suitable location away from any obstructions.
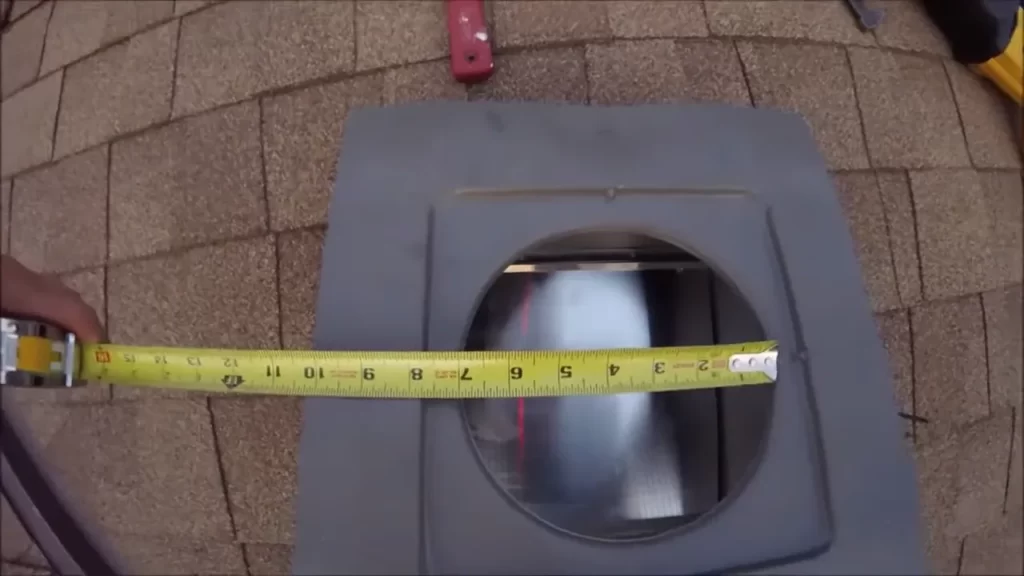
- Measure and mark the outline of the vent pipe on the roof. Ensure that the hole is slightly larger than the diameter of the vent pipe to allow for adjustment.
- Using a reciprocating saw or a hole saw, carefully cut out the marked hole on the roof. Dispose of any debris or shingles that may have been cut.
- Insert the vent pipe into the hole from the inside of the bathroom. Extend it until it reaches the roof, making sure it protrudes a few inches above the surface.
- To secure the vent pipe, use screws or roofing nails on the flange provided by the manufacturer. Make sure it is tightly fastened to prevent any leaks.
Connecting the vent to the bathroom fan or ductwork
After securing the vent pipe, the next step is to connect it to the bathroom fan or ductwork. This connection is crucial for the proper functioning of the vent system. Here’s how to do it:
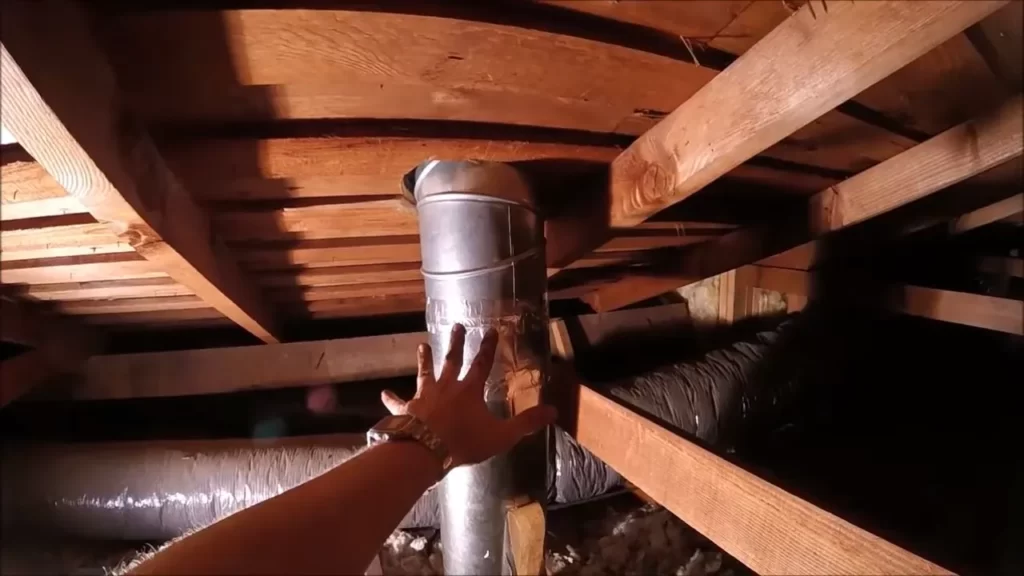
- Locate the ductwork or the bathroom fan that connects to the vent pipe. It is typically located in the ceiling or the wall.
- If needed, remove any existing duct tape or sealant from the end of the vent pipe.
- Place the end of the vent pipe over the opening of the ductwork or the bathroom fan. Ensure it fits securely without any gaps.
- If necessary, use metal duct clamps or zip ties to secure the connection. This will prevent any air leaks and ensure a tight seal.
Sealing the connections with caulk or sealant
To further enhance the effectiveness of the vent system and prevent any air leaks, it is essential to seal all the connections with caulk or sealant. This will create a watertight and airtight seal. Here’s what you need to do:
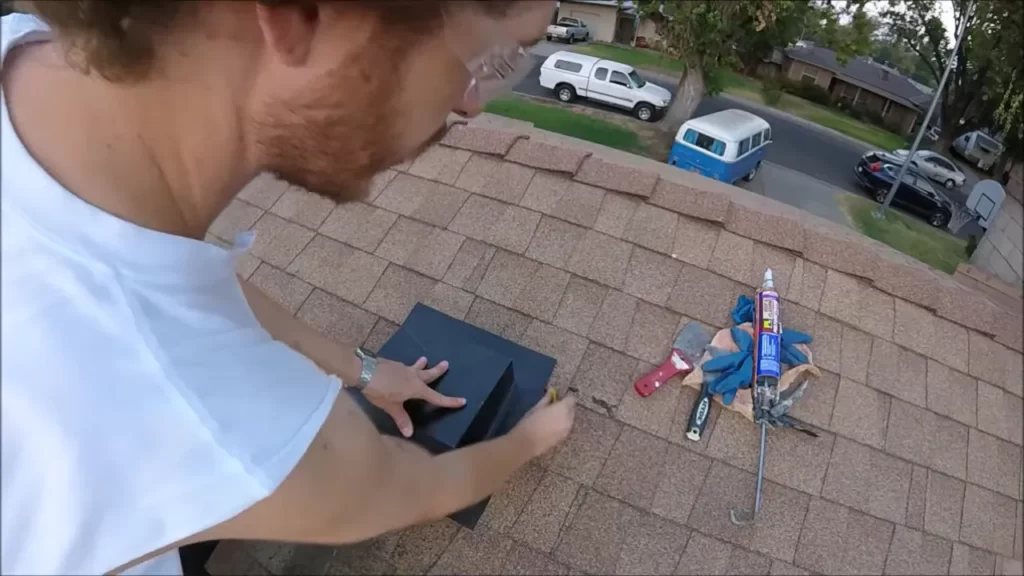
- Apply a bead of caulk or sealant around the outside of the connection between the vent pipe and the roof. This will create a waterproof barrier and prevent any water from entering your bathroom.
- Smooth the caulk or sealant using a putty knife or your finger to ensure an even application and proper adhesion.
- Inspect all the connections, including the one between the vent pipe and the bathroom fan or ductwork, and apply caulk or sealant as needed.
By following these steps and ensuring a secure and properly sealed installation, you can enjoy the benefits of a well-ventilated bathroom. Remember, proper ventilation not only keeps the air fresh but also helps maintain a healthy environment free from moisture-related issues. Happy venting!
Securing The Roof Vent In Place
Attaching the vent to the roof using roofing nails or screws
Securing the roof vent in place is a crucial step in the installation process. To ensure a sturdy and long-lasting attachment, you have two options: using roofing nails or screws. Both methods provide secure fastening, but the choice depends on your personal preference and the type of roof you have.
If you prefer to use roofing nails, you’ll need to make sure they are long enough to penetrate through the vent flange and fully into the roof decking. Typically, nails that are 1 ½ inches long are sufficient for this task. For added stability, it’s recommended to use a minimum of four nails evenly spaced around the vent flange.
On the other hand, if you opt for screws, you’ll need to choose ones that are specifically designed for roofing applications. These screws typically have a rubber or neoprene washer that helps create a watertight seal. Make sure the screws are long enough to secure the vent and penetrate through the roofing material and into the roof decking. Placing screws at each corner of the vent flange is recommended, ensuring a total of four screws.
Applying roofing tar or sealant for added protection against leaks
After securing the roof vent in place, it’s essential to apply roofing tar or sealant around the edges of the vent flange. This extra layer of protection helps prevent water from seeping beneath the flange and causing leaks.
To apply the roofing tar or sealant, start by cleaning the surface around the vent flange with a brush or rag to remove any debris or dirt. Next, use a caulking gun to apply a generous amount of roofing tar or sealant along the edges of the flange. Make sure to cover the entire circumference of the vent, leaving no gaps or exposed areas.
It’s particularly crucial to pay extra attention to the areas where the vent flange meets the roofing material. Ensure the tar or sealant creates a seamless and watertight seal, leaving no room for water infiltration.
By following these steps to secure the roof vent in place and applying the necessary roofing tar or sealant, you can have peace of mind knowing that your bathroom roof vent is securely installed and protected against potential leaks.
Testing And Inspecting The Installed Bathroom Roof Vent
Once you have successfully installed a bathroom roof vent in your home, it is important to thoroughly test and inspect the installation to ensure it is functioning properly. This step is crucial in maintaining proper airflow and ventilation in your bathroom, as well as preventing any potential leaks that could lead to damage in your home.
Checking for proper airflow and ventilation
One of the first things you should do when testing and inspecting your newly installed bathroom roof vent is to check for proper airflow and ventilation. This involves assessing whether the vent is effectively removing excess humidity, odors, and airborne pollutants from your bathroom.
You can start by running the bathroom exhaust fan and placing your hand near the vent opening on the roof. Ideally, you should feel a steady and consistent flow of air being expelled from the vent. If the airflow seems weak or inconsistent, this could indicate a problem with the installation that needs to be addressed.
Another way to check for proper airflow is by observing the performance of your bathroom fan. Is it operating at its full capacity? Is it able to quickly clear the steam and condensation produced during a hot shower? If you notice any issues with the fan’s performance, it may be necessary to consult a professional for further assistance.
Examining the seal and connections for any signs of leaks
In addition to checking for proper airflow and ventilation, it is essential to carefully examine the seal and connections of your bathroom roof vent for any signs of leaks. This step is crucial in preventing water damage and ensuring the longevity of your vent.
Start by inspecting the seal around the vent opening on the roof. Is it tight and secure? Are there any visible cracks or gaps that could potentially allow water to enter your home? If you notice any issues with the seal, it is important to address them promptly to prevent any water leaks during rainstorms or other sources of moisture.
Next, examine the connections between the vent and the ductwork in your bathroom. Ensure that they are properly attached and sealed to prevent any air or water leakage. You can use a flashlight to inspect these areas more closely, looking for any signs of loose or disconnected components.
Finally, it is recommended to perform a water test to check for any hidden leaks. Simply pour a small amount of water around the vent opening on the roof and observe if any water begins to seep into your home. If you notice any leaks, it is imperative to address them immediately to prevent further damage.
In conclusion, testing and inspecting your installed bathroom roof vent is essential for ensuring proper airflow, ventilation, and preventing any potential leaks. By following these steps and addressing any issues that arise, you can maintain a functional and efficient bathroom vent that will benefit your home in the long run.
Regular Maintenance And Cleaning Of The Bathroom Roof Vent
Regular Maintenance and Cleaning of the Bathroom Roof Vent
Proper maintenance and regular cleaning are essential to ensure the efficient and effective operation of your bathroom roof vent. By taking the time to perform these tasks, you can prevent blockages, reduce odors, and promote good airflow in your bathroom. In this section, we will discuss two important aspects of maintaining your bathroom roof vent: removing debris and obstructions and checking for blockages or buildup.
Removing Debris and Obstructions
One of the key maintenance tasks for your bathroom roof vent is removing any debris or obstructions that may accumulate over time. These obstructions can include leaves, twigs, dust, or even bird nests. If left unchecked, they can hinder the proper functioning of the vent and lead to unpleasant odors or poor airflow in your bathroom.
To remove the debris and obstructions, follow these steps:
- Start by putting on gloves and safety goggles to protect yourself from any harmful substances or sharp objects.
- Use a ladder to safely access the roof where the vent is located. Take precautions and ensure the ladder is stable before climbing.
- Carefully inspect the vent opening for any visible debris or obstructions. Use a brush or broom to gently sweep away any loose dirt or debris.
- If you notice any bird nests or significant blockages, use a long-handled brush or vacuum with an extension to remove them. Take care not to damage the vent or any surrounding roofing materials.
- Once you have removed the debris, use a hose or bucket of water to rinse the vent opening and remove any remaining dirt. Make sure the water flows freely through the vent without any obstructions.
<!————————Table————————–!>
| Important Note: |
|---|
| It is recommended to perform this maintenance task at least twice a year, especially during the spring and fall seasons when debris tends to accumulate more. |
<!——————————————————!>
Checking for Blockages or Buildup
In addition to removing debris, regularly checking for blockages or buildup is crucial to maintain the efficiency of your bathroom roof vent. Over time, dust, lint, and moisture can accumulate in the vent duct, leading to restricted airflow and potential issues.
To check for blockages or buildup, follow the steps below:
- Turn off the power to the bathroom vent to ensure your safety when inspecting the vent.
- Remove the vent cover or grille by unscrewing it or gently pulling it off, depending on the type of vent you have. Set aside the cover and keep the screws in a safe place.
- Using a flashlight, carefully examine the interior of the vent duct for any visible blockages or buildup. Pay close attention to areas where debris is more likely to accumulate, such as bends or joints.
- If you notice any blockages, use a long, flexible brush or a vacuum cleaner with a narrow attachment to remove the buildup. Make sure to reach as far as possible into the duct to ensure thorough cleaning.
- Once you have removed the blockages or buildup, wipe the interior of the vent duct with a damp cloth to remove any remaining dust or debris.
By regularly performing these maintenance tasks, you can ensure the optimal functioning of your bathroom roof vent. Remember to clean the vent regularly, at least every six months, and address any blockages or buildup promptly to maintain good airflow and reduce unwanted odors.
Troubleshooting Common Issues With Bathroom Roof Vents
Identifying and Addressing Ventilation Problems
If you’re experiencing issues with your bathroom roof vent, it’s essential to identify and address potential ventilation problems promptly. Poor ventilation can lead to a buildup of moisture, unpleasant odors, and even mold growth in your bathroom. Here are some common issues you may encounter:
| Problem | Solution |
|---|---|
| Insufficient airflow | Check if the vent is clogged with debris, dirt, or dust. Clean the vent and ensure it’s clear of any obstructions. You may also need to replace or repair a damaged fan. |
| Excessive noise | If your bathroom roof vent is making excessive noise, it could indicate an issue with the motor or fan blades. Consider lubricating the moving parts or replacing worn-out components. |
| Moisture leaks | Inspect the surrounding area for signs of moisture leaks. Damaged flashing or a cracked vent pipe could be the culprit. Repair or replace these components to prevent further leaks and water damage. |
Repairing Leaks or Damaged Components
When it comes to bathroom roof vents, leaks or damaged components are common issues that may require attention. Here’s what you need to do to fix these problems:
- Locate the source of the leak. It could be a damaged vent cover, cracked vent pipe, or worn-out seal.
- Replace the damaged components. Ensure you purchase the correct size and type of vent cover or vent pipe.
- Remove the old vent cover or pipe and clean the surrounding area before installing the new components.
- Apply a waterproof sealant or roofing cement to create a watertight seal around the vent cover or pipe.
- Securely attach the new vent cover or pipe to prevent future leaks.
By addressing and troubleshooting these common issues, you can ensure your bathroom roof vent functions optimally, providing proper ventilation and preventing potential problems. Regular maintenance and inspections can help you catch and resolve any issues early, saving you from more significant repairs down the line.
Seeking Professional Help When Necessary
Knowing when to hire a professional for installation or repairs
While installing a bathroom roof vent may seem like a straightforward task, there are instances where seeking professional help is necessary. Hiring a professional ensures that the job is done correctly, avoiding potential issues and saving you time and money in the long run. Here are some situations where it’s best to leave the installation or repairs to the experts:
- Complex or unfamiliar installations: If you’re dealing with a complex roof design or are unfamiliar with the necessary steps, it’s advisable to hire a professional. They have the expertise to handle tricky installations and can navigate any challenges that may arise.
- Electrical work: If your bathroom vent requires electrical connections, it’s crucial to hire a licensed electrician. Working with electricity can be dangerous and requires specific knowledge to ensure safety and compliance with building codes.
- Roof repairs: If your roof has existing damage or needs repairs, it’s wise to consult a professional roofer before installing a bathroom vent. They can assess the condition of your roof, make any necessary repairs, and ensure that the vent is properly installed to prevent further damage.
- Warranty coverage: Some bathroom vent manufacturers require professional installation to maintain warranty coverage. Hiring a professional ensures that the installation meets the manufacturer’s specifications, protecting your investment in the vent system.
While it’s tempting to tackle DIY projects to save money, certain tasks are best left to professionals. They have the knowledge, skills, and tools necessary to complete the job correctly and safely. Whether it’s complex installations, electrical work, roof repairs, or warranty requirements, hiring a professional for your bathroom roof vent installation or repairs can give you peace of mind and ensure a successful outcome.
Frequently Asked Questions
How Do You Attach A Bathroom Vent To A Roof?
To attach a bathroom vent to a roof, follow these steps: 1. Determine the ideal location for the vent on the roof. 2. Mark the outline of the vent and cut a hole in the roof. 3. Install the vent pipe through the hole, ensuring it is securely attached.
4. Apply roofing sealant around the vent pipe to prevent leaks. 5. Connect the vent hood to the vent pipe, ensuring a tight fit.
Can I Install A Bathroom Vent Myself?
Yes, you can install a bathroom vent yourself. However, it is important to follow proper guidelines and ensure safety. Properly read the instructions provided, gather the necessary tools, and ensure the vent is securely attached to the exterior. If unsure, consult a professional for assistance.
Do Bathroom Exhaust Fans Have To Be Vented Through The Roof?
Bathroom exhaust fans don’t necessarily have to be vented through the roof. They can also be vented through an exterior wall or soffit. However, venting through the roof is often preferred as it helps to ensure that the moist air is fully expelled from the bathroom.
How Much Does It Cost To Vent A Bathroom Fan Through The Roof?
The cost to vent a bathroom fan through the roof varies depending on factors such as the location and complexity of the installation. Generally, it can range from $200 to $500. It’s best to get quotes from professionals to know the exact cost for your specific situation.
Conclusion
Installing a bathroom roof vent is a crucial step in ensuring proper ventilation and maintaining the overall health of your bathroom. By following the steps outlined in this guide, you can successfully install a bathroom roof vent and prevent moisture buildup and potential damage.
Remember to prioritize safety, adhere to building codes, and consult professionals if needed. With a well-installed bathroom roof vent, you can enjoy a fresh and odor-free bathroom for years to come.