
To install a bathroom light fixture without a junction box, follow these steps: mount the fixture on a crossbar, attach the wires with wire nuts, secure the fixture with screws, and connect the wires to the electrical box. Now, let’s dive into the details of how you can successfully install a bathroom light fixture without a junction box.
Updating your bathroom lighting can instantly enhance its overall appeal and functionality. However, the absence of a junction box can pose a challenge when installing a new light fixture. In this guide, we will walk you through the necessary steps to install a bathroom light fixture without a junction box.
We will provide you with all the information you need to successfully complete this project and create a well-lit and stylish bathroom space. So, let’s get started and learn how to install a bathroom light fixture without a junction box.
The Importance Of A Junction Box In Bathroom Light Fixture Installation
Explanation of the purpose of a junction box in a typical light fixture installation
The junction box is a crucial component in the installation process of a bathroom light fixture. Its primary function is to safely connect and protect the electrical wires of the light fixture. The junction box serves as a housing unit that encloses the electrical connections, ensuring that they are secure and insulated.
When installing a light fixture, the electrical wires need to be properly connected to the power source. The junction box provides a centralized location for this connection to take place. It acts as a hub where the electrical wires from the fixture can be joined with the wires from the electrical circuit, creating a secure and well-organized wiring system.
Additionally, the junction box offers a level of structural support for the light fixture. It serves as a sturdy base for attaching the fixture to the wall or ceiling, ensuring it remains securely in place. Without a junction box, the weight of the light fixture could strain the electrical connections and potentially lead to loose wiring or a hazardous situation.
Discuss the safety hazards of not using a junction box
While it may be tempting to bypass the use of a junction box in a bathroom light fixture installation, doing so can pose serious safety hazards. Let’s take a closer look at some of the risks:
- Exposed electrical connections: Without a junction box, the electrical connections of the light fixture remain exposed. This increases the likelihood of accidental contact with live wires, which can result in electric shock or even electrocution.
- Fire hazard: Proper insulation and containment of electrical connections are essential in preventing electrical fires. Junction boxes are designed to prevent sparks or heat generated by the electrical current from coming into contact with combustible materials in the surrounding area. Without a junction box, the risk of fire significantly increases.
- Code compliance: Electrical codes and regulations require the use of junction boxes in light fixture installations. Failure to adhere to these codes can lead to legal issues, complications during home inspections, and difficulties in obtaining insurance coverage.
It is evident that the absence of a junction box in the installation of a bathroom light fixture can have dire consequences. By neglecting this important safety measure, you not only risk your personal well-being but also compromise the integrity of your home’s electrical system.
Now that we understand the importance of a junction box and the hazards of not using one, let’s explore how to install a bathroom light fixture without a junction box in our upcoming section.
Safe Alternatives To Using A Junction Box For Bathroom Light Fixtures
When it comes to installing a bathroom light fixture without a junction box, safety should always be a top priority. While using a junction box is the most secure and recommended method, there are safe alternatives that can be used in certain situations. In this article, we will explore different ways to securely install a light fixture without a junction box, ensuring that you can have a well-lit bathroom without compromising safety.
Different ways to securely install a light fixture without a junction box
Rely on Remodeling Boxes
If you are looking to install a bathroom light fixture without the use of a junction box, one safe alternative is to rely on remodeling boxes.
A remodeling box, also known as an old work box, can be easily installed into existing drywall without the need for access to the wall studs. These boxes are designed to be used in renovation or remodeling projects, making them a suitable option when you want to add a light fixture to your bathroom without the hassle of cutting into the wall.
To install a light fixture using a remodeling box, follow these steps:
- First, turn off the power to the bathroom light fixture from the circuit breaker to ensure your safety.
- Next, determine the location where you want to install the light fixture and mark it on the wall.
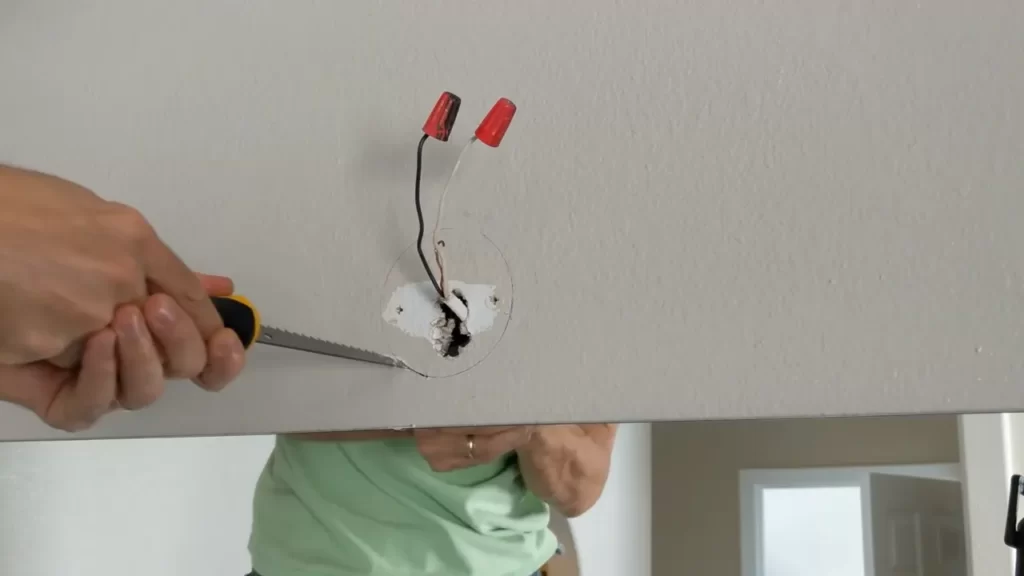
- Using a drywall saw, cut a hole in the marked area to accommodate the remodeling box.
- Insert the remodeling box into the hole, making sure it fits snugly.
- Secure the remodeling box to the drywall by tightening the screws on the box.
- Finally, wire the light fixture according to the manufacturer’s instructions, making sure to connect the proper electrical connections.
By using a remodeling box, you can securely install a bathroom light fixture without the need for a junction box, giving you a convenient and safe alternative for your lighting needs.
Consider Old Work Boxes
Another safe alternative to using a junction box for bathroom light fixtures is to consider old work boxes.
Old work boxes, also known as retrofit or cut-in boxes, are designed to be installed in finished walls where you cannot access the wall studs. These boxes have adjustable tabs or brackets that secure them to the drywall, providing a sturdy mounting surface for your light fixtures.
To install a light fixture using an old work box, follow these steps:
- First, turn off the power to the bathroom light fixture from the circuit breaker.
- Next, determine the desired location for the light fixture and mark it on the wall.
- Using a drywall saw, cut a hole in the marked area to accommodate the old work box.
- Insert the old work box into the hole, ensuring that the adjustable tabs or brackets are extended.
- Tighten the tabs or brackets on the old work box to secure it to the drywall.
- Finally, wire the light fixture following the manufacturer’s instructions, making sure to connect the appropriate electrical connections.
By utilizing old work boxes, you can install a bathroom light fixture safely and securely without the need for a junction box, giving you peace of mind and a functional lighting solution in your bathroom.
Option 1: Installing A Remodeling Box For Bathroom Light Fixture
Installing a remodeling box for your bathroom light fixture is a great option if you don’t have a junction box in place. Remodeling boxes are specifically designed to be installed in existing walls and can provide a secure and stable mount for your light fixture. In this step-by-step guide, we’ll walk you through the process of installing a remodeling box for your bathroom light fixture. But before we dive into the installation process, let’s take a look at some tips on how to choose the right remodeling box for your specific needs.
Step-by-step Guide on How to Install a Remodeling Box for a Light Fixture
- Start by turning off the power to the area where you’ll be installing the remodeling box. This step is crucial for your safety.
- Next, mark the location where you want to install the remodeling box. Ensure it is centered above or beside your bathroom mirror, vanity, or any other desired location.
- Using a stud finder, locate any nearby studs in the wall. This will help ensure that you have a secure attachment point for your remodeling box.
- If there are no studs in the desired location, you can use drywall anchors to provide additional support for the box.
- Using a keyhole saw, carefully cut a hole in the marked location. Make sure the hole is just large enough to accommodate the remodeling box.
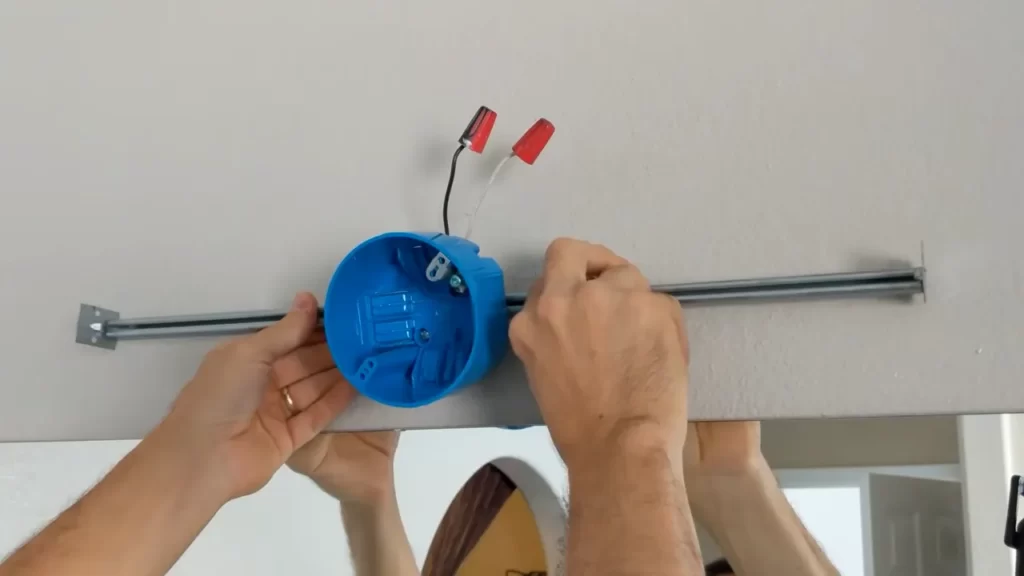
- Insert the remodeling box into the hole and secure it in place using the provided screws or nails. Ensure that the box is flush against the wall.
- If necessary, connect a ground wire from the box to the electrical system. This step is essential for safety reasons and to meet electrical code requirements.
- Finally, attach the light fixture to the remodeling box according to the manufacturer’s instructions. Make sure all wiring connections are secure before turning the power back on.
- Once the installation is complete, turn the power back on and test the light fixture to ensure it is functioning correctly.
Tips on Choosing the Right Remodeling Box for Your Specific Needs
Choosing the right remodeling box for your bathroom light fixture is essential for a successful installation. Here are some tips to help you select the right box:
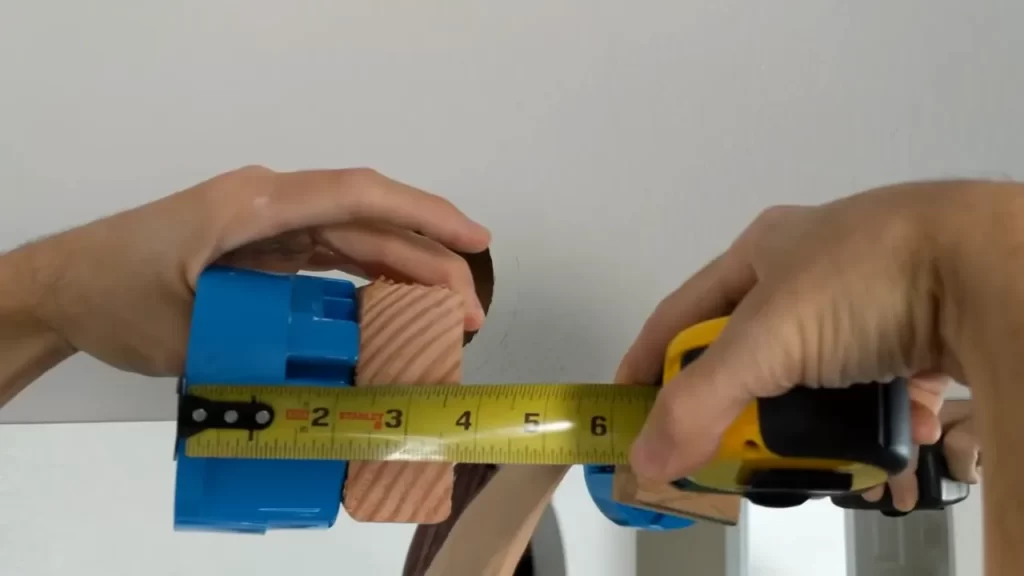
- Consider the weight and size of your light fixture. Make sure the remodeling box you choose can support the weight and accommodate the size of your fixture.
- Determine the type of mounting you need. Different light fixtures require different types of mounts, such as a brace or strap. Ensure the remodeling box you select is compatible with your desired mounting method.
- Check the electrical code requirements in your area. Make sure the remodeling box meets the necessary standards and regulations.
- Consider the space available in your wall. If you have limited space, choose a low-profile remodeling box that will fit seamlessly into the existing wall.
By following these tips and the step-by-step guide provided, you’ll be able to install a remodeling box for your bathroom light fixture without a junction box in no time. Remember to always prioritize safety and consult a professional electrician if you’re unsure about any part of the installation process.
Option 2: Using An Old Work Box For Bathroom Light Fixture Installation
When it comes to installing a bathroom light fixture without a junction box, using an old work box is a great option. An old work box, also known as a remodeling or retrofit box, is a simple and effective solution that allows you to safely and securely install your light fixture.
Detailed instructions on installing an old work box for a light fixture
Installing an old work box for your bathroom light fixture is a simple process that requires a few basic tools and materials. Follow these detailed instructions to successfully install your old work box:
- Start by turning off the power to the circuit you’ll be working on. This ensures your safety throughout the installation process.
- Remove the existing light fixture and detach it from the wires. Carefully set the fixture aside.
- Locate the desired location for your new light fixture. Ensure that the area is suitable for installation and aligns with your desired lighting placement.
- Measure and mark the area where the old work box will be installed. Make sure it is centered and level with your bathroom fixture layout.
- Using a keyhole saw or a drywall saw, cut a hole in the wall for the old work box according to your marked measurements.
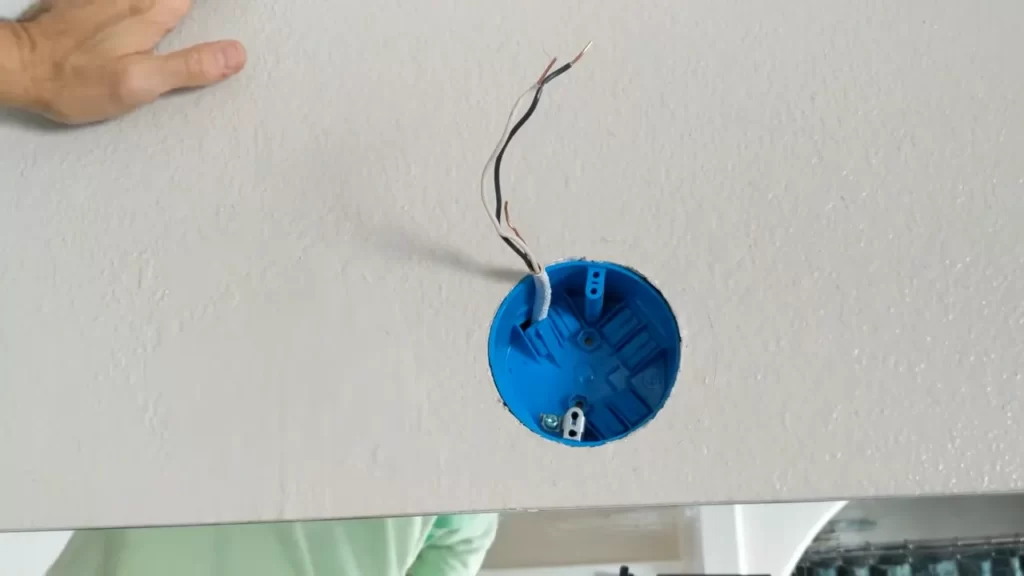
- Insert the old work box into the hole you just created. Ensure it fits snugly and is flush with the wall surface.
- Tighten the mounting screws on the old work box to secure it into position. Make sure it is firmly attached and will hold the weight of your light fixture.
- Carefully insert the wires from the circuit through the opening in the old work box.
- Connect the wires from the circuit to the wires of your light fixture, following the appropriate color-coding and using wire nuts to secure the connections.
- Fit the light fixture into the old work box, aligning it with the mounting screws. Use the provided screws to attach the fixture securely.
- Double-check all connections and ensure they are secure. Once everything is in place, turn the power back on and test the light fixture to ensure it is working properly.
Highlight the benefits of using an old work box over other alternatives
Using an old work box for bathroom light fixture installation offers several advantages over other alternatives:
- Easy Installation: Installing an old work box is a straightforward process that can be completed by most homeowners with basic DIY skills. You don’t need to hire a professional electrician to get the job done.
- No Need for a Junction Box: In situations where a junction box is not present or accessible, an old work box provides a safe and practical solution. It allows you to securely mount your light fixture without the need for extensive electrical work.
- Versatility: Old work boxes are compatible with various types of light fixtures, making them a versatile choice for different bathroom designs and styles.
- Removable and Adjustable: If you ever need to remove or relocate your light fixture, an old work box allows for easy disassembly and adjustment. This flexibility is particularly useful if you plan on making changes to your bathroom layout in the future.
By following the detailed instructions and utilizing the benefits of an old work box, you can successfully install a bathroom light fixture without a junction box. Enjoy enhanced lighting in your bathroom with this simple and effective solution.
Tools And Materials Needed For Installing A Bathroom Light Fixture Without A Junction Box
Installing a bathroom light fixture without a junction box may seem intimidating at first, but with the right tools and materials, it can be a straightforward process. In this section, we will discuss the essential tools and specific materials you’ll need to ensure a secure installation.
List of essential tools required for the installation process
Before getting started, make sure you have the following tools handy:
- Wire cutters: These will be necessary for trimming and stripping the electrical wires.
- Screwdriver set: A set of screwdrivers with various sizes and types will come in handy for removing and installing screws.
- Wire connectors: These connectors are essential for connecting the wires securely.
- Wire nuts: Wire nuts are used to join electrical wires together and ensure proper insulation.
- Electrical tape: Electrical tape is vital for securing and insulating the electrical connections.
- Voltage tester: To ensure safety, always use a voltage tester to check if the power is off before starting any electrical work.
- Step ladder: A sturdy step ladder will help you reach the light fixture and work comfortably.
- Pliers: A pair of pliers will be useful for gripping and twisting wires.
Mention the specific materials needed to ensure a secure installation
In addition to the tools mentioned above, you will also need the following materials to ensure a secure installation:
- Light fixture mounting bracket: This bracket will help secure the light fixture to the wall or ceiling.
- Mounting screws: These screws will be used to attach the mounting bracket to the wall or ceiling.
- Decorative cover plate: The cover plate will add a finishing touch and hide any exposed wires or junction box openings.
- Light bulbs: Choose the appropriate light bulbs for your fixture, considering the type and wattage recommended by the manufacturer.
- Wire strippers: Wire strippers will help you remove the insulation from the electrical wires with precision.
Having these tools and materials readily available will make the installation process efficient and ensure a secure and functional bathroom light fixture without a junction box. Remember to take your time, follow safety precautions, and refer to the manufacturer’s instructions for any specific requirements.
Step-By-Step Guide To Installing A Bathroom Light Fixture Without A Junction Box
Step-by-Step Guide to Installing a Bathroom Light Fixture Without a Junction Box
If you’re looking to upgrade your bathroom lighting but don’t have a junction box, don’t worry! With a little bit of know-how and the right tools, you can easily install a bathroom light fixture without a junction box. In this step-by-step guide, we will walk you through the entire installation process, from mounting the fixture to wiring and securing connections. So let’s get started!
1. Mounting the Fixture
The first step is to choose the location where you want to install your light fixture. Make sure the area is clean and free from any obstructions. Using a stud finder, locate the studs on the wall where you plan to mount the fixture. Once you find the studs, mark the spots where you will drill the screw holes.
Next, using a power drill, drill pilot holes into the marked spots. Make sure the holes are slightly smaller than the screws you will be using. Once the pilot holes are drilled, hold the fixture up to the wall and align it with the pilot holes. Insert the screws through the fixture and into the pilot holes, then use a screwdriver or power drill to tighten them securely.
2. Wiring the Fixture
Now that the fixture is mounted, it’s time to wire it. Start by turning off the electricity to the bathroom at the circuit breaker. This is crucial to ensure your safety during the installation process. Use a voltage tester to double-check that the power is off before proceeding.
- Strip the insulation off the end of the fixture wires, exposing about half an inch of bare wire. If the fixture comes with a grounding wire, strip the insulation as well.
- Next, locate the electrical wires in your wall. In some cases, they may be sticking out from the wall or covered by a wire nut. Make sure to identify the hot wire (usually black or red), the neutral wire (usually white or gray), and the grounding wire (usually green or copper).
- Using wire connectors, connect the fixture’s hot wire to the wall’s hot wire, the neutral wire to the neutral wire, and the grounding wire to the grounding wire. Make sure the connections are tight and secure.
3. Securing Connections
After wiring the fixture, it’s important to ensure that all connections are properly secured. Start by gently tugging on each wire to make sure it’s tightly connected. If any wires come loose, reattach them securely using wire connectors or electrical tape.
Once all the wires are secure, carefully push them back into the junction box. Make sure they are neatly folded and there is no excess wire sticking out.
Finally, attach the fixture’s mounting plate or cover, following the manufacturer’s instructions. This will not only provide a clean and finished look but also keep the wires protected.
And there you have it! By following these step-by-step instructions, you can successfully install a bathroom light fixture without a junction box. Just remember to exercise caution, turn off the power, and double-check your connections before completing the installation. Enjoy your new bathroom lighting!
Tips For Ensuring Safety And Proper Functioning Of Bathroom Light Fixtures Without A Junction Box
Provide tips on checking for stability and proper grounding of the fixture
When installing a bathroom light fixture without a junction box, it is crucial to ensure both stability and proper grounding. While this method may not be the ideal solution, following certain tips can help make the installation safer and the fixture function properly. Here are some important tips to consider:
- Choose a sturdy mounting surface: Without a junction box, you’ll need to find a solid surface to mount your light fixture. Look for a secure area on the wall or ceiling where you can attach the fixture securely. Avoid mounting the fixture on weak or unstable surfaces that may not be able to support its weight in the long run.
- Ensure proper electrical connections: Before mounting the fixture, it is essential to ensure proper electrical connections. Make sure the power is turned off and use a voltage tester to double-check. Connect the wires according to the manufacturer’s instructions, ensuring they are tightly secured and well-insulated.
- Examine the stability: After mounting the fixture, it is crucial to examine its stability. Gently tug on the fixture to check if it moves or feels loose. If there is any wobbling or instability, reinforce the mounting and attachments until the fixture is securely in place.
- Inspect the grounding: Proper grounding is vital for the safe functioning of any electrical fixture. Without a junction box, you may need to use grounding screws or wires to establish a solid connection to the ground. Inspect the grounding regularly to ensure it remains intact and effective.
Advise troubleshooting methods for any issues that may arise during installation or regular use
While installing a bathroom light fixture without a junction box, it’s possible to encounter certain issues during the installation process or regular use. Here are some troubleshooting methods to address common problems:
- Flashing or flickering lights: If your bathroom light fixture starts flashing or flickering, it could indicate a loose wire connection. Double-check all the electrical connections and tighten any loose wires. If the issue persists, consider consulting a professional electrician.
- Dim lights: In case your bathroom light fixture appears dim, it could point to a low voltage or faulty bulb. Verify that you’re using the correct bulb wattage and replace any burnt-out bulbs. If the problem continues, you may need to have the electrical wiring inspected.
- Intermittent power loss: If you experience intermittent power loss with your bathroom light fixture, it could signify loose wire connections or faulty electrical components. Carefully examine all the connections, ensuring they are secure. If the problem persists, it is advisable to consult a professional electrician to identify and rectify the underlying cause.
- Constant buzzing or humming: A constant buzzing or humming noise coming from your bathroom light fixture may indicate a problem with the electrical circuit or a faulty fixture. Check the wiring connections and tighten any loose screws. If the issue persists, it’s best to consult a professional for further troubleshooting and repairs.
By following these tips on stability, grounding, and troubleshooting, you can install and maintain a bathroom light fixture without a junction box safely and effectively. However, it is always important to prioritize safety and consult a professional if you have any doubts or concerns.
Frequently Asked Questions
Can I Install A Light Fixture Without A Junction Box?
No, you cannot install a light fixture without a junction box. A junction box provides safety by housing the electrical connections and protecting them from damage. It is a essential component for proper installation and adherence to electrical codes.
How Do You Install An Electrical Box Where There Is No Stud?
To install an electrical box where there is no stud: 1. Trace the box outline on the wall. 2. Use a drywall saw to remove the marked area. 3. Insert an expanding anchor into the hole. 4. Attach the electrical box to the anchor.
5. Secure the box with screws.
Does A Junction Box Have To Be Attached?
Yes, a junction box must be attached. It is essential for connecting electrical wires and protecting them from damage. The junction box ensures safety and compliance with electrical codes. Make sure the box is securely fastened and accessible for future maintenance and repairs.
How Do You Attach A Light Fixture Junction Box To A Wall If There Is No Stud?
To attach a light fixture junction box to a wall without a stud, you can use toggle bolts or drywall anchors. These hardware options provide stability and secure attachment for your light fixture. Make sure to follow the manufacturer’s instructions and use the appropriate size and type of hardware for your specific junction box and wall material.
Conclusion
Installing a bathroom light fixture without a junction box may seem like a daunting task, but with the right tools and steps, it can be done. By following the tips and tricks mentioned in this blog post, you can safely and effectively install a bathroom light fixture without the need for a junction box.
Remember to always prioritize safety and consult a professional if needed. With a little patience and effort, you can achieve a well-lit and stylish bathroom space without the hassle of a junction box.