To install a Badger 500 garbage disposal, start by turning off the power, removing the old disposal, attaching the mounting ring, connecting the electrical wires, and finally, securing the unit to the sink. Are you looking to replace or install a Badger 500 garbage disposal?
Having a garbage disposal in your kitchen can provide convenience and help with waste management. Whether you’re upgrading from an old unit or installing one for the first time, the process can be relatively simple with the right guidance. We will provide step-by-step instructions on how to install a Badger 500 garbage disposal, ensuring a hassle-free and efficient installation.
By following these instructions, you will have a functioning garbage disposal in no time, making your kitchen tasks much more manageable. So, let’s dive into the necessary steps and get started on your installation journey.
Understanding The Badger 500 Garbage Disposal
When it comes to managing kitchen waste efficiently, the Badger 500 Garbage Disposal is a top-notch choice. Designed with convenience and durability in mind, this powerful household appliance can quickly and effectively dispose of food scraps, reducing the need for constant trips to the trash bin. Whether you’re a seasoned DIY enthusiast or simply looking to upgrade your kitchen, understanding the Badger 500 Garbage Disposal is essential for a successful installation.
Key features and benefits of the Badger 500 Garbage Disposal
The Badger 500 Garbage Disposal is packed with features that make it not only reliable but also user-friendly. Here is a closer look at some of its standout characteristics:
- Durable construction: Crafted from rugged stainless steel, the Badger 500 Garbage Disposal is built to withstand heavy use and last for years. Its robust design ensures that it can handle even tough food waste without clogging or jamming.
- Powerful motor: With a 1/2 horsepower motor, the Badger 500 Garbage Disposal provides ample grinding power to break down food waste efficiently. This means fewer instances of blockages and a smoother disposal process overall.
- Noise reduction technology: Unlike many other garbage disposals on the market, the Badger 500 features advanced noise reduction technology. This means quieter operation, allowing you to enjoy a peaceful kitchen environment even while the disposal is running.
- Ease of installation: The Badger 500 Garbage Disposal is designed for easy installation, making it an excellent choice for both professional plumbers and DIY enthusiasts. Its compact size and straightforward installation instructions ensure a hassle-free setup process.
- Environmentally friendly: Utilizing the Badger 500 Garbage Disposal helps to reduce organic waste in landfills, contributing to a more sustainable environment. By disposing of food scraps through this appliance, you can efficiently recycle them into useful resources, such as compost.
Exploring the different models available and their specifications
Buying the right model of the Badger 500 Garbage Disposal is crucial to ensure it meets your specific needs. Here is a breakdown of the available models and their corresponding specifications:
| Model | Specifications |
|---|---|
| Badger 500 | 1/2 horsepower motor, continuous feed, durable stainless steel construction, noise reduction technology |
| Badger 500 Plus | 1/2 horsepower motor, continuous feed, durable stainless steel construction, noise reduction technology, removable splashguard for easy cleaning |
| Badger 500 PRO | 1/2 horsepower motor, continuous feed, durable stainless steel construction, noise reduction technology, removable splashguard for easy cleaning, inSinkErator’s exclusive Quick Lock mounting system for effortless installation |
These different models allow you to choose the one that best suits your preferences and requirements. Whether you prioritize noise reduction, easy cleaning, or a quick installation process, there is a Badger 500 Garbage Disposal model that will deliver the performance you need.
Now that we’ve delved into understanding the Badger 500 Garbage Disposal, it’s clear to see why it stands out as a top choice for hassle-free waste disposal in the kitchen. With its key features, durable construction, and various model options, this garbage disposal is sure to make your daily cleanup routine a breeze.

Preparing For Installation
Before you begin installing your Badger 500 Garbage Disposal, it’s crucial to make the necessary preparations to ensure a smooth and efficient process. This section will outline the steps you need to take to gather the necessary tools and equipment, prioritize safety precautions, and identify the ideal location for installation.
Gather the necessary tools and equipment
To start off, you’ll need to gather the following tools and equipment:
- Adjustable wrench or plumber’s wrench
- Plumber’s putty or silicone-based adhesive
- Screwdriver (if required)
- Pipe wrench (if required)
- Electrical cord and wire connectors (if not included with the unit)
Having these tools readily available will enable you to tackle any potential challenges that may arise during the installation process.
Safety precautions to consider before starting the installation process
Prioritize your safety by considering the following precautions:
- Ensure that the power supply to the area is turned off to avoid any electrical accidents.
- Wear protective gloves to protect your hands from sharp edges or potential injuries.
- Clear the work area, removing any objects or debris that may hinder the installation process.
- Read the instruction manual provided with the Badger 500 Garbage Disposal carefully to understand the installation steps and any specific safety guidelines.
- If you are unsure about any aspect of the installation process, consult a professional plumber or electrician for assistance.
Identifying the location for installation
Selecting the right location for your Badger 500 Garbage Disposal is crucial for its optimal functionality. Consider the following factors:
- Choose an area under your sink that is easily accessible for installation and future maintenance.
- Ensure that there is a nearby power source to connect the unit.
- Check the plumbing connections to verify that there is enough space to accommodate the disposal unit.
- Avoid installing the unit in a location where it may obstruct other plumbing or interfere with future repairs.
Take the time to evaluate these factors before proceeding with the installation to prevent any inconveniences down the line.
By gathering the necessary tools, following safety precautions, and identifying an appropriate location for installation, you will be well-prepared to install your Badger 500 Garbage Disposal with ease and efficiency.
Step 1: Removing The Old Disposal Unit
Are you tired of a faulty garbage disposal? Installing a new one on your own can save you time and money. In this step-by-step guide, we will walk you through the process of removing your old disposal unit and replacing it with a brand new Badger 500 Garbage Disposal. Let’s get started with the first step – removing the old disposal unit.
Disconnecting the power supply
Before starting any work on your garbage disposal, ensure your safety by disconnecting the power supply. This is a crucial step that should not be skipped. Follow these simple steps:
- Find the circuit breaker panel in your home and locate the switch that controls the power supply to the garbage disposal.
- Switch it off to cut off the electricity flow to the unit.
- For added safety, use a voltage tester to ensure that the power is not flowing to the disposal unit.
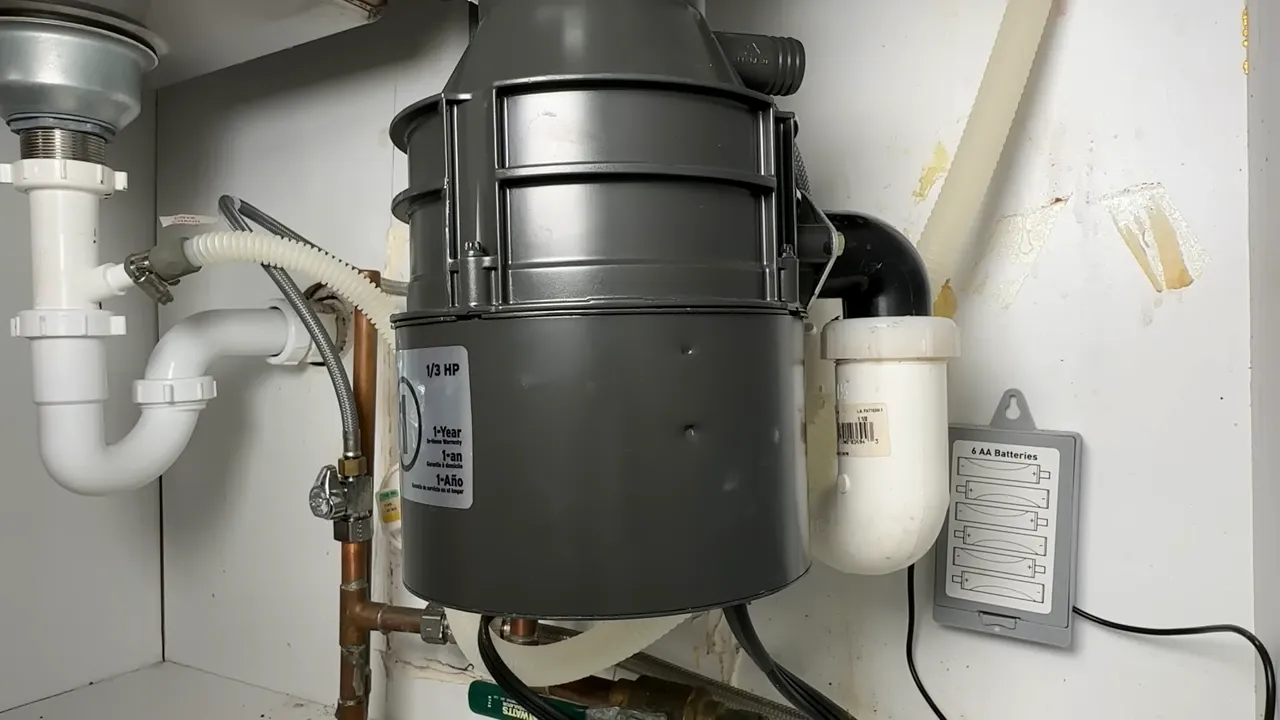
Removing the old disposal unit and drain fittings
Once the power is disconnected, you can safely proceed to remove the old disposal unit. Follow these steps to remove the unit and drain fittings:
- Position a bucket underneath the sink to catch any water that may spill during the process.
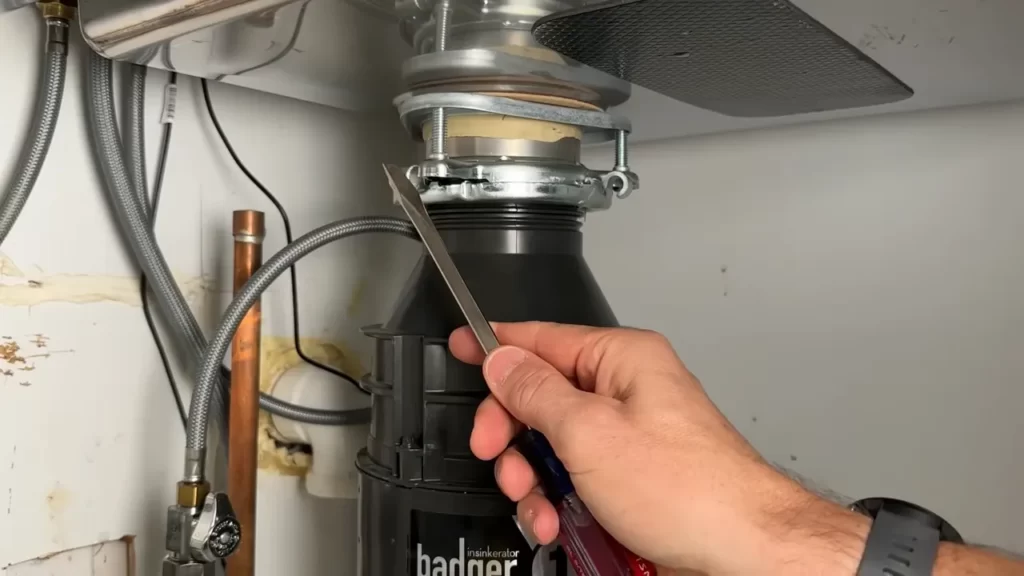
- Locate the metal ring that connects the disposal unit to the sink and turn it counterclockwise to loosen it.
- Once loose, carefully lower the disposal unit and remove it from the sink mount.
- Next, disconnect the drain fittings by loosening the slip nut that connects the drain pipe to the disposal unit.
- Take the time to clean the drain pipe and fittings from any debris or clogs to ensure proper functioning of the new disposal unit.
Clearing any clogs or debris from the drain pipes
Before installing your new Badger 500 Garbage Disposal, it is essential to clear any clogs or debris from the drain pipes. Use these steps to clear the pipes efficiently:
- Inspect the drain pipes for any visible obstructions or buildup.
- If necessary, use a plunger or a drain snake tool to remove any clogs that may be causing blockages.
- Run water through the drain to ensure it flows freely without any restrictions.
- Once you have cleared the drain pipes, make sure to dry them thoroughly before proceeding to the installation of your new disposal unit.
By following these simple steps, you have successfully removed the old disposal unit, disconnected the power supply, and cleared any clogs or debris from the drain pipes. In the next step, we will guide you through the installation process of your brand new Badger 500 Garbage Disposal. Stay tuned!
+
Step 2: Assembling The Badger 500 Garbage Disposal
In this step, we will walk you through the process of assembling the Badger 500 Garbage Disposal. Familiarizing yourself with the components of the garbage disposal, attaching the mounting assembly, and connecting the drain and dishwasher hoses are the key tasks involved in this step. Let’s get started!
<h3>Familiarizing yourself with the components of the Badger 500 Garbage Disposal</h3>
Before you start assembling the Badger 500 Garbage Disposal, it’s important to have a clear understanding of its components. This will help you navigate through the assembly process smoothly and ensure that everything is correctly put together. Here are the main components you’ll find in the package:
- Grinding chamber
- Dishwasher inlet
- Mounting assembly
- Drain elbow and gasket
- Flange and stopper
- Power cord
Take a moment to familiarize yourself with these components and identify them in your package.
<h3>Attaching the mounting assembly</h3>
Attaching the mounting assembly is the next step in the assembly process. The mounting assembly secures the garbage disposal unit to the bottom of your kitchen sink. Follow these steps to attach the mounting assembly:
- Place the mounting assembly over the sink drain hole, ensuring that the mounting tabs are aligned with the mounting holes.
- Insert the mounting screws through the mounting holes and tighten them using a screwdriver or a wrench.
- Make sure the mounting assembly is securely attached to the sink.
With the mounting assembly properly attached, you are now ready to move on to the next step – connecting the drain and dishwasher hoses.
<h3>Connecting the drain and dishwasher hoses</h3>
Connecting the drain and dishwasher hoses is a crucial step in the assembly process as it ensures proper drainage and allows your dishwasher to empty into the garbage disposal. Follow these simple steps for a seamless connection:
- Attach the drain hose to the drain elbow protruding from the side of the garbage disposal unit. Make sure it is tightly secured.
- Connect the dishwasher hose to the dishwasher inlet on the garbage disposal. This allows the waste water from your dishwasher to flow into the garbage disposal for efficient disposal.
- Double-check all connections to ensure that they are tightly secured and leak-free.
Congratulations! You have now successfully assembled the Badger 500 Garbage Disposal. Proceed to the next step of the installation process for further instructions.
Step 3: Mounting The Badger 500 Garbage Disposal
Once you’ve successfully completed steps 1 and 2 of installing your Badger 500 garbage disposal, you’re ready to move on to the next step: mounting the unit. Mounting the disposal is an important part of the installation process as it ensures the unit is securely attached to the sink and can operate smoothly and efficiently. In this step, we will cover how to attach the disposal unit to the mounting assembly and adjust its positioning for optimal operation.
Attaching the disposal unit to the mounting assembly
To attach the disposal unit to the mounting assembly, follow these steps:
- Place the mounting gasket over the drain opening in the sink, ensuring it fits snugly.
- Align the mounting ring with the mounting gasket and rotate it clockwise until it locks into place.
- Attach the disposal unit to the mounting ring by aligning the tabs on the unit with the slots on the ring and rotating it clockwise until it locks into place.
By following these steps, you will securely attach the disposal unit to the mounting assembly, providing a stable foundation for the unit to operate.
Adjusting the positioning for optimal operation
Once the disposal unit is attached to the mounting assembly, it’s important to adjust its positioning for optimal operation. This will ensure that the unit works efficiently and effectively.
Follow these guidelines to adjust the positioning of the disposal unit:
- Make sure the disposal unit is aligned with the sink drain and sits centrally beneath the sink.
- Check that the outlet on the disposal unit aligns with the drainpipe connection.
- Ensure that there is enough space between the disposal unit and any nearby plumbing or obstacles to allow for proper installation and maintenance.
By carefully adjusting the positioning of the disposal unit, you can prevent any potential issues and ensure that it operates optimally.
Now that you’ve successfully mounted your Badger 500 garbage disposal, you’re one step closer to having a fully functioning and efficient kitchen appliance. In the next step, we’ll cover the final installation tasks to complete the process and get your garbage disposal up and running.
Step 4: Connecting The Plumbing
Now that you have successfully mounted your Badger 500 garbage disposal, it’s time to move on to the next crucial step – connecting the plumbing. This step ensures proper water flow and efficient disposal of waste in your kitchen sink. Follow these instructions carefully to complete this task.
Installing the discharge elbow and drainpipe
The first substep in connecting the plumbing is to install the discharge elbow and drainpipe. This is where the waste from your garbage disposal will be directed. Here’s how you can do it:
- Place the discharge elbow onto the Badger 500’s outlet, ensuring a snug fit.
- Attach the drainpipe to the other end of the discharge elbow, aligning them properly.
- Secure the connection by tightening the metal hose clamp around the junction point. Make sure it is secure but not overly tight, as it may damage the components.
By following these steps, you will have successfully installed the discharge elbow and drainpipe, bringing you one step closer to a fully functioning garbage disposal system.
Securing the connection with a compression ring or mounting gasket
After connecting the discharge elbow and drainpipe, it is essential to secure the connection to prevent leaks and ensure smooth operation. You have two options to accomplish this – a compression ring or a mounting gasket. Here’s how you can proceed:
| Option | Instructions |
|---|---|
| Compression Ring |
|
| Mounting Gasket |
|
Regardless of the option you choose, make sure the connection is secure and leak-free before proceeding. This will provide you with peace of mind and efficient performance from your Badger 500 garbage disposal.
Congratulations! You have successfully connected the plumbing for your Badger 500 garbage disposal. Proceed to the next step to complete the installation process.
Step 5: Electrical Connection
Once you’ve successfully mounted the Badger 500 garbage disposal under your sink, it’s time to tackle the electrical connection. This step is crucial to ensure that your disposal functions efficiently and safely. In this guide, we’ll walk you through the process of wiring the Badger 500 garbage disposal to the power supply and ensuring proper grounding and electrical safety measures. Let’s get started!
Wiring the Badger 500 Garbage Disposal to the Power Supply
It’s important to follow all safety guidelines and local electrical codes when wiring the Badger 500 garbage disposal to the power supply. Here’s a step-by-step guide to help you through the process:
- Turn off the power: Before you begin any electrical work, ensure that the power to the circuit that powers the garbage disposal has been turned off. This is crucial to avoid any accidents or injuries.
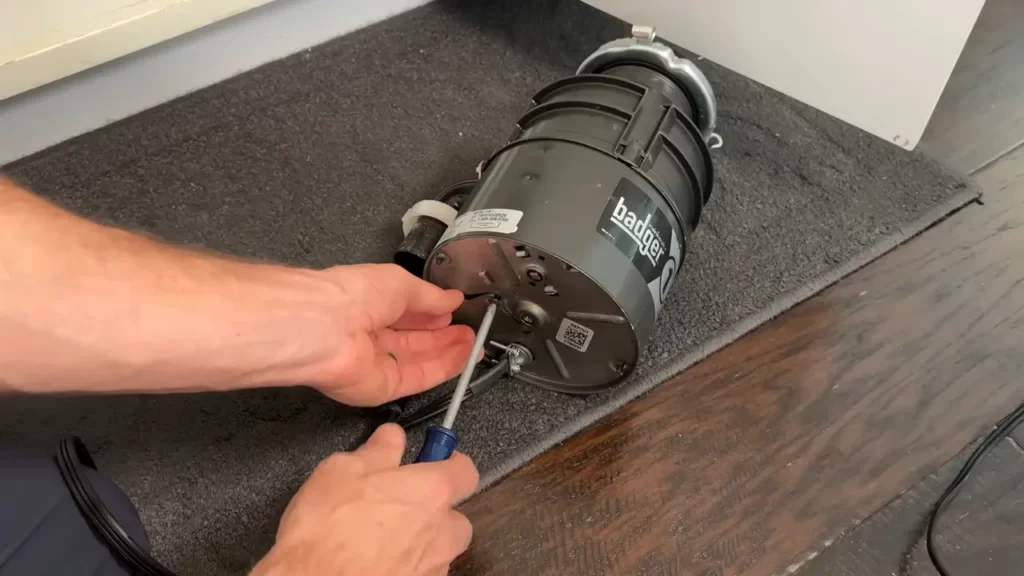
- Remove the electrical cover plate: Locate the electrical cover plate on the bottom of the Badger 500 garbage disposal. Use a screwdriver to remove the screws and take off the cover plate.
- Connect the power supply wires: Inside the electrical compartment, you’ll find three wires – black, white, and green or bare copper. These wires are the power supply wires. Connect the black wire to the black (hot) wire from the power supply, the white wire to the white (neutral) wire, and the green or bare copper wire to the ground wire.
- Secure the wire connections: After making the wire connections, secure them with wire connectors or wire nuts. This will ensure that the connections remain tight and eliminate the risk of electrical hazards.
- Replace the electrical cover plate: Once you’ve properly secured the wire connections, place the electrical cover plate back onto the garbage disposal and fasten it with the screws.
Ensuring Proper Grounding and Electrical Safety Measures
Proper grounding and electrical safety measures are essential when installing the Badger 500 garbage disposal. Follow these tips to ensure a safe and efficient electrical connection:
- Grounding: The green or bare copper wire is the ground wire and should be properly connected to ensure proper grounding. This is crucial for protecting against electrical shock and preventing damage to the disposal.
- Secure connections: Ensure that all wire connections are secure and tightly fastened to avoid any loose wires or potential electrical hazards.
- Check for proper insulation: Make sure that all wires are properly insulated, with no exposed or damaged wiring. Insulation ensures that the electrical connections are protected and reduces the risk of electrical accidents.
- Test the connection: After completing the electrical connection, turn the power back on and test the garbage disposal. Check for any unusual noises, vibrations, or any signs of electrical malfunctions. If you encounter any issues, turn off the power immediately and consult a professional electrician.
By following these steps and adhering to proper grounding and electrical safety measures, you can ensure a successful electrical connection for your Badger 500 garbage disposal. Remember, if you’re unsure about any part of the process, it’s always best to consult a qualified professional to ensure a safe installation.
Step 6: Testing And Troubleshooting
Once you have successfully installed your Badger 500 Garbage Disposal following the steps explained in the previous sections, it’s time to move on to step 6: testing and troubleshooting. This crucial step ensures that the installation is leak-free and the disposal unit is functioning correctly.
Verifying the installation for leaks
The first thing you need to do is check for any potential leaks in your newly installed Badger 500 Garbage Disposal. This step is vital to prevent any water damage or further complications down the line. Follow these steps to verify the installation for leaks:
- Fill the sink with water.
- Plug the drain opening with a stopper or a thick cloth to prevent water from flowing through.
- Turn on the water supply.
- Inspect under the sink for any signs of water leakage.
- If you notice any leaks, carefully tighten the connections until they are snug, ensuring not to overtighten.
- Repeat the process until you are certain that the installation is leak-free.
Testing the functionality of the Badger 500 Garbage Disposal
Once you have confirmed that there are no leaks, it’s time to test the functionality of your Badger 500 Garbage Disposal. Follow these steps to ensure everything is working as expected:
- Remove the stopper or cloth from the drain opening.
- Turn on the water and let it run at a moderate flow.
- Flip the switch or press the button to activate the garbage disposal unit.
- You should hear a mechanical humming sound, indicating that the unit is functioning correctly.
- Slowly feed small food scraps into the disposal’s hopper.
- Observe how the garbage disposal grinds the food waste and expels it down the drain.
Troubleshooting common issues and solutions
In the event that you encounter any issues or problems with your Badger 500 Garbage Disposal during testing or regular use, here are some common problems and their solutions:
| Issue | Solution |
|---|---|
| The disposal unit does not turn on. | Check if the unit is properly plugged into the power source. If it is, reset the circuit breaker or replace the fuse. If the problem persists, consult the manufacturer’s manual or contact their customer support. |
| The disposal unit is making unusual noises. | Turn off the unit and inspect for any foreign objects stuck inside. Use tongs or pliers to remove any obstructions. If the noise persists, contact the manufacturer for further guidance. |
| The disposal unit is leaking. | Check all the connections under the sink and tighten them if necessary. If the leak continues, it might be due to a damaged seal or gasket. Contact the manufacturer for assistance on replacing these parts. |
With proper installation, testing, and troubleshooting, your Badger 500 Garbage Disposal should provide you with years of reliable service. Remember to always follow the manufacturer’s instructions and safety guidelines for optimal performance and long-term usage. Enjoy the convenience and efficiency of having a garbage disposal unit in your kitchen!
Maintenance And Care Tips
Proper maintenance and care are essential to keep your Badger 500 Garbage Disposal unit running smoothly and extending its lifespan. By following these tips, you can ensure optimal performance and avoid common mistakes that may damage the unit. Let’s explore some of the best practices for regular cleaning and maintenance, as well as tips to avoid potential issues and enhance the longevity of your Badger 500 Garbage Disposal.
Regular cleaning and maintenance practices
Regular cleaning is crucial to prevent unpleasant odors and maintain the efficiency of your Badger 500 Garbage Disposal. Follow these maintenance practices to keep your disposal unit in top condition:
- Always disconnect the power supply before cleaning or performing any maintenance on the disposal unit.
- Use a soft brush or cloth to clean the exterior surfaces of the garbage disposal. Avoid using abrasive cleaners that may damage the finish.
- Remove any food particles or debris from the grind chamber using a long-handled brush or a non-abrasive scrub brush.
- For a thorough cleaning, create a mixture of mild soap and warm water. Use this solution to clean the rubber baffle, splash guard, and other removable parts of the disposal. Rinse them thoroughly before reattaching.
- Run a few ice cubes through the disposal to help keep the grinding chamber clean. The ice will help dislodge any buildup of food particles and sharpen the blades.
Avoiding common mistakes that can damage the disposal unit
To ensure the longevity of your Badger 500 Garbage Disposal and prevent unnecessary breakdowns, it’s important to avoid these common mistakes:
- Never put non-food items or hard materials like metal, glass, or plastic into the disposal unit, as they can cause damage to the blades and motor.
- Avoid disposing of fibrous food waste like celery, corn husks, or onion skins, as they can wrap around the blades and impede their rotation.
- Do not pour grease or oil down the disposal, as they can solidify and clog the plumbing system. Instead, dispose of these substances in a separate container.
- Always run cold water while operating the disposal to help solidify any food waste and make it easier to grind. After turning off the disposal, continue running water for a few seconds to flush out any remaining particles.
Tips for extended lifespan and optimal performance
To ensure your Badger 500 Garbage Disposal unit performs at its best and has an extended lifespan, consider these valuable tips:
- Avoid overloading the disposal with large amounts of food waste. Instead, feed it gradually to prevent clogs or strain on the motor.
- Occasionally grinding citrus peels or small lemon wedges can help freshen the disposal and eliminate any unpleasant odors.
- Periodically, apply a biodegradable cleaning solution specifically designed for garbage disposals to sanitize and eliminate bacteria buildup.
- Keep an eye out for strange noises, excessive vibrations, or other signs of potential problems. If you notice any issues, it’s best to consult a professional for proper diagnosis and repair.
- Consider regular professional maintenance to ensure that all components of your disposal unit are working correctly and efficiently.
By following these maintenance and care tips for your Badger 500 Garbage Disposal, you can enjoy a trouble-free operation and prolong the life of your unit. Remember, proper care and regular maintenance are key to the optimal performance of your disposal system.
Frequently Asked Questions (Faqs)
Common Questions about Installing and Using the Badger 500 Garbage Disposal
Being one of the most popular garbage disposals on the market, the Badger 500 Garbage Disposal is a reliable and efficient kitchen appliance. However, as with any installation or new device, you may have some questions. In this section, we address the most frequently asked questions (FAQs) about installing and using the Badger 500 Garbage Disposal.
1. How difficult is it to install the Badger 500 Garbage Disposal?
Installing the Badger 500 Garbage Disposal is surprisingly straightforward, even for those with limited DIY experience. With some basic tools and a little patience, you can complete the installation in a few hours. The package includes a detailed instruction manual and all the necessary components, making the process even easier. If you prefer visual guidance, consider watching some online tutorial videos for a step-by-step walkthrough of the installation process.
2. Can I install the Badger 500 Garbage Disposal myself, or should I hire a professional?
While it is possible to install the Badger 500 Garbage Disposal yourself, hiring a professional plumber is always recommended. They have the expertise and experience to ensure a proper installation, minimizing the risk of leaks or other problems. Plus, professional plumbers can also help with any additional plumbing work that might be required during the installation, saving you time and effort in the long run.
3. What do I need to know about maintaining and cleaning the Badger 500 Garbage Disposal?
Proper maintenance and regular cleaning are essential for ensuring the longevity and efficiency of your Badger 500 Garbage Disposal. To keep it in tip-top shape, follow these simple tips:
– Run cold water before and after using the disposal to prevent clogs and help flush away debris effectively.
– Avoid putting large, hard items such as bones or fruit pits into the disposal, as they can damage the blades.
– Periodically clean the disposal by grinding ice cubes or a mixture of baking soda and vinegar. This helps eliminate any unpleasant odors and keeps the disposal running smoothly.
– Consider using a rubber splash guard to prevent food particles from splashing back during operation.
4. Is there a warranty for the Badger 500 Garbage Disposal?
Yes, the Badger 500 Garbage Disposal comes with an impressive warranty, providing you with peace of mind. It includes a limited warranty of two to three years based on the manufacturer. However, be sure to carefully read and understand the terms and conditions of the warranty to take full advantage of its coverage.
Conclusion
By addressing these common questions, we hope to have answered some of your concerns about installing and using the Badger 500 Garbage Disposal. Remember, if you have any specific queries or issues, it’s always a good idea to consult the product manual or reach out to the manufacturer’s customer support for personalized assistance. So go ahead, equip your kitchen with this reliable and efficient garbage disposal and say goodbye to kitchen waste hassles!
Frequently Asked Questions
Does Badger 500 Come With Power Cord?
Yes, the Badger 500 does come with a power cord. It is included with the disposal unit for your convenience.
What Is Difference Between Badger 5 And 500?
The main difference between Badger 5 and 500 is their power. Badger 5 has a 1/2 horsepower motor, while Badger 500 has a 3/4 horsepower motor. The higher horsepower of Badger 500 enables it to handle tougher food waste.
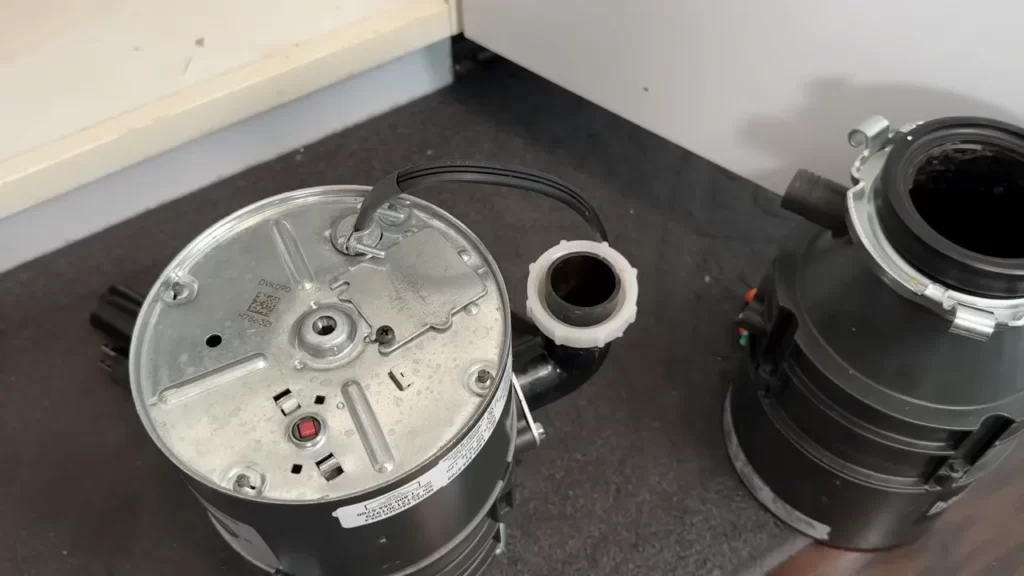
Is There A Reset Button On A Badger 500 Garbage Disposal?
Yes, the Badger 500 garbage disposal has a reset button. It is located at the bottom or side of the unit. If the disposal gets jammed or overloads, press the reset button to restart it. Make sure to disconnect the power before pressing the reset button.
How Do You Clean A Badger 500 Garbage Disposal?
To clean a Badger 500 garbage disposal, follow these steps: 1. Turn off power. 2. Remove debris using tongs or pliers. 3. Clean with a mixture of ice cubes and rock salt. 4. Run cold water while grinding lemon peels to freshen.
5. Rinse with water.
Conclusion
To wrap up, installing a Badger 500 garbage disposal is a simple and efficient process that anyone can do with the right tools and guidance. By following the step-by-step instructions provided in this blog post, you can seamlessly integrate this powerful appliance into your kitchen.
With its reliable performance and durability, the Badger 500 is sure to make your kitchen activities easier and more convenient. Waste no time and get started on your installation today!