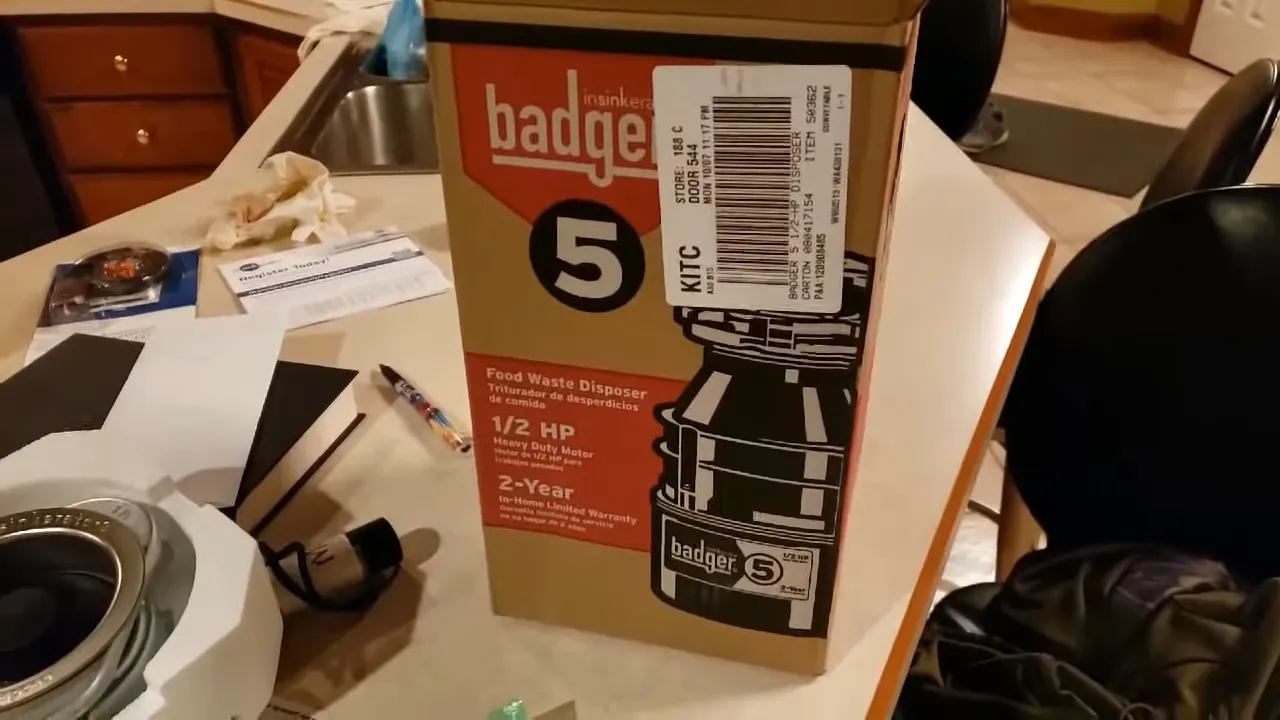
To install a Badger 5 garbage disposal, follow these steps: turn off the power, remove the old disposal, attach the mounting flange, connect the drain trap, attach the disposal unit, and finally, connect the electrical wiring. Welcome to our comprehensive guide on how to install a Badger 5 garbage disposal.
If you’re tired of dealing with food waste clogging up your kitchen sink, installing a garbage disposal can make your life much easier. In this guide, we will walk you through the step-by-step process of installing a Badger 5 garbage disposal, ensuring a smooth and hassle-free installation.
By following these instructions, you’ll have your new disposal up and running in no time. So, let’s get started and say goodbye to kitchen sink clogs forever!
Understanding The Basics Of Badger 5 Garbage Disposal
Before diving into the process of installing a Badger 5 Garbage Disposal, it’s essential to understand its basics. To put it simply, the Badger 5 Garbage Disposal is a powerful and efficient appliance designed to grind and dispose of food waste. It is an excellent addition to any kitchen, providing convenience and helping to keep your kitchen clean and odor-free.
What is Badger 5 Garbage Disposal?
The Badger 5 Garbage Disposal is a popular and reliable choice for homeowners looking for an effective way to manage their food waste. Equipped with a 1/2 horsepower motor, this disposal system easily grinds up kitchen scraps, allowing them to flow smoothly through your plumbing system.
Advantages of using Badger 5 Garbage Disposal
There are numerous advantages to installing a Badger 5 Garbage Disposal in your kitchen. Here are some key benefits:
- Effective waste management: The Badger 5 Garbage Disposal efficiently grinds food waste, reducing the risks of clogs in your pipes and eliminating the need for traditional garbage disposal methods.
- Convenience: With a Badger 5 Garbage Disposal, you can quickly and easily dispose of food scraps after meals, saving you time and effort.
- Environmental-friendly: Properly using a garbage disposal like the Badger 5 helps reduce landfill waste and is more environmentally friendly compared to traditional garbage disposal methods.
- Odor control: By grinding and disposing of food waste immediately, a Badger 5 Garbage Disposal helps to prevent foul odors in your kitchen, helping you maintain a fresh and clean space.
Things to consider before installing Badger 5 Garbage Disposal
Before purchasing and installing a Badger 5 Garbage Disposal, there are a few important factors to consider:
- Compatibility: Ensure that your kitchen sink plumbing is compatible with a garbage disposal system and has the necessary power supply.
- Installation requirements: Familiarize yourself with the installation process and the tools needed. Consider if you have the necessary skills or if you need professional assistance.
- Proper maintenance: Understand the maintenance requirements of a Badger 5 Garbage Disposal to ensure its optimal performance and longevity.
- Safety precautions: Always adhere to safety guidelines when operating or installing a garbage disposal to prevent accidents and injuries.
By keeping these considerations in mind, you’ll be well-prepared to install a Badger 5 Garbage Disposal and enjoy the convenience and benefits it brings to your kitchen.

Tools And Materials Needed For Installation
In order to install a Badger 5 garbage disposal, you will need a few essential tools and some additional materials. Gathering all the necessary supplies before you begin the installation process will ensure a smooth and efficient experience. Here is a breakdown of the tools and materials you will need:
Essential tools for installation
To complete the installation of your Badger 5 garbage disposal, the following tools are essential:
- Adjustable wrench
- Plumbers putty
- Screwdriver
- Hammer
- Plunger
Additional materials required
In addition to the essential tools, you will also need the following materials:
- The Badger 5 garbage disposal unit
- Pipes and fittings
- Electrical wire connectors
- Wire nuts
- Plumber’s tape
- Power cord (if not included with the disposal unit)
- Bucket or container for water
- Cleaning materials (such as a sponge and dish soap)
Tips for gathering all the necessary supplies
Gathering all the necessary supplies can be a headache if not done properly. Follow these tips to ensure you have everything you need:
- Make a checklist: Create a checklist of all the tools and materials mentioned above.
- Check for compatibility: Double-check the specifications of the Badger 5 garbage disposal to ensure that the pipes and fittings you purchase are compatible.
- Measurements: Take accurate measurements of the space under your sink to determine the length of pipes and fittings you will need.
- Buy extra: It’s always a good idea to buy a few extra fittings and connectors, just in case.
- Shop in advance: Start gathering the supplies well in advance of the installation date, to allow for any shipping delays or unexpected issues.
By following these tips and ensuring that you have all the necessary tools and materials, you will be well-prepared to install your Badger 5 garbage disposal with ease.
Step 1: Preparing For The Installation
Before you start installing your Badger 5 Garbage Disposal, it’s important to prepare the installation space properly. In this step, we will discuss understanding the installation space requirements, and the necessary safety precautions to take before getting started. If you have an existing garbage disposal that needs to be removed, we will also cover how to do that in a safe and efficient manner.
Understanding the Installation Space Requirements
Before beginning the installation process, it’s crucial to ensure that you have enough space to accommodate the Badger 5 Garbage Disposal. Here are some key points to keep in mind:
- Make sure there is ample space below the sink for the garbage disposal unit to fit. Measure the distance between the bottom of the sink and any nearby obstructions, such as pipes or cabinets.
- Check that the electrical outlet is within reach of the disposal unit’s power cord. If not, you may need to hire an electrician to install an outlet in a more accessible location.
- Ensure that there is enough space for the dishwasher connection, if applicable. The Badger 5 Garbage Disposal has a dishwasher inlet, so make sure you have enough room to connect it properly if you plan on using it.
Safety Precautions before Starting the Installation
Prior to beginning the installation process, it’s crucial to prioritize your safety. Here are some important safety precautions to follow:
- Turn off the power: Before doing anything else, make sure to turn off the power by turning off the circuit breaker that supplies electricity to the garbage disposal area. This will prevent any accidental electrocution while working.
- Use protective gear: It is always recommended to wear protective gear, such as gloves and safety glasses, to avoid any injuries or accidents during the installation process.
- Be cautious with sharp objects: Be careful while handling any sharp tools or metal components to avoid cuts or wounds.
Removing the Existing Garbage Disposal, if Applicable
If you already have a garbage disposal installed and need to remove it before installing the Badger 5, follow these steps:
- Turn off the power: As mentioned earlier, ensure the power to the existing garbage disposal is switched off by turning off the respective circuit breaker.
- Disconnect the drain pipe: Loosen the drain pipe connection located beneath the sink by turning it counterclockwise. Once it’s loose, carefully remove the drain pipe from the disposal unit.
- Detach electrical connections: If your existing disposal unit is hardwired, disconnect the electrical connections by unscrewing the wire nuts and separating the wires.
- Remove the disposal unit: Using a disposal wrench or a large pipe wrench, rotate the disposal unit counterclockwise to loosen it from the mounting assembly. Once loose, carefully remove the disposal unit and set it aside.
Once you have completed these steps, you will be ready to move on to the next step of the installation process. Stay tuned for Step 2: Mounting the Badger 5 Garbage Disposal, where we will discuss how to securely mount the new unit.

Step 2: Assembling The Badger 5 Garbage Disposal
In order to properly install your Badger 5 garbage disposal, you’ll need to follow a series of steps. The second step is assembling the various components of the disposal. This process may seem daunting at first, but with the right guidance, it can be done smoothly and efficiently. In this section, we’ll guide you through each stage of assembling the Badger 5 garbage disposal, ensuring that you have a solid foundation for the installation process.
Identifying and preparing the different components
Before you can begin assembling the Badger 5 garbage disposal, it’s important to identify and prepare all the different components. This includes the mounting assembly, mounting ring, discharge pipe, and power cord. Take a moment to familiarize yourself with each component, ensuring that you have everything you need for a successful installation.
Connecting the mounting assembly and mounting ring
Once you have identified the mounting assembly and mounting ring, it’s time to connect them. This step is crucial as it ensures that the disposal unit is securely attached to your sink. To do this, first, locate the mounting assembly and position it underneath the sink opening. Then, align the tabs on the mounting ring with the slots on the mounting assembly. With a clockwise rotation, twist the mounting ring until it is securely fastened.
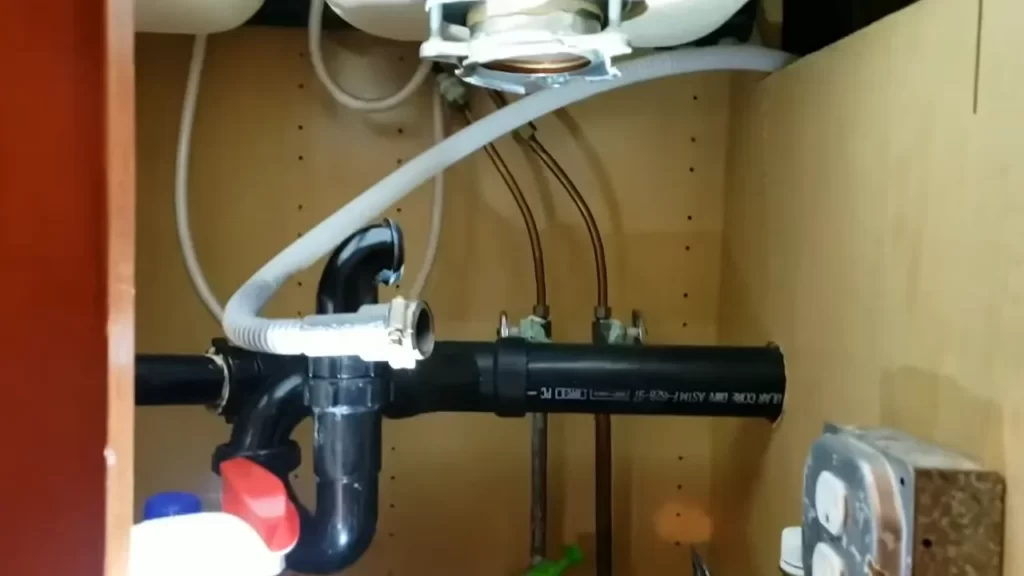
Attaching the discharge pipe and power cord
With the mounting assembly and mounting ring securely in place, it’s time to attach the discharge pipe and power cord. The discharge pipe is responsible for carrying the waste away from your sink, while the power cord ensures that the disposal unit is properly connected to a power source.
To attach the discharge pipe, insert one end into the opening on the side of the disposal unit. Twist it in a clockwise direction until it is securely attached. Next, connect the other end of the discharge pipe to the drainpipe under your sink. Use a screwdriver or adjustable wrench to tighten any necessary connections. Ensure that the discharge pipe is properly aligned and free from any obstructions, ensuring a smooth flow of waste.
To attach the power cord, locate the electrical connection on the disposal unit. Align the plug of the power cord with the electrical connection and insert it until it clicks into place. Double-check that the connection is secure, as a loose power cord can lead to electrical issues.
With the discharge pipe and power cord securely attached, you can now move on to the next step in the installation process. By following these straightforward instructions, you’ll have your Badger 5 garbage disposal assembled and ready to go in no time!
Step 3: Mounting And Wiring The Badger 5 Garbage Disposal
Once you have successfully prepared your sink and gathered all the required tools and materials, it’s time to move on to the exciting part – mounting and wiring the Badger 5 garbage disposal! This step not only ensures that your disposal unit is securely attached to your sink but also ensures a safe and efficient electrical connection. Let’s dive into the details of each task:
Mounting the disposal unit to the sink
The first task you need to tackle is mounting the Badger 5 garbage disposal to your sink. This process involves aligning and attaching the disposal to the mounting assembly.
To get started, follow these steps:
- Position the disposal unit under the sink opening.
- Take the mounting assembly and insert the mounting ring over the disposal’s inlet.
- Turn the mounting ring clockwise until it is snugly in place.
- Align the tabs on the mounting ring with the mounting assembly and insert them into the grooves.
- Rotate the mounting ring counterclockwise until it locks into position.
- Tighten the mounting screws to secure the disposal unit to the mounting assembly.
- Double-check the alignment and stability of the disposal unit.
By following these steps, you’ll have your Badger 5 garbage disposal securely mounted to your sink, ready for the next step.
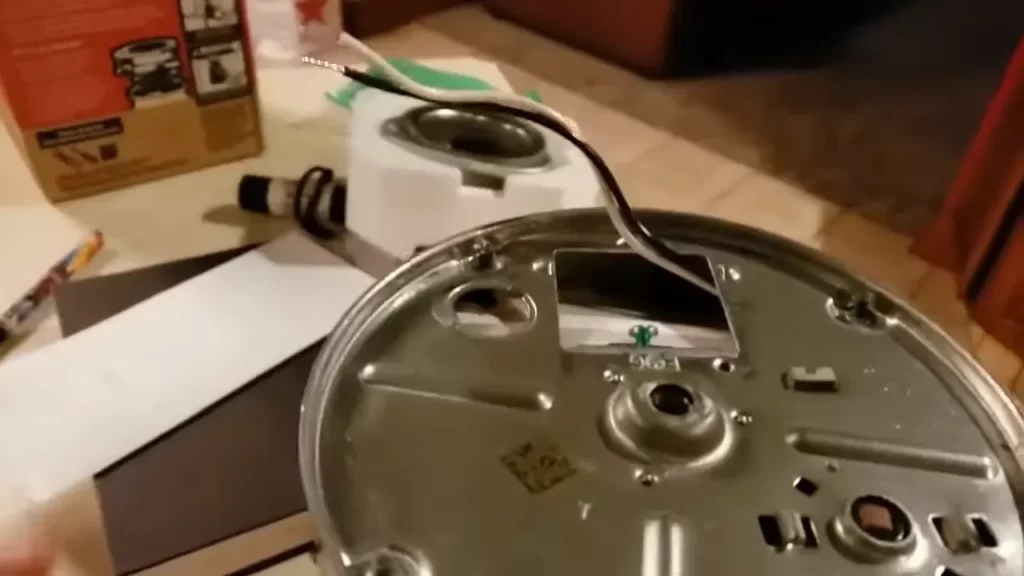
Connecting the power cord to the disposal unit
Once you have mounted the disposal unit, the next task is to connect the power cord. This step involves attaching the power cord to the disposal unit for a safe and reliable power supply.
Here’s how to connect the power cord:
- Locate the terminal box on the disposal unit.
- Remove the cover from the terminal box.
- Strip the insulation from the power cord wires.
- Connect the black wire from the power cord to the black wire in the terminal box.
- Connect the white wire from the power cord to the white wire in the terminal box.
- Secure the wires by tightening the screws on the terminal box.
- Attach the cover back onto the terminal box.
With these steps completed, your Badger 5 garbage disposal is now wired and ready to be powered up.
Securing the wiring connections and ensuring safety
To ensure a safe and reliable electrical connection, it’s important to secure the wiring connections and take necessary safety precautions. Follow these guidelines:
- Tightly screw the wire connectors onto the wire connections.
- Do not leave any exposed wires.
- Ensure that the power cord is properly strain-relieved to prevent tension on the wires.
- Inspect the wiring connections for any signs of damage or loose connections.
- Test the disposal unit by turning it on briefly to confirm that it is working properly.
- Always adhere to the manufacturer’s instructions and guidelines.
By securing the wiring connections and prioritizing safety, you can confidently enjoy the functionality and convenience of your newly installed Badger 5 garbage disposal.
Now that you have successfully mounted and wired the Badger 5 garbage disposal, your kitchen is one step closer to getting that upgrade it deserves. Stay tuned for the final step, where we will guide you through the process of testing and troubleshooting your disposal unit.
Step 4: Testing And Troubleshooting
Once you have successfully completed the installation of your Badger 5 garbage disposal, it is vital to conduct a thorough testing and troubleshooting process. This step ensures that everything is functioning properly and helps address any potential issues that may arise. Follow the steps below to conduct the necessary checks and troubleshoot common installation problems.
Conducting a preliminary check-up
Before you start testing the garbage disposal, it is essential to conduct a preliminary check-up to ensure that all connections are secure and there are no visible signs of damage. Here’s a simple checklist you can follow:
- Inspect the power cord and make sure it is securely plugged into a functioning electrical outlet.
- Check all the plumbing connections for any leaks or loose fittings.
- Turn on the water and run it through the disposal to flush out any debris that may have accumulated during the installation.
If everything appears to be in order, you can proceed with the actual testing and troubleshooting process.
Tips for troubleshooting common installation issues
During the installation of your Badger 5 garbage disposal, you may encounter some common issues. Here are a few tips to help you troubleshoot and overcome these problems:
- No power: If the disposal does not turn on when you flip the switch, check if it is properly plugged in and the circuit breaker is not tripped. You can also try resetting the disposal by pressing the reset button located at the bottom of the unit.
- Excessive noise: If the disposal is making more noise than usual, it could be due to loose components or foreign objects stuck in the grinding chamber. Turn off the disposal and inspect for any visible obstructions. Tighten loose components if necessary.
- Clogging: If the water is not draining properly or the disposal is experiencing frequent clogs, it may be due to improper food waste disposal or a faulty drain. Avoid putting fibrous or hard materials down the disposal and use a plunger or a drain snake to clear any blockages.
By following these troubleshooting tips, you can quickly address common installation issues and ensure the smooth operation of your Badger 5 garbage disposal.
Ensuring proper functionality and addressing any problems
After conducting the necessary checks and troubleshooting steps, it is crucial to verify the proper functionality of your Badger 5 garbage disposal. Here are a few final steps to consider:
- Operational test: Run water through the disposal and turn it on to ensure it functions smoothly.
- Odor control: To keep your garbage disposal smelling fresh, you can run ice cubes and citrus peels through it periodically.
- Professional assistance: If you encounter persistent issues that you are unable to resolve, it is advisable to seek professional assistance from a qualified plumber or electrician.
Remember, regular maintenance and proper use of the garbage disposal are essential for its longevity and optimal performance. By following these steps, you can install your Badger 5 garbage disposal with confidence and enjoy its benefits for years to come.
Step 5: Maintaining And Extending The Lifespan Of Badger 5 Garbage Disposal
Congratulations on successfully installing your Badger 5 Garbage Disposal! Now that you have it up and running efficiently, it’s important to know how to properly maintain and extend its lifespan. By following these simple steps, you can ensure that your disposal remains in optimal condition for years to come.
Proper cleaning and maintenance practices
To keep your Badger 5 Garbage Disposal running smoothly, regular cleaning and maintenance are crucial. Here are some tips to help you maintain its performance:
1. Clean the disposal regularly: After each use, run cold water for a few seconds to wash away any remaining residue. You can also use a scrub brush or a toothbrush to gently clean the rubber baffle and inner walls of the disposal.
2. Use natural cleaners: Avoid using harsh chemicals as they can damage the disposal. Instead, consider using natural cleaners like baking soda and vinegar to eliminate odors and remove any buildup.
3. Sharpen the blades: Over time, the blades of your disposal can become dull. To keep them sharp, you can grind ice cubes or small chicken bones in the disposal. This will help remove any debris and keep the blades working efficiently.
4. Regularly check for leaks: Inspect the connections between your Badger 5 Garbage Disposal and the sink for any signs of leaks. If you notice any leaks, tighten the connections or replace any faulty parts immediately.
Tips for preventing clogs and blockages
Nobody wants to deal with a clogged garbage disposal. To prevent clogs and blockages, follow these simple tips:
1. Avoid putting non-food items down the disposal: Only dispose of food waste in your Badger 5 Garbage Disposal. Non-food items such as glass, plastic, and paper can damage the blades and cause blockages.
2. Chop larger food items: Cut larger food items into smaller pieces before putting them down the disposal. This will help prevent the blades from getting overwhelmed and reduce the risk of blockages.
3. Run cold water: Always use cold water while running the disposal. Cold water helps solidify grease and oil, making it easier for the disposal to grind them up. Avoid using hot water, as it can melt fats and cause them to build up in the pipes.
Extending the lifespan of your Badger 5 Garbage Disposal
With proper care and maintenance, you can significantly extend the lifespan of your Badger 5 Garbage Disposal. Here are a few additional tips to help you get the most out of your disposal:
1. Avoid overloading the disposal: Remember to feed the disposal small amounts of food waste at a time. Overloading it can strain the motor and lead to premature wear and tear.
2. Use cold water while grinding: Always run cold water when using the disposal. The cold water helps keep the motor and bearings cool and prevents overheating.
3. Keep it lubricated: Over time, the moving parts of your disposal may need lubrication to ensure smooth operation. Consider using a food-grade lubricant or manufacturer-recommended oil to lubricate the disposal. Refer to the user manual for specific instructions.
By following these cleaning, maintenance, and prevention tips, you can keep your Badger 5 Garbage Disposal running smoothly for years to come. Remember, a well-maintained disposal not only saves you from the hassle of repairs but also helps in preserving the environment by efficiently disposing of food waste. So, take care of your disposal, and it will continue to serve you well for a long time.
Further Tips And Considerations
Upgrading your kitchen plumbing system
If you’re considering installing a Badger 5 Garbage Disposal, it may also be a good time to think about upgrading your kitchen plumbing system. A garbage disposal is a valuable addition to any kitchen, but it does put additional strain on your pipes and drains. Upgrading your plumbing system can help ensure that it can handle the increased workload and prevent any potential plumbing issues in the future.
Professional installation options
While installing a Badger 5 Garbage Disposal is a relatively straightforward process, some homeowners may prefer to leave it to the professionals. Hiring a professional plumber can give you peace of mind knowing that the installation will be done correctly and efficiently. Additionally, if you’re not comfortable working with plumbing systems or don’t have the necessary tools, it’s always best to hire a professional to avoid any potential accidents or damage.
Frequently asked questions about Badger 5 Garbage Disposal
If you’re considering installing a Badger 5 Garbage Disposal, you may have a few questions in mind. Here are some commonly asked questions about this particular model:
- What is the Badger 5 Garbage Disposal?
The Badger 5 Garbage Disposal is a powerful and reliable disposal unit designed to handle everyday food waste. It features a 1/2 horsepower motor and a galvanized steel grind system, making it suitable for most households. - Can I install the Badger 5 Garbage Disposal myself?
Yes, installing the Badger 5 Garbage Disposal can be a DIY project for homeowners with some basic plumbing knowledge and tools. However, if you’re unsure or not confident in your abilities, it’s best to hire a professional. - What precautions should I take during installation?
It’s important to turn off the power to the disposal unit before starting the installation process. Additionally, make sure to follow all safety guidelines provided by the manufacturer to avoid any accidents or injuries. - How do I maintain the Badger 5 Garbage Disposal?
Regular maintenance is key to keeping your Badger 5 Garbage Disposal in good working condition. Avoid putting large bones, fibrous materials, and non-food items down the disposal. Running cold water before and after each use can help keep the unit clean and clear of any debris. - Is the Badger 5 Garbage Disposal noisy?
Like any other garbage disposal, the Badger 5 does produce some noise during operation. However, it is designed to minimize noise and vibrations to provide a more pleasant and comfortable kitchen environment.
Hopefully, these answered some of your questions about the Badger 5 Garbage Disposal. Now that you have further tips and considerations in mind, you can proceed confidently with your installation project, whether you choose to do it yourself or hire a professional.
Frequently Asked Questions
What Is The Difference Between Badger 5 And Badger 5Xl Garbage Disposal?
The main difference between Badger 5 and Badger 5XL garbage disposals is their horsepower. Badger 5 has a 1/2 HP motor, while Badger 5XL has a more powerful 3/4 HP motor. This means that Badger 5XL can handle more heavy-duty tasks and larger quantities of waste.
How Do You Put A Garbage Disposal Back On?
To put a garbage disposal back on, follow these steps: 1. Turn off the power and disconnect the disposal. 2. Align the disposal with the mounting ring and rotate it into place. 3. Reconnect the drain pipe and secure it tightly.
4. Reattach the electrical connections and turn on the power. 5. Test the disposal to ensure it’s functioning properly.
Is There A Reset Button On A Badger 5 Garbage Disposal?
Yes, the Badger 5 garbage disposal does have a reset button. It is located at the bottom of the unit and can be pressed to reboot the system in case of a jam or overload.
How Much Does Lowe’S Charge To Install A Garbage Disposal?
Lowe’s charges for garbage disposal installation vary depending on the specific model and any additional services required. Prices can range from $99 to $239, but it’s best to contact your local Lowe’s store or visit their website for more information and to get an accurate estimate.
Conclusion
Installing a Badger 5 garbage disposal is a straightforward process that can greatly improve your kitchen experience. By following the step-by-step instructions provided in this blog post, you can easily set up the disposal and start enjoying the benefits it offers.
Remember to prioritize safety and refer to the manufacturer’s manual for any specific details. Happy DIY-ing!