
Installing a 3 hole Delta bathroom faucet is a straightforward process that can be completed with basic tools and a few simple steps. To begin the installation, turn off the water supply and disconnect the old faucet.
Next, clean the sink surface and position the new faucet assembly in the desired location. Connect the hot and cold water supply lines, ensuring they are tight and secure. Finally, test the faucet for leaks and functionality before completing the installation.
By following these steps, you can easily install a 3 hole Delta bathroom faucet and enjoy its benefits in no time.
Preparing For The Installation
Before you begin installing your new 3 Hole Delta Bathroom Faucet, there are a few important steps you need to take to ensure a smooth and successful installation. This guide will walk you through the process of preparing for the installation, including choosing the right Delta bathroom faucet, checking the compatibility of the 3-hole setup, and gathering the necessary tools and materials.
Choosing the Right Delta Bathroom Faucet
When it comes to choosing the right Delta bathroom faucet for your installation, there are a few factors you need to consider. First, determine the style and design that best fits your bathroom decor. Delta offers a wide range of options, from traditional to modern, ensuring you can find the perfect faucet to complement your bathroom’s aesthetic.
Next, consider the functionality and features you want. Do you prefer a single-handle or double-handle faucet? Are you looking for additional features such as a pull-down sprayer or touchless technology? Keep in mind your personal preferences and needs when making your selection.
Lastly, ensure that the faucet you choose is compatible with the 3-hole setup in your bathroom. This brings us to the next step in the installation process.
Checking the Compatibility of the 3-Hole Setup
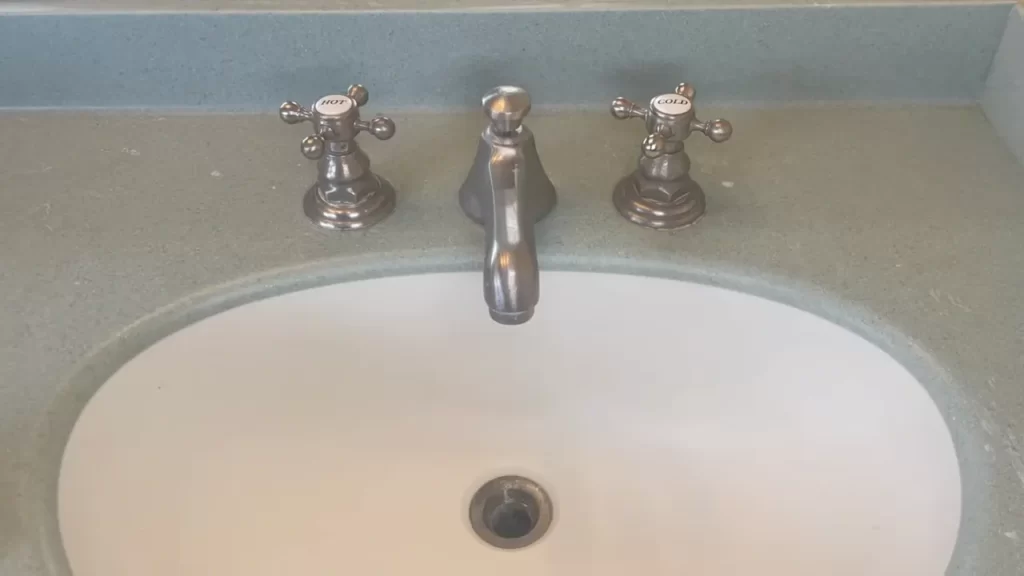
Before you begin the installation, it’s essential to check the compatibility of the 3-hole setup in your bathroom. Most Delta bathroom faucets require a 3-hole configuration, with one hole for the hot water handle, one for the cold water handle, and one for the spout.
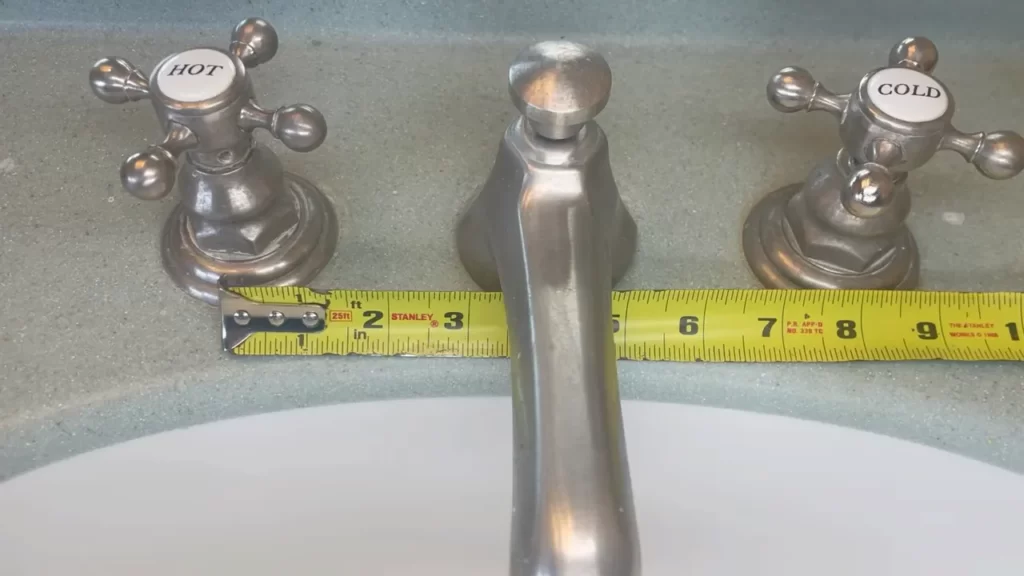
To check the compatibility, start by examining your sink or countertop to ensure it has the necessary 3-hole configuration. Measure the distance between the holes to confirm that it matches the specifications of the Delta faucet you have chosen.
If your bathroom does not have a 3-hole setup, don’t worry. Delta also offers options for 1-hole and 4-hole configurations. You can choose a faucet that matches the setup you have or consider modifying your bathroom’s configuration to accommodate the faucet of your choice.
Gathering the Necessary Tools and Materials
Now that you have chosen the right Delta bathroom faucet and confirmed the compatibility of your 3-hole setup, it’s time to gather the necessary tools and materials for the installation. Here is a list of items you will need:
| Tools | Materials |
|---|---|
|
|
Make sure you have all the tools and materials listed above before you begin the installation. This will help you work efficiently and ensure that the installation process goes smoothly.
With the right Delta bathroom faucet chosen, the compatibility of your 3-hole setup confirmed, and all the necessary tools and materials gathered, you are now ready to proceed with the installation. Follow the next steps in this guide to install your faucet and enjoy a beautifully updated bathroom.
Removing The Old Faucet
In order to install a new 3-hole Delta bathroom faucet, you’ll first need to remove the old faucet. This process consists of a few important steps, including shutting off the water supply, draining any remaining water, and detaching the supply lines and connections. By following these steps, you’ll be one step closer to installing a beautiful new faucet in your bathroom.
Shutting off the water supply
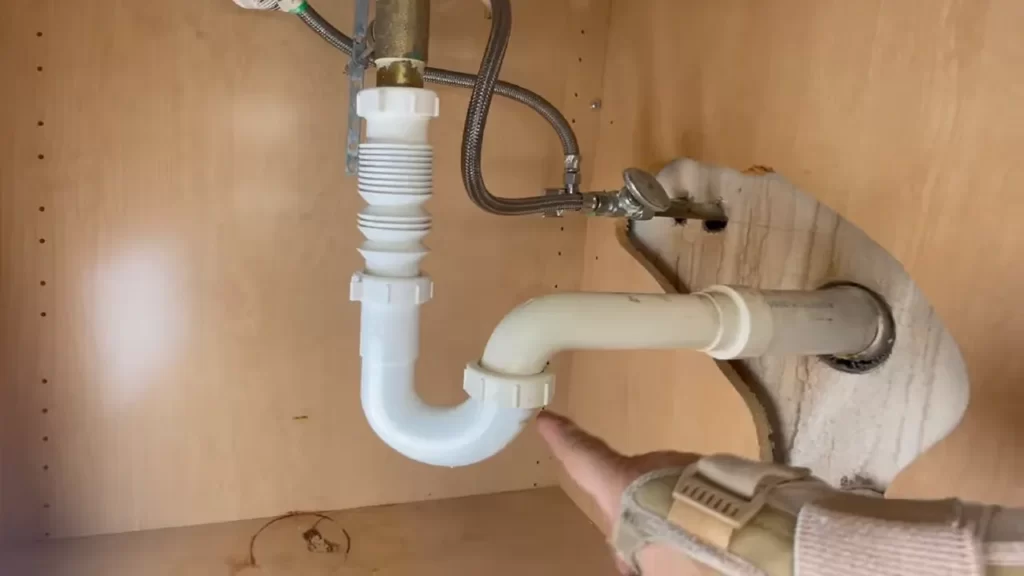
The first step in removing the old faucet is to shut off the water supply to the bathroom. This can usually be done by locating the shut-off valves underneath the sink. Turn the valves clockwise to close them and stop the water flow. If you’re unable to locate these valves or they are not functioning properly, you may need to shut off the main water supply to your home.
Draining any remaining water
After shutting off the water supply, it’s important to drain any remaining water from the faucet and supply lines. To do this, turn on the faucet and let the water run until it stops flowing. This will help prevent any water from spilling or causing damage when you detach the supply lines.
Detaching the supply lines and connections
With the water supply shut off and the faucet drained, you can now begin detaching the supply lines and connections. Start by disconnecting the supply lines from the shut-off valves using an adjustable wrench. Turn the nuts counterclockwise to loosen and remove them. Once the supply lines are disconnected, you can then disconnect any additional connections, such as the pop-up drain or sprayer hose.
Remember: It’s important to take note of which supply line is connected to which shut-off valve, as you’ll need to reconnect the new faucet in the same way. Consider labeling the supply lines if necessary.
Once all the connections are detached, you can carefully lift the old faucet out of the sink. Take this opportunity to clean the sink surface and prepare it for the installation of the new faucet. Remove any old putty or gasket residue, ensuring a clean and smooth surface for the new faucet to be installed on.
Following these steps to remove the old faucet will ensure a smooth transition to installing your new 3-hole Delta bathroom faucet. With the old faucet out of the way, you can continue with confidence knowing that you’re on your way to enhancing the look and functionality of your bathroom space.
Installing The New Faucet
Installing a new faucet is a simple and rewarding DIY project that can instantly update the look of your bathroom. With a few basic tools and the right instructions, you’ll have your new 3-hole Delta bathroom faucet up and running in no time. In this guide, we’ll walk you through the step-by-step process to ensure a successful installation.
Positioning the faucet on the sink
The first step in installing your new Delta bathroom faucet is to position it on the sink. Start by aligning the faucet holes on your sink with the corresponding holes on the faucet itself. Make sure the faucet is centered and securely positioned on the sink. This will ensure proper water flow and prevent any leaks.
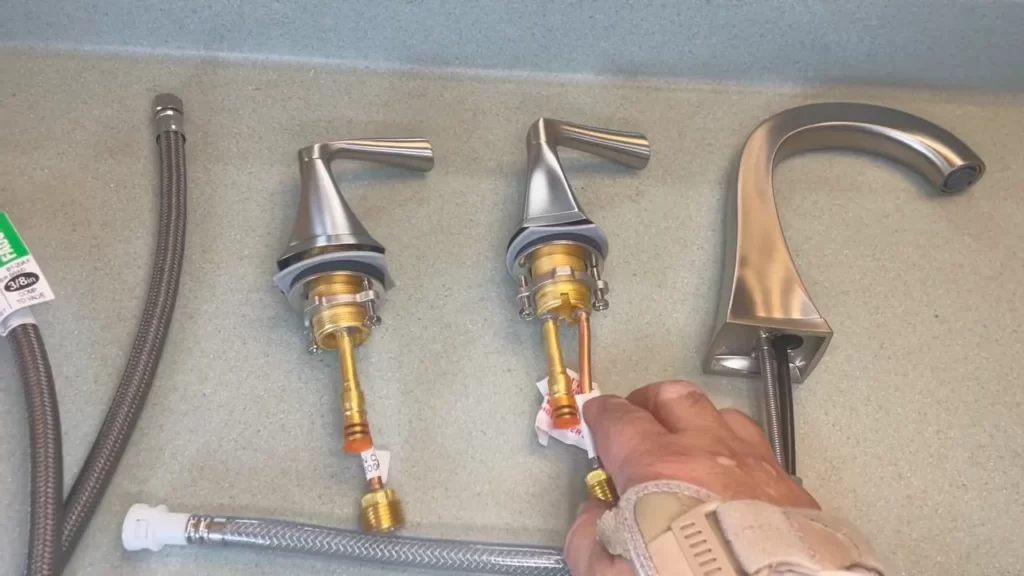
Attaching the supply lines and connections
Once the faucet is positioned, it’s time to attach the supply lines and connections. Delta bathroom faucets typically come with pre-attached supply lines for easy installation. However, if your faucet does not have pre-attached supply lines, you’ll need to connect them yourself.
Start by applying plumber’s tape to the threaded ends of the supply lines. This will create a watertight seal and prevent leaks. Next, carefully attach the supply lines to the corresponding hot and cold water valves under your sink. Use an adjustable wrench to tighten the connections, making sure they are snug but not over-tightened. Over-tightening can cause damage to the threads.
Securing the faucet with mounting hardware
After connecting the supply lines, you’ll need to secure the faucet to the sink using the provided mounting hardware. This will ensure that the faucet stays in place and doesn’t wobble during use. The mounting hardware typically consists of a mounting bracket and screws.
Start by attaching the mounting bracket to the bottom of the faucet. Line up the holes on the bracket with the holes on the sink and insert the screws. Use a screwdriver or a drill with the appropriate bit to tighten the screws, making sure the faucet is securely fastened to the sink.
Finally, turn on the water supply valves and check for any leaks. If you notice any leaks, carefully tighten the connections until the leaks stop. Once everything is secure and leak-free, you can enjoy your new Delta bathroom faucet.
Finalizing The Installation
Once you have successfully installed your 3 hole Delta bathroom faucet, it’s time to finalize the process. This involves turning on the water supply, checking for leaks and proper functionality, and cleaning up the workspace. Follow the steps below to complete the installation and ensure a seamless and functional faucet for your bathroom.
Turning on the water supply
To start, locate the shut-off valves underneath the sink. These valves control the water supply to your faucet. Turn them clockwise to fully open the valves and allow the water to flow. Check for any leaks around the valves or connections as you turn on the water supply. If you notice any leaks, tighten the connections or consult a professional if needed.
Checking for leaks and proper functionality
Once the water supply is turned on, inspect the faucet and its connections for any leaks. Run both hot and cold water through the faucet and check for any drips or leaks. Ensure that the water flows smoothly from all the spouts without any obstructions or unusual noises. Additionally, test the handle or handles to make sure they operate smoothly and without sticking. If you encounter any leaks or issues, double-check the connections and tighten them if necessary.
Cleaning up the workspace
After confirming that your faucet is leak-free and functioning properly, it’s time to clean up the workspace. Wipe down the countertop and surrounding areas with a non-abrasive cleaner to remove any dirt or debris that may have accumulated during the installation process. Use a soft cloth to dry the surface and give your bathroom a clean and polished look.
By following these steps and finalizing the installation of your 3 hole Delta bathroom faucet, you can enjoy a beautiful and fully functional addition to your bathroom. Remember to regularly check for any leaks or issues and address them promptly to ensure the longevity and optimal performance of your faucet.
Troubleshooting Common Issues
Installing a 3-hole Delta bathroom faucet can transform the look of your bathroom, giving it a sleek and modern touch. However, sometimes you may encounter common issues that can hinder the smooth operation of your faucet. In this section, we will address some of these issues and provide you with solutions to troubleshoot and resolve them.
Addressing leaks or drips
If you notice water leaking or dripping from your Delta bathroom faucet, it can be a frustrating experience. There are a few potential causes for this issue:
- Loose connections: Ensure that all the connections between the faucet components are tight. Check the connections between the supply lines, shutoff valves, and the faucet itself. If any connections are loose, tighten them using a wrench or pliers.
- Worn-out O-rings: Over time, the O-rings inside the faucet can wear out, causing leaks. To fix this, you will need to disassemble the faucet and replace the worn-out O-rings. Refer to your faucet’s user manual for detailed instructions on how to do this.
- Faulty cartridge: The cartridge inside the faucet controls the flow of water. If the cartridge is damaged or worn out, it can cause leaks. To resolve this issue, you will need to replace the cartridge. Consult the user manual or contact Delta’s customer support for guidance on finding the correct replacement cartridge for your faucet model.
Handling low water pressure
If you are experiencing low water pressure from your Delta bathroom faucet, try the following troubleshooting steps:
- Check the aerator: The aerator is a small mesh screen located at the end of the faucet spout. Over time, it can get clogged with mineral deposits, affecting the water pressure. Unscrew the aerator from the faucet and clean it thoroughly. This should help restore adequate water pressure.
- Inspect the supply lines: Ensure that the supply lines are not kinked or blocked. Straighten any kinks and remove any debris or sediment that may be obstructing the flow of water.
- Examine the valve: If the low water pressure issue persists, the problem might be with the valve in the faucet. Contact Delta’s customer support for further assistance in troubleshooting and resolving this issue.
Resolving issues with hot or cold water
If your Delta bathroom faucet is not providing the desired hot or cold water, consider the following solutions:
- Check the handle positions: Ensure that the handles are set in the correct positions. If you are not getting hot water, the handle for hot water may be turned off or not fully opened. Adjust the handles accordingly to achieve the desired water temperature.
- Inspect the supply valves: Make sure the supply valves supplying hot and cold water to the faucet are fully open. Sometimes, these valves can get partially closed, limiting the water flow and affecting the temperature. Turn the valves completely counterclockwise to ensure unrestricted water flow.
- Verify the water heater settings: If you are not receiving hot water, check the temperature settings on your water heater. Ensure that it is set to an appropriate temperature for hot water supply.
By following these troubleshooting steps, you can overcome common issues that may arise during the installation or use of a 3-hole Delta bathroom faucet. Remember to consult the user manual or reach out to Delta’s customer support if you encounter any difficulties or require further assistance.
Tips For Maintenance And Care
Once you have successfully installed your 3 Hole Delta Bathroom Faucet, it’s important to ensure proper maintenance and care to keep it functioning smoothly for years to come. Regular cleaning, preventing mineral buildup, and handling minor repairs are essential in keeping your faucet looking as good as new. In this section, we will discuss these maintenance tips in detail.
Regularly cleaning the faucet
To maintain the shine and cleanliness of your 3 Hole Delta Bathroom Faucet, regular cleaning is necessary. Dust, dirt, and water spots can accumulate on the faucet’s surface, dulling its appearance. Here are a few steps to follow for effective cleaning:
- Start by dampening a soft cloth or sponge with warm water.
- Add a small amount of mild liquid soap or faucet cleaner to the cloth.
- Gently scrub the faucet’s surface, paying extra attention to the areas around the handles and spout.
- Rinse the cloth thoroughly and wipe away any soap residue from the faucet.
- Finally, dry the faucet with a clean, lint-free cloth to prevent water spots.
Regular cleaning not only enhances the aesthetic appeal of your faucet but also helps maintain its functionality by removing any debris that may hinder its performance.
Preventing mineral buildup
Mineral buildup is a common issue with bathroom faucets, especially in areas with hard water. Over time, minerals such as calcium and magnesium can accumulate on the faucet’s aerator, reducing water flow and affecting its performance. To prevent mineral buildup, follow these steps:
- Remove the aerator from the faucet by unscrewing it counterclockwise.
- Soak the aerator in a mixture of equal parts vinegar and water for about 30 minutes.
- Gently scrub the aerator with a soft brush to remove any stubborn residue.
- Rinse the aerator thoroughly with water and reattach it to the faucet.
By regularly removing mineral buildup, you can ensure optimal water flow and extend the lifespan of your 3 Hole Delta Bathroom Faucet.
Handling minor repairs and replacements
Occasionally, you may encounter minor issues with your 3 Hole Delta Bathroom Faucet that require repair or replacement. By addressing these issues promptly, you can prevent further damage and ensure the longevity of your faucet. Here are a few common repairs and replacements you may need to handle:
- Dripping faucet:
- If your faucet is dripping, it may indicate a worn-out cartridge. To fix this, replace the cartridge following the manufacturer’s instructions.
- Leaking handles:
- If the handles of your faucet are leaking, check the O-rings. These rubber seals can wear out over time and will need replacement.
- Spout leak:
- If water is leaking from the spout, the cause may be a worn-out valve seat. Use a wrench to unscrew the valve seat and replace it with a new one.
Handling these minor repairs and replacements as soon as possible will help maintain the functionality and efficiency of your 3 Hole Delta Bathroom Faucet, saving you from costly repairs down the line.
By following these tips for maintenance and care, you can keep your 3 Hole Delta Bathroom Faucet in pristine condition, ensuring it continues to serve you for years to come.
Additional Considerations
When installing a 3-hole Delta bathroom faucet, there are a few additional considerations that can enhance your experience and ensure the longevity of your faucet. These include adjusting the water temperature, adding accessories or extensions, and exploring warranty options. Let’s delve into each of these considerations in more detail:
Adjusting the water temperature:
Once your Delta bathroom faucet is installed, you may want to fine-tune the water temperature to your liking. Delta faucets often come with a temperature control feature that allows you to easily adjust the hot and cold water mixture for optimal comfort. To access this feature, locate the temperature adjustment lever on the faucet body. Using this lever, you can increase or decrease the amount of hot or cold water flowing through the faucet. Experiment with different settings until you find the perfect balance that suits your preferences.
Adding accessories or extensions:
Delta offers a range of accessories and extensions that can enhance the functionality of your bathroom faucet. For instance, you may consider adding a soap dispenser or a lotion dispenser for convenience and a clean countertop look. Additionally, if you have a deep sink or need extended reach, you can explore Delta’s collection of faucet extensions or long spouts. These accessories can be easily installed following the manufacturer’s instructions and can greatly improve your overall bathroom experience.
Exploring warranty options:
Delta is known for its commitment to quality and offers various warranty options for their bathroom faucet range. It is important to thoroughly review these warranty options before making a purchase as they can provide added peace of mind. Delta offers limited lifetime warranties, covering defects in materials and workmanship under normal use. Familiarize yourself with the warranty terms and conditions, such as any exclusions or requirements for proper installation and maintenance, to ensure you are eligible for coverage should any issues arise in the future.
By considering these additional factors, you can fine-tune your bathroom faucet, customize it to suit your needs, and ensure you are protected by the manufacturer’s warranty. Keep in mind that proper installation and regular maintenance are crucial for the optimal performance of your Delta bathroom faucet, so always refer to the manufacturer’s instructions and guidelines.
Frequently Asked Questions
What Is The Difference Between A 2 Hole Faucet And A 3 Hole Faucet?
A 2 hole faucet has two openings for the handles and the spout, while a 3 hole faucet has an additional hole for a sprayer or soap dispenser.
What Is 3 Hole Installation Faucet?
A 3 hole installation faucet is a type of faucet that requires three separate holes in the sink or countertop for installation. It typically consists of a center spout and two handles for hot and cold water.
Can You Replace A Three-Hole Faucet With A One Hole?
Yes, it is possible to replace a three-hole faucet with a one-hole faucet.
Can You Put A Widespread Faucet In A Three-Hole Sink?
Yes, you can install a widespread faucet in a three-hole sink. Widespread faucets require three separate holes for installation.
Conclusion
Installing a 3 hole Delta bathroom faucet is a straightforward task that can be accomplished with a few simple steps. By following the instructions provided in this guide, you can successfully replace your old faucet and enjoy the benefits of a new and improved bathroom fixture.
Remember to gather the necessary tools, prepare the installation area, and carefully follow each step to ensure a successful installation. Enjoy your updated bathroom and the convenience of your new Delta faucet!