To install a corner shelf in the shower, follow these steps. Here’s a comprehensive guide to help you efficiently set up a corner shelf in your shower.
Assessing Your Shower Space
Assessing Your Shower Space is the first step when it comes to installing a corner shelf in your shower. This crucial step involves considering factors such as the ideal location for your shelf, measuring and marking the placement, and analyzing the shower materials and wall type for mounting options.
Determining the Ideal Location for Your Corner Shelf
The location of your corner shelf plays a significant role in its functionality and aesthetic appeal. Before installing the shelf, you need to determine the ideal spot that allows easy access to your shower essentials without causing any obstructions. Consider the height and reach for convenience, as well as the overall layout and design of your shower.
Measuring and Marking the Placement of the Shelf
Accurate measurement and marking are essential for a successful installation of the corner shelf. To measure the placement, use a level to ensure straight lines and precise angles. Keep in mind the dimensions and size of the shelf, as well as the distance from the shower floor. Mark the exact points where the shelf will be installed to avoid any errors during the installation process.
Analyzing the Shower Materials and Wall Type for Mounting Options
When it comes to mounting the corner shelf, understanding the shower materials and wall type is crucial. Depending on the material, such as tile, fiberglass, or stone, different mounting options might be required. Analyze the surface texture and durability to determine the appropriate method of installation, whether it’s adhesive, suction cups, or drilling. Ensuring a secure and stable mount will prevent any accidents or damages in the long run.

Gathering The Necessary Tools And Materials
Before you start installing a corner shelf in your shower, it’s essential to gather all the necessary tools and materials. This will ensure a smooth and hassle-free installation process. In this section, we will discuss the essential tools for installing a corner shelf, selecting the right type of corner shelf, and making sure you have the proper mounting hardware. Let’s dive in!
Essential Tools for Installing a Corner Shelf
Having the right tools will not only make your installation process easier but also ensure the safety of both yourself and your bathroom fixtures. Here are the essential tools you’ll need:
- A drill with various drill bits, including a masonry bit if your shower walls are tiled.
- A level to ensure your corner shelf is properly aligned.
- A tape measure for taking accurate measurements.
- A pencil for marking the spots where you’ll be drilling.
- A screwdriver or a screw gun for securing the shelf.
- A stud finder, especially if you’re planning to attach the shelf to a wall stud.
- An adjustable wrench for tightening screws and bolts.
- A silicone sealant and caulk gun for waterproofing the edges of the shelf.
- A towel or cloth for cleaning the installation area.
Selecting the Right Type of Corner Shelf
When it comes to selecting the right type of corner shelf for your shower, consider your specific needs and the overall aesthetic of your bathroom. Here are some factors to keep in mind:
- Material: Corner shelves are available in a variety of materials, including glass, ceramic, marble, and stainless steel. Choose a material that matches the style and durability of your bathroom.
- Size: Measure the available space in your shower to determine the appropriate size of the corner shelf. Consider the items you plan to store on the shelf and ensure it provides enough room.
- Design: Corner shelves come in different designs and styles, including floating shelves, wall-mounted shelves, and corner caddies. Choose a design that complements the overall decor of your bathroom.
- Installation: Consider the ease of installation when selecting a corner shelf. Some shelves require complex mounting systems, while others can be easily installed with basic tools.
Ensuring You Have the Proper Mounting Hardware
Having the right mounting hardware is crucial for the stability and durability of your corner shelf. Depending on the type of shelf you choose and the material of your shower walls, you may need different types of mounting hardware. Here’s a list of common hardware options:
| Type of Corner Shelf | Recommended Mounting Hardware |
|---|---|
| Glass corner shelf | Wall anchors and screws suitable for glass |
| Ceramic corner shelf | Masonry screws or adhesive caulk |
| Marble corner shelf | Construction adhesive suitable for marble |
| Stainless steel corner shelf | Stainless steel screws and anchors |
Make sure to check the manufacturer’s instructions or consult a professional if you’re unsure about the specific mounting hardware required for your corner shelf.
Now that you are equipped with the necessary tools and knowledge for installing a corner shelf in your shower, it’s time to move on to the actual installation process. Stay tuned for the next section!

Preparing The Shower Area
When it comes to installing a corner shelf in your shower, proper preparation of the shower area is essential. This involves cleaning and drying the shower walls, applying a waterproofing sealant or coating, and removing any existing hardware or obstructions in the corner. By following these steps, you can ensure a sturdy and long-lasting installation of your corner shelf. Let’s dive into each step in detail.
Cleaning and Drying the Shower Walls
In order to create a clean surface for your corner shelf installation, it’s important to start by clearing away any residue or grime on the shower walls. This will help the sealant or adhesive bond securely to the surface. Use a mild cleaning solution and a sponge or soft cloth to gently scrub the walls. Rinse the walls thoroughly with water and make sure they are completely dry before moving on to the next step.
Applying a Waterproofing Sealant or Coating
To prevent water damage and prolong the lifespan of your corner shelf, applying a waterproofing sealant or coating is highly recommended. This step helps to create a barrier against moisture and prevents the growth of mold and mildew. Choose a high-quality sealant or coating suitable for your shower walls’ material (e.g., tile, acrylic, or fiberglass) and follow the manufacturer’s instructions for application. Apply the sealant or coating to the entire shower area, paying extra attention to the corners where the shelf will be installed. Allow sufficient time for the sealant or coating to cure before proceeding.
Removing any Existing Hardware or Obstructions in the Corner
Prior to installing the corner shelf, it’s crucial to remove any existing hardware or obstructions that may interfere with the installation process. This can include towel bars, soap dishes, or any other fixtures that occupy the corner space where the shelf will be located. Carefully remove these items, taking care not to damage the surrounding walls or tiles. Use appropriate tools, such as screwdrivers or pliers, as needed. Once all obstructions have been removed, thoroughly clean the corner area to ensure a smooth surface for the shelf to adhere to.

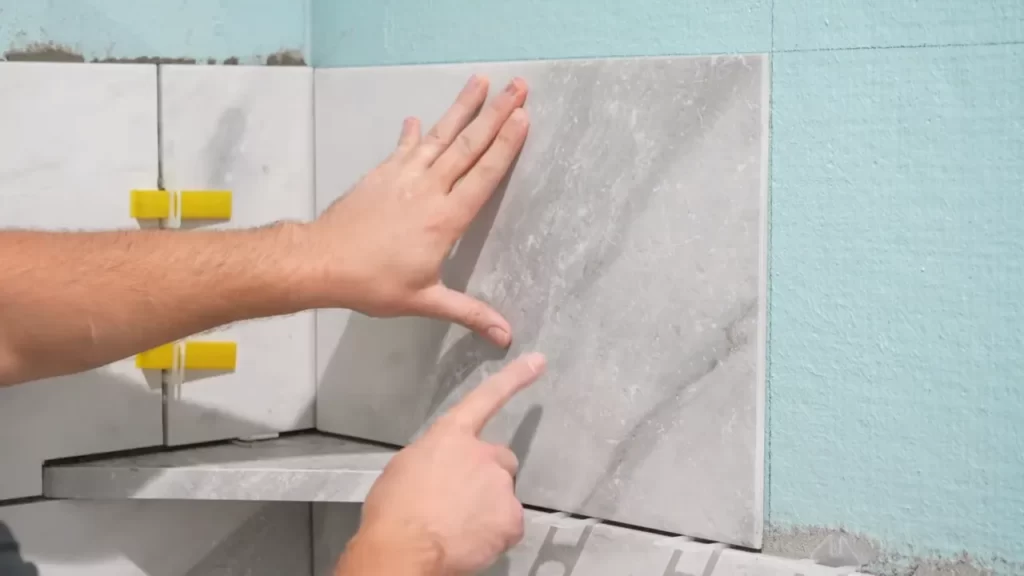
Installing The Corner Shelf
Installing a corner shelf in your shower can be a great way to add storage space and keep your essentials within reach. Not only does it help to declutter your shower area, but it also adds a stylish touch to your bathroom decor. In this section, we will guide you through the process of installing the corner shelf step by step, from marking the drilling points to securing and adjusting the shelf for stability.
Marking the Drilling Points and Pilot Holes
The first step in installing a corner shelf is to accurately mark the drilling points on the shower wall. You will want to ensure that the shelf is positioned at a convenient height and at a suitable distance from any other fixtures. Using a pencil, make small marks where the screws will go.
Next, it’s time to drill the pilot holes. Pilot holes serve as a guide for the screws and prevent the wall from cracking or splitting when you insert them. Choose a drill bit with a diameter slightly smaller than the mounting hardware that comes with your corner shelf.
Drilling the Holes for the Mounting Hardware
Important: Before drilling, check the shower walls for any pipes or electrical wires. Use a stud finder or consult a professional if you are unsure.
Now that you have marked the drilling points and have your drill bit ready, carefully drill the holes at the marked locations. If your shower walls are made of tile, you may need to use a masonry drill bit. Be sure to apply steady pressure and drill straight to avoid any damage to the surrounding tiles.
Tip: Placing a small piece of tape on the drill bit at the desired drilling depth can help you avoid drilling too deep.
Anchoring the Shelf to the Shower Wall
Once the holes are drilled, it’s time to anchor the shelf to the shower wall. Insert the mounting hardware, such as wall anchors or toggle bolts, into the holes. Make sure they are securely in place.
Tip: If your mounting hardware comes with screws, partially screw them into the anchors or toggle bolts to act as temporary holders for the shelf.
Position the corner shelf over the mounting hardware and align the pre-drilled holes on the shelf with the screws. Slowly tighten the screws, alternating between them, until the shelf feels secure against the wall.
Securing and Adjusting the Shelf for Stability
Once the shelf is anchored to the shower wall, it’s essential to secure and adjust it for stability. Tighten all the screws firmly, ensuring that the shelf is level and not wobbling.
If your corner shelf comes with adjustable brackets, you can use them to fine-tune the position of the shelf. Adjust the brackets until the shelf is level and sits securely in the corner of your shower.
Finally, give the shelf a gentle tug to check for stability. If it feels secure and doesn’t move, then congratulations – you have successfully installed a corner shelf in your shower!
Installing a corner shelf in your shower is a simple and rewarding DIY project that can enhance the functionality and aesthetics of your bathroom. With the right tools and following these step-by-step instructions, you can enjoy the convenience and style of a neatly organized shower space.
Finishing Touches And Maintenance
Once you have successfully installed a corner shelf in your shower, it’s time to focus on the finishing touches and maintenance. Properly sealed joints and gaps are crucial to ensure water resistance and prevent any damage. Cleaning and polishing the corner shelf will keep it looking new and enhance its longevity. Regular maintenance and inspection are essential to detect any issues early on and address them promptly. Let’s dive into the details of these important steps:
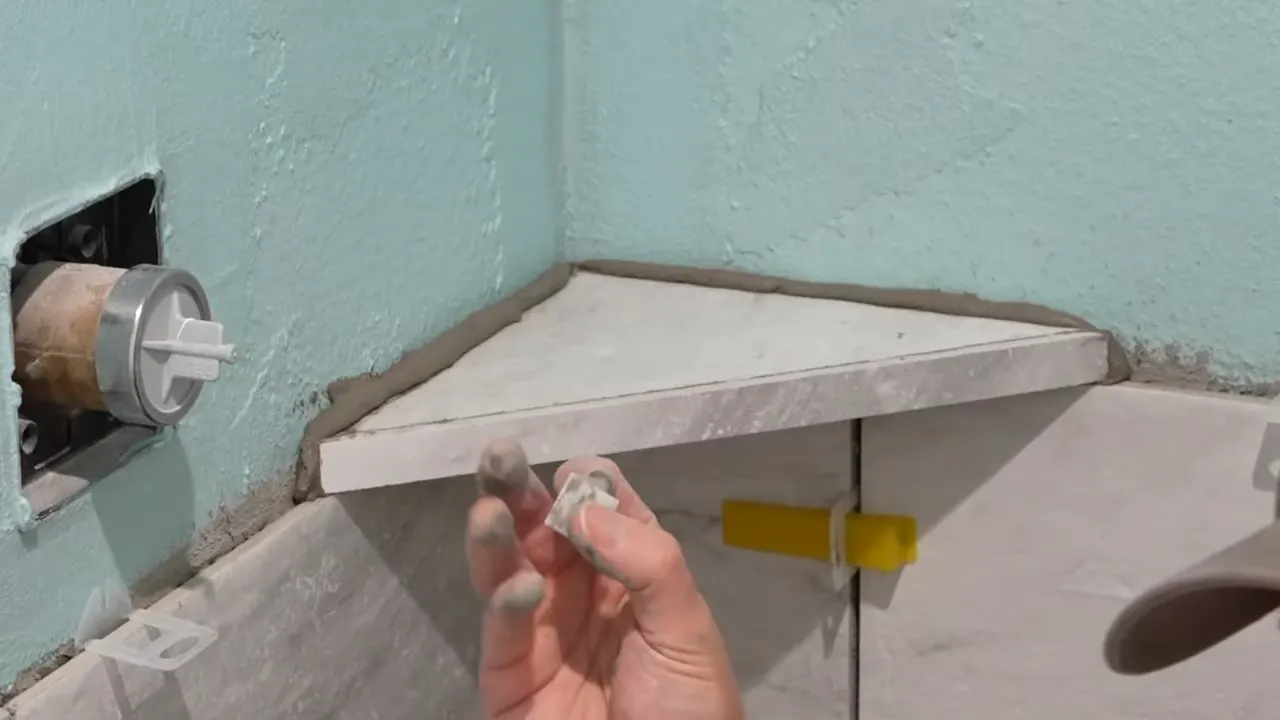
Sealing the Joints and Gaps for Water Resistance
When it comes to ensuring water resistance for your corner shelf, sealing the joints and gaps is of utmost importance. This step will help prevent water from seeping into areas where it shouldn’t, such as behind the shelf or between the tiles and the shelf. Here’s how you can achieve a proper seal:
- Clean the joints and gaps thoroughly to remove any dirt or debris.
- Apply a high-quality silicone sealant along the edges of the shelf where it meets the wall and the tiles.
- Smooth and shape the sealant using a caulking tool or your finger, ensuring a neat and even application.
- Allow the sealant to dry completely as per the manufacturer’s instructions.
By following these steps, you’ll create a tight seal that prevents water from seeping into unwanted areas, protecting your corner shelf and the surrounding shower space.
Cleaning and Polishing the Corner Shelf
A clean and polished corner shelf not only improves the overall aesthetics of your shower but also contributes to its maintenance. Here’s how you can keep your corner shelf sparkling and free from grime:
- Regularly wipe down the shelf with a mild soap or detergent mixed with warm water.
- Use a non-abrasive sponge or cloth to gently scrub away any dirt or residue.
- Rinse the shelf thoroughly with clean water to remove any soap residue.
- Dry the shelf with a clean towel or cloth to prevent water spots or streaks.
- To add an extra shine to the shelf, apply a small amount of stainless steel or glass cleaner and polish with a soft cloth.
By following these cleaning and polishing steps on a regular basis, you’ll maintain the pristine appearance of your corner shelf and prolong its lifespan.
Regular Maintenance and Inspection Tips for Longevity
Regular maintenance and inspection are crucial to ensure the longevity of your corner shelf. By following these tips, you can identify and address any issues promptly:
- Check the sealant periodically to ensure it’s intact and not showing any signs of wear or damage.
- Inspect the shelf for any cracks, chips, or loose screws. If you notice any damage, repair or replace the shelf as necessary.
- Pay attention to the caulk lines around the shelf. If they start to crack or peel, remove the old caulk and reapply a fresh seal.
- Keep an eye out for any mold or mildew growth. If detected, clean it using a solution of equal parts water and bleach.
- Ensure proper ventilation in your shower area to prevent excessive humidity, as it can lead to mold and mildew growth.
By regularly maintaining and inspecting your corner shelf, you’ll proactively address any issues and ensure its longevity in your shower space.
Troubleshooting And Common Mistakes
Installing a corner shelf in your shower can be a great way to maximize storage space and add a stylish touch to your bathroom. However, it’s important to ensure that the installation is done correctly to avoid any issues down the road. In this section, we will discuss some common mistakes that people make when installing corner shelves in the shower and provide solutions to address these issues.
Addressing Uneven or Loose Shelf Installation
One of the most common problems that can occur during the installation of a corner shelf is an uneven or loose installation. This can happen if the shelf is not properly aligned or if the mounting hardware is not tightened securely. To address this issue, follow these steps:
- Start by double-checking the level of the shelf. Place a level on top of the shelf to ensure it is perfectly horizontal.
- If the shelf is uneven, remove it and adjust the positioning. Make sure all sides are level before proceeding.
- Tighten the mounting hardware securely using a screwdriver or the appropriate tool. Ensure that the shelf is firmly attached to the wall.
By following these steps, you can ensure that your corner shelf is installed evenly and securely, providing a stable and functional storage solution in your shower.
Fixing Damaged or Cracked Tiles During Installation
Another common issue that can arise during the installation of a corner shelf is the potential for damaged or cracked tiles. This can happen if excessive force is applied when drilling or if the tile is not properly supported during the installation process. If you encounter this problem, here are some steps to fix it:
- Start by carefully removing the damaged or cracked tile using a chisel or grout saw. Take your time to avoid causing further damage.
- Clean the area thoroughly and remove any debris or loose tile fragments. Ensure that the surface is smooth and free from any obstructions.
- Replace the damaged tile with a new tile of the same size and color. Use tile adhesive to secure it in place and allow it to dry according to the manufacturer’s instructions.
- Once the new tile is dry, reapply grout to seal the edges and joints. Wipe away any excess grout and allow it to cure completely.
By following these steps, you can effectively fix damaged or cracked tiles during the installation of a corner shelf in your shower, restoring the overall appearance and integrity of your bathroom.
Solutions for Failed Mounting Hardware or Anchors
In some cases, the mounting hardware or anchors used during the installation of a corner shelf may fail, resulting in an unstable or loose shelf. If you encounter this issue, it’s important to address it promptly to prevent any accidents or further damage. Here are some solutions:
- Remove the shelf from the wall and inspect the mounting hardware or anchors.
- If any of the hardware is damaged or worn, replace it with new ones of the same specifications.
- If the anchors are not providing sufficient support, consider using heavy-duty anchors or toggle bolts for a more secure installation.
- Reinstall the shelf, ensuring that the new hardware or anchors are tightened securely.
By taking these steps, you can effectively address failed mounting hardware or anchors during the installation of a corner shelf, ensuring a stable and reliable storage solution in your shower.
Expanding Your Storage Solution
Expanding Your Storage Solution
Installing a corner shelf in your shower not only serves a functional purpose but also allows you to maximize your storage space. With a well-designed corner shelf, you can keep your shower essentials organized and within easy reach. But why stop at just one shelf? There are plenty of options to consider for expanding your storage solution even further!
Ideas for Additional Corner Shelf Installations
If one corner shelf isn’t enough to accommodate all of your shower supplies, don’t worry – you can easily install multiple shelves to meet your storage needs. Here are a few ideas for additional corner shelf installations:
- Vertical Shelving: Instead of adding more shelves horizontally, consider installing vertical shelving units. This not only optimizes the available space but also adds a visually appealing element to your shower.
- Stacked Shelves: Another option is to install multiple corner shelves on top of each other. This allows you to organize your shower items according to categories, keeping everything in its designated place.
- Tiered Shelves: Tiered corner shelves are an excellent choice for those who want a unique and stylish storage solution. With multiple levels, you can arrange your shower essentials in an organized and visually pleasing manner.
Matching Accessories and Decorative Options
Once you’ve installed your corner shelves, you can enhance the overall aesthetics of your shower by incorporating matching accessories and decorative options. These elements not only add a touch of personal style but also help create a cohesive and inviting atmosphere. Consider the following:
- Shower Caddy: An elegant shower caddy can complement your corner shelves and provide additional storage for items that need to be easily accessible.
- Decorative Tiles: Incorporating decorative tiles on the shelves or surrounding areas can elevate the look of your shower, turning it into a focal point. Choose tiles that match your bathroom’s color scheme or opt for eye-catching patterns.
- Basket or Storage Containers: For a more organized and clutter-free shower space, invest in matching baskets or storage containers. These not only add a decorative touch but also keep your shower essentials neatly arranged.
Tips for Customizing and Personalizing Your Shower Space
Customizing and personalizing your shower space can make it feel like a luxurious retreat. Here are a few tips to help you achieve a unique and welcoming atmosphere:
- Incorporate Plants: Adding a touch of greenery to your shower can create a refreshing and calming ambiance. Choose plants that thrive in a humid environment, such as ferns or Aloe Vera.
- Introduce Aromatherapy: Enhance your shower experience by incorporating scented candles, essential oils, or shower tablets with calming fragrances. The soothing scent will add an extra layer of relaxation to your shower routine.
- Consider Lighting: Think about installing soft and warm lighting in your shower area. This can create a cozy and inviting atmosphere, perfect for winding down after a long day.
By exploring these additional corner shelf installations, matching accessories, and personalization options, you can transform your shower into a functional and visually appealing space. Expand your storage solution and enjoy a shower experience that is not only efficient but also tailored to your unique style and needs.
Frequently Asked Questions
What Is The Best Adhesive For Shower Corner Shelves?
The best adhesive for shower corner shelves is a waterproof silicone adhesive. It provides strong and durable bonding, preventing the shelves from falling or shifting due to moisture. Silicone adhesive is easy to apply and ensures long-lasting stability for your shower corner shelves.
How Do You Install Corner Shelves When Tiling?
To install corner shelves when tiling, follow these steps: 1. Mark the desired location on the wall. 2. Cut an opening in the tile using a tile saw or drill. 3. Apply adhesive and place the shelf using a level to ensure it’s straight.
4. Allow the adhesive to dry completely. 5. Grout around the shelf and clean any excess grout. Note: Please make sure to measure accurately and use appropriate safety precautions during the installation process.
Can You Add Corner Shelf To Tile Shower?
Yes, you can add corner shelves to a tile shower. It’s a simple and practical way to create extra storage space for your shower essentials, allowing you to keep them within easy reach.
How To Install Corner Shower Caddy?
To install a corner shower caddy, follow these steps: 1. Clean the corner of your shower wall. 2. Use a tape measure to determine the desired height, and mark it on the wall. 3. Use a drill to create holes on the marked spots.
4. Insert wall anchors into the holes. 5. Attach the shower caddy by screwing it into the anchors.
Conclusion
To sum it up, installing a corner shelf in your shower not only enhances the functionality of your space but also adds a decorative touch. By following the step-by-step guide, you can easily complete this DIY project without any hassle.
Remember to choose the right materials and proper techniques to ensure a sturdy and secure installation. So go ahead, transform your shower into a tidy and organized sanctuary with a stylish corner shelf today!