To install a Delta shower valve, first, turn off the water supply. Then, remove the old valve and install the new one following the manufacturer’s instructions.
Essential Tools And Materials For The Installation Process
Installing a Delta shower valve may seem like a daunting task, but with the right tools and materials, you can easily complete the job with confidence. Whether you’re a seasoned DIYer or a first-time plumber, having the necessary tools is crucial for a successful installation. Here are the essential tools and materials you’ll need:
Wrench
A wrench is an indispensable tool for any plumbing project, and installing a Delta shower valve is no exception. Specifically, an adjustable wrench is needed to loosen and tighten the connections between the valve and the water supply pipes. This tool allows you to apply the right amount of torque to ensure a secure and leak-free connection.
Screwdriver
In addition to a wrench, a screwdriver is another essential tool for installing a Delta shower valve. A Phillips or flat-head screwdriver will be needed to remove and install any screws or brackets that hold the valve in place. It’s important to use the right size and type of screwdriver to prevent stripping or damaging the screws.
Pipe cutter
To properly connect the Delta shower valve to the water supply pipes, you’ll need a pipe cutter. This tool allows you to cleanly cut the pipes to the appropriate length, ensuring a precise fit. Choose a pipe cutter that is suitable for the type and size of pipes you’re working with, whether it’s copper, PEX, or another material.
Plumber’s tape
Plumber’s tape, also known as Teflon tape, is a crucial material for creating a watertight seal between threaded connections. It’s a thin, white tape that is wrapped around the male threads of the valve and pipe fittings. The tape helps prevent leaks by filling in any gaps or irregularities in the threads.
With these essential tools and materials at your disposal, you’re ready to tackle the installation of a Delta shower valve. Remember to always follow the manufacturer’s instructions and take necessary safety precautions. By using the right tools and materials, you’ll ensure a successful installation and enjoy a leak-free shower experience.

Shutting Off The Water Supply And Removing The Old Valve
Before you can begin installing a new Delta shower valve, it is important to shut off the water supply and remove the old valve. This process ensures a smooth and successful installation of the new valve. In this section, we will walk you through the steps to properly shut off the water supply and remove the old valve, so you can get started on your shower renovation project.
Locate the Main Water Shut-Off Valve
The first step in shutting off the water supply is to locate the main water shut-off valve for your home. This valve is typically located where the water pipe enters your home or in the basement. Once you have located the main shut-off valve, turn it clockwise until it is fully closed to shut off the water supply to your entire home.
Turn off the Water Supply to the Bathroom
After you have shut off the main water supply, you need to turn off the water supply to the bathroom where the shower valve is located. To do this, look for the individual shut-off valve specifically for the bathroom. It is usually located under the sink or inside the bathroom wall. Turn the valve clockwise until it is fully closed to stop the water flow to the bathroom.
Remove the Handle and Cover Plate of the Old Valve
With the water supply shut off, it’s time to remove the handle and cover plate of the old Delta shower valve. This can be done by following these steps:
- Use a screwdriver to remove any screws securing the handle to the valve.
- Once the screws are removed, gently pull the handle off the valve stem.
- Next, locate the cover plate behind the handle and use a screwdriver to remove any screws securing it to the wall.
- Once the screws are removed, carefully pull the cover plate away from the wall, exposing the valve.
Make sure to place the screws and removed parts in a safe place for later use or disposal.
By following these steps, you have successfully shut off the water supply and removed the handle and cover plate of the old Delta shower valve. Now you are ready to proceed with the next steps of the installation process, so your new shower valve can be properly installed. Remember to always follow the manufacturer’s instructions and take necessary safety precautions throughout the installation process.
Step-By-Step Instructions For A Hassle-Free Installation
The installation of a Delta shower valve may seem like a daunting task, but with the right guidance, it can be a hassle-free experience. By following these step-by-step instructions, you’ll be able to install your Delta shower valve with ease, ensuring a seamless and leak-free shower.
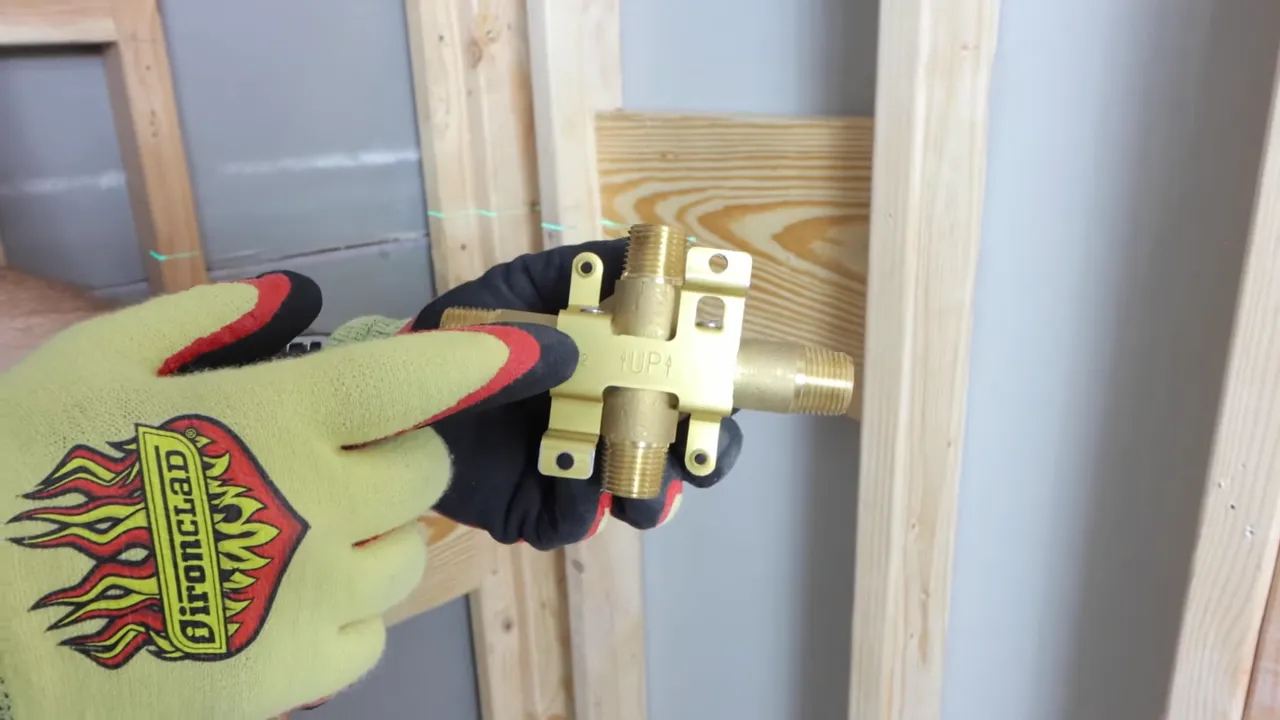
Determine the correct placement for the new valve
The first step in installing your Delta shower valve is determining its correct placement. Make sure to choose a convenient and accessible location to ensure easy operation. Consider the height and reach of the valve, as well as the placement of other fixtures in your shower.
To determine the correct placement, consider the following:
- Measure the distance between the center of the valve and the desired height.
- Mark the location on the wall using a pencil.
- Double-check the measurements to ensure accuracy.
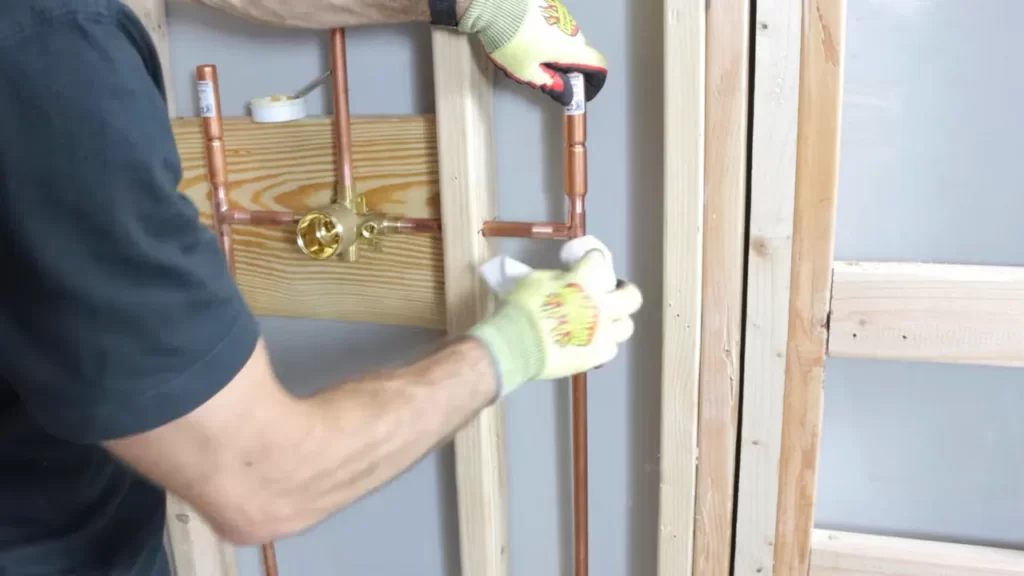
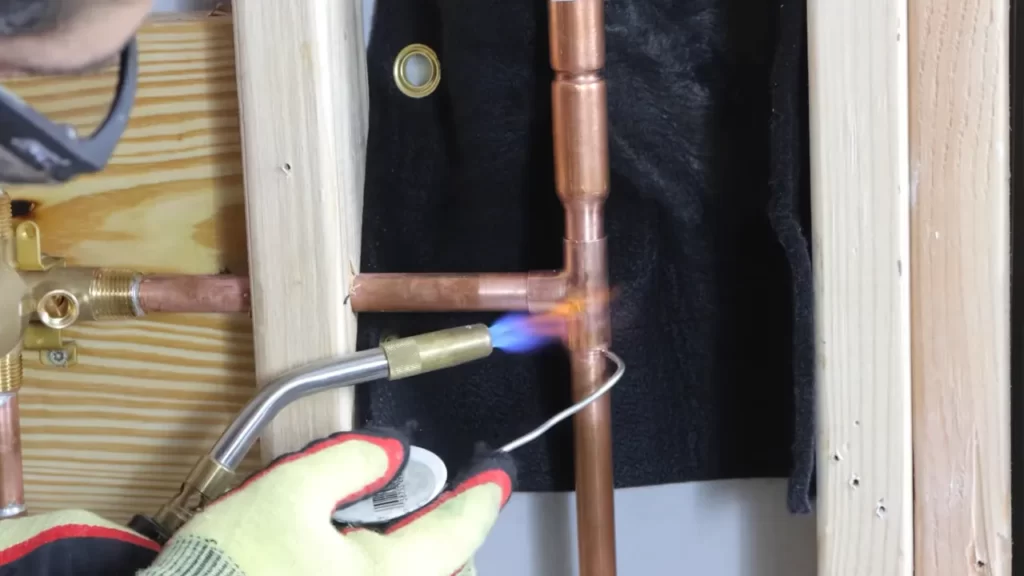
Connect the valve to the existing plumbing system
Once you have determined the correct placement for your Delta shower valve, it’s time to connect it to the existing plumbing system. Follow these steps for a seamless connection:
- Shut off the water supply to your shower.
- Remove the existing valve by loosening the connections with a wrench.
- Clean the pipes and remove any debris or old sealant.
- Apply plumber’s tape to the threads of the new valve.
- Connect the new valve to the existing plumbing system, ensuring a tight and secure fit.
- Tighten the connections with a wrench, being careful not to overtighten.
Secure the valve in place and test for leaks
Securing the valve in place is crucial to ensure its stability and prevent any future leaks. Follow these steps to secure your Delta shower valve:
- Slide the trim plate over the valve and align it with the wall.
- Tighten the trim plate screws to secure it in place.
- Check for any gaps between the trim plate and the wall.
- Apply a caulking sealant around the trim plate to seal any gaps and provide a finished look.
- Turn on the water supply to your shower.
- Test the valve for any leaks by running the water at different temperatures and pressures.
- If you notice any leaks, tighten the connections or replace any faulty parts.
By following these step-by-step instructions, you can confidently install your Delta shower valve and enjoy a hassle-free shower experience. Remember to consult the manufacturer’s instructions specific to your valve model for any additional guidance. Happy showering!
How To Address Potential Problems During The Installation Process
Installing a Delta shower valve may seem like a straightforward task, but like any plumbing project, you may encounter a few hiccup. In this section, we will discuss some potential problems you may face during the installation process and provide easy solutions to help you troubleshoot and overcome them.
Leaky Connections and How to Fix Them
One common issue that you may come across during the installation of your Delta shower valve is leaky connections. Leaks can occur due to loose fittings or damaged O-rings. To address this problem, follow these steps:
- Tighten all connections: Start by ensuring that all the fittings and connections are tightened securely. Use a wrench to give them an extra quarter turn to create a watertight seal.
- Inspect the O-rings: Check the O-rings for any signs of damage or wear. If they appear to be worn out, replace them with new ones before reassembling the connections.
- Apply plumber’s tape: To further prevent leaks, wrap plumber’s tape around the threads of the fittings. This will provide an additional layer of protection against potential leaks.
Understanding Pressure and Temperature Control Issues
Another potential problem you may encounter during the installation of your Delta shower valve is pressure and temperature control issues. If you notice fluctuating water pressure or inconsistent temperature, follow these steps to address the problem:
- Check the water supply: Make sure that the water supply to your shower valve is turned on fully and that the main water pressure is sufficient. Low water pressure can affect both pressure and temperature control.
- Adjust the pressure-balancing valve: Your Delta shower valve may be equipped with a pressure-balancing valve that maintains a consistent water pressure despite fluctuations in the hot and cold water supply. Locate the valve and adjust it according to the manufacturer’s instructions to correct any pressure imbalances.
- Calibrate the temperature control: If you’re experiencing temperature control issues, your Delta shower valve may have a temperature control adjustment feature. Refer to the valve’s instruction manual to understand how to recalibrate the temperature control to achieve the desired water temperature.
Dealing with Valve Compatibility Concerns
Valve compatibility is an important aspect of the installation process, as using incompatible valves can result in issues with functionality and performance. If you encounter valve compatibility concerns, consider the following solutions:
- Consult the product manual: Read the product manual or visit the manufacturer’s website to ensure that you have chosen the correct Delta shower valve model that is compatible with your existing plumbing system.
- Seek professional guidance: If you are unsure about which valve to choose or are experiencing difficulties in finding a compatible valve, it is advisable to seek professional assistance from a licensed plumber. They will assess your specific needs and guide you towards the best valve option for your shower installation.
By addressing potential problems like leaky connections, pressure and temperature control issues, and valve compatibility concerns, you can ensure a successful installation of your Delta shower valve. Take your time, follow the manufacturer’s instructions, and don’t hesitate to seek professional help if needed. With proper troubleshooting and careful attention to detail, you’ll soon be enjoying a fully functional and efficient showering experience.

Expert Advice To Ensure A Successful Installation
Installing a Delta shower valve can be a straightforward task when you have the right knowledge and guidance. To help you achieve a successful installation, we have gathered expert advice and essential tips that will ensure your shower valve is installed correctly and functions optimally. Whether you are a seasoned DIY-er or a first-time installer, these guidelines will make your Delta shower valve installation a breeze.
Choosing the right Delta shower valve model for your needs
When it comes to selecting the right Delta shower valve model, it is important to consider your specific needs and preferences. Delta offers a wide range of options to suit various installation requirements and budget considerations. To make an informed decision:
- Consider the type of valve you need, such as a pressure-balanced valve to maintain a consistent water temperature or a thermostatic valve for precise temperature control.
- Evaluate the flow rate you desire and choose a valve model that meets your requirements.
- Ensure compatibility with your existing plumbing system by consulting with a professional or referring to Delta’s compatibility guidelines.
Proper maintenance and care for your shower valve
Proper maintenance and regular care are essential to ensure the longevity and optimal performance of your Delta shower valve. Follow these tips to keep your shower valve in excellent condition:
- Periodically inspect the valve for any leaks, cracks, or signs of wear. If any issues are found, address them promptly.
- Clean the valve regularly using a mild soap and water solution, avoiding abrasive cleaners or scrub brushes that may damage the finish.
- Check and clean the cartridge or valves as recommended by the manufacturer to prevent mineral buildup and ensure smooth operation.
- Avoid excessive force when operating the valve handles to prevent damage or loosening of components.
Enhancing your shower experience with Delta accessories
Delta offers a range of accessories that can enhance your shower experience and complement your Delta shower valve. Consider adding these accessories:
- Showerheads with different spray patterns to customize your shower experience.
- Handheld showers for added flexibility and convenience.
- Shower panels with multiple body sprays for a luxurious and invigorating shower experience.
- Temperature and pressure control valves to fine-tune your shower settings.
Discover additional tips and considerations to make your Delta shower valve installation a breeze.
Here are some additional tips and considerations to keep in mind for a smooth and successful Delta shower valve installation:
- Read and thoroughly understand the installation instructions provided by Delta before starting the installation process.
- Gather all the necessary tools and materials in advance to avoid interruptions during the installation.
- Take accurate measurements and ensure proper alignment of the valve to prevent leaks or other installation issues.
- If you are unsure about any step of the installation process, consult a professional plumber or contact Delta’s customer support for assistance.
By following these expert tips and guidelines, you can confidently install your Delta shower valve and enjoy a reliable and satisfying shower experience. Remember, if you encounter any difficulties or have any questions, don’t hesitate to seek professional advice or reach out to Delta’s knowledgeable support team.
Frequently Asked Questions
How Do You Install A Delta Shower Valve Cartridge?
To install a Delta shower valve cartridge, first turn off the water supply. Remove the handle, trim, and bonnet nut to access the cartridge. Take out the old cartridge and insert the new one, making sure it aligns properly. Reassemble the parts and test for water leaks.
How Do I Know What Delta Shower Valve I Have?
To identify your Delta shower valve, look for a metal plate on the valve body or check the model number on the trim. You can also contact Delta customer support for assistance.
Are All Delta Shower Valve Bodies The Same?
No, Delta shower valve bodies are not all the same. There are different models and configurations to suit different needs. Choose the right one for your shower setup.
How Do You Put A Delta Shower Head Back On?
To put a Delta shower head back on, follow these steps: 1. Remove the old shower head by turning it counterclockwise. 2. Clean the shower arm threads to ensure a good connection. 3. Take the new Delta shower head and place it onto the shower arm.
4. Tighten the shower head by turning it clockwise. 5. Test for leaks and adjust as needed.
Conclusion
Installing a Delta shower valve doesn’t have to be a daunting task. With this step-by-step guide, you can confidently tackle the installation process. From gathering the necessary tools to following each meticulous step, you’ll be able to successfully install your Delta shower valve.
Remember, attention to detail is key, and with a little patience, you’ll have a functioning and beautiful shower in no time. Happy installing!