
To install a shower head with handheld, follow these steps: remove the existing shower head, clean the shower pipe threads, attach the handheld bracket, install the handheld shower head, and tighten all connections securely. Looking to add versatility and convenience to your shower experience?
Installing a shower head with handheld functionality can make a world of difference. Whether you want to target specific areas or simply enjoy the flexibility of a handheld shower, this upgrade is relatively simple to accomplish. In this guide, we will walk you through the steps to install a shower head with handheld, allowing you to enjoy the benefits it provides.
From removing the old shower head to securely fastening the new one, we’ll cover all the necessary steps for a successful installation. So, let’s dive right in and get started on upgrading your shower!
Choosing The Right Shower Head With Handheld
Consider Your Preferences and Needs
Before you dive into the process of installing a shower head with a handheld option, it’s essential to consider your preferences and needs. Here are a few points to keep in mind:
- Water Pressure: An important factor to consider is the water pressure in your bathroom. Some shower heads with handheld options require higher water pressure for optimal performance, while others work well even with low pressure. Take note of your water pressure and choose a shower head accordingly.
- Shower Space: Another consideration is the size of your shower space. If you have a smaller bathroom, you may want to opt for a compact shower head with a handheld option to save space. On the other hand, if you have a larger shower area, you have the flexibility to choose a larger shower head.
- Functionality: Think about the functions you require from your shower head. Do you want a shower head with adjustable spray modes? Or maybe you prefer a rainfall shower experience? Consider the different features available and select a shower head that meets your specific needs.
- Budget: It’s always wise to set a budget before making any purchase. Shower heads with handheld options are available in a range of prices. Determine how much you are willing to spend and explore options within your budget.
Types of Shower Heads with Handheld Options
There are various types of shower heads with handheld options, each offering its own unique benefits. Let’s explore some of the popular choices:
- Rain Shower Head with Handheld: This type of shower head provides a luxurious rainfall-like experience coupled with the convenience of a handheld attachment. Perfect for a spa-like shower experience.
- Handheld Shower Head on a Sliding Bar: Ideal for families or individuals of different heights, this shower head can be easily adjusted up and down the sliding bar to accommodate every member of the household.
- Combination Shower Head: These shower heads offer both a fixed overhead shower and a detachable handheld option. You can use each setting independently or together for a revitalizing shower experience.
- Massage Shower Head with Handheld: If you enjoy a refreshing massage while showering, this type of shower head is for you. It provides pulsating water streams that help relax your muscles.
Understanding Water Pressure Requirements
It’s crucial to understand the water pressure requirements of the shower head with a handheld option you choose. Different shower heads have varying water pressure needs, and not meeting these requirements can lead to a less-than-optimal shower experience. To ensure a satisfying and invigorating shower, take note of the following:
| Shower Head Type | Recommended Water Pressure |
|---|---|
| Rain Shower Head with Handheld | High water pressure |
| Handheld Shower Head on a Sliding Bar | Medium water pressure |
| Combination Shower Head | Medium to high water pressure |
| Massage Shower Head with Handheld | High water pressure |
Remember to check your home’s water pressure before making a final decision. It’s recommended to consult a professional plumber if you are unsure about the water pressure in your bathroom.
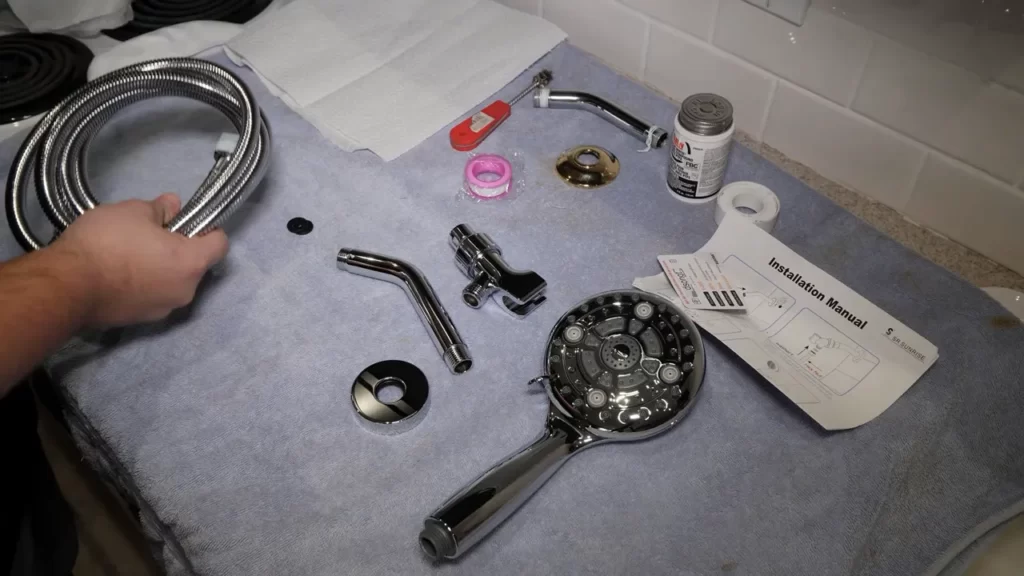
Assembling The Necessary Tools And Materials
Installing a shower head with handheld functionality can transform your daily shower experience. Whether you’re looking to upgrade or replace an existing shower head, the installation process is relatively simple if you have the right tools and materials at hand. In this guide, we’ll walk you through the essential tools needed for installation, how to check for any additional parts required, and how to ensure all materials are readily available.
Essential Tools for Installation
To successfully install a shower head with handheld feature, it’s crucial to have the following tools:
| Tools | Details |
|---|---|
| Adjustable wrench | Used to loosen and tighten connections |
| Pliers | For gripping and turning fittings |
| Teflon tape | To seal threaded connections and prevent leaks |
| Screwdriver | Depending on the shower head type, either flathead or Phillips |
| Plumber’s tape | For secure and leak-free sealing of plumbing connections |
Having these tools within reach will ensure a smooth and hassle-free installation process.
Checking for Any Additional Parts Needed
Prior to starting the installation, it’s essential to check if you have all the necessary parts. Examining the contents of the shower head package will help you determine if any additional parts need to be purchased. Common components include:
- Shower arm
- Shower head holder or bracket
- Handheld shower head
- Shower hose
- Washers and O-rings
Double-checking and ensuring you have all the required parts will save you time and prevent any interruptions during the installation process.
Ensuring All Materials are Readily Available
Before you begin installing the shower head with handheld feature, it’s crucial to ensure all materials are readily available. This includes:
- Shower head package and manual
- Teflon tape and plumber’s tape
- Tools mentioned earlier (adjustable wrench, pliers, screwdriver)
- Any additional parts needed, based on the package contents
Having all the materials organized and within reach will make the installation process more efficient and convenient.
By assembling the necessary tools and materials before starting the installation, you’ll be well-prepared to proceed with the subsequent steps. In the next section, we’ll guide you through the process of removing the existing shower head.
Removing The Old Shower Head
Before you can install a new shower head with a handheld feature, you need to remove the old shower head. This process involves a few simple steps to ensure a smooth transition from the old to the new. In this section, we will guide you through each step of removing the old shower head, from turning off the water supply to removing any debris or dirt.
Turning off the water supply
The first step in removing your old shower head is to turn off the water supply. This will prevent any water from flowing while you work, making the process safer and less messy. Locate the shutoff valve, usually located near the shower or within the main water supply line of your home, and turn it off by rotating the valve handle clockwise. This will cut off the water supply to the showerhead, ensuring a smooth removal process.
Using pliers to loosen and detach the existing shower head
Once the water supply is turned off, you can start loosening and detaching the existing shower head. To do this, you will need a pair of pliers. Wrap a rubber band or a cloth around the shower arm to protect the metal finish from scratches or damages. Then, use the pliers to grip the shower head firmly and turn it counterclockwise to loosen it. The shower head should start to come loose after a few rotations, and you can continue unscrewing it by hand until it is completely detached from the shower arm.
Removing any excess debris or dirt
After removing the old shower head, it’s important to clean the area and remove any excess debris or dirt that may have accumulated. This step is crucial to ensure a proper installation of the new shower head. Use a soft cloth or brush to wipe away any dirt or residue from the shower arm, making sure to check for any blockages that could hinder water flow. If you notice any stubborn debris or mineral buildup, you can use a mild cleaning solution or vinegar to dissolve it. Rinse the area thoroughly to remove any cleaning solution residue before proceeding with the installation.
By following these simple steps, you can easily remove your old shower head and prepare for the installation of a new shower head with a handheld feature. Remember to turn off the water supply, use pliers to loosen and detach the existing shower head, and remove any excess debris or dirt for a clean and smooth transition.
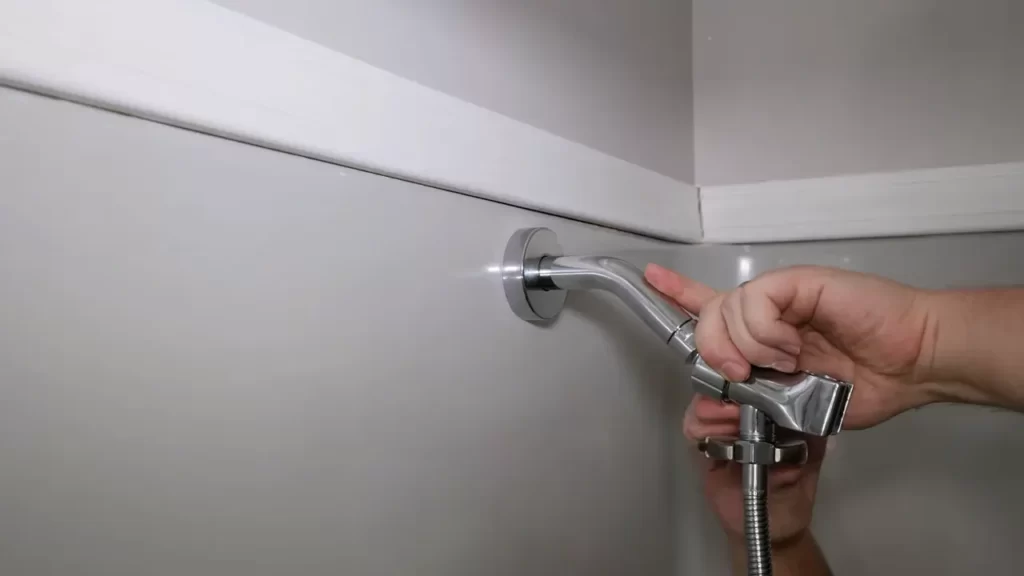
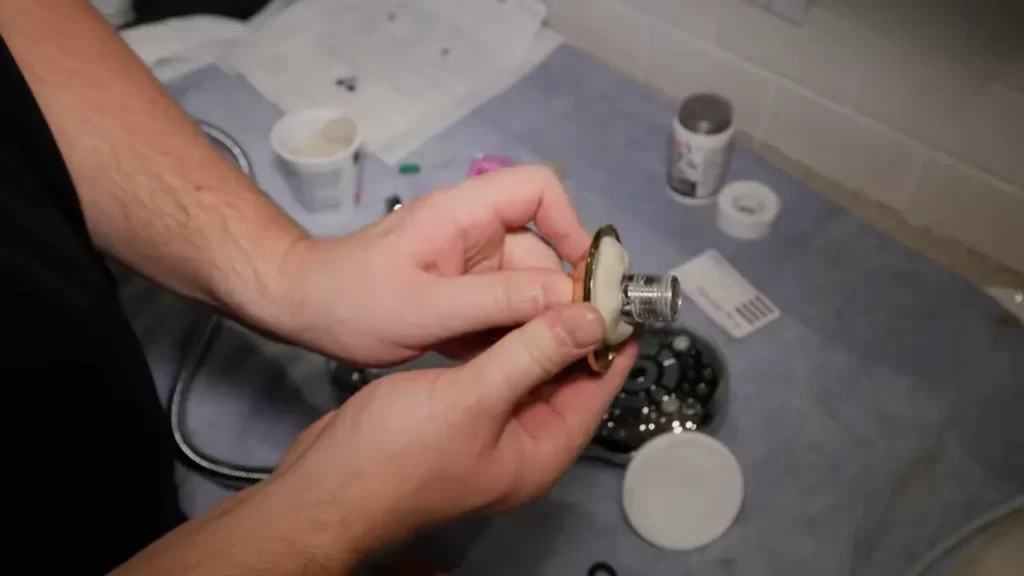
Installing The Shower Arm Mount
Once you have chosen the perfect shower head with a handheld option, the next step is to install it. One crucial part of the installation process is attaching the shower arm mount securely. This ensures that your shower head remains stable and in the desired position while providing you with a soothing and enjoyable shower experience.
Applying plumber’s tape to the shower arm threads
To start the installation, you first need to apply plumber’s tape to the shower arm threads. This simple step can help prevent any potential leaks in the future. Plumber’s tape, also known as Teflon tape, is a thin white tape that is specifically designed to create a watertight seal. To apply it, take the tape and wrap it around the threads in a clockwise direction, ensuring that you cover the entire threaded area. This tape will provide an extra layer of protection and ensure a tight fit between the shower arm and the shower arm mount.
Attaching the shower arm mount securely
Once the plumber’s tape is in place, it’s time to attach the shower arm mount securely. The mount typically has a threaded female end that needs to be screwed onto the shower arm’s threaded male end. Start by aligning the mount with the shower arm and gently twisting it clockwise. Use your hand to tighten it as much as possible. For an extra secure fit, you can use an adjustable wrench to give it a slight turn. Just be sure not to overtighten, as this may damage the shower arm or the mount.
Checking for any leaks or loose fittings
After attaching the shower arm mount, it’s essential to check for any leaks or loose fittings. Turn on the water and carefully inspect the area around the connections for any signs of water leakage. If you notice any leaks, try tightening the connections a bit more or reapplying plumber’s tape to ensure a proper seal. Additionally, check for any loose fittings and make sure everything is securely in place. Addressing these issues now will save you from potential problems in the future.
Installing the shower arm mount is a crucial step in the process of setting up your shower head with a handheld feature. By following these simple steps and ensuring a secure attachment, you can enjoy a relaxing and invigorating shower experience with confidence.
Attaching The Handheld Shower Hose
When it comes to upgrading your shower experience, installing a shower head with a handheld option can make a world of difference. Not only does it provide more flexibility and convenience, but it also allows for a more targeted and personalized showering experience. Attaching the handheld shower hose is a crucial step in this process, as it ensures that the handheld showerhead is securely connected to the shower arm. Here’s how you can do it:
Connecting the hose to the shower arm mount
The first step in attaching the handheld shower hose is connecting it to the shower arm mount. The mount is usually located on the wall, and it serves as the base for the hose. To do this:
- Start by unscrewing the shower arm mount cover from the mount.
- Next, take the handheld shower hose and insert it into the mount.
- Twist the hose clockwise until it is securely attached to the mount.
- Make sure to tighten it enough to prevent any potential leaks, but be careful not to overtighten, as that can cause damage.
Ensuring a tight fit to prevent leaks
Once the hose is connected to the shower arm mount, it’s important to ensure a tight fit to prevent any leaks. A loose connection can result in water leakage, which can be both wasteful and frustrating. Here are some tips to ensure a tight fit:
- Hold the shower hose firmly while twisting it onto the mount to provide extra stability.
- Use a wrench or pliers, if necessary, to securely tighten the connection.
- Check for any signs of gaps or movement between the hose and the mount. If you notice any, adjust and tighten the connection accordingly.
- Inspect the connection for any cracked or damaged parts. If you find any, replace them before proceeding.
Testing the connection for any potential issues
After attaching the handheld shower hose and ensuring a tight fit, it’s essential to test the connection for any potential issues before using it. Testing the connection allows you to identify and address any problems early on, ensuring a smooth showering experience. Here’s how you can do it:
- Turn on the water and check for any leaks around the hose connection.
- If you notice any leaks, try tightening the connection further or adjusting the hose to eliminate the issue.
- Inspect the hose for any kinks or twists that may obstruct the water flow. Straighten the hose if necessary.
- Run the water through the handheld showerhead to ensure proper functionality and water pressure.
- If everything looks and works fine, congratulations! You’ve successfully attached the handheld shower hose. Enjoy your upgraded shower experience!
Installing The Shower Head With Handheld
Installing a shower head with a handheld attachment can greatly enhance your showering experience, providing you with the flexibility to direct water exactly where you need it. Whether you want to enjoy a soothing rainfall stream or need a powerful jet to rinse off soap and shampoo, a shower head with handheld capability gives you control over your showering experience.
Attaching the shower head to the hose
Attaching the shower head to the hose is the first step in installing your shower head with a handheld attachment. Follow these simple steps:
- Ensure that the shower head and hose are compatible by checking the fittings.
- Wrap plumber’s tape around the threaded end of the hose to create a watertight seal.
- Screw the threaded end of the hose onto the bottom of the shower head, turning it clockwise until it is tightly secured.
- Hand-tighten the connection, and then use a wrench to give it an extra quarter-turn for added security.
Adjusting the position and angle as desired
Once the shower head is securely attached to the hose, you can adjust its position and angle to suit your preferences. Follow these steps:
- Hold the shower head firmly and rotate it to the desired position.
- Ensure that the angle of the spray is in line with your body for optimal coverage.
- Experiment with different angles and positions until you find the perfect setting for your shower.
Securing the shower head with a wrench if necessary
In some cases, you may need to secure the shower head with a wrench to prevent it from moving or loosening over time. Here’s how to do it:
- Use a wrench to hold the shower arm steady.
- With your other hand, turn the shower head clockwise until it is tightly secured.
- Be careful not to overtighten, as this can damage the shower head or the arm.
With these simple steps, you can easily install a shower head with handheld capability and enjoy the convenience and versatility it offers. Take your showering experience to the next level by directing the water exactly where you need it.
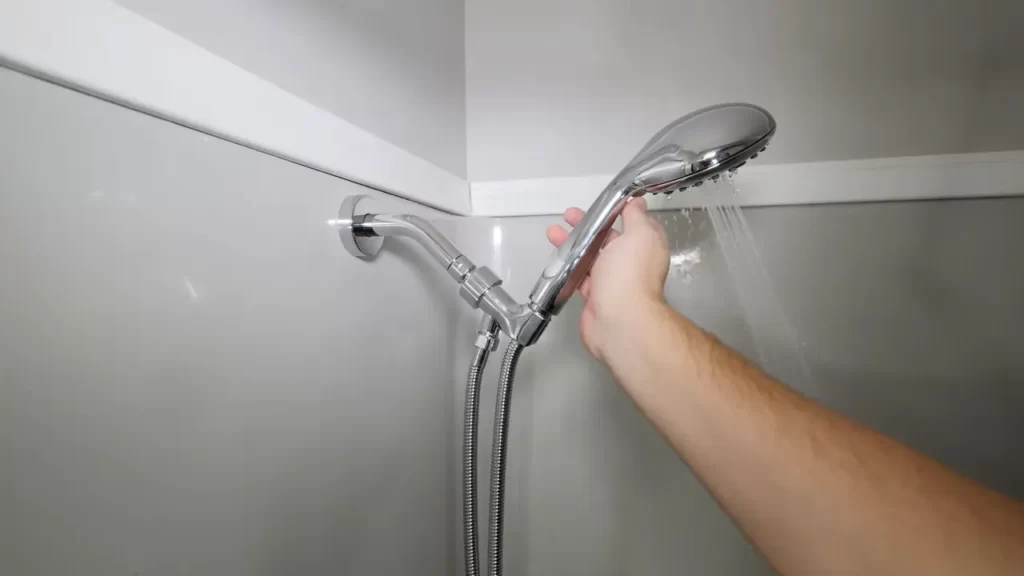
Testing The Newly Installed Shower Head With Handheld
Once you have successfully installed your new shower head with handheld, it’s time to put it to the test. Below are some important steps to follow to ensure that everything is in proper working order. Remember, testing is crucial to identify any potential issues and to make any necessary adjustments.
Turning on the water supply and checking for any leaks
Before you start testing the spray settings and handheld functionality, it’s important to ensure that there are no leaks in your newly installed shower head. Here’s what you need to do:
- Turn on the water supply by gently twisting the shower handle or lever.
- Observe the shower head and connections closely for any signs of leaks. Pay attention to areas such as the shower arm, the connection between the shower head and handheld, and any threaded joints.
- If you notice any leaks, tighten the connections using a wrench or plumber’s tape. Make sure to follow the manufacturer’s instructions for tightening and sealing properly to avoid further issues.
- Once you have addressed any leaks, turn off the water supply to proceed with the next step.
Testing the different spray settings and handheld functionality
Now that you have confirmed there are no leaks, let’s move on to testing the spray settings and handheld functionality of your shower head. Follow these steps:
- Turn on the water supply and adjust the temperature to your desired level.
- Hold the handheld shower head in your hand and activate the different spray settings. Many shower heads offer a variety of options such as rainfall, massage, mist, or a combination of settings.
- Switch between the different spray settings, focusing on the water flow and pressure. Make sure each setting is functioning properly and providing the desired experience.
- Test the handheld functionality by detaching it from its holder and using it to direct water to specific areas of your body. Ensure that the handheld shower head remains securely attached to the holder when not in use.
Adjusting the water pressure as needed
During the testing process, you may find that the water pressure is too high or too low for your liking. Here’s how you can adjust it:
- Locate the water pressure regulator, which is usually located near the base of the shower arm.
- Using a screwdriver, turn the regulator clockwise to increase the water pressure or counterclockwise to decrease it.
- Gradually adjust the regulator while testing the water pressure until you find the desired level.
- Once you have adjusted the water pressure, test the spray settings and handheld functionality again to ensure everything is working as intended.
By following these steps, you can confidently test and enjoy your newly installed shower head with handheld. Remember to periodically check for any leaks or issues and make adjustments as needed to maintain a comfortable and enjoyable shower experience.
Troubleshooting Common Installation Issues
Dealing with leaks or drips
If you notice leaks or drips after installing a shower head with handheld, it can be frustrating. However, there are a few common causes for this issue that you can easily troubleshoot:
- Check the connections: First, ensure that all connections are tight and secure. Sometimes, leaks can occur if the fittings are not properly tightened. Use a wrench to tighten any loose connections, making sure not to overtighten.
- Inspect the washers: Leaks can also be caused by worn-out or damaged washers. Detach the shower head and examine the washers. If they appear worn or cracked, replace them with new ones. This simple step can often resolve the issue.
- Apply plumber’s tape: Another way to prevent leaks is by using plumber’s tape. Wrap a few layers of this tape around the shower arm threads before attaching the shower head. The tape creates a watertight seal, minimizing the chance of leaks.
Adjusting the water pressure for optimal performance
Water pressure plays a crucial role in delivering a satisfying shower experience. If you find that the water pressure is too weak or too strong after installing a shower head with handheld, consider the following tips:
- Check the flow restrictor: Some shower heads come with flow restrictors to help conserve water. If you prefer a stronger water pressure, you can remove or modify the flow restrictor. Refer to the manufacturer’s instructions to locate and adjust the flow restrictor.
- Inspect the shower head nozzles: Over time, mineral deposits from hard water can build up and clog the nozzles. This can reduce the water pressure. To address this issue, soak the shower head in a mixture of vinegar and water for a few hours. Then, use a brush or toothpick to remove any remaining debris from the nozzles.
- Consider your plumbing system: In some cases, the water pressure issue may be related to the plumbing system in your home. If you consistently experience low water pressure, it might be worth consulting a professional plumber to evaluate your plumbing system and make any necessary adjustments.
Handling any compatibility issues with existing plumbing
When installing a new shower head with handheld, it’s important to ensure compatibility with your existing plumbing system. Here are a few steps to address compatibility issues:
- Check the connection type: Take note of the connection type of your existing shower arm. There are various connection types, such as threaded or snap-on. Make sure the new shower head is compatible with the existing connection type. If not, you may need to purchase an adapter to bridge the compatibility gap.
- Consider the size and weight: Different shower heads have varying sizes and weight. Ensure that the shower head you choose is suitable for your shower arm and wall mount. Incompatible sizing can lead to difficulties in installation and potential issues down the line.
- Consult the manufacturer: If you encounter any compatibility issues, reach out to the manufacturer for guidance. They can provide valuable insight and recommend specific solutions to ensure a successful installation.
Caring For And Cleaning The Shower Head With Handheld
Caring for and Cleaning the Shower Head with Handheld
Regular maintenance to prevent clogs or buildup
A shower head with handheld is an essential addition to any bathroom, providing convenience and versatility while enhancing your daily shower experience. However, to ensure its optimal performance, it is crucial to take proper care of your shower head. Regular maintenance is key to prevent clogs or buildup that could potentially disrupt the flow of water. By establishing a routine maintenance plan, you can keep your shower head with handheld clean and functioning efficiently.
- Inspect the shower head periodically to identify any signs of mineral deposits or residue buildup.
- If you notice any clogs or reduced water flow, remove the shower head and check for debris inside the nozzle or perforations.
- Regularly clean the filters or screens in your shower head to prevent sediment or debris from causing blockages.
- Consider using a water softener if you live in an area with hard water, as this can help reduce mineral deposits over time.
Using vinegar or other cleaning solutions to remove mineral deposits
Mineral deposits can accumulate over time, especially in areas with hard water. These deposits can affect the performance of your shower head by reducing water pressure and causing blockages. To remove mineral deposits and restore the functionality of your shower head, you can use common household ingredients such as vinegar or other cleaning solutions.
Follow these steps to clean your shower head:
- Fill a plastic bag or container with vinegar or a cleaning solution.
- Detach the shower head from the hose or arm.
- Submerge the shower head in the vinegar or cleaning solution, ensuring that the nozzles are fully immersed.
- Allow the shower head to soak for a minimum of 1 hour, or as recommended by the cleaning solution’s instructions.
- After soaking, use a brush or toothbrush to scrub away any remaining deposits.
- Rinse the shower head thoroughly with water, ensuring all cleaning solution residue is removed.
- Reattach the shower head to the hose or arm, and test the water flow to ensure it is back to its optimal level.
Ensuring the longevity and performance of your shower head
To ensure the longevity and optimal performance of your shower head with handheld, it is essential to follow good maintenance practices and take preventive measures against potential issues.
- Always handle the shower head with care to avoid any physical damage that could affect its performance.
- Protect the shower head from excessive exposure to chemicals or harsh cleaning agents that may deteriorate its material or finish.
- Regularly check for leaks or loose connections and address them promptly to avoid water wastage and potential damage to the shower head.
- Consider investing in a quality shower head that is designed to withstand the test of time and provide reliable performance.
Frequently Asked Questions
Can I Add A Handheld Shower Head To My Existing Shower Head?
Yes, you can add a handheld shower head to your existing shower head. It’s a simple and convenient way to enhance your shower experience. Just attach it to the existing shower arm, and you’ll be able to switch between the two shower heads easily.
Enjoy the flexibility and versatility of a handheld shower!
Can You Use A Shower Head And Handheld At The Same Time?
Yes, you can use a shower head and handheld simultaneously. They can be connected to separate valves and operated together in most modern shower systems. This allows you to enjoy the benefits of both shower options at the same time.
How Do You Replace A Hand Held Shower Head And Hose?
To replace a hand-held shower head and hose, follow these steps: 1. Turn off the water supply by shutting the water valve. 2. Unscrew the existing shower head from the hose. 3. Attach the new shower head by screwing it onto the hose.
4. Turn the water valve back on to test the new shower head. 5. Make sure the connection is tight to prevent leaks.
How Do You Attach A Shower Head To A Shower Hose?
To attach a shower head to a shower hose, screw the threaded end of the shower hose onto the shower pipe. Then, tightly screw the other end of the hose onto the threaded connection on the shower head. Ensure it is secure to prevent leaks during use.
Conclusion
Installing a shower head with a handheld feature can greatly enhance your shower experience. With the easy-to-follow steps outlined in this guide, you can easily upgrade your bathroom. Remember to gather the necessary tools, follow the manufacturer’s instructions, and take your time during the installation process.
Whether you’re looking for a more convenient way to shower or wanting to create a spa-like atmosphere, installing a shower head with a handheld feature is a practical and luxurious choice. Enjoy the ultimate showering experience!