To install a new shower handle, first, turn off the water supply. Then, unscrew the old handle, replace it with the new one, and tighten the screws.
How To Safely And Easily Remove The Old Shower Handle
Are you tired of your old shower handle? Is it hard to turn or simply outdated? It may be time to install a new one. Before you can enjoy the benefits of a modern and functional shower handle, you’ll need to remove the old one. In this guide, we’ll walk you through the process step-by-step to ensure a smooth and hassle-free removal.
Locate and Remove the Decorative Cap or Cover Plate
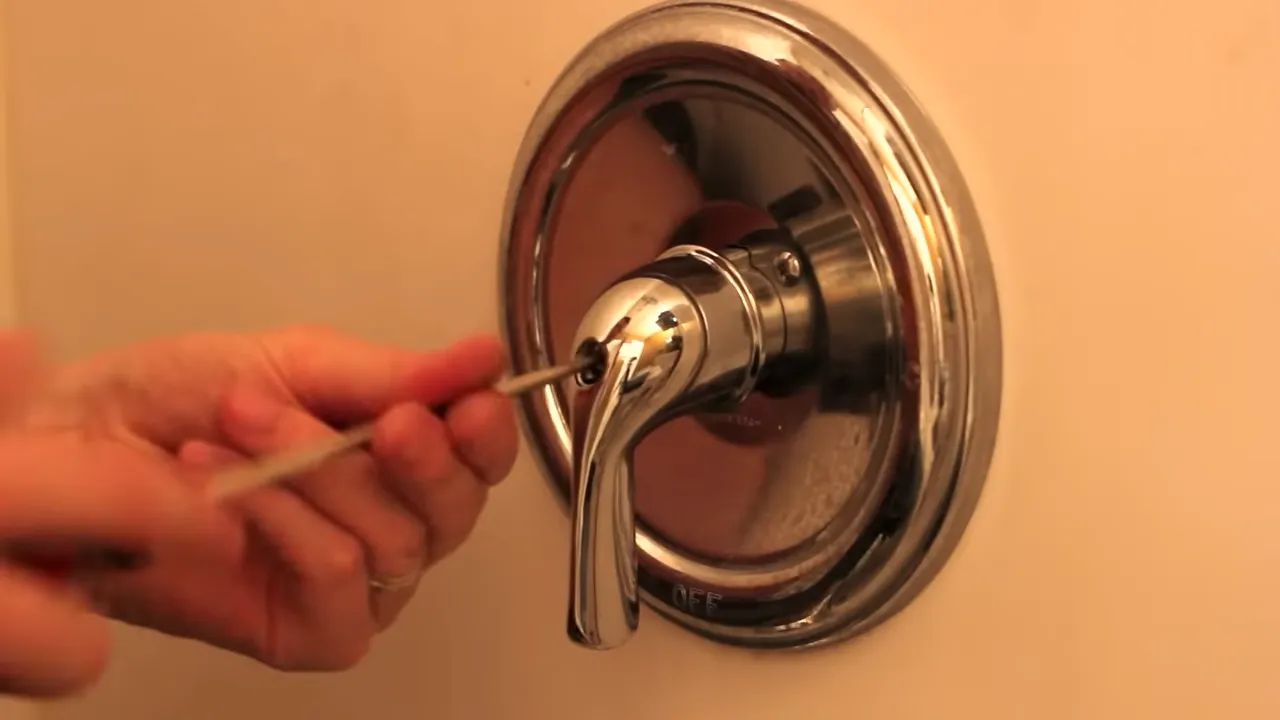
The first step in removing the old shower handle is to locate and remove the decorative cap or cover plate. This cap or plate is usually situated at the center of the handle and serves as a decorative element. To remove it, you may need to use a small flat-head screwdriver or a putty knife.
Step 1: Locate the decorative cap or cover plate.
Step 2: Insert a flat-head screwdriver or putty knife underneath the cap or plate.
Step 3: Gently pry the cap or plate upward to loosen it.
Unscrew the Handle Screw
Once you’ve successfully removed the decorative cap or cover plate, you’ll need to unscrew the handle screw. This screw holds the handle in place and may require an appropriate screwdriver or Allen wrench, depending on the design of your shower handle.
Step 4: Locate the handle screw. It is usually situated underneath the cap or cover plate.
Step 5: Using the appropriate screwdriver or Allen wrench, carefully turn the screw counterclockwise to loosen it.
Step 6: Continue unscrewing until the handle is no longer secured to the valve stem.
Slide Off the Handle from the Valve Stem
Once the handle screw is completely unscrewed, you can easily slide off the handle from the valve stem. This step is crucial before you can proceed with installing the new shower handle.
Step 7: Hold the handle firmly and pull it directly away from the valve stem.
Step 8: Wiggle the handle gently, if necessary, to loosen it from the stem.
And with that, you’ve successfully removed the old shower handle! Now you’re ready to install your new one and enjoy a refreshed and functional shower experience. Stay tuned for our next guide on how to install a new shower handle.

Ensure The Valve Stem Is Ready For The New Handle
Clean the valve stem of any debris or buildup
Before installing a new shower handle, it is essential to ensure that the valve stem is clean and free from any debris or buildup. Over time, mineral deposits, soap scum, and other impurities can accumulate on the valve stem, affecting its performance and compromising the smooth operation of the handle.
To clean the valve stem, follow these steps:
- Turn off the water supply to the shower. This can typically be done by shutting off the main water valve.
- Remove the old shower handle by unscrewing any screws or bolts holding it in place. This will expose the valve stem.
- Inspect the valve stem for any visible debris or buildup. Use a soft cloth or brush to gently remove any dirt or sediment.
- If there are stubborn deposits, you can use a mild bathroom cleaner or vinegar solution to dissolve them. Be sure to rinse the valve stem thoroughly after cleaning.
- Once the valve stem is clean, dry it with a clean cloth to ensure there is no moisture left behind.
Apply plumber’s grease to the valve stem for smoother operation
To ensure the new shower handle operates smoothly and lasts longer, it is recommended to apply plumber’s grease to the valve stem. This lubricates the moving parts and reduces friction, allowing for easier and more effortless handle movement.
Here’s how to apply plumber’s grease:
- Choose a high-quality plumber’s grease specifically designed for plumbing applications.
- Apply a small amount of grease to the valve stem using a clean cloth or your fingers. Make sure to evenly coat the entire surface of the stem.
- Avoid applying excessive grease, as it can attract dirt and may cause the handle to become sticky.
Remember to regularly inspect and clean the valve stem to maintain optimal performance of your shower handle. By following these simple steps, you can ensure that the valve stem is ready for the new handle, providing you with a smooth and enjoyable shower experience.
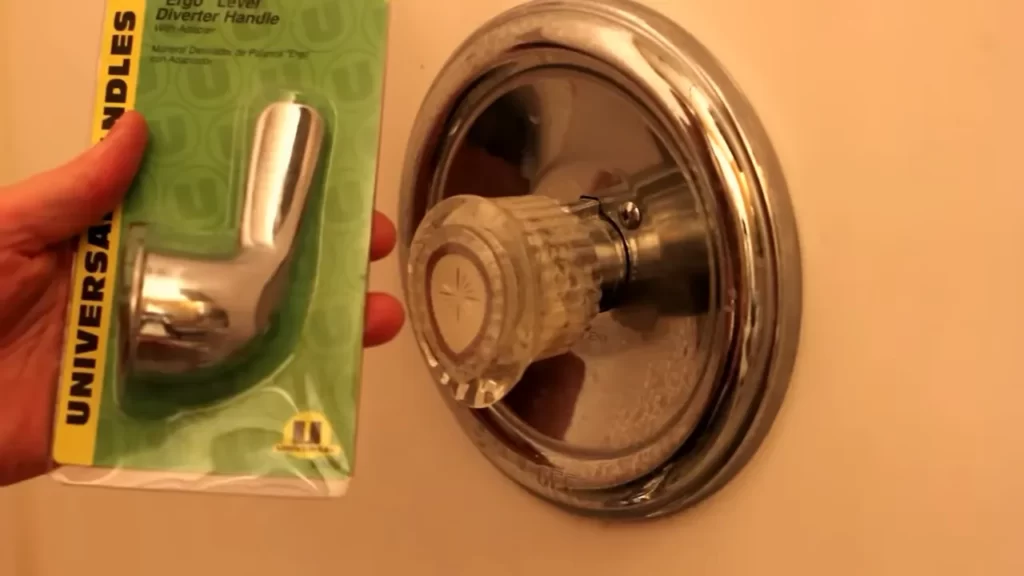
Factors To Consider When Selecting A New Shower Handle
Factors to Consider When Selecting a New Shower Handle
When it comes to installing a new shower handle, there are several factors to consider to ensure a successful and functional result. By carefully evaluating these factors, you can choose a shower handle that not only enhances the aesthetics of your bathroom but also fits seamlessly with your existing shower valve. Let’s take a look at three important considerations when selecting a new shower handle:
1. Compatibility with Your Existing Valve
One of the first things you need to consider when choosing a new shower handle is its compatibility with your existing valve. Different shower valves have different specifications and mechanisms, so it’s important to ensure that the handle you choose is designed to work with your specific valve. You don’t want to end up with a beautiful handle that doesn’t fit or function properly. To determine compatibility, check the manufacturer’s specifications or consult with a professional.
2. Style and Finish Options
The style and finish of the shower handle can significantly impact the overall look and feel of your bathroom. Whether you prefer a modern and sleek design or a more traditional and ornate style, there are plenty of options to choose from. Consider the overall aesthetic of your bathroom and select a handle that complements your existing fixtures and decor. Additionally, think about the finish of the handle. Popular choices include chrome, brushed nickel, bronze, and brass. Take your time to find a style and finish that aligns with your personal taste and enhances the visual appeal of your shower.
3. Budget Considerations
Of course, budget is a crucial factor to consider when selecting a new shower handle. Prices can vary significantly depending on the brand, material, and design. While it’s important to stick within your budget, keep in mind that investing in a high-quality handle can ensure durability and longevity. Cheaper options may require frequent replacements, which can end up costing you more in the long run. Take the time to research different brands and compare prices to find the best value for your money. Remember, quality doesn’t always mean expensive.
By carefully considering these factors when selecting a new shower handle, you can make an informed decision that results in a stylish and functional addition to your bathroom. Ensure compatibility with your existing valve, choose a style and finish that suits your taste and complements your decor, and find the right balance between budget and quality. With these considerations in mind, you’ll be well on your way to enjoying a refreshing shower experience with your newly installed handle.
Step-By-Step Instructions For Installing The New Handle
Installing a new shower handle is a relatively simple process that can give your bathroom a fresh look. In this guide, we will provide you with step-by-step instructions on how to install the new handle. Whether you’re remodeling your bathroom or simply replacing an old handle, follow these easy steps to get the job done.
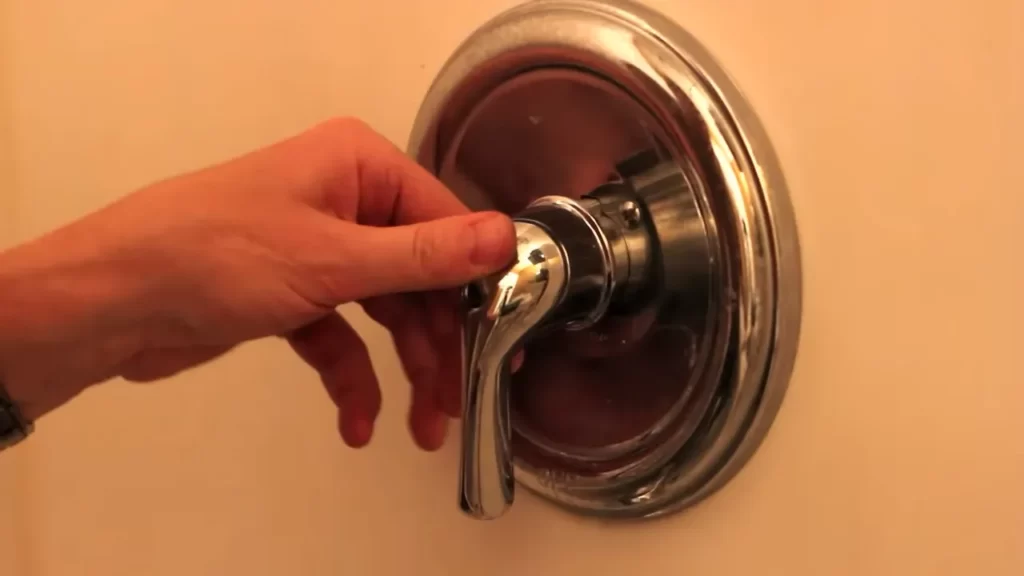
Slide the new handle onto the valve stem
To start, slide the new handle onto the valve stem. Ensure that the handle fits snugly and aligns properly. Take note of any markings on the handle that indicate the correct orientation.
If you are having trouble sliding the handle onto the valve stem, try lubricating the stem with a small amount of plumber’s grease or silicone spray. This will make it easier to slide the handle into place.
Tighten the handle screw securely
Once you have the handle in position, locate the screw that secures it to the valve stem. Using a screwdriver or Allen wrench, tighten the screw securely. Make sure the handle is firmly attached and doesn’t wobble or move when you turn it. This will ensure that the handle functions properly and doesn’t come loose over time.
Attach the decorative cap or cover plate
Finally, attach the decorative cap or cover plate to the handle. This cap or plate is designed to hide any screws or hardware, giving your shower a clean and finished appearance.
If your handle has a decorative cap, simply snap it into place over the screw. If it has a cover plate, align it with the handle and use a screwdriver to secure it. Ensure that the cap or plate is flush with the handle and tightened securely.
By following these step-by-step instructions, you can easily install a new shower handle and give your bathroom a quick and affordable update. Remember to choose a handle that matches your bathroom’s style and décor for a cohesive look. Enjoy your newly installed shower handle!

Ensuring Proper Functionality And Adjustment Of The New Handle
Installing a new shower handle can not only give your bathroom a refreshed look but also improve your overall showering experience. Once you have successfully installed the new handle, it is important to ensure its proper functionality and make any necessary adjustments. This will ensure that you can enjoy smooth operation and have control over the water temperature. In this section, we will guide you through the steps to turn the water supply back on, test the handle for smooth operation and proper temperature control, and make any necessary adjustments to its position or tension.
Turn the water supply back on
Before you can start testing the new shower handle, you need to turn the water supply back on. Locate the main water supply valve, typically found near the water meter, and turn it clockwise to open it. This will allow water to flow back into the shower system and enable you to properly test the handle.
Test the handle for smooth operation and proper temperature control
After turning on the water supply, it’s time to test the shower handle. Begin by activating the showerhead and running water through it. Gradually turn the handle clockwise and counterclockwise to adjust both the water flow and temperature. Pay attention to any resistance or difficulty in turning the handle, as these could indicate that adjustments are needed.
Additionally, make sure the handle smoothly transitions between hot and cold water. Start with a warm water setting and gradually increase or decrease the temperature to ensure the handle responds correctly. This test will help identify any issues with temperature control and allow you to make the necessary adjustments.
Make any necessary adjustments to the handle’s position or tension
If you encounter any difficulties during the testing phase, such as a stiff handle or inconsistent water flow, adjustments may be required. Refer to the manufacturer’s instructions for your specific shower handle model, as the adjustment methods can vary.
Here are a few common adjustments you may need to make:
- Tighten or loosen the handle’s set screw using an appropriate screwdriver to improve its tension.
- Check if the handle is properly aligned with the valve stem. If not, adjust its position by removing the handle and reinstalling it at the correct angle.
- Inspect the cartridge or valve assembly for any damage or obstructions. Clean or replace the cartridge if necessary.
By taking the time to make these important adjustments, you can ensure that your new shower handle operates smoothly and provides optimal temperature control. Once the necessary adjustments are made, test the handle again to confirm its functionality and make any additional fine-tuning if needed.
Steps To Complete The Installation And Clean Up
Installing a new shower handle can be a simple and satisfying task that can transform the look and functionality of your shower. However, it’s important to follow the necessary steps and clean up properly to ensure a successful and hassle-free installation. In this guide, we will outline the steps you need to take to complete the installation and provide tips for cleaning up afterwards.
Check for any water leaks around the handle
Before you begin the installation process, it’s important to check for any water leaks around the handle. Start by turning off the water supply to the shower. Once the water is off, carefully inspect the area around the old handle for any signs of water leakage. Look out for any drips or moisture on the walls or flooring. If you notice any leaks, it’s crucial to address them before proceeding with the installation.
Tighten any fittings if necessary
Once you have checked for leaks and ensured the area is dry, it’s time to proceed with the installation. Carefully remove the old shower handle by loosening the screws or other fasteners that are holding it in place. Once you have removed the old handle, inspect the fittings to ensure they are snug and secure. If you notice any loose fittings, use a wrench or pliers to tighten them. This will prevent any future issues and ensure that the new handle is securely installed.
Clean up any debris or tools used during the installation
After successfully installing the new shower handle, it’s important to clean up any debris or tools that were used during the installation process. This will not only make your bathroom look tidy but also prevent any accidents or injuries that could result from leaving tools or sharp objects lying around. Gather all the tools and materials used during the installation and store them in a safe place. Wipe down the area around the shower handle to remove any dust or residue. Finally, dispose of any packaging materials or old shower handle components properly.
By following these simple steps and cleaning up properly after the installation, you can enjoy your new shower handle with peace of mind. Remember to check for any water leaks, tighten fittings if necessary, and clean up any debris or tools used during the process. Taking these extra steps will ensure that your installation is successful and that your bathroom remains clean and organized.
Frequently Asked Questions
How Do You Replace Old Shower Handles?
To replace old shower handles, follow these steps: 1. Turn off the water supply. 2. Remove the decorative cover plates. 3. Unscrew the screws holding the handles in place. 4. Take off the old handles and replace them with new ones.
5. Secure the new handles with screws and replace the cover plates.
Are All Shower Handles Universal?
No, shower handles are not universally compatible. Different brands and models may have unique fittings and designs, requiring specific replacement parts. Always check the specifications and measurements before purchasing a new shower handle to ensure it will fit your existing fixture correctly.
How Do You Replace A Shower Faucet With No Access Panel?
To replace a shower faucet without an access panel, follow these steps: 1. Turn off the water supply. 2. Remove the shower handle and trim plate. 3. Disconnect the old faucet by loosening the screws. 4. Install the new faucet by following the instructions.
5. Replace the handle and trim plate, and turn the water supply back on.
How Do You Install A Set Screw In A Shower Handle?
To install a set screw in a shower handle, follow these steps: 1. Locate the set screw hole on the handle. 2. Insert the set screw into the hole using an Allen wrench or screwdriver. 3. Tighten the set screw securely, but be careful not to over-tighten.
4. Test the handle to ensure it is securely attached. 5. If necessary, make adjustments to the screw’s tightness for a snug fit.
Conclusion
Installing a new shower handle doesn’t have to be a complicated task. By following the step-by-step guide provided in this blog post, you can easily upgrade your bathroom experience. Remember to turn off the water supply and gather all the necessary tools before starting.
With the right tools and a little bit of patience, you’ll have your new shower handle installed in no time. Enjoy your newly upgraded shower experience!