To install a countertop dishwasher under the sink, follow these steps: connect the dishwasher to the sink faucet, route the drain hose to the sink’s drain pipe, and secure the dishwasher in place. In addition, ensure that the power supply is accessible and compatible with the dishwasher.
Installing a countertop dishwasher under the sink can be an efficient solution for those who have limited kitchen space or prefer a discreet appliance. This convenient setup allows you to easily wash dishes without taking up valuable countertop space. We will guide you through the process of installing a countertop dishwasher under the sink.
By following the steps outlined below, you can have a fully functioning dishwasher that seamlessly integrates into your kitchen layout while improving your dishwashing experience. Let’s get started with the installation process!
Understanding The Benefits Of A Countertop Dishwasher
Understanding the Benefits of a Countertop Dishwasher
When it comes to efficiently cleaning your dishes, a countertop dishwasher can be a game-changer. This compact and versatile appliance offers numerous benefits that make it an attractive option for smaller kitchens or those looking for a space-saving solution. In this article, we will delve into the advantages of a countertop dishwasher, focusing on three key benefits: its space-saving design, energy efficiency, and convenience and ease of use.
Space-saving solution for smaller kitchens
If you have a small kitchen or limited countertop space, a countertop dishwasher can be a game-changer. Unlike traditional dishwashers that require a large space in your kitchen, these compact appliances are designed to fit seamlessly under your sink or on your countertop. With their smaller footprint, they help you make the most of your available space without compromising on functionality.
Energy-efficient alternative to traditional dishwashers
In addition to saving space, countertop dishwashers are also an energy-efficient alternative to their larger counterparts. With their smaller size, these dishwashers use less water and energy to clean your dishes, making them an eco-friendly choice. This not only helps to reduce your carbon footprint but also saves you money on your utility bills. So, you can have sparkling clean dishes while being mindful of the environment and your pocket.
Convenience and ease of use
Convenience and ease of use are two factors that make countertop dishwashers immensely popular. With their simple installation process, these dishwashers can be set up hassle-free under your sink or on your countertop. Most models also come with user-friendly controls and intuitive features, allowing you to easily customize your wash cycles and adjust settings for optimal performance. Additionally, countertop dishwashers are designed to accommodate a reasonable number of dishes, making it convenient for individuals or small families.
In conclusion, a countertop dishwasher offers a multitude of benefits that make it a compelling choice for any kitchen. Its space-saving design is perfect for smaller kitchens, allowing you to make the most of your available space. The energy-efficient nature of this appliance helps you save money on utility bills and reduce your environmental impact. Lastly, its convenience and ease of use make it an attractive option for individuals looking for a hassle-free way to keep their dishes clean. With all these advantages, a countertop dishwasher proves to be a valuable addition to any kitchen, providing a practical and efficient solution for your dishwashing needs.
Preparing For Installation
Before you start installing a countertop dishwasher under the sink, it’s important to prepare the space and gather all the necessary tools and materials. This will ensure a smooth and successful installation process.
Evaluating the available space under the sink
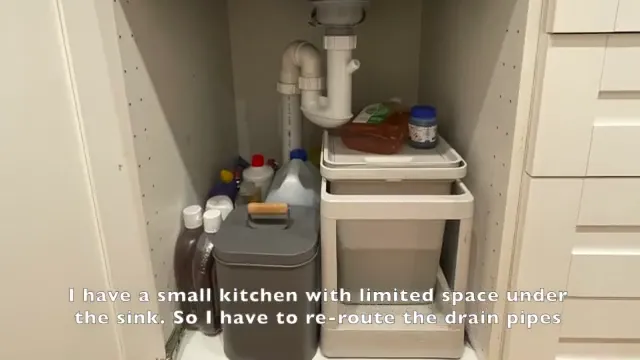
First and foremost, you need to evaluate the available space under your sink. Measure the dimensions of the space to ensure that the countertop dishwasher will fit properly. Keep in mind that you’ll also need to make space for the necessary plumbing connections.
Ensuring proper plumbing connections
Once you have assessed the space, it’s vital to ensure that you have the proper plumbing connections in place. Check if there is an existing plumbing line that can be used for the dishwasher. If not, you may need to modify your plumbing system to accommodate the new appliance. It’s recommended to consult a professional plumber to assist you with any necessary modifications.
Gathering the necessary tools and materials
Before you begin the installation, gather all the necessary tools and materials. This will help you complete the installation process more efficiently. Here is a list of tools and materials you may need:
| Tools | Materials |
|---|---|
|
|
Having all the necessary tools and materials ready beforehand will save you time and prevent any unnecessary delays during the installation process.
Step 1: Assessing The Sink Cabinet And Plumbing
Before installing a countertop dishwasher under the sink, it is crucial to assess the sink cabinet and plumbing to ensure a successful installation. This step will help you determine if there is adequate space and clearance, assess the sink cabinet structure and stability, and examine the existing plumbing connections. Let’s dive into each aspect in detail.
Checking for adequate space and clearance
The first thing you need to do is check if there is enough space under your sink cabinet to accommodate a countertop dishwasher. Measure the available width, height, and depth to ensure it will fit properly. Additionally, make sure there is sufficient clearance between the bottom of the sink and the cabinet floor for the dishwasher’s components.
Assessing the sink cabinet structure and stability
Next, evaluate the structure and stability of your sink cabinet. Since a countertop dishwasher can be heavy when filled with water, it’s important to ensure the cabinet is strong enough to support its weight. Look for any signs of damage, such as sagging or weak joints, and make any necessary repairs before proceeding with the installation.
Examining the existing plumbing connections
Finally, examine the existing plumbing connections to determine if they are compatible with a countertop dishwasher. Check for the availability of a water supply line and a drain connection. Ensure that the water supply line has a suitable shut-off valve and that the drain connection is in good condition. If any modifications are needed, consult a professional plumber to ensure proper installation and prevent potential leaks or damages.
By thoroughly assessing the sink cabinet and plumbing, you can ensure a smooth and trouble-free installation process for your countertop dishwasher. This step is crucial for creating a solid foundation and avoiding any complications in the future. Once you have completed this assessment, you’ll be ready to move on to the next step of the installation process.
Step 2: Selecting The Right Countertop Dishwasher
Once you have determined that a countertop dishwasher is the perfect solution for your kitchen, the next step is to select the right one. With so many options available in the market, it can be overwhelming to make a decision. This section will guide you through the key factors to consider when choosing the perfect countertop dishwasher for your needs.
Considering the dimensions and capacity
When it comes to selecting a countertop dishwasher, the dimensions and capacity are crucial factors to consider. Since this appliance will be installed under your sink, it’s important to ensure that it fits comfortably in the space available. Measure the height, width, and depth of the area under your sink to determine the maximum dimensions you can accommodate. This way, you can narrow down your options to dishwashers that match your space requirements.
Furthermore, pay attention to the dishwasher’s capacity. Consider the number of dishes you typically use in a single meal and choose a dishwasher that can handle that load. Additionally, think about the available countertop space you have and select a dishwasher that does not compromise your preparation area.
Choosing between portable and built-in models
Another important decision to make when selecting a countertop dishwasher is whether to go for a portable or a built-in model. Each has its advantages and considerations. Portable dishwashers are designed to be easy to move and can be stored away when not in use. They typically have multiple hookups that allow you to connect them to various faucet types, making them a versatile option for those who may want to use the dishwasher in different locations.
On the other hand, built-in dishwashers offer a more permanent solution. They are installed directly under the sink or in a designated cabinet space. Built-in models tend to offer more features and functionalities and are generally more powerful than portable dishwashers. However, keep in mind that installation may require modifications to your plumbing and cabinetry, so ensure that you are prepared for the necessary adjustments.
Evaluating features and functionalities
When it comes to selecting the perfect countertop dishwasher, it’s important to evaluate the features and functionalities that each model offers. Look for features that align with your needs and lifestyle. For example, some dishwashers offer different wash cycles, such as quick wash or heavy-duty, allowing you to customize your cleaning process. Others may have energy-saving modes or delay start options, providing flexibility and efficiency.
Additionally, consider the dishwasher’s noise level, especially if your kitchen is an open-concept space. Look for dishwashers that have noise-reducing technologies to ensure a peaceful environment while the dishwasher is running.
By carefully considering the dimensions, capacity, portable vs. built-in options, and the features and functionalities that matter the most to you, you will be able to select a countertop dishwasher that perfectly suits your needs and enhances your kitchen experience.
Step 3: Gathering The Required Tools And Materials
Before you begin the installation process for your countertop dishwasher, it’s essential to gather all the necessary tools and materials. Having everything you need on hand will help streamline the process and ensure a smooth installation. There are a few different categories of items you’ll need to gather: the necessary tools, the required plumbing materials, and any additional parts or accessories that may be needed for your specific installation.
List of Necessary Tools for Installation
Ensuring you have the right tools for the job is crucial for a successful installation. Here is a handy list of the essential tools you will need:
| Tools |
|---|
| Screwdriver |
| Adjustable wrench |
| Utility knife |
| Tape measure |
| Pliers |
| Drill |
| Level |
Identifying the Required Plumbing Materials
In addition to the tools mentioned above, you’ll also need specific plumbing materials to ensure a proper installation. These plumbing materials typically include:
- A supply line with a shut-off valve
- A drain hose with a high loop
- A drain pipe connector
- A hose clamp for securing the drain hose
Gathering Additional Parts and Accessories (If Needed)
Depending on the specific requirements of your countertop dishwasher and your existing plumbing setup, you may need to gather some additional parts and accessories. These can vary, but some common examples include:
- Extension cords or power strips
- Teflon tape for sealing connections
- Adapters for faucet connections, if required
- Mounting brackets or straps for securing the dishwasher
Be sure to check the manufacturer’s instructions or consult with a professional to determine if any additional parts or accessories are needed for your particular installation.
By gathering all the required tools, plumbing materials, and any additional parts or accessories, you’ll be well-prepared for a successful installation of your countertop dishwasher. This will make the process smoother and help ensure that your dishwasher operates efficiently once it’s installed.
Step 4: Preparing The Sink Cabinet
Before you can install your countertop dishwasher under the sink, it’s crucial to prepare the sink cabinet properly. This step involves clearing out any items or obstructions, removing unnecessary shelves or dividers, and creating enough space for the dishwasher unit. Let’s take a closer look at each of these tasks.
Clearing out any items or obstructions
First, start by removing any items from the sink cabinet. Make sure to clear out cleaning supplies, kitchenware, or any other objects that may interfere with the installation process. It’s essential to have a clean and empty space to work with.
Removing unnecessary shelves or dividers
Next, assess the interior of the sink cabinet and identify any shelves or dividers that are unnecessary or obstructive. These elements may need to be taken out to make room for the dishwasher unit. Carefully remove any screws or brackets holding the shelves or dividers in place and set them aside for later use if needed.
Creating space for the dishwasher unit
To create space for the dishwasher unit, measure the dimensions of the unit and ensure that it will fit comfortably within the sink cabinet. Remove any additional fixtures or attachments that may hinder the installation. It might be necessary to detach the sink trap temporarily to achieve the required space.
Consider organizing the space more effectively by using baskets or containers to store cleaning supplies or other items that were previously cluttering the sink cabinet. Utilizing storage solutions can help optimize the available space and make it easier to access the cabinet contents.
Pro tip: For a more streamlined installation process, consult the user manual or installation guide provided by the manufacturer. They often include specific instructions for preparing the sink cabinet and can provide valuable insights to ensure a smooth installation.
Remember, proper preparation of the sink cabinet is crucial for a successful countertop dishwasher installation. By clearing out any items or obstructions, removing unnecessary shelves or dividers, and creating enough space for the dishwasher unit, you’ll be well on your way to enjoying the convenience and efficiency of a countertop dishwasher right under your sink.
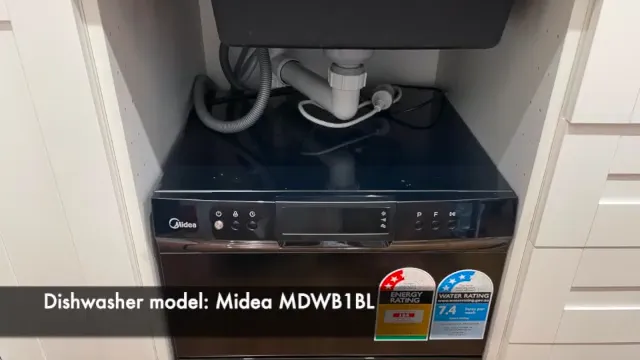
Step 5: Installing The Plumbing Connections
Now that you have successfully positioned and secured your countertop dishwasher under the sink, it’s time to move on to connecting the plumbing. This step is crucial for ensuring the proper functioning of your dishwasher and preventing any leaks or drainage issues.
Connecting the dishwasher’s water supply
The first thing you need to do is connect the dishwasher to the water supply. Locate the hot water supply valve under your sink and turn it off. This valve is usually located near the angle stop valve for your sink faucet. Once you’ve turned off the valve, you can proceed with the following steps:
- Find the water supply line that comes with your countertop dishwasher. This line should have a quick-connect adapter on one end.
- Attach the quick-connect adapter to the hot water supply valve. Make sure it fits snugly and secure it tightly.
- Take the other end of the water supply line and attach it to the corresponding inlet on the back of the dishwasher. Again, make sure to secure it tightly.
Once you have connected the water supply, you can move on to ensuring proper drainage with a sink adapter.
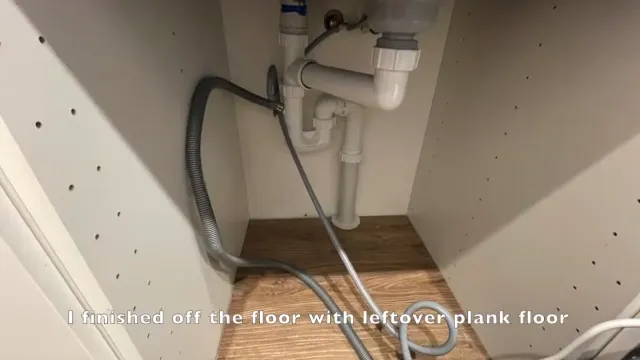
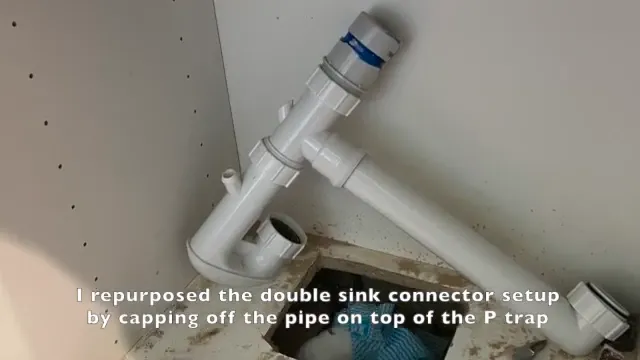
Ensuring proper drainage with a sink adapter
In order for your countertop dishwasher to drain properly, you will need to install a sink adapter. This adapter connects the dishwasher’s drain hose to the sink’s drainage system. Follow these steps to install the sink adapter:
- Identify the drain outlet on the back of the dishwasher. It is usually located near the bottom.
- Measure the diameter of the drain outlet to determine the size of the sink adapter you will need. Most dishwashers come with a standard-size drain outlet.
- Purchase a sink adapter that matches the diameter of the drain outlet. You can find these adapters at your local hardware store or online.
- Attach the sink adapter to the drain outlet, making sure it fits tightly and securely.
- Connect the other end of the sink adapter to the sink’s drainage system. This can be done by removing the sink’s drain pipe and attaching the adapter in its place. Again, ensure a tight and secure connection.
Securing all plumbing connections tightly
Now that both the water supply and drainage connections are in place, it’s important to go back and double-check that all connections are secured tightly. This will minimize the risk of any leaks or water damage. Give each connection a gentle tug to ensure it is properly locked in place.
Additionally, take a moment to inspect the overall plumbing setup and make sure there are no kinks or twists in any of the hoses. Straighten out any bends to ensure a smooth flow of water and drainage.
By following these steps and securing all plumbing connections tightly, you can ensure a successful installation of your countertop dishwasher under the sink. This will allow you to enjoy the convenience of a dishwasher in even the smallest of kitchens.
Step 6: Positioning And Securing The Dishwasher
Now that you have successfully connected the necessary plumbing and electrical components, it’s time to position and secure the countertop dishwasher under the sink. This step ensures that the appliance is stable, properly aligned, and securely attached to the underside of the cabinet.
Sliding the dishwasher unit into place
To begin, carefully slide the dishwasher unit into the designated space under the sink. Make sure to align it with the existing plumbing connections, such as the drain pipe and water supply lines. Depending on the model, you may need to remove the lower front panel of the dishwasher to access and connect the water supply.
Adjusting the leveling feet for balance
Once the dishwasher is in place, it’s essential to ensure that it is level for efficient operation and proper drainage. Most dishwashers have adjustable leveling feet, typically located at the front corners of the unit. Using a wrench or pliers, adjust these feet until the dishwasher is level in both the front-to-back and side-to-side directions. This will help prevent any leaks and ensure optimal performance.
Securing the dishwasher to the underside of the cabinet
After achieving the desired level, it’s important to secure the dishwasher to the underside of the cabinet to prevent any movement or vibrations during operation. Use a screwdriver or drill to attach mounting brackets or screws provided by the manufacturer to the cabinet or countertop. Follow the specific instructions provided with your dishwasher model to ensure proper attachment, as the method may vary depending on the design.
Once the dishwasher is securely attached, double-check all your connections, ensuring that they are tight and free from any leaks. Now is also a good time to check the dishwasher door’s functionality, ensuring it opens and closes smoothly without any obstructions.
Congratulations! You have successfully positioned and secured your countertop dishwasher under the sink. Now you can enjoy the convenience of a compact dishwasher without sacrificing valuable counter space.
Step 7: Testing And Final Adjustments
Once you have successfully installed your countertop dishwasher under the sink, it is time to move on to the final step – testing and making any necessary adjustments. This step is crucial to ensure that your dishwasher is functioning properly and that there are no leaks or plumbing issues that could potentially cause damage.
Running a test cycle to ensure proper functionality
To begin the testing process, you need to run a test cycle on your new countertop dishwasher. This will help you determine if all the components are working correctly. To do this, follow these simple steps:
- Turn on the water supply to the dishwasher.
- Close the dishwasher door securely.
- Plug in the dishwasher and ensure it is receiving power.
- Select a short test cycle on the dishwasher control panel.
- Press the “Start” button and let the dishwasher run through the entire cycle.
- Pay attention to any unusual noises or error messages displayed on the control panel.
- Once the cycle is complete, open the dishwasher door and inspect the dishes for cleanliness.
If the dishwasher runs smoothly, without any issues or error messages, and the dishes come out clean, then you can consider the test cycle successful.
Adjusting the dishwasher’s position, if needed
During the test cycle, you may notice that the countertop dishwasher is not sitting properly or is misaligned. In such cases, you will need to make some adjustments to ensure a perfect fit. Follow these steps to adjust the dishwasher’s position:
- Turn off the water supply and unplug the dishwasher to avoid any accidents.
- Check the dishwasher’s feet or levelers to see if they need adjustment.
- Use a wrench or pliers to loosen the locking nuts on the feet.
- Level the dishwasher by adjusting the height of each foot.
- Once the dishwasher is level, tighten the locking nuts to secure the feet in place.
- Ensure that the dishwasher is aligned with the cabinet or countertop opening.
By properly adjusting the position of the dishwasher, you will not only enhance its aesthetics but also prevent any potential leaks or issues that may arise from misalignment.
Checking for any leaks or plumbing issues
After running the test cycle and adjusting the dishwasher’s position, it’s crucial to check for any leaks or plumbing issues to avoid water damage. Follow these steps to thoroughly inspect your installation:
- Inspect all the water supply and drainage connections for leaks or loose fittings.
- Look for any signs of water accumulation or wetness around the dishwasher, sink, or cabinet.
- Run another short cycle while observing the connections for any leaks.
- If you find any leaks or plumbing issues, tighten the connections or replace faulty parts as needed.
- Once you are confident that there are no leaks or plumbing issues, you can consider your countertop dishwasher installation complete.
Remember, regular maintenance and periodic checks are essential to ensure your dishwasher continues to function optimally and extend its lifespan. By following these final steps, you can enjoy the convenience and efficiency of your newly installed countertop dishwasher for years to come.
Troubleshooting Common Installation Problems
Installing a countertop dishwasher under the sink can be a convenient and space-saving option for many homeowners. However, like any appliance installation, there can be some common problems that arise during the process. In this section, we will address some of the most common installation problems and provide solutions to help you overcome these challenges.
Dealing with Compatibility Issues
Compatibility issues can be one of the main hurdles when installing a countertop dishwasher under the sink. Here are some steps you can take to address these problems:
- Check the dimensions: Ensure that the dishwasher you have purchased fits properly under your sink. Measure the space accurately to avoid any surprises during installation.
- Adjust the plumbing: In some cases, you may need to make changes to the existing plumbing in order to accommodate the dishwasher. This may involve adding or redirecting pipes to ensure a proper connection.
- Modify the cabinet: If your cabinet needs modification to create enough space for the dishwasher, consider hiring a professional or consulting DIY resources to ensure the job is done correctly.
Fixing Leaks and Drainage Problems
Leaking water and drainage problems are common issues that can occur after installing a countertop dishwasher. Here are some troubleshooting tips:
- Check the connections: Inspect all the water supply and drainage connections to make sure they are tightly secured. Loose connections can often be a source of leaks.
- Inspect the hoses and pipes: Look for any signs of wear, damage, or blockage in the hoses and pipes. Replace any damaged components and clear any clogs that may be causing drainage issues.
- Consider a drain air gap: Installing a drain air gap can help prevent backflow and improve drainage. Consult the manufacturer’s instructions for proper installation guidelines.
Troubleshooting Electrical Connections
Ensuring a proper electrical connection is crucial for the functioning of your countertop dishwasher. Here are some troubleshooting steps:
- Double-check the power source: Make sure the dishwasher is properly connected to a grounded power outlet. Check the circuit breaker to ensure it hasn’t tripped.
- Inspect the power cord: Examine the power cord for any visible damage or fraying. If you notice any issues, it’s important to replace the cord before continuing to use the dishwasher.
- Test the control panel: If the dishwasher is not turning on or experiencing control panel issues, consult the manufacturer’s manual for troubleshooting steps or contact their customer support for guidance.
By addressing compatibility, leak, drainage, and electrical connection problems, you’ll be well on your way to successfully installing and troubleshooting your countertop dishwasher under the sink. Remember, if you’re unsure about any aspect of the installation process, it’s always best to consult a professional or seek guidance from the manufacturer.
Maintenance And Care Tips For Countertop Dishwashers
Proper cleaning and maintenance practices are essential to ensure the efficient and effective functioning of your countertop dishwasher. By following these care tips, you can extend its lifespan and keep it running smoothly for years to come.
Proper cleaning and maintenance practices
To keep your countertop dishwasher in top shape, it’s important to establish a regular cleaning routine. Here are some key practices to keep in mind:
- Start by carefully reading the manufacturer’s instructions for cleaning and maintenance. These guidelines will provide specific details about the dishwasher’s components and any special care requirements.
- After each use, remove and clean the filter to prevent buildup and ensure proper drainage. Rinse it thoroughly under running water to remove any food particles or debris.
- Use a soft sponge or cloth to wipe the interior of the dishwasher, including the racks and sides. Avoid using abrasive cleaners or scrub brushes, as they can damage the surface.
- Pay special attention to the spray arm and nozzles, as they can become clogged with food particles. Use a toothpick or small brush to remove any buildup and maintain optimal water flow.
- Regularly check the door seal for any signs of damage or wear. Clean it with a damp cloth and mild soap if necessary. A good seal is crucial for preventing leaks and ensuring efficient operation.
Regularly inspecting and replacing parts
Another important aspect of proper maintenance is inspecting and replacing parts as needed. Here’s what you should keep an eye on:
- Inspect the water inlet and outlet hoses for any signs of leakage or damage. Tighten any loose connections and replace worn-out hoses to prevent water leakage and potential flooding.
- Check the power cord for any fraying or exposed wires. If you notice any damage, it’s important to replace the cord to avoid electrical hazards.
- Examine the dishwasher’s spray arm and racks for cracks or loose parts. Replace any damaged components to ensure smooth operation and prevent damage to your dishes.
- Regularly check the dishwasher’s control panel for any signs of malfunction. If you notice buttons sticking or display issues, contact a professional technician to diagnose and repair the problem.
- Consider installing a water softener if you live in an area with hard water. Hard water can cause limescale buildup, reducing the dishwasher’s efficiency. A water softener can help prevent this issue.
Maximizing the lifespan of your dishwasher
By following these maintenance and care tips, you can maximize the lifespan of your countertop dishwasher:
- Use dishwasher-safe utensils and dishes to avoid damage and ensure proper cleaning.
- Avoid overloading the dishwasher, as it can affect its performance and efficiency.
- Run regular cleaning cycles using dishwasher cleaners or vinegar to remove grease and scale buildup.
- Consider using rinse aid to enhance drying performance and prevent water spots on your dishes.
- Store dishwasher detergent in a cool, dry place to maintain its effectiveness.
By following these maintenance and care tips for your countertop dishwasher, you can enjoy clean and sparkling dishes for years to come while maximizing the lifespan of your appliance.
Frequently Asked Questions
Can You Connect A Countertop Dishwasher Under The Sink?
Yes, you can connect a countertop dishwasher under the sink.
Do Counter Top Dishwashers Need Plumbing In?
No, counter top dishwashers do not require plumbing in. They can conveniently be connected to the kitchen faucet using a specialized adapter.
How Do You Secure A Dishwasher Under A Countertop?
To secure a dishwasher under a countertop, follow these steps: 1. Slide the dishwasher under the countertop opening. 2. Adjust the dishwasher legs so it is level with the countertop. 3. Use brackets to attach the dishwasher to the countertop.
4. Connect the dishwasher’s water supply and drain pipes. 5. Plug in the dishwasher and test it to ensure it is secure.
Where Do You Put A Countertop Dishwasher?
A countertop dishwasher should be placed on a stable and flat surface near a sink. It can also be placed on a kitchen cart or a portable stand for easy access to water and drainage.
Conclusion
Installing a countertop dishwasher under the sink is a convenient solution for small kitchens. By following the step-by-step guide provided in this blog post, you can easily add this space-saving appliance to your kitchen setup. With its compact design and efficient functionality, a countertop dishwasher makes dishwashing hassle-free and saves you valuable time.
Say goodbye to the daunting task of hand washing dishes and embrace the ease of a countertop dishwasher. Upgrade your kitchen with this simple yet effective solution today.