To install a float switch, first, turn off the power supply. Then, attach the switch to the desired location using screws or adhesive.
Understanding The Float Switch
<h2>Understanding the Float Switch</h2>
<p>In any modern automation system, the float switch plays a crucial role. It provides a simple yet effective solution for controlling liquid levels in tanks, sumps, and various other applications. Understanding the float switch is essential before you can successfully install it. This blog post will guide you through the basics of a float switch, its importance, and the different types available in the market. So, let’s dive right in!</p>
<h3>What is a float switch?</h3>
<p>A float switch is a mechanical device designed to detect liquid levels and trigger specific actions based on those levels. It consists of a float, typically made of plastic or stainless steel, that moves up and down with the liquid’s level. The float is attached to a switch mechanism that activates or deactivates electrical circuits.</p>
<p>The float switch operates on a simple principle: when liquid levels rise or fall, the float moves accordingly. Once the float reaches a pre-set level, it triggers the switch to either turn on or off, completing or breaking the circuit. This mechanism is often employed in applications such as pump control, water tanks, HVAC systems, and wastewater treatment plants.</p>
<h3>Why do you need a float switch?</h3>
<p>Installing a float switch offers several advantages. For instance, it provides an efficient solution for maintaining liquid levels within a desired range, preventing overflow or running dry. Additionally, a float switch can automate processes, saving time and effort that would otherwise be required for manual monitoring and control.</p>
<p>By using a float switch, you can protect equipment from potential damage caused by low or high fluid levels. This is particularly important in industries where precise liquid management is critical, such as water and wastewater treatment plants, where overflow or underflow can lead to severe consequences. The float switch acts as an early warning system, preventing costly breakdowns and downtime.</p>
<h3>Different types of float switches</h3>
<p>Float switches come in various types to suit different applications and liquid mediums. Here are some common types of float switches you might encounter:</p>
<table>
<tr>
<th>Type</th>
<th>Description</th>
</tr>
<tr>
<td>Vertical Float Switch</td>
<td>This type of float switch is fixed vertically and moves up and down along a rod. It is commonly used in sump pumps, wells, and tanks with limited horizontal space.</td>
</tr>
<tr>
<td>Horizontal Float Switch</td>
<td>Unlike vertical float switches, these are installed horizontally. They are ideal for applications where space is limited.</td>
</tr>
<tr>
<td>Tethered Float Switch</td>
<td>Tethered float switches have a float connected to a tether or cable. They are suitable for shallow tanks or applications requiring a wider range of control.</td>
</tr>
<tr>
<td>Magnetic Float Switch</td>
<td>These float switches use a magnet instead of a mechanical switch. They are widely used in applications with corrosive liquids, as they do not have contact points that can wear out.</td>
</tr>
</table>
<p>Remember that the type of float switch you choose should be based on the specific needs of your application.</p>
<p>Now that we have covered the basics of understanding the float switch, it’s time to proceed with its installation. Stay tuned for our next blog post, where we will guide you through the step-by-step process of installing a float switch successfully.</p>
Preparing For Installation
Before you start installing a float switch, it is essential to prepare yourself by gathering the necessary tools and materials, choosing the right float switch for your application, and familiarizing yourself with the electrical wiring.
Gather the necessary tools and materials
Before you can begin installing a float switch, be sure to gather all the tools and materials you will need. This ensures a smooth installation process without any delays or interruptions. Here’s a list of the essential tools and materials you should have:
- Float switch
- Screwdriver set
- Pliers
- Wire cutters/strippers
- Electrical tape
- Wire connectors
- Electrical wires
- Drill (if mounting is required)
- Mounting brackets (if necessary)
Having all these tools and materials ready before you begin the installation process will save you time and effort.
Choose the right float switch for your application
When it comes to selecting a float switch for your specific application, it’s crucial to choose the right one that suits your needs. Float switches come in various types and configurations, such as vertical or horizontal mounting, pump or liquid level control, and different material construction like stainless steel or plastic. Consider the following factors when selecting the appropriate float switch:
- The type and size of the liquid you want to control.
- The desired mounting position (vertical or horizontal).
- The operating temperature and pressure range.
- The electrical requirements and compatibility.
- The environment in which the float switch will be installed (corrosive, hazardous, etc.).
By carefully evaluating these aspects, you can ensure that the float switch you choose will meet your specific needs and perform reliably in your application.
Familiarize yourself with the electrical wiring
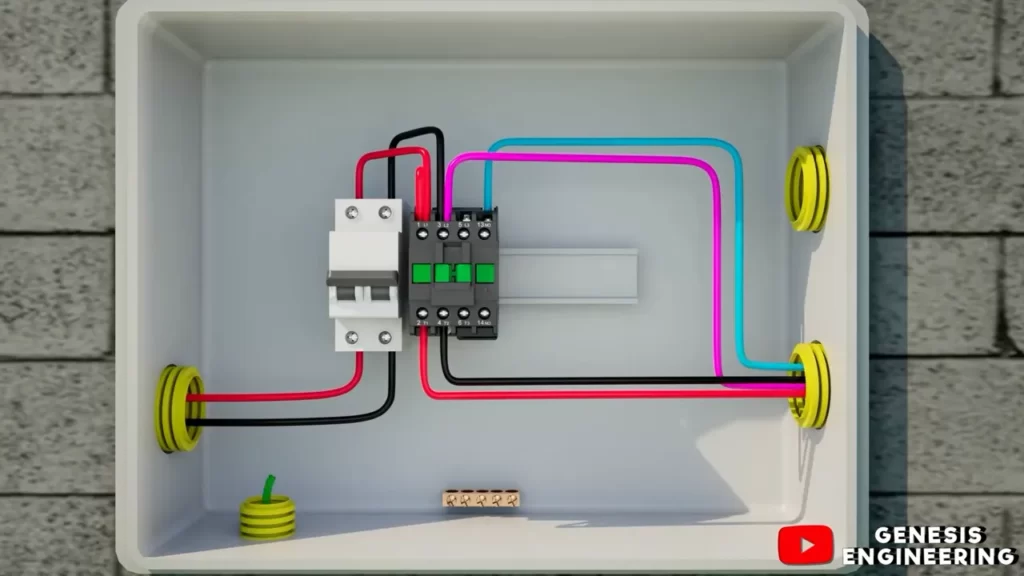
Prior to installing a float switch, it is essential to be familiar with the electrical wiring involved in the process. This will help ensure a safe and successful installation. Become knowledgeable about the wiring setup, including the main power supply, control panel, and any other associated components. Pay attention to color codes and labeling to ensure proper connections.
If you are uncertain about any aspect of the electrical wiring, consult a professional electrician or refer to the manufacturer’s instructions. Safety should always be a top priority when dealing with electrical work.
Step-By-Step Installation Process
Installing a float switch is a straightforward process that can help automate the control of liquid levels in tanks or other liquid-containing systems. Follow this step-by-step guide to ensure a successful installation:
Removing the old switch
Before installing a new float switch, you must first remove the old one. Start by turning off the power supply to the system to ensure your safety.
Turn off the power supply
Locate the power source and switch it off to avoid any electrical accidents during the installation process.
Disconnect the old switch from the electrical circuit
Once the power is off, disconnect the wiring connected to the old float switch from the electrical circuit. Ensure that the wires are properly stripped for a secure connection.
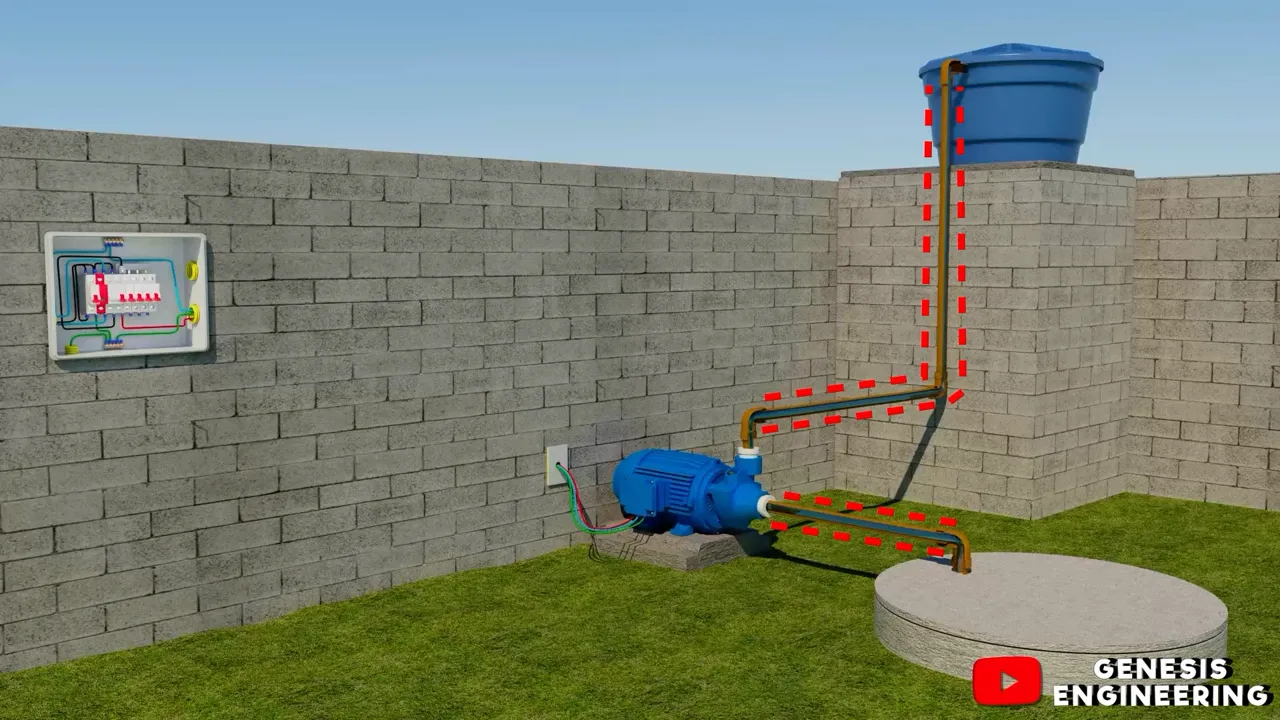
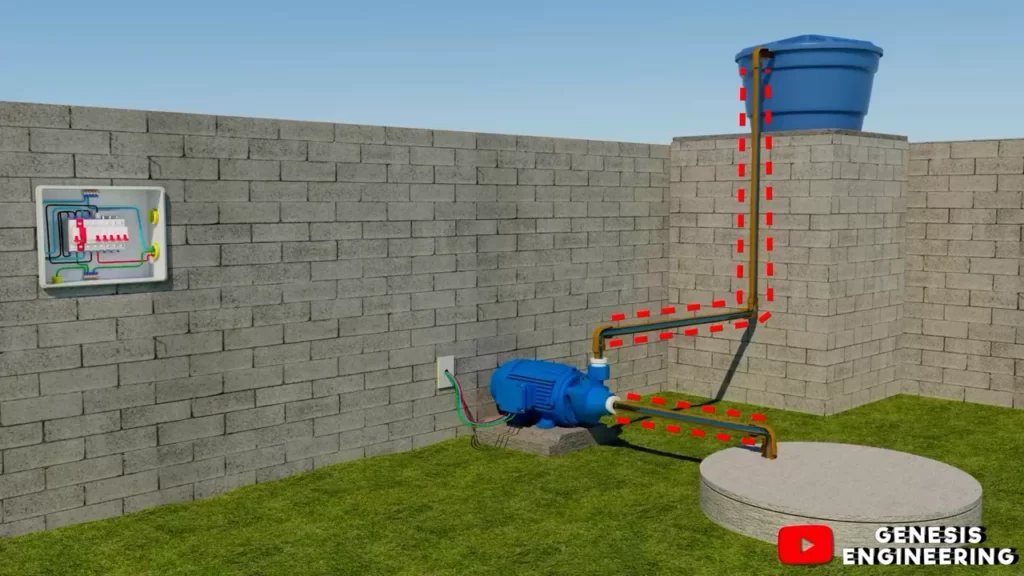
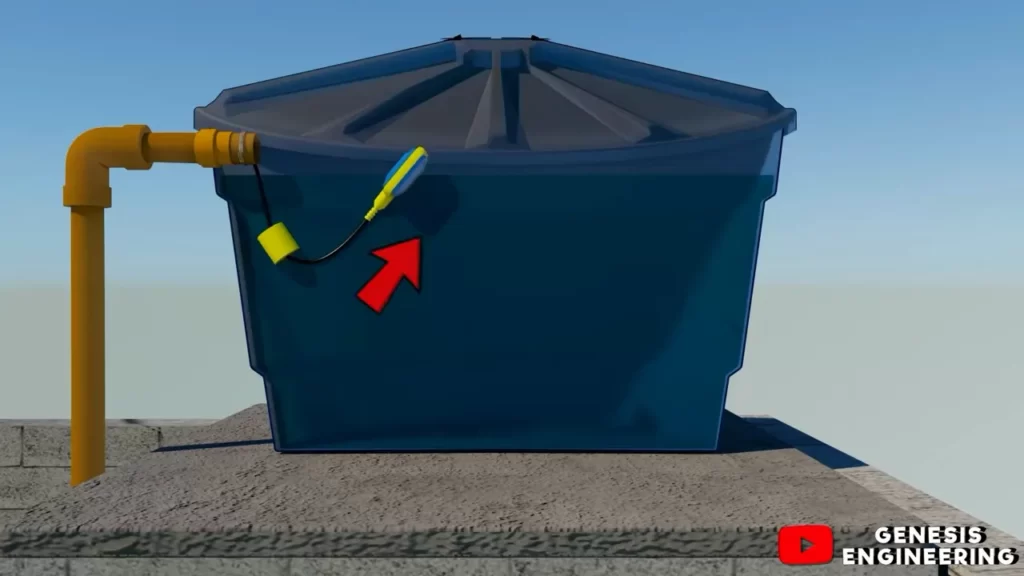
Mounting the float switch
Next, determine the ideal location for mounting your new float switch. It should be placed at a position where it can efficiently detect liquid levels. Once decided, secure the switch using screws or brackets, ensuring it is fixed firmly in place.
Connecting the wiring
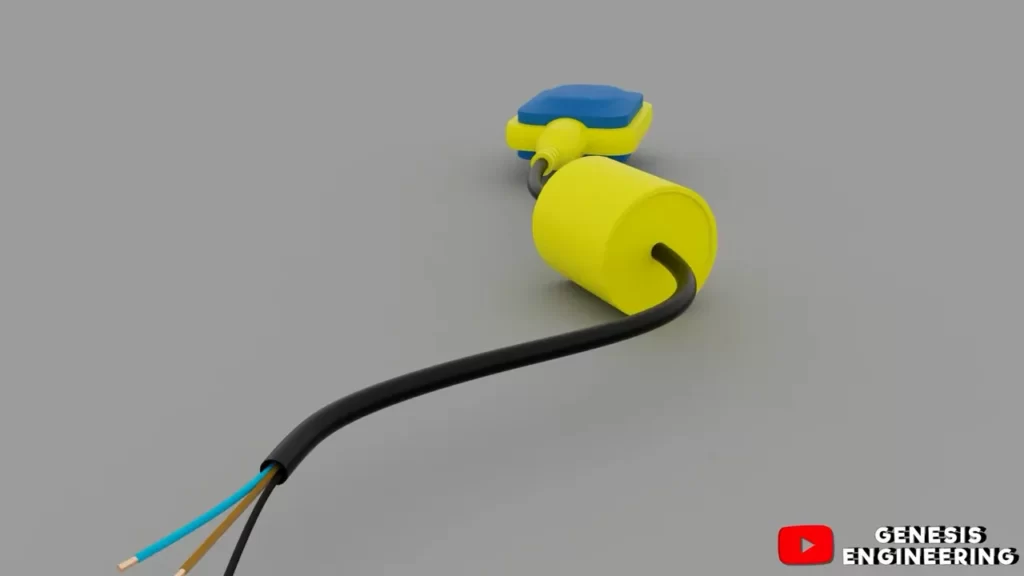
After mounting the float switch, move on to connecting the wiring. Strip the wires of both the float switch and the electrical circuit for a clean and secure connection.
Use wire connectors to join the wires securely
Using wire connectors, join the stripped ends of the wires from the float switch and the electrical circuit. Make sure the connections are tight and secure for proper functionality.
Testing and Adjusting
Once the connections are made, it’s time to test the float switch’s functionality.
Turn on the power supply
First, turn on the power supply to the system and ensure that there are no electrical malfunctions or safety concerns.
Test the float switch’s functionality
Observe the float switch in action and test its responsiveness by adding or removing liquid to trigger the switch. Ensure that it activates and deactivates as intended.
Adjust the switch settings if necessary
If you notice any issues or inconsistencies in the float switch’s performance, you may need to adjust the switch settings. Refer to the manufacturer’s instructions for specific guidelines on adjusting the switch to meet your requirements.
By following these step-by-step instructions, you can successfully install and set up a float switch to automate liquid level control in your system.
Troubleshooting Common Issues
Switch not working
If your float switch is not working properly, there are a few troubleshooting steps you can take to identify and resolve the issue. The first thing you should do is to check the power supply.
Check the power supply
Ensure that the power source connected to the float switch is functioning correctly. Check if the switch is receiving power by using a multimeter to measure voltage at the switch terminals. If there is no voltage, you may need to check the circuit breaker or fuse associated with the switch and reset or replace them accordingly.
Inspect the wiring connections
Another common issue that can cause the float switch to not work is faulty wiring connections. Inspect the wiring connections at the switch terminals to ensure they are securely connected. Loose or corroded connections can disrupt the electrical circuit and prevent the switch from functioning properly. If you find any loose connections, tighten them using a screwdriver or wire stripper and check if the switch is working.
Ensure proper float switch positioning
Improper positioning of the float switch can also be a cause of malfunction. Make sure that the float arm is free from any obstructions and can move freely. Verify that the float switch is installed at the correct height and angle, allowing the water level to activate the switch as intended. Adjust the positioning of the float switch if needed and retest it to see if the issue is resolved.
Faulty activation
If your float switch is activating too frequently or not activating at all, there are a few troubleshooting steps you can try. Firstly, evaluate the positioning of the float switch.
Evaluate the float switch positioning
Check if the float switch is positioned properly in the water or liquid being monitored. Sometimes, the switch may be positioned too high or too low, causing inaccurate activation. Adjust the positioning of the switch so that it activates when the desired water level is reached.
Adjust the switch sensitivity if needed
In some cases, the sensitivity of the float switch may need to be adjusted. Most float switches have a sensitivity adjustment screw or dial that allows you to customize the activation level. Refer to the manufacturer’s instructions to locate the sensitivity adjustment mechanism and make the necessary adjustments. Remember to test the switch after making any changes to ensure proper activation.
Water leakage
If you notice water leakage around the float switch, it can be a sign of improper installation or a faulty component. Follow these troubleshooting steps to resolve the issue.
Verify proper sealing of connections
Inspect the wiring connections and seals around the float switch to ensure there are no gaps or openings that could allow water to penetrate. Use waterproof sealant or electrical tape to seal any exposed wires or connections. This will help prevent water leakage and potential damage to the switch.
Ensure switch is installed correctly
Double-check the installation of the float switch to confirm it is done correctly. Ensure that the switch is securely mounted and that all connections are tight. Refer to the manufacturer’s instructions for the proper installation procedure and make any necessary adjustments or corrections. Test the switch after reinstallation to confirm that the issue has been resolved.
In conclusion, troubleshooting common issues with a float switch involves checking the power supply, inspecting wiring connections, ensuring proper float switch positioning, evaluating switch sensitivity, and verifying the sealing of connections. By following these steps, you can identify and resolve any problems with the float switch, ensuring it operates effectively and efficiently.
Additional Tips And Recommendations
Proper installation of a float switch is essential for efficient and reliable water level monitoring. However, there are a few additional tips and recommendations that can help ensure optimal performance and longevity of your float switch. Regular maintenance and cleaning, considering professional assistance if unsure, and compatibility with other devices and systems are key aspects to keep in mind.
Regular maintenance and cleaning
Maintaining your float switch on a regular basis is vital to prevent any malfunctions or false readings. Over time, debris and dirt can accumulate on the float switch, making it less responsive or causing it to get stuck. To avoid these issues, it is recommended to clean the float switch periodically.
Here are a few tips for regular maintenance and cleaning:
- Disconnect the power supply before performing any maintenance or cleaning tasks to ensure your safety.
- Inspect the float switch for any signs of damage, wear, or corrosion. Replace or repair any faulty components.
- Clean the float switch using a soft cloth or brush to remove any dust or debris. Avoid using harsh chemicals that could damage the switch.
- Check the wiring connections to ensure they are secure and free from any loose or damaged wires.
- Perform a test run after cleaning to verify the float switch’s proper functionality.
Consider professional assistance if unsure
If you are uncertain about how to install or troubleshoot a float switch, it is highly recommended to seek professional assistance. A qualified technician or plumber who specializes in float switch installations can ensure the job is done correctly, minimizing the risk of errors or complications.
Here are a few reasons why professional assistance may be advantageous:
- Expertise and experience: Professionals have the knowledge and skills to handle different types of float switches and complex installations.
- Time-saving: Hiring a professional can save you time and effort, especially if you are unfamiliar with float switch installations.
- Peace of mind: Knowing that a trained professional has installed or repaired your float switch can give you confidence in its proper functioning.
Compatibility with other devices and systems
When installing a float switch, it is important to consider its compatibility with other devices and systems in your setup. This ensures seamless integration and proper functioning of your overall water level monitoring system.
Here are a few factors to consider regarding compatibility:
| Device or System | Considerations |
|---|---|
| Control panel or alarm system | Ensure that the float switch is compatible with the control panel or alarm system you are using, and that it can send accurate signals for effective monitoring. |
| Pumps or valves | Verify that the float switch can control the operation of the pumps or valves in your water system, as per your requirements. |
| Power supply | Consider the power supply requirements and voltage compatibility of your float switch to prevent any electrical issues. |
By ensuring compatibility with other devices and systems, you can avoid any potential conflicts that could affect the performance or reliability of your float switch.
Remember, regular maintenance, professional assistance if needed, and compatibility with other devices and systems play crucial roles in maximizing the efficiency and accuracy of your float switch installation. Following these tips and recommendations will help you make the most of your water level monitoring system while also ensuring the safety of your property and valuables.
Frequently Asked Questions
How Are Float Switches Wired?
Float switches are wired by connecting the switch to a power source and a pump. The switch closes the circuit when the water level reaches a specific point, activating the pump to turn on and pump water out.
How Do You Connect A Float Switch To A Sump Pump?
To connect a float switch to a sump pump, first, locate the pump’s electrical supply line. Then, connect the switch’s wires to the power wires of the pump. Make sure to follow the switch manufacturer’s instructions for proper wiring. Finally, test the switch to ensure it activates the pump when the water level rises.
Should Float Switch Be Up Or Down?
The float switch should be positioned in the downward direction.
Why Is The Float Switch Not Working On My Water Tank?
The float switch may not be working on your water tank due to electrical issues or a malfunction in the switch mechanism. Check the wiring for any damages or loose connections. If the wiring is fine, the switch may need to be replaced.
Conclusion
Installing a float switch can provide an effective solution for controlling water levels in various applications. By carefully following the step-by-step instructions outlined in this guide, you can ensure a successful installation process. Whether you are a novice or an experienced DIYer, installing a float switch is a straightforward task that can enhance the efficiency and reliability of your water systems.
Enjoy the peace of mind that comes with knowing your water levels are being monitored and controlled accurately.