To install Sharkbite fittings on Pex, follow these steps for a secure and reliable connection. Sharkbite fittings can be easily installed on Pex tubing without the need for any special tools or soldering.
With their push-to-connect design, simply push the fitting onto the tubing until it clicks into place to create a watertight seal. The fittings can be easily removed and reused if needed. By following the manufacturer’s instructions, you can quickly and efficiently install Sharkbite fittings on Pex for a hassle-free plumbing job.
Understanding The Basics Of Pex And Sharkbite Fittings
When it comes to installing or repairing plumbing systems, having the right fittings is crucial. One popular option for plumbing applications is Pex, which stands for cross-linked polyethylene. Pex tubing is flexible, durable, and resistant to corrosion, making it an ideal choice for both residential and commercial plumbing projects.
However, installing Pex tubing can be challenging without the right fittings. That’s where Sharkbite fittings come in. Sharkbite fittings are innovative push-to-connect fittings that make Pex installation a breeze. Whether you’re a professional plumber or a DIY enthusiast, understanding the basics of Pex and Sharkbite fittings is essential to ensure a successful installation.
What is Pex?
Pex is a type of plastic tubing that is commonly used in plumbing applications. It is made of cross-linked polyethylene, which enhances its strength and durability. Pex tubing is an excellent alternative to traditional copper and PVC pipes as it is resistant to freeze damage, corrosion, and scaling.
One of the key advantages of Pex tubing is its flexibility, which allows for easier installation and fewer connections. This flexibility also makes it ideal for retrofitting existing plumbing systems. Pex tubing is available in different sizes, colors, and types, including Pex-A, Pex-B, and Pex-C, each with its own benefits and specific applications.
Introduction to Sharkbite Fittings
Sharkbite fittings are a game-changer in the plumbing industry. These fittings feature a unique design that allows for quick and secure connections without the need for special tools or soldering. With Sharkbite fittings, you can join Pex tubing to Pex, copper, CPVC, or PE-RT pipes effortlessly.
Sharkbite fittings use a push-to-connect technology, meaning you simply need to push the tubing into the fitting until it clicks into place. The fitting’s teeth and O-ring create a watertight seal, ensuring a leak-free connection. If you need to make changes or remove the fitting, Sharkbite fittings feature a simple disconnect mechanism, allowing for easy disassembly.
Why Choose Sharkbite Fittings for Pex?
There are several reasons why Sharkbite fittings are an excellent choice for Pex installations. Firstly, their ease of use makes them ideal for both professional plumbers and DIY enthusiasts. With Sharkbite fittings, you can save time and effort, as there’s no need for complex pipe preparation or specialized tools.
Secondly, Sharkbite fittings provide a reliable connection. The push-to-connect technology ensures a secure joint that is resistant to leaks and pull-out forces. This reliability makes Sharkbite fittings suitable for various plumbing applications, including hot and cold water distribution, hydronic heating systems, and even underground installations.
Lastly, Sharkbite fittings offer versatility. They can be installed in tight spaces, around corners, and in hard-to-reach areas, thanks to their compact design. This flexibility allows for more efficient installations, even in challenging plumbing projects.
In conclusion, understanding the basics of Pex and Sharkbite fittings is essential for successful plumbing installations. Pex tubing provides a durable and flexible option for plumbing systems, while Sharkbite fittings offer quick and reliable connections. By choosing Sharkbite fittings for your Pex installations, you can save time, effort, and ensure a watertight and dependable connection.

Tools And Materials Needed For Installation
Installing Sharkbite fittings on Pex is a straightforward process that can significantly simplify plumbing projects. However, before you begin, it’s important to gather the essential tools and materials needed for a successful installation. By having everything prepared in advance, you can streamline the process and ensure a professional outcome.
Essential Tools for Installing Sharkbite Fittings on Pex
When it comes to installing Sharkbite fittings on Pex, having the right tools is crucial to a smooth installation experience. The following tools should be in your toolbox for a seamless installation:
- Pipe Cutter: A pipe cutter allows you to easily and accurately trim the Pex pipe to the desired length.
- Deburring Tool: After cutting the Pex pipe, use a deburring tool to remove any rough edges or burrs that may affect the seal of the Sharkbite fitting.
- Adjustable Wrench: An adjustable wrench is essential for tightening and securing the Sharkbite fittings onto the Pex pipe.
- Measuring Tape: Accurate measurements are key to a successful installation. A measuring tape ensures you cut the Pex pipe to the correct length for a precise fit.
- Marker: Use a marker to mark the desired length on the Pex pipe before cutting.
- Tube Cutter: If you’re working with smaller diameter Pex pipe, a tube cutter provides precise cuts without crushing or deforming the pipe.
Required Materials for a Successful Installation
In addition to the necessary tools, you’ll also need the following materials for a successful Sharkbite fitting installation:
- Sharkbite Fittings: These fittings are specifically designed for Pex pipes and provide a reliable and secure connection.
- Pex Pipes: Choose the appropriate size and length of Pex pipe for your project. Make sure to measure accurately to avoid any wastage.
- Pex Crimp Rings: If your installation requires crimping, ensure you have the correct size and quantity of Pex crimp rings to secure the fittings onto the pipes.
- Teflon Tape: For threaded connections, applying Teflon tape ensures a watertight seal and prevents leaks.
- Pipe Support: Depending on the installation, you may need pipe supports to secure the Pex pipes in place and prevent sagging or movement.
- Sealant: A suitable sealant is essential for ensuring leak-free connections.
By having the essential tools and necessary materials on hand, you’re ready to begin your Sharkbite fitting installation on Pex pipes. Remember to follow the manufacturer’s instructions and take necessary safety precautions throughout the process. With the right tools and materials, you can successfully complete your plumbing project hassle-free.
Step 1: Preparing The Pex Pipe And Sharkbite Fittings
Before you can begin installing Sharkbite fittings on Pex pipe, it’s important to properly prepare both the pipe and fittings. This step is crucial to ensure a secure and leak-free connection for your plumbing project. In this article, we will guide you through the process with three essential steps: measuring and cutting the Pex pipe, deburring the cut ends of the Pex pipe, and selecting the correct Sharkbite fittings for the job.
Measuring and Cutting the Pex Pipe
The first step in preparing the Pex pipe is to measure and cut it to the desired length. Accurate measurements are essential to ensure a proper fit and avoid any unnecessary bends or kinks in the pipe. Follow these steps:
- Use a tape measure or ruler to measure the length needed for your plumbing project.
- Mark the measured length on the Pex pipe with a permanent marker.
- Using a Pex pipe cutter or a fine-toothed hacksaw, carefully cut the pipe at the marked location.
- Ensure the cut is clean and straight to ensure a proper connection with the Sharkbite fitting.
Deburring the Cut Ends of the Pex Pipe
After cutting the Pex pipe, it’s essential to remove any sharp edges or burrs from the cut ends. This step will prevent any damage to the O-ring inside the Sharkbite fitting and ensure a tight and reliable connection. Follow these steps to deburr the cut ends:
- Using a deburring tool specifically designed for Pex pipe, carefully remove any burrs or rough edges from the cut ends.
- Rotate the deburring tool around the inside and outside edges of the cut until the surface is smooth and free from imperfections.
- Once deburred, use a clean cloth to wipe away any debris or particles that may have accumulated during the process.
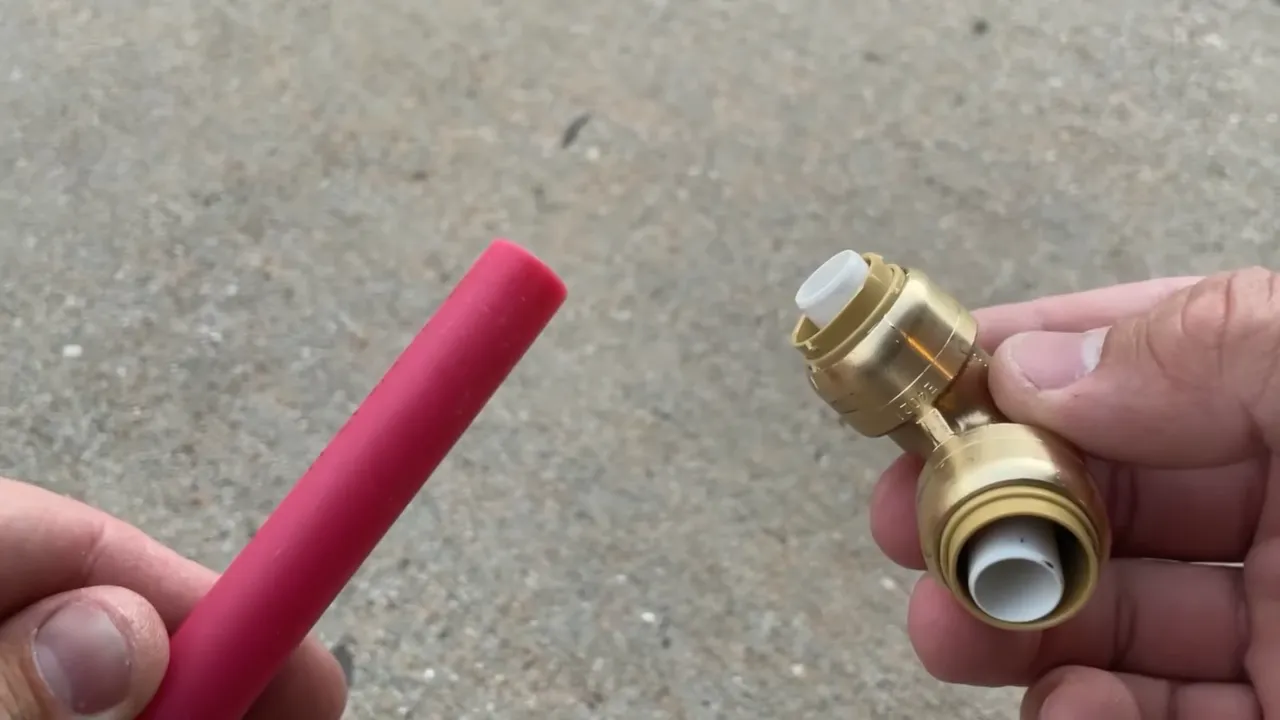
Selecting the Correct Sharkbite Fittings for the Job
Choosing the right Sharkbite fittings for your specific plumbing project is crucial to achieve a secure and watertight connection. Follow these steps to ensure you select the correct fittings:
- Identify the type and size of the Pex pipe you’re using. Common sizes include 1/2 inch, 3/4 inch, and 1 inch.
- Consider the specific needs of your project, such as straight connectors, elbow connectors, tee connectors, or valve connectors.
- Take into account any additional components or accessories you may need, such as pressure gauges or shut-off valves.
- Consult the Sharkbite fitting compatibility chart or seek professional advice if you’re unsure about the right fittings for your project.
By following these three essential steps – measuring and cutting the Pex pipe, deburring the cut ends, and selecting the correct Sharkbite fittings – you’ll be well-prepared to continue with the installation process. Stay tuned for step 2 of our guide, where we will walk you through the process of connecting the Sharkbite fittings to the Pex pipe for a reliable and efficient plumbing system.
Step 2: Installing Sharkbite Fittings Onto The Pex Pipe
Installing Sharkbite fittings onto the Pex pipe is a straightforward process that can be completed by anyone with a few basic tools and some patience. In this step-by-step guide, we will walk you through the entire process, starting with inserting the Pex pipe into the Sharkbite fitting, followed by ensuring a proper connection with the depth gauge, and finally, we will show you how to use disconnect clips for easy removal.
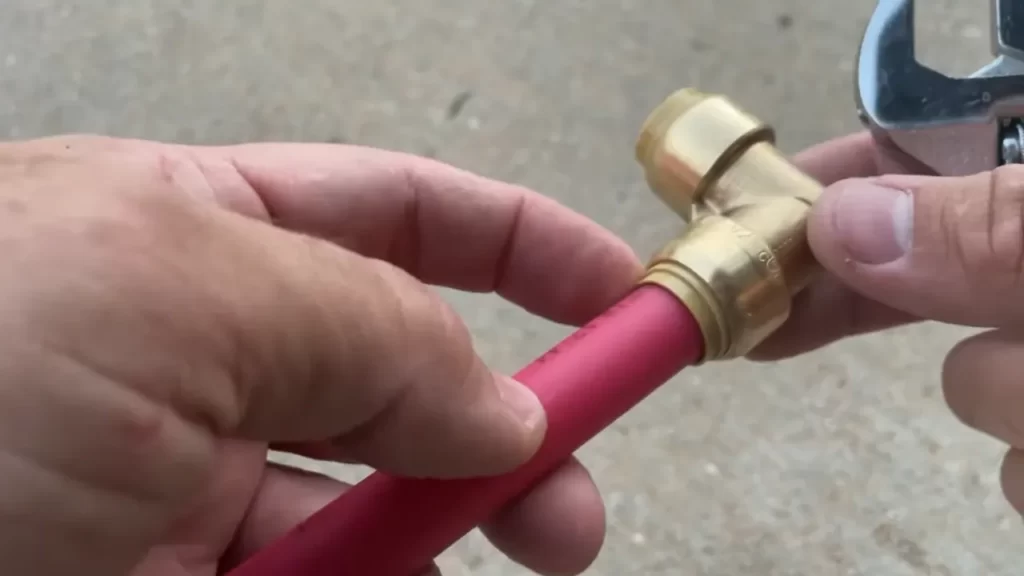
Inserting the Pex Pipe into the Sharkbite Fitting
Inserting the Pex pipe into the Sharkbite fitting requires a few simple steps:
- Measure and cut the Pex pipe to the desired length using a Pex pipe cutter.
- Ensure that the cut end of the Pex pipe is clean and free from any debris or burrs that may interfere with the fitting.
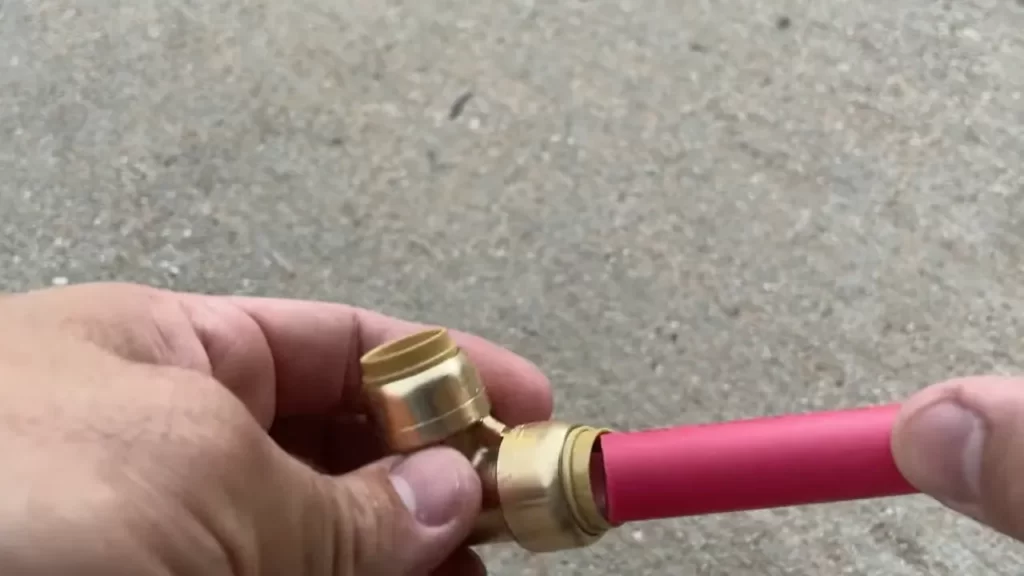
- Push the Sharkbite fitting onto the end of the Pex pipe until it reaches the shoulder of the fitting.
- Make sure the fitting is properly aligned and seated flush against the pipe.
This process ensures a secure and leak-free connection between the Pex pipe and the Sharkbite fitting.
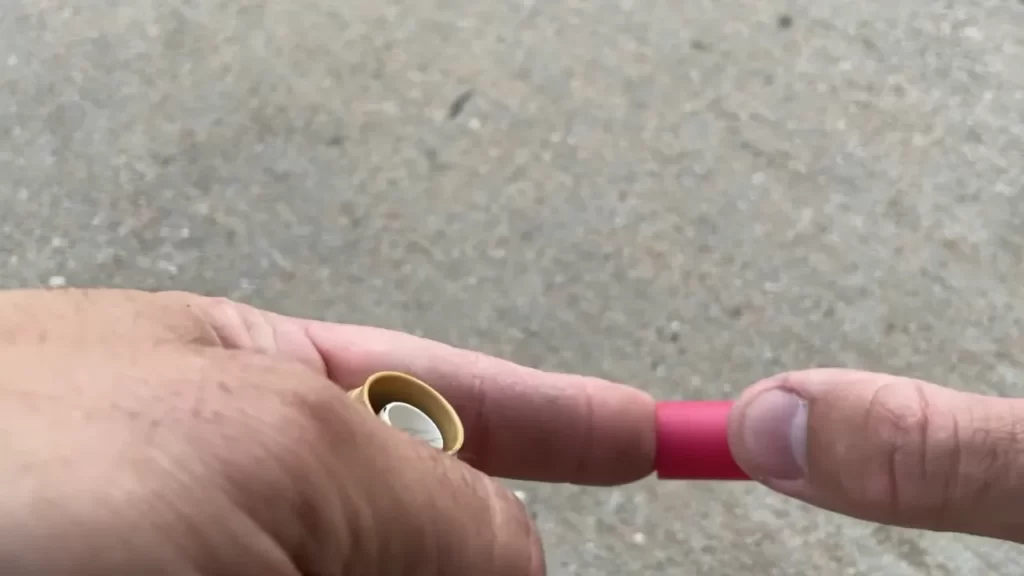
Ensuring a Proper Connection with the Depth Gauge
After inserting the Pex pipe into the Sharkbite fitting, it is important to ensure a proper connection by using a depth gauge. Here’s how to do it:
- Place the depth gauge alongside the Sharkbite fitting, aligning the edge of the gauge with the shoulder of the fitting.
- Verify that the pipe is fully inserted into the fitting by checking that the end of the pipe lines up with the appropriate mark on the depth gauge.
- If the pipe does not reach the correct mark on the depth gauge, remove the fitting and make sure that the pipe end is clean and free from any obstructions.
- Repeat the process of inserting the pipe into the fitting, verifying the depth with the gauge until the proper connection is achieved.
This step is crucial for ensuring a secure and reliable connection between the Pex pipe and the Sharkbite fitting.
How to Use Disconnect Clips for Easy Removal
Installing Sharkbite fittings on Pex pipes offers the advantage of easy removal if necessary. Here’s how to use disconnect clips for a hassle-free removal:
- Slide the disconnect clip over the Sharkbite fitting, aligning it with the release collar.
- Push the clip firmly against the release collar.
- While continuing to apply pressure with the clip, pull the Pex pipe out of the Sharkbite fitting.
The disconnect clip makes it quick and easy to remove the Pex pipe from the Sharkbite fitting without causing any damage to either component.
By following these steps and utilizing the disconnect clips when needed, you can confidently install Sharkbite fittings onto your Pex pipes, ensuring a strong, leak-free connection that will stand the test of time.
Step 3: Testing And Inspecting The Installation
Step 3: Testing and Inspecting the Installation
Conducting a Pressure Test to Ensure Leak-Free Connections
After completing the installation of Sharkbite fittings on Pex, it is essential to conduct a pressure test to ensure that all connections are leak-free. This step is crucial as a small leak can lead to significant water damage over time. To perform the test, follow these steps:
- Close all the water supply valves connected to the Pex system.
- Attach a pressure gauge to one of the Sharkbite fitting connections.
- Slowly open the water supply valves and allow the pressure to build up.
- Observe the pressure gauge and make sure it remains steady. If there is a drop in pressure, it indicates a potential leak.
- If a leak is detected, take note of the specific connection and disassemble it to check for any issues. Make sure to rectify the problem before reassembling and retesting the connection.
By conducting a pressure test, you can have peace of mind knowing that your Sharkbite fittings are providing a secure and leak-free connection.
Checking for Proper Alignment and Firm Grip of Sharkbite Fittings
Another important aspect of installing Sharkbite fittings on Pex is ensuring proper alignment and a firm grip between the fittings and the Pex pipe. This step helps to prevent leaks and maintain the integrity of the installation. Follow these steps to check for alignment and firm grip:
- Visually inspect each Sharkbite fitting connection. Ensure that the Pex pipe is fully inserted into the fitting, up to the depth mark provided on the fitting.
- Gently pull on the Pex pipe to test its grip. It should not easily come loose from the fitting.
- Repeat the process for all the connections in the installation.
Proper alignment and a firm grip are crucial as they enhance the reliability and longevity of the Sharkbite fittings.
Inspecting for Any Defects or Irregularities in the Installation
Before finalizing the installation of Sharkbite fittings on Pex, it is essential to thoroughly inspect for any defects or irregularities. This step ensures a safe and efficient plumbing system. Here are some key points to consider during the inspection:
- Look for any visible leaks, discoloration, or unusual markings around the fittings.
- Check the overall appearance of the installation, ensuring that all fittings are securely attached and aligned correctly.
- Ensure that there are no sharp edges or burrs on the fittings or Pex pipe.
By meticulously inspecting the installation for defects or irregularities, you can address any potential issues before they become significant problems.
Common Installation Mistakes And How To Avoid Them
When it comes to installing Sharkbite fittings on Pex pipes, a few common mistakes can hinder the process and compromise the integrity of your connections. Understanding these mistakes and knowing how to avoid them is crucial in ensuring a successful installation. In this section, we will discuss three of the most common installation mistakes and provide you with practical tips to avoid them.
Over-insertion or Under-insertion of the Pex Pipe
One common mistake that people make when installing Sharkbite fittings on Pex pipes is either over-inserting or under-inserting the pipe. Both of these scenarios can lead to leaky connections and potential water damage. To avoid this mistake, follow these simple steps:
- Ensure that the end of the Pex pipe is cut cleanly and squarely.
- Remove any sharp edges or burrs from the pipe.
- Insert the pipe into the Sharkbite fitting until it reaches the depth mark on the fitting.
- Check that the pipe is fully inserted by pulling on it gently. If it doesn’t come out, then it is properly inserted.
By following these steps, you can avoid both over-insertion and under-insertion, ensuring a snug and secure connection.
Dealing with Misaligned or Leaky Connections
Another common issue that people encounter during the installation of Sharkbite fittings is misaligned or leaky connections. This can happen if the fittings are not properly aligned before insertion. To avoid this problem, follow these steps:
- Ensure that the Sharkbite fitting and the Pex pipe are clean and free from debris.
- Align the fitting and the pipe carefully, making sure they are straight and properly seated.
- Push the fitting onto the pipe with a firm, even pressure until it reaches the depth mark.
- Check for leaks by turning on the water supply and inspecting the connection. If there are any leaks, follow the troubleshooting steps provided by Sharkbite.
By taking the time to align your fittings correctly, you can avoid misaligned or leaky connections that could lead to costly repairs and potential water damage.
What to Do If a Sharkbite Fitting Gets Stuck on the Pex Pipe
Occasionally, a Sharkbite fitting may get stuck on the Pex pipe, causing frustration and potentially damaging the pipe. If this happens, here are the steps you should take to resolve the issue:
- First, try twisting the fitting back and forth while gently pulling it away from the pipe.
- If that doesn’t work, use a pair of adjustable pliers to grip the fitting’s release collar and rotate it counterclockwise.
- Apply slight pulling pressure while continuing to rotate the fitting until it releases from the pipe.
- If all else fails, you can use the Sharkbite Disconnect Clip to release the fitting.
Remember, it’s important to be patient and gentle when dealing with a stuck fitting to avoid damaging the pipe.
In conclusion, by being mindful of the common installation mistakes discussed in this section and following the tips provided, you can ensure a successful installation of Sharkbite fittings on Pex pipes. Avoid over-insertion or under-insertion, properly align your connections, and know how to deal with a stuck fitting if it occurs. By doing so, you will save time, money, and headaches in the long run.
Additional Tips For A Successful Installation
Installing Sharkbite fittings on Pex pipe can be a straightforward process if you follow the proper steps. However, there are some additional tips that can help ensure a successful installation and guarantee long-lasting performance. In this section, we will discuss three essential aspects: properly supporting the Pex pipe and Sharkbite fittings, using Teflon tape or pipe compound for threaded connections, and understanding the temperature and pressure limits of Sharkbite fittings.
Properly Supporting the Pex Pipe and Sharkbite Fittings
Supporting the Pex pipe and Sharkbite fittings is crucial to prevent any unwanted stress or strain on the connections. When installing the fittings, make sure to support the pipe properly, especially at joints and bends. This will help maintain alignment and reduce the risk of leaks or damage over time. Additionally, consider using pipe hangers or supports to keep the pipe in place and avoid unnecessary movement.
Using Teflon Tape or Pipe Compound for Threaded Connections
For threaded connections, such as those between Sharkbite fittings and other plumbing components, using Teflon tape or pipe compound is essential. These substances create a watertight seal and help prevent any leaks. Before applying Teflon tape or pipe compound, ensure that the threads are clean and free from debris. Apply the tape or compound in a clockwise direction, making three to five wraps around the threads. This will provide a secure seal and ensure a leak-free connection.
Understanding the Temperature and Pressure Limits of Sharkbite Fittings
Before installing Sharkbite fittings, it is crucial to understand their temperature and pressure limits. These limits vary depending on the specific type of fitting you are using. Exceeding these limits can result in compromised performance and potential leaks. To ensure a successful installation, always refer to the manufacturer’s specifications and guidelines. Familiarize yourself with the maximum temperature and pressure ratings of the fittings, and ensure that they align with your specific plumbing system requirements.
Frequently Asked Questions
Can Sharkbite Fittings Be Used On Pex Pipe?
Yes, SharkBite fittings can be used on PEX pipe. They are designed to easily connect to PEX pipes without the need for special tools or soldering.
Do You Need The Plastic Insert For Sharkbite Fittings For Pex?
Yes, you need the plastic insert for SharkBite fittings when using PEX. The plastic insert ensures a secure and leak-free connection with the PEX tubing.
How Far Do Sharkbite Fittings Push On?
SharkBite fittings push on up to 2 inches, securing pipes without the need for soldering or glue. These fittings ensure a secure, leak-free connection and are easy to install. Simply push the fitting onto the pipe until it locks in place for a dependable and efficient plumbing solution.
Do Shark Bites Work On Pex A Or Pex B?
Shark bites work on both PEX A and PEX B.
Conclusion
Sharkbite fittings offer a convenient and efficient solution for installing Pex pipes. With their push-to-connect design, these fittings make the installation process easier and quicker. By following the step-by-step guide mentioned in this blog post, you can confidently install Sharkbite fittings on Pex without any professional help.
Whether you are a DIY enthusiast or a professional plumber, using Sharkbite fittings will ensure a reliable and leak-free connection. Upgrade your plumbing system today and experience the convenience of Sharkbite fittings.