To install Pex pipe to copper, use a push fitting or compression fitting for a secure connection. The process involves inserting the Pex pipe into the fitting and tightening it.
The combination of Pex pipe and copper provides a durable and flexible plumbing solution. Now let’s explore the steps involved in installing Pex pipe to copper and how to ensure a leak-free connection. Enjoy a streamlined installation process and reliable plumbing system.
Benefits Of Using Pex Pipe And Copper Connections
When it comes to plumbing systems, choosing the right materials is crucial. Pex pipe and copper connections offer several benefits over traditional plumbing materials like PVC or galvanized steel. In this section, we will explore the benefits of using Pex pipe and copper connections for your plumbing needs.
Higher durability and resistance to corrosion
Pex pipe and copper connections are known for their exceptional durability and resistance to corrosion. Unlike PVC or galvanized steel, which can deteriorate over time, Pex pipe and copper connections can withstand the test of time, ensuring a long-lasting plumbing system.
Versatility for both hot and cold water systems
One of the major advantages of using Pex pipe and copper connections is their versatility. They can be used for both hot and cold water systems, making them suitable for a wide range of applications. Whether you need to install a new plumbing system or replace old pipes, Pex pipe and copper connections can accommodate your requirements.
Easy installation process
Another significant benefit of using Pex pipe and copper connections is the ease of installation. The installation process for Pex pipe involves fewer steps and requires less expertise compared to other materials. Additionally, the flexibility of Pex pipe allows for easy maneuverability around obstacles, making installation in tight spaces a breeze.
When it comes to connecting Pex pipe to copper, you can utilize various methods. The most common method is using a Pex-to-copper compression fitting, which ensures a secure and leak-free connection. These fittings are easy to install and require minimal tools. Alternatively, you can also use Pex-to-copper push-fit connectors, which provide a quick and hassle-free connection without the need for any special tools or soldering.
In conclusion, the benefits of using Pex pipe and copper connections are numerous. From their higher durability and resistance to corrosion to their versatility for both hot and cold water systems, Pex pipe and copper connections offer a reliable and efficient plumbing solution. The easy installation process further adds to their appeal, making them a top choice for homeowners and professionals alike.

Tools And Materials Required For Installation
When it comes to installing PEX pipe to copper, it’s important to have the right tools and materials on hand to ensure a smooth and successful installation. Whether you’re a seasoned DIY-er or a professional plumber, having the correct tools will make the job much easier and save you time and frustration. Below is a list of the essential tools and materials you’ll need for the installation.
Pex pipe cutter
A PEX pipe cutter is an essential tool for trimming PEX tubing to the desired length. It ensures clean cuts, minimizing the risk of leaks and ensuring a secure connection. When selecting a PEX pipe cutter, look for one that can accommodate the diameter of the PEX pipe you are working with.
Crimping tool
A crimping tool is used to create a tight and secure connection between PEX pipe and copper fittings. It provides the necessary pressure to compress the copper crimp ring or stainless steel cinch ring onto the PEX pipe, creating a leak-free joint. Make sure to choose a crimping tool that matches the size of the crimp ring you plan to use.
Copper crimp rings or stainless steel cinch rings
The copper crimp rings or stainless steel cinch rings are crucial components of the PEX pipe to copper connection. These rings are securely attached to the PEX pipe using the crimping tool, holding it in place and preventing any water leakage.
Deburring tool
A deburring tool is used to remove any burrs or rough edges from the cut end of the PEX pipe. This ensures a smooth and even surface for proper connection. It’s important to deburr the pipe before inserting it into fittings to prevent any damage to the O-rings and ensure a watertight seal.
Compression fittings
Compression fittings provide a secure connection between PEX pipe and copper fittings without the need for crimp rings. These fittings have a brass body with a compression nut and a ferrule that creates a tight seal when tightened properly. They are a great option when working with soft PEX tubing or in situations where using a crimping tool is not feasible.
Copper fittings
Copper fittings are used to connect PEX pipe to fixtures, valves, and other copper pipes. They come in various shapes and sizes to accommodate different plumbing needs. Copper fittings are known for their durability and longevity, making them a popular choice in plumbing installations.
Teflon tape
Teflon tape, also known as plumber’s tape, is used to create a watertight seal on threaded connections. It is wrapped around the male threads of the copper fittings before screwing them into the female threads of other components. This helps prevent leaks and ensures a tight connection.
Adjustable wrench
An adjustable wrench is a versatile tool that can be used to tighten and loosen various plumbing connections, including compression fittings and threaded connections. It allows you to adjust the jaw size to fit different sizes of nuts and bolts, making it an essential tool for any plumbing project.
Measuring tape
A measuring tape is essential for accurately measuring PEX tubing and ensuring precise cuts. It helps you determine the correct length of tubing needed for each installation, minimizing waste and ensuring efficient use of materials.
Step 1: Prepare The Work Area
Before you can begin installing Pex pipe to copper, it’s important to properly prepare the work area. This ensures a smooth and successful installation process. There are three key steps to follow…
Shut off the water supply
The first step is to shut off the water supply to the area where you will be working. This prevents any accidental leaks or water damage during the installation process. Locate the main water valve and turn it off, ensuring that the water is completely shut off before proceeding.
Drain the pipes
Once the water supply is shut off, it’s essential to drain the pipes to relieve any remaining pressure. This can be done by opening faucets and releasing any water in the system. Be sure to open both hot and cold water faucets to fully drain the pipes.
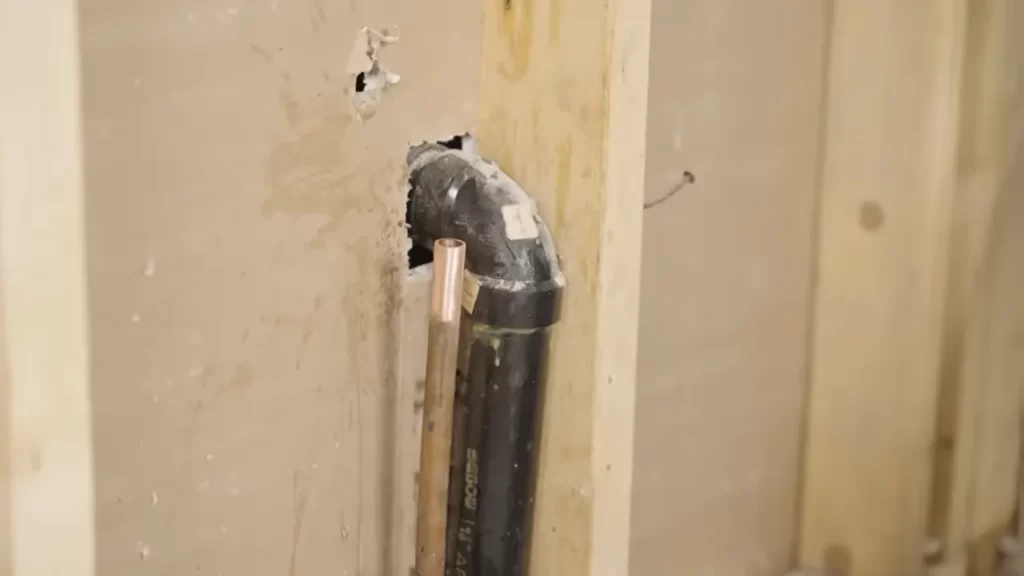
Remove any existing fittings and connections
Next, it’s important to remove any existing fittings and connections to prepare for the Pex pipe installation. Using appropriate tools, carefully loosen and disconnect the fittings from the copper pipes. Ensure that each connection is completely detached before moving on to the next one. Removing these fittings will provide a clean slate for installing the Pex pipe.
By following these three steps, you will have successfully prepared the work area for installing Pex pipe to copper. This will set the foundation for a seamless and efficient installation process, ensuring a reliable and durable water supply system for your needs.
Step 2: Measure And Cut The Pex Pipe
Once you have properly planned the layout and secured the necessary fittings, it is time to measure and cut the Pex pipe. This step is crucial to ensure a tight and leak-free connection between the Pex pipe and the copper fittings.
Measure the required length of the Pex pipe
The first thing you need to do is accurately measure the length of Pex pipe required for your installation. This can be easily done using a measuring tape or a ruler.
It’s important to measure carefully and double-check your measurements before making any cuts. Remember, it’s better to have a slightly longer pipe that can be trimmed later, rather than cutting it too short and having to start all over again.
Use a Pex pipe cutter to make clean cuts
Once you have determined the correct length, it’s time to make the cuts. To ensure clean and precise cuts, it is recommended to use a Pex pipe cutter. This specialized tool is designed to provide smooth and straight cuts every time.
Simply place the pipe inside the cutter, close the jaws, and rotate the cutter around the pipe. Apply consistent pressure to achieve a clean cut.
Remember to remove any burrs or rough edges after making the cuts. This can be done by using either a utility knife or a deburring tool. Smooth edges will guarantee a proper fit and minimize the risk of leaks.
Ensure each H3 heading adheres to HTML syntax
When formatting your blog content for WordPress, it is essential to adhere to HTML syntax conventions. To ensure each H3 heading is displayed correctly, use the following HTML code:
   <h3>Measure the required length of the Pex pipe</h3>
   <h3>Use a Pex pipe cutter to make clean cuts</h3>
By following these steps and using the correct tools, you can confidently measure and cut the Pex pipe for your installation. Remember to double-check your measurements and make clean cuts, and soon you’ll be well on your way to connecting Pex pipe to copper fittings like a pro!
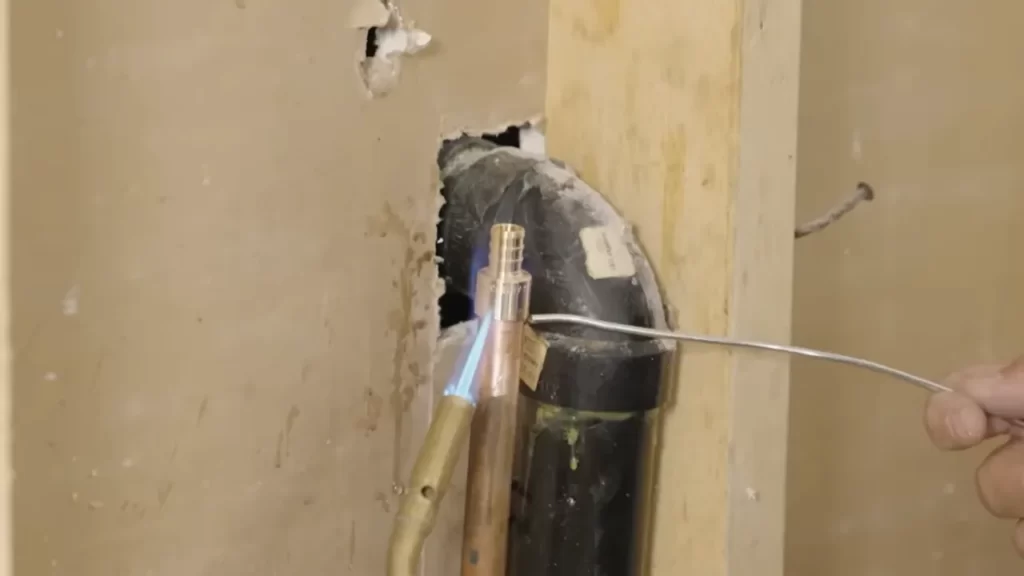
Step 3: Prepare The Copper Pipe
Clean the end of the copper pipe with a pipe cleaner or sandpaper
Before you can connect the Pex pipe to the copper pipe, it’s essential to clean the end of the copper pipe thoroughly. This step ensures a tight and secure connection between the two materials. You have two options for cleaning the copper pipe: using a pipe cleaner or sandpaper.
To clean the pipe using a pipe cleaner, follow these simple steps:
- Wrap the pipe cleaner around the end of the copper pipe.
- Hold the pipe cleaner firmly and rotate it in a circular motion.
- Continue rotating until you have cleaned the entire circumference of the pipe.
If you prefer to use sandpaper, here’s how you can clean the copper pipe:
- Take a piece of fine-grit sandpaper.
- Hold the sandpaper against the end of the copper pipe.
- Rotate the sandpaper around the pipe in a circular motion.
- Apply gentle pressure while sanding to remove any dirt, debris, or oxidation.
Once you have cleaned the end of the copper pipe, it’s time to move on to the next step: applying flux.
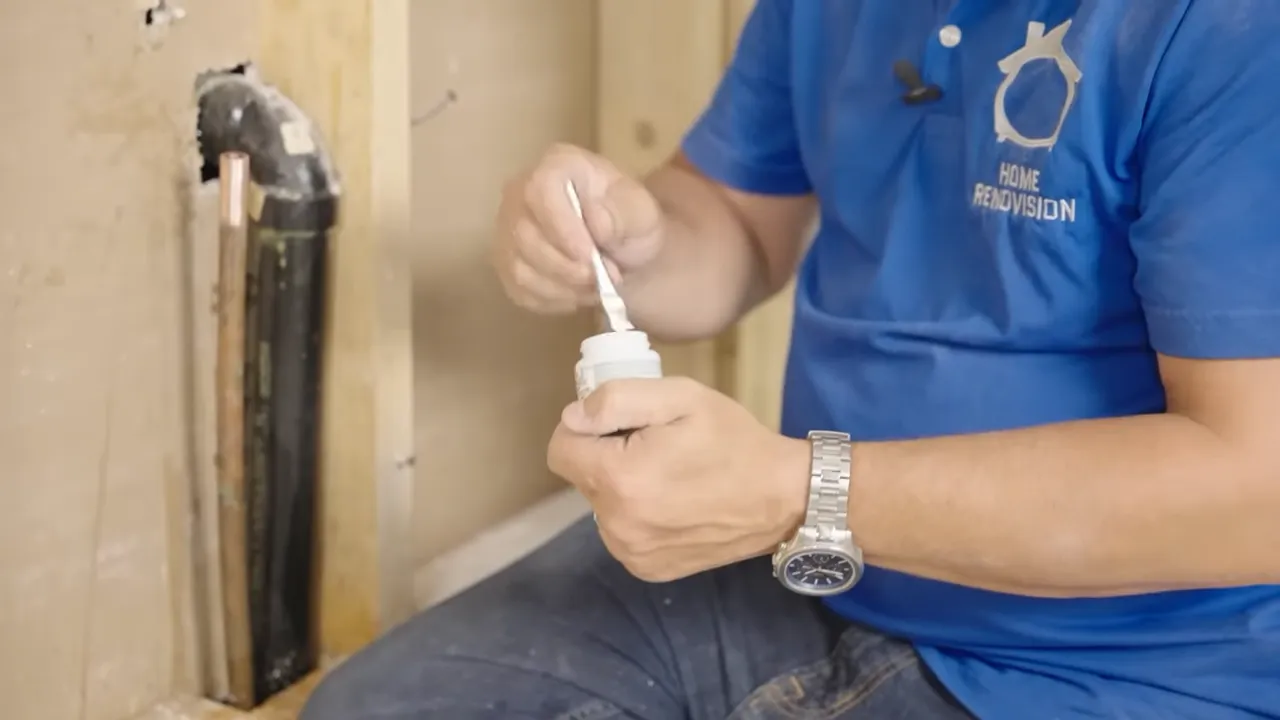
Apply flux to the end of the copper pipe
Flux is a critical component in the installation of Pex pipe to copper. Its purpose is to ensure a strong and reliable bond between the two materials. Applying flux to the end of the copper pipe is a straightforward process:
- Take a small brush or flux applicator.
- Dip the brush or applicator into the flux.
- Apply a thin and even layer of flux to the cleaned end of the copper pipe.
Make sure to cover the entire circumference of the pipe with flux, as this will promote proper adhesion between the copper pipe and the Pex pipe.
Now that you have cleaned the end of the copper pipe and applied flux, you are ready to move forward with the installation process. Connecting the Pex pipe to the prepared copper pipe is the next step, which we will cover in the following section.
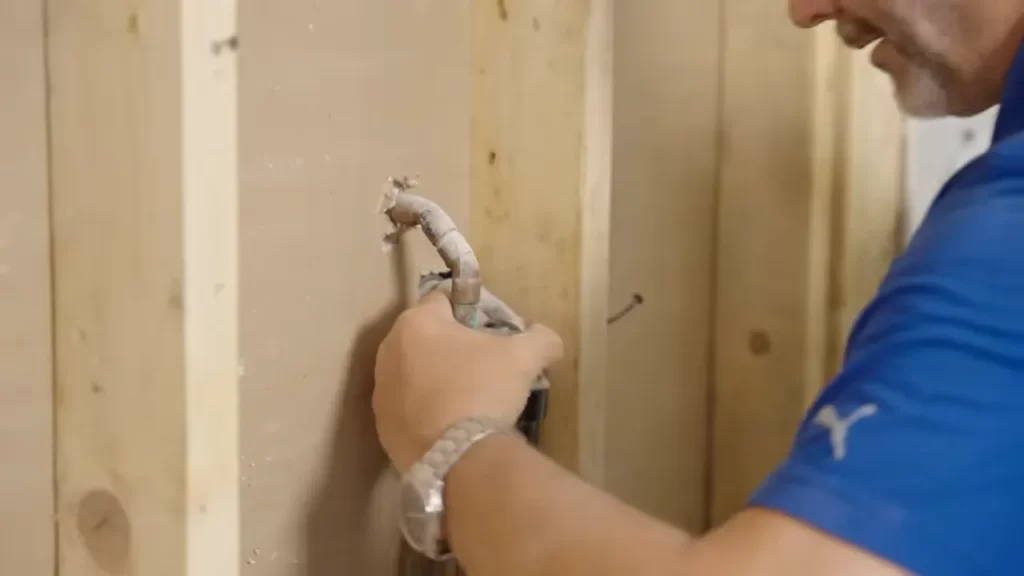
Step 4: Connect The Pex Pipe And Copper Pipe
Now that you have prepared both the Pex pipe and the copper fitting, it’s time to connect them. Follow these steps to ensure a secure and leak-free connection:
Slide a crimp ring onto the Pex pipe
To start the connection process, take a crimp ring and slide it onto the end of the Pex pipe. Make sure the ring is positioned properly, close to the end of the pipe where it will be joined with the copper fitting.
Insert the Pex pipe into the copper fitting
Take the Pex pipe with the crimp ring and carefully insert it into the copper fitting. Make sure the pipe goes all the way in until it reaches the shoulder of the fitting. This will ensure a tight and secure connection.
Slide the crimp ring over the connection
Once the Pex pipe is inserted into the copper fitting, slide the crimp ring over the connection point. Ensure that the ring is positioned right at the center of the joint, covering both the pipe and the fitting.
Use a crimping tool to secure the crimp ring
Now it’s time to secure the connection by crimping the ring. Take a crimping tool and position it over the crimp ring. Apply steady pressure to the tool, ensuring all sides of the ring are crimped evenly. This will create a strong and watertight connection between the Pex pipe and the copper fitting.
Remember to repeat these steps for each connection point between the Pex pipe and the copper fittings. Once all connections are made, it’s important to test the system for any leaks or issues before closing up the walls. With the proper installation and secure connections, your Pex and copper pipe system will provide reliable plumbing for years to come.
Step 5: Test The Connection
After successfully connecting the PEX pipe to the copper fittings, the next crucial step is to test the connection to ensure a leak-free and properly functioning system. This step is essential, as any leaks or issues can lead to water damage and costly repairs in the future. Follow the steps below to test the connection between the PEX pipe and copper fittings.
Turn on the water supply and check for any leaks
Once you have completed the installation process, cautiously turn on the water supply. Start with a slow and gradual increase in water flow to allow any air trapped in the system to escape. Keep a keen eye out for any signs of leaks, such as drips, puddles, or wet spots around the connections. It’s important to check all the connections thoroughly, including the connection points between the PEX pipe and the copper fittings, as well as any compression fittings or valves that were used during installation.
If you come across any leaks during this stage, take immediate action to rectify the problem. Tighten any loose connections gently using an appropriate tool until the leak is resolved. Be cautious not to overtighten, as this can damage the fittings. If tightening the connections doesn’t solve the issue, you may need to disassemble and reassemble the connection using new fittings or consult a professional plumber for assistance.
Verify proper water flow and pressure
In addition to checking for leaks, it’s crucial to verify the proper water flow and pressure throughout your newly installed PEX pipe to copper system. Open each faucet, showerhead, or other water outlets within your home one by one, checking for any irregularities in water flow or pressure. Ensure that the water flows smoothly, with consistent pressure, and that there are no unusual noises or vibrations.
If you notice any issues, such as low water flow or fluctuating pressure, address them promptly. Check for any kinks or obstructions in the PEX pipe that might be causing the problem. Additionally, examine the copper fittings for any signs of damage or incorrect installation, and make any necessary adjustments or replacements accordingly.
By following these steps and testing the connection thoroughly, you can ensure a leak-free and properly functioning PEX pipe to copper installation. Remember, if you encounter any difficulties or are unsure about any part of the process, it’s always best to consult a professional plumber for guidance.
Step 6: Insulate The Pipes (Optional)
Step 6: Insulate the Pipes (Optional)
Insulating your pipes is an optional but highly recommended step when installing Pex pipes to copper. By doing this, you can protect your pipes against freezing temperatures or heat loss, minimizing the risk of damage and optimizing energy efficiency. Properly insulating your pipes can also help maintain the temperature of the water flowing through them, ensuring it stays hot or cold for longer periods.
Use foam pipe insulation to protect against freezing or heat loss
One of the most common and effective methods of insulating Pex pipes to copper is by using foam pipe insulation. This type of insulation is widely available, affordable, and easy to install. The foam material provides excellent insulation properties, preventing heat loss and minimizing the chances of freezing during cold weather.
When using foam pipe insulation, make sure to choose the appropriate size for your pipes. It should fit snugly around the pipe, covering the entire length. This way, you ensure maximum coverage and protection. Foam pipe insulation can be found in different lengths and diameters to accommodate different pipe sizes.
Ensuring each H3 heading adheres to HTML syntax
Using HTML syntax correctly is essential for optimizing the structure and appearance of your blog post. When using H3 headings in your content, make sure to enclose them in the appropriate HTML tags. The opening tag is
and the closing tag is
. By adhering to HTML syntax, you ensure that search engines and web browsers correctly interpret and display your headings.
Properly structuring your content with HTML headings not only improves readability for your audience but also helps search engines understand the hierarchy and importance of the information on your page. This can have a positive impact on your SEO efforts and improve your website’s visibility in search engine results.
In conclusion, insulating your Pex pipes to copper is an optional but highly beneficial step in the installation process. By using foam pipe insulation, you can protect your pipes against freezing temperatures or heat loss, ensuring optimal functionality and energy efficiency. Remember to choose the appropriate size and properly adhere to HTML syntax when implementing H3 headings.
Ensure Proper Pipe Support
When it comes to installing Pex pipe to copper, ensuring proper pipe support is crucial for a successful installation. Without adequate support, the pipes can sag or experience excessive movement, which can lead to leaks, damage, and a compromised plumbing system. By using pipe hangers or clamps, you can provide the necessary support for both Pex and copper pipes, ensuring that they stay in place and function optimally.
Use Pipe Hangers or Clamps to Support the Pex and Copper Pipes
One of the best ways to ensure proper pipe support is by using pipe hangers or clamps. These fixtures securely hold the pipes in place, preventing them from sagging or moving excessively. When selecting pipe hangers or clamps, make sure they are compatible with both Pex and copper pipes. It’s essential to choose high-quality hangers or clamps that are designed for the specific diameter of your pipes and are sturdy enough to withstand the weight of the water flowing through them.
To install pipe hangers or clamps, follow these steps:
- Measure the distance between each hanger or clamp, ensuring proper spacing according to the manufacturer’s guidelines.
- Mark the locations where the hangers or clamps will be installed, ensuring that they are positioned at regular intervals along the length of the pipes.
- Securely attach the hangers or clamps to the wall, floor, or other suitable surfaces using screws or nails, making sure they are tightly fastened.
- Place the Pex pipe and copper pipe into the hangers or clamps, ensuring that they fit snugly and are fully supported.
By using pipe hangers or clamps, you can prevent sagging or excessive movement of the Pex and copper pipes, ensuring a properly supported plumbing system. This will not only minimize the risk of leaks and damage but also promote efficient water flow throughout your home or building. Remember to always consult the manufacturer’s instructions and guidelines when installing pipe hangers or clamps for the best results.
Follow Local Plumbing Codes And Regulations
When installing PEX pipe to copper, it is crucial to follow local plumbing codes and regulations. These regulations are put in place to ensure the safety and efficiency of plumbing systems. Failure to comply with these codes not only poses a risk to the occupants but may also result in penalties or the need to redo the installation.
Check with local authorities to ensure compliance with regulations
The first step in installing PEX pipe to copper is to check with the local authorities to ensure compliance with the regulations. In different areas, there may be variations in the plumbing codes that need to be followed. Therefore, it is essential to reach out to the local authorities responsible for plumbing regulations to understand the specific requirements.
Obtain necessary permits if required
In some cases, obtaining permits may be required before installing PEX pipe to copper. These permits ensure that the installation meets the necessary standards and is carried out by qualified individuals. It is important to check with the local authorities about the permit requirements and submit the necessary documents, such as plans and specifications, before initiating the installation process.
Additionally, it is crucial to ensure that the installation is carried out by licensed professionals. Hiring experienced plumbers who are familiar with local plumbing codes and regulations not only guarantees compliance but also ensures the installation is done correctly.
Conduct Regular Maintenance And Inspections
Check for any signs of leakage or damage
Regularly checking for any signs of leakage or damage is essential to maintaining the integrity of your Pex pipe to copper installation. Even a small leak can escalate into a major issue if left unchecked. Here are a few steps to help you conduct a thorough inspection:
- Inspect the connections: Start by examining the joints where the Pex pipe connects to copper fittings. Look for any moisture, discoloration, or signs of corrosion around these areas. If you notice any leaks or dampness, it’s crucial to address them immediately.
- Check for visible wear: Inspect the entire length of the Pex pipe for signs of wear, including scratches, warping, or indentations. These can indicate potential weak spots in the pipe that may lead to leaks or bursts.
- Examine the fittings: Pay close attention to the Pex pipe fittings, such as elbows, tees, and couplings. Look for any cracks, chips, or signs of deterioration in these components. Damaged fittings should be replaced promptly to prevent leaks or water damage.
By regularly checking for any signs of leakage or damage, you can catch potential issues early on and avoid costly repairs or replacements later. Make it a part of your routine home maintenance to safeguard your Pex pipe to copper installation.
Inspect connections periodically for any signs of wear or corrosion
Connections between Pex pipes and copper fittings are susceptible to wear and corrosion over time due to factors like temperature changes and water quality. To ensure the longevity of your Pex pipe to copper installation, follow these steps to inspect the connections:
- Visually inspect the connections: Take a close look at each connection point for any signs of wear or corrosion. Look for discoloration, pitting, or rough areas on the copper fittings. If you notice any of these issues, it’s important to address them promptly to prevent leaks.
- Feel for abnormalities: Run your fingers along the connections to feel for any irregularities. These can include rough surfaces, loose fittings, or gaps between the Pex pipe and copper fitting. If you encounter any abnormalities, it’s best to consult a professional plumber for further evaluation.
- Check for proper sealing: Ensure that all connections are properly sealed to prevent leaks. Look for any gaps or signs of inadequate sealing between the Pex pipe and copper fitting. Reapply sealant if necessary to maintain a watertight connection.
Regular inspections of your Pex pipe to copper connections help identify any potential issues early on. By addressing wear or corrosion promptly, you can preserve the efficiency and reliability of your plumbing system.
Frequently Asked Questions
What Is The Best Connection For Pex To Copper?
The best connection for PEX to copper is a PEX crimp or clamp fitting. It provides a secure and watertight connection between the two types of piping.
How Do I Connect Pex To My Plumbing Fixtures?
To connect PEX to your plumbing fixtures, follow these steps: 1. Cut the PEX tubing to the desired length using a PEX cutter. 2. Connect the PEX fitting to the end of the tubing, ensuring a secure fit. 3. Insert the other end of the fitting into the fixture’s valve or outlet.
4. Use a crimp ring or clamp to secure the connection. 5. Test the connection for leaks by turning on the water supply briefly.
Do You Lose Water Pressure Going From Copper To Pex?
Switching from copper to PEX pipes doesn’t typically cause a loss of water pressure. PEX can maintain high pressure levels, and its smooth interior helps maintain flow. However, factors such as incorrect installation or using the wrong size could impact water pressure.
Professional installation is crucial for optimal performance.
How Do You Connect Copper To Pex Using Sharkbite Fittings?
To connect copper to PEX, use SharkBite fittings. Simply push the fitting onto the copper or PEX pipe for a secure connection. No soldering or tools are needed, making it quick and easy. SharkBite fittings are reliable and can save you time and effort in your plumbing projects.
Conclusion
To sum up, installing Pex pipe to copper is a straightforward process that offers numerous benefits. It provides a reliable and durable alternative to traditional copper pipes, with improved resistance to corrosion and flexibility. The steps outlined in this guide ensure a successful installation, allowing you to enjoy a long-lasting and efficient plumbing system.
With the right tools and techniques, you can confidently make the switch to Pex pipe while improving the functionality of your plumbing system. So, why wait? Start upgrading your pipes today!