
To install a transition strip from wood to tile, first, ensure the subfloor is clean and dry. Then, lay the strip in place and secure it with adhesive or nails.
Tools And Materials Needed
Before diving into the installation process, it’s important to gather the necessary tools and materials to ensure a smooth and successful transition strip installation from wood to tile. Here’s a list of everything you’ll need:
Transition Strip
To start, you’ll obviously need a transition strip. This strip serves as a bridge between the wood and tile, providing a seamless transition while adding a touch of elegance to your flooring.
Measuring Tape
Accurate measurements are crucial for a precise fit. Make sure you have a measuring tape handy to measure the width and length of the transition area accurately.
Pencil
A simple pencil will come in handy to mark the measurements on the transition strip and the floor, ensuring precise cuts and placements.
Miter Saw
A miter saw will be your best friend during this installation. It allows you to make angled cuts with precision, ensuring that the transition strip fits perfectly at the junction between the wood and tile.
Wood Glue
Wood glue is an essential adhesive that will help secure the transition strip to the wooden floor. The glue ensures a strong bond, preventing any unwanted movement or shifting over time.
Drill
A drill is necessary for creating holes in the transition strip, which will allow you to attach it to the wooden floor securely. Ensure you have the right drill bit size for the screws you’ll be using.
Screws
Sturdy screws are required to fix the transition strip firmly in place. Be sure to select screws that are the appropriate length and diameter for your specific installation.
Screwdriver
A screwdriver is necessary for driving the screws into the pre-drilled holes. Ensure you have a matching screwdriver head that fits the screws you’re using.
Now that you have all the necessary tools and materials at your disposal, it’s time to move on to the installation process. Stay tuned for our next section, where we’ll provide step-by-step instructions on how to install a transition strip from wood to tile.
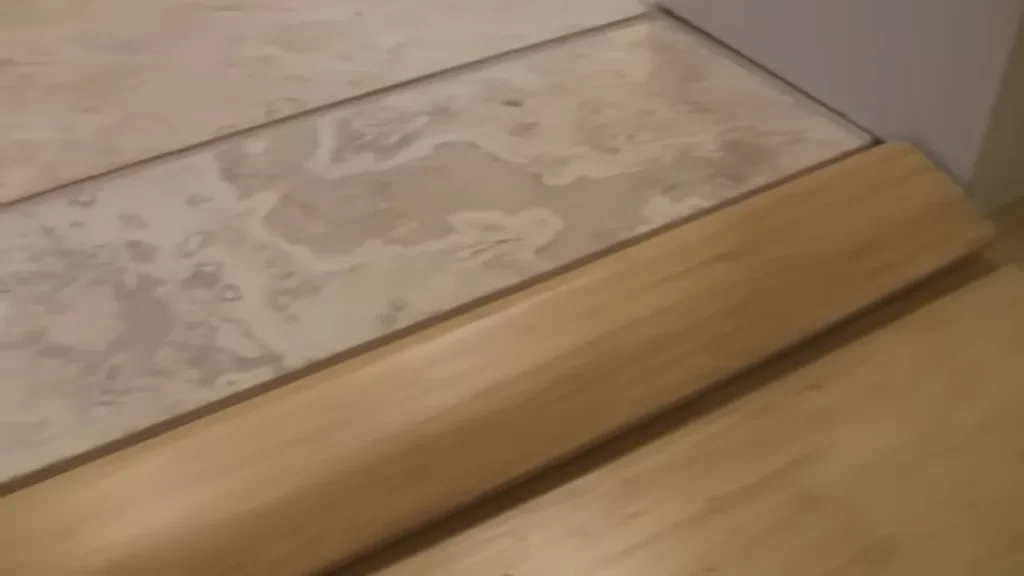
Choosing The Right Transition Strip
When it comes to installing a transition strip from wood to tile, one of the most important steps is choosing the right transition strip. This small detail can make a big difference in the overall look and functionality of your flooring transition. In this section, we will explore the different types of transition strips available and the considerations to keep in mind when selecting the right one for your project.
Types of Transition Strips
There are various types of transition strips available in the market, each designed to serve a specific purpose. Understanding the different options can help you make an informed decision. Here are some common types:
| Transition Strip Type | Features |
|---|---|
| T-Molding | A T-shaped strip that is versatile and effective for covering gaps between two different types of flooring materials. |
| Reducer | A sloping strip that smoothly transitions from a higher flooring surface to a lower one, such as from wood to tile. |
| Threshold | A strip placed at the edge of a door frame to create a seamless transition between rooms. |
Considerations for Selecting the Right Strip
When selecting a transition strip, there are a few key considerations to keep in mind:
- Height: Measure the height difference between the two floorings to ensure that the transition strip you choose is the appropriate height, providing a smooth transition without any tripping hazards.
- Material: Consider the material of the transition strip, ensuring that it complements both the wood and tile flooring. Popular materials include wood, metal, and rubber.
- Design: Choose a transition strip that matches the aesthetic of your space. Whether you prefer a modern, sleek look or a more traditional design, there are options available to suit your style.
- Installation: Consider the ease of installation. Some transition strips require adhesives, while others can be nailed or screwed into place. Select one that aligns with your skills and comfort level.
- Durability: Ensure that the transition strip you choose is durable and able to withstand the daily wear and tear of foot traffic. Look for options that are resistant to scratches, stains, and moisture.
By considering these factors, you can select the right transition strip that seamlessly blends your wood and tile flooring while adding both functionality and aesthetic appeal to your space.
Preparing The Subfloor And Wood Flooring
Before installing a transition strip from wood to tile, it is important to properly prepare both the subfloor and the wood flooring. This ensures a smooth and secure installation, preventing any future damage or issues. In this section, we will guide you through the steps of inspecting the subfloor, removing any obstructions or debris, and preparing the wood flooring. Let’s get started!
Inspecting the Subfloor
Inspecting the subfloor is the first crucial step in preparing for the installation of a transition strip. This helps identify any existing problems or potential issues that may affect the installation process. Here’s what you need to do:
- Start by thoroughly examining the subfloor for any signs of damage, such as cracks, rot, or unevenness. If you notice any major issues, it is recommended to address them before proceeding with the installation.
- Check if the subfloor is level and even. Use a straight edge or level tool to ensure there are no significant dips or variations. If you find any uneven areas, you may need to level them by sanding or filling accordingly.
- Verify that the subfloor is clean and free of debris. Remove any loose dirt, dust, or debris using a broom or vacuum cleaner. This creates a clean and smooth surface for the transition strip and ensures proper adhesion.
Removing any Obstructions or Debris
Before installing the transition strip, it is important to remove any obstructions or debris that may hinder the installation process or affect the final result. Here are the steps to follow:
- Remove any old adhesive, nails, or staples that might be sticking out from the subfloor. These can cause unevenness and compromise the stability of the transition strip.
- Check for any existing transitions or trim pieces that need to be removed. Carefully remove them using appropriate tools, ensuring not to damage the surrounding area.
- Clear away any remaining debris or loose particles from the subfloor. This can be done by using a damp cloth or mop to ensure a clean surface.
Preparing the Wood Flooring
In addition to preparing the subfloor, it is essential to prepare the wood flooring itself. This ensures that the transition strip can be installed securely and effectively. Follow these steps:
- Inspect the wood flooring for any signs of damage, such as warping or loose boards. If any issues are found, make the necessary repairs or replacements before proceeding.
- Ensure that the wood flooring is clean and free of dirt, dust, or any other debris. Clean the surface using a soft brush or damp cloth, taking care not to saturate the wood.
- If required, apply a suitable primer or sealer to the wood flooring. This can help enhance the durability and longevity of the transition strip installation.
By properly inspecting the subfloor and preparing the wood flooring, you create a solid foundation for the installation of a transition strip from wood to tile. Following these steps will help ensure a seamless and visually appealing transition between the two flooring materials.
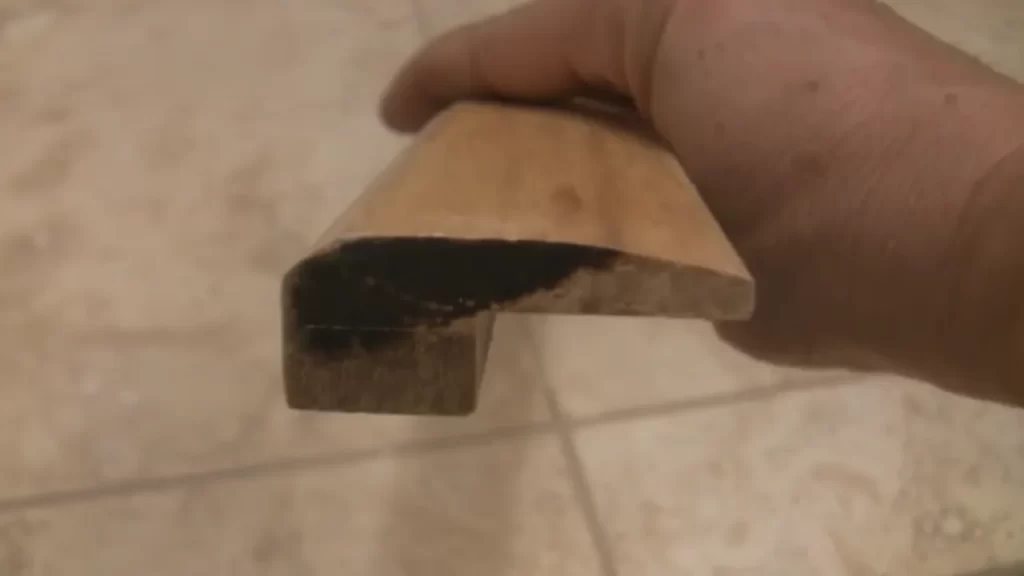
Measuring And Cutting The Transition Strip
Measuring the width between the wood and tile
When installing a transition strip between wood and tile, the first step is to accurately measure the width between the two surfaces. This measurement is crucial to ensure a seamless fit and a polished finish. To measure the width, follow these simple steps:
1. Start by positioning a tape measure at one end of the wood surface. Extend the tape measure across until it reaches the beginning of the tile surface.
2. Carefully align the tape measure to ensure that it sits parallel to both surfaces. This will guarantee an accurate measurement.
3. Take note of the measurement displayed on the tape measure. Ensure that you record it accurately, as this measurement will be used to mark and cut the transition strip.
Marking the transition strip accordingly
Once you have obtained the width measurement, the next step is to mark the transition strip to the appropriate length. Follow these steps to ensure precise markings:
1. Start by placing the transition strip on a flat and stable surface. Ensure that it is aligned straight and secure to avoid any discrepancies in the marking process.
2. Using a pencil or a marker, make a small mark on the transition strip at the measurement you obtained. This mark will serve as a guide for cutting the strip to the correct length.
3. Double-check the marking to ensure its accuracy. It is crucial to take your time and be meticulous during this step, as any mistakes may result in an ill-fitting transition strip.
Cutting the strip to the appropriate length
Now that you have marked the transition strip, it is time to cut it to the appropriate length. Follow these steps to achieve a precise and clean cut:
1. Before proceeding with the cut, ensure that you have the necessary tools, such as a miter saw or a circular saw. These tools will provide you with a smooth and accurate cut.
2. Align the marked section of the transition strip with the saw’s cutting guide or line it up with the appropriate blade measurement.
3. Safely activate the saw and carefully guide the strip through the blade, ensuring a steady and controlled motion. Make sure to follow all safety precautions and wear protective gear during this step.
4. After cutting the transition strip, inspect the cut edge to ensure its smoothness and accuracy. If needed, sand the edge lightly to remove any roughness or unevenness.
By following these steps and taking the necessary precautions, you will be able to measure and cut a transition strip from wood to tile with precision. This will ensure a seamless and professional appearance in your flooring project.
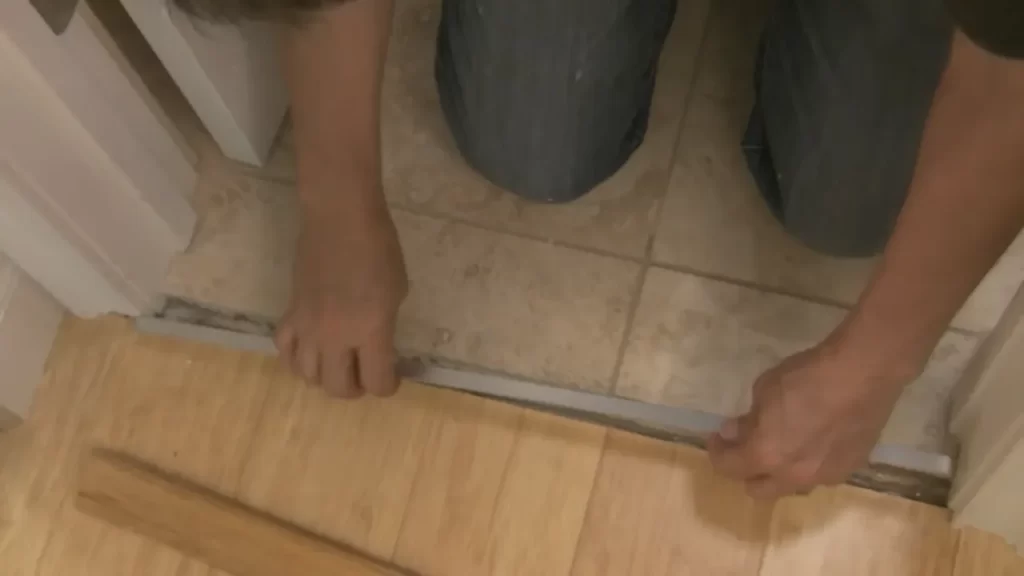
Installing The Transition Strip
Welcome back to our series on installing transition strips! In the previous posts, we discussed the different types of transition strips and the tools you’ll need for installation. Now, let’s dive into the process of actually installing the transition strip from wood to tile. In this post, we’ll walk you through the three key steps: dry fitting the strip, applying wood glue, and securing the strip with screws. These steps are crucial to ensuring a seamless and durable transition between your wood and tile floors.
Dry fitting the strip
Before you begin the actual installation, it’s important to dry fit the transition strip to ensure a proper fit. This step allows you to make any necessary adjustments and ensures that the strip aligns perfectly with the edge of the tile and the wood flooring. To start, place the transition strip over the area where the two surfaces meet. Make sure it covers the gap evenly and sits flush against both the wood and tile. If there are any areas where the strip doesn’t fit snugly, mark them for adjustment later.
Applying wood glue to the strip
Once you’ve dry fitted the transition strip and are satisfied with the fit, it’s time to apply wood glue. Wood glue is essential for ensuring a strong bond between the strip and the flooring materials. To apply the glue, use a small brush or a spreader to evenly coat the bottom side of the strip. Be sure to apply the glue generously but avoid overdoing it, as excess glue can seep out and create a mess. Once you’ve applied the glue, carefully place the strip back in position, pressing it firmly against the wood and tile surfaces.
Securing the strip with screws
After applying the wood glue, you’ll want to reinforce the bond by securing the transition strip with screws. This step ensures that the strip stays in place and prevents any shifting or loosening over time. To begin, mark the locations where the screws will go. Generally, it’s best to place screws every 6-8 inches along the length of the strip for optimal stability. Use a drill to create pilot holes at the marked spots, then carefully drive the screws into the wood, making sure not to overtighten them. Repeat this process for each screw until the entire strip is securely attached.
And there you have it – the complete process for installing a transition strip from wood to tile! Remember to take your time with each step and double-check the alignment and fit before moving on. By dry fitting the strip, applying wood glue, and securing it with screws, you’ll create a seamless transition that not only looks great but also stands the test of time.
Finishing Touches
When it comes to installing a transition strip from wood to tile, the finishing touches are essential for creating a seamless and professional look. These final steps ensure that any gaps or unevenness are addressed, the transition strip is smooth and well-prepared, and that the overall appearance is enhanced. In this section, we will take a closer look at three crucial finishing touches: checking for gaps or unevenness, sanding the transition strip, and applying finish or stain if desired.
Checking for any gaps or unevenness
Before proceeding with the installation of the transition strip, it is important to thoroughly check the area for any gaps or unevenness. This can be done by placing a straight edge such as a level or ruler across the transition area where the strip will be installed. If there are any gaps or uneven spots, they can be filled or leveled using wood filler or a leveling compound, respectively. It is crucial to address these issues before proceeding, as they can affect the final appearance and performance of the transition strip.
Sanding the transition strip
Once any gaps or unevenness have been addressed, it is time to sand the transition strip. Sanding the strip helps to ensure that its surface is smooth, free from any rough patches or imperfections. To sand the strip, begin by selecting a sandpaper with a medium grit, such as 120 or 150. Hold the sandpaper firmly and sand the surface of the strip in the direction of the wood grain. Be sure to sand evenly and avoid applying too much pressure, as this can cause damage to the strip. After sanding, use a soft cloth or brush to remove any dust or debris before proceeding to the next step.
Applying finish or stain if desired
If you wish to enhance the appearance of the transition strip, you can apply a finish or stain of your choice. Before applying any finish, ensure that the strip is clean and free from any dust or debris. Apply the chosen finish or stain using a brush or cloth, following the manufacturer’s instructions. Allow sufficient drying time between coats, and consider applying multiple coats to achieve the desired finish. Remember to let the strip dry completely before walking on or using the area. This final touch not only protects the transition strip but also adds a touch of elegance to the overall aesthetic of the space.
Maintenance And Care
Taking proper care of your transition strip is essential for maintaining its longevity and functionality. Regular cleaning and inspecting for any damage or wear are two crucial aspects of maintenance. By implementing these preventive measures, you can ensure that your transition strip from wood to tile continues to serve its purpose effectively.
Cleaning the transition strip
Regular cleaning of your transition strip is essential to prevent the buildup of dirt, grime, and debris that can affect its appearance and functionality. Here are some steps to follow when cleaning your transition strip:
- Start by vacuuming or sweeping the strip to remove loose debris, dust, and dirt.
- Use a damp cloth or mop to wipe away any remaining dirt or stains. Make sure to use a mild cleaning solution or detergent that is suitable for the material of your transition strip.
- Gently scrub the strip using a soft-bristled brush to remove any stubborn stains or dirt particles.
- Rinse the strip thoroughly with clean water to remove any cleaning residue.
- Finally, dry the strip completely using a clean towel or cloth.
Regular cleaning helps to maintain the appearance of your transition strip and prevents the accumulation of grime that can affect its performance over time.
Checking for any damage or wear
Periodically inspecting your transition strip for any signs of damage or wear is crucial in maintaining its integrity and safety. Here are a few steps to follow when checking your transition strip:
| Steps for Checking for any damage or wear: |
|---|
| 1. Carefully examine the strip for any cracks, splits, or warping. These can compromise the stability and effectiveness of the strip. |
| 2. Check the edges of the strip to ensure that they are intact and not chipped or frayed. |
| 3. Test the flexibility of the strip by gently pressing on it. A properly functioning strip should be able to withstand moderate pressure without bending or snapping. |
| 4. If your transition strip has adhesive backing, check if it is still firmly adhered to both the wood and tile surfaces. Reapply adhesive if necessary. |
| 5. If you notice any signs of damage or wear, it is important to replace the strip promptly to prevent further issues. |
Regularly checking your transition strip helps identify any potential problems early on, allowing you to take appropriate action to ensure its functionality and safety.
By following these maintenance and care practices, you can extend the lifespan of your transition strip and ensure a smooth and seamless transition between your wood and tile flooring. Remember, regular cleaning and inspecting for any damage or wear are key to a well-maintained and long-lasting transition strip.
Troubleshooting Common Issues
While installing a transition strip from wood to tile can enhance the aesthetic appeal of your flooring, it’s important to be prepared for the possibility of encountering some common issues along the way. In this section, we will address two common problems that may arise during installation: dealing with uneven subfloors and addressing gaps or spaces between the strip and flooring.
Dealing with Uneven Subfloors
An uneven subfloor can pose a challenge when installing a transition strip, as it can affect the stability and appearance of the finished product. To ensure a smooth transition and prevent any tripping hazards, it’s crucial to tackle this problem head-on. Here are a few steps you can take:
- Begin by thoroughly inspecting the subfloor for any uneven areas. Use a straightedge or level to identify any high or low spots.
- For minor unevenness, you can try using a patching compound or self-leveling underlayment to even out the surface. Follow the manufacturer’s instructions for application and drying times.
- If the subfloor has significant irregularities, you may need to consider hiring a professional to level the floor using methods such as sanding, grinding, or floor leveling compounds.
- Once the subfloor is level, proceed with the installation of the transition strip, ensuring it sits firmly and securely on the even surface.
Addressing Gaps or Spaces between the Strip and Flooring
Another common issue that may arise when installing a transition strip from wood to tile is the presence of gaps or spaces between the strip and the flooring. These gaps can not only be unsightly but can also potentially collect dirt or pose a tripping hazard. To address this problem effectively, follow these steps:
- Measure the gap between the strip and flooring to determine its size.
- If the gap is small, you can try using a caulk or silicone sealant that matches the color of the transition strip. Apply the sealant carefully, ensuring it fills the gap evenly.
- For larger gaps, you may need to consider using a decorative molding or quarter-round to bridge the space between the strip and the flooring. Measure and cut the molding to fit, and secure it in place using construction adhesive or small finishing nails.
- Once the gap is addressed, make sure to clean up any excess sealant, adhesive, or nails to achieve a neat and professional-looking finish.
By following these troubleshooting steps, you can overcome common issues that may arise during the installation of a transition strip from wood to tile. Remember, attention to detail and proper preparation will result in a seamless transition that enhances the beauty and functionality of your flooring.
Frequently Asked Questions
How Do You Transition Between Wood And Tile?
Transitioning between wood and tile can be done by using transition strips or thresholds. These are installed at the point where the two flooring types meet, providing a smooth and seamless transition. Proper measurements and installation are crucial to ensure a seamless and aesthetically pleasing transition.
How Do You Install Transition Strips Between Tile And Hardwood?
To install transition strips between tile and hardwood, measure the width of the doorway and cut the strip accordingly. Apply adhesive on the hardwood and press the strip firmly onto it. Allow it to dry completely before walking on it.
Do You Need A Transition Strip Between Hardwood And Tile?
Yes, a transition strip is needed between hardwood and tile. It helps to cover the gap between the two types of flooring and provides a smooth and seamless transition.
Do You Glue Down Transition Strips?
No, transition strips are typically not glued down. They are designed to be installed without adhesive to allow for easy removal or replacement if needed. Instead, they are often installed using screws, nails, or simply placed in the appropriate doorway or threshold.
Conclusion
Transition strips are an essential component when installing a transition between wood and tile flooring. Proper installation of these strips ensures not only a smooth and seamless transition but also improves the overall aesthetic appeal of your space. By following the step-by-step guide provided in this blog post, you can easily install a transition strip without any hassle.
So, go ahead and give it a try, and enjoy the beautiful and functionally designed flooring in your home.