
To install a new shower faucet, turn off the water supply, remove the old faucet, and connect the new faucet following the manufacturer’s instructions. Shower faucets are essential components of any bathroom, providing control over the flow and temperature of the water.
Over time, faucets may deteriorate or become outdated, requiring replacement. Installing a new shower faucet is a relatively straightforward process that can be done by following a few simple steps. By turning off the water supply, removing the old faucet, and connecting the new one, you can enjoy a functioning and updated shower faucet in no time.
This article will guide you through the process of installing a new shower faucet, ensuring a successful and efficient installation.
Choosing The Right Shower Faucet
Choosing the Right Shower Faucet
When it comes to installing a new shower faucet, selecting the right one is crucial. The shower faucet not only serves a functional purpose but also adds to the overall aesthetic of your bathroom. With so many options available in the market, it can be overwhelming to choose the perfect shower faucet for your needs. However, by considering a few factors and following some guidelines, you can make the process much easier and ensure that you install a shower faucet that both enhances the functionality of your shower and complements the style of your bathroom.
Factors to consider before purchasing a shower faucet
Before diving into the world of shower faucets, it’s important to take a few factors into consideration. These factors will help you narrow down your options and ensure that you choose a shower faucet that meets your specific requirements:
- Compatibility: Before purchasing a shower faucet, you need to ensure that it is compatible with your existing plumbing system. Consider factors like the number of handles or knobs, the placement of the faucet, and the type of valve it requires.
- Water Pressure: Take into account the water pressure in your home. You want to choose a shower faucet that is designed to function optimally with the available water pressure.
- Budget: Set a budget for your shower faucet purchase. This will help you narrow down your options and prevent overspending.
- Durability: Look for a shower faucet that is made from high-quality materials and is built to last. This ensures that you get the best value for your money.
Finding the perfect style and finish for your bathroom
Once you have determined the technical aspects of your new shower faucet, it’s time to consider the style and finish that will complement your bathroom. Here are a few tips to help you find the perfect fit:
- Bathroom Style: Consider the overall style and theme of your bathroom. Whether it’s modern, traditional, or contemporary, choose a shower faucet that aligns with the existing aesthetic.
- Finish: The finish of your shower faucet should harmonize with the other fixtures in your bathroom. Popular options include chrome, brushed nickel, bronze, and stainless steel.
- Ergonomics: Test out different styles and designs to ensure that the shower faucet is easy to use and comfortable to handle. Functionality should never be compromised for the sake of aesthetics.
All in all, choosing the right shower faucet requires careful consideration of technical factors such as compatibility and water pressure, as well as attention to the style and finish that will complement your bathroom. By taking these factors into account, you can install a shower faucet that not only enhances the functionality of your shower but also adds a touch of elegance to your bathroom space.
Gather The Necessary Tools And Materials
Gathering the necessary tools and materials is the first step towards installing a new shower faucet. Ensuring that you have all the right tools and materials on hand can help make the installation process smooth and efficient. In this section, we will discuss the essential tools required for shower faucet installation as well as the materials needed for a successful installation.
Essential Tools for Shower Faucet Installation
Before you start the installation process, it’s important to have the essential tools ready. Here are the tools you’ll need:
| Tool | Description |
|---|---|
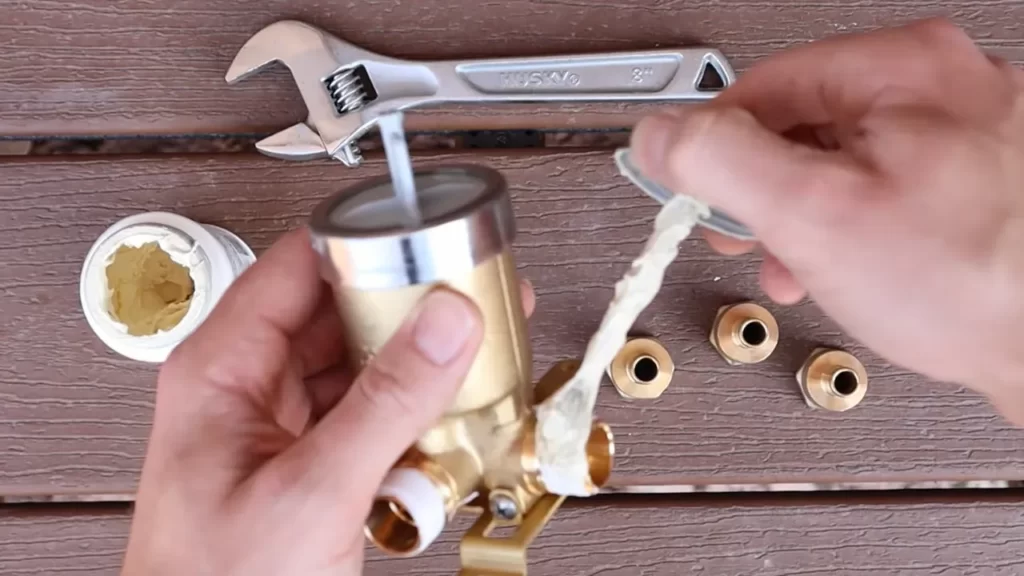
| Adjustable wrench | An adjustable wrench will allow you to tighten or loosen various fittings during the installation process. |
| Plumber’s tape | Plumber’s tape, also known as Teflon tape, is used to create a watertight seal on threaded connections. |
| Screwdriver set | A set of screwdrivers, both flathead and Phillips head, is essential for removing or tightening screws during the installation process. |
| Pipe cutter | A pipe cutter is needed to cut and remove the old pipes if you are replacing an existing shower faucet. |
| Plumbers’ putty | Plumbers’ putty is used to seal the gaps between the faucet and the sink or shower enclosure, preventing any water leakage. |
Materials Needed for a Successful Installation
Aside from the essential tools, there are a few materials that you’ll need to ensure a successful shower faucet installation. Here’s a list of the materials:
- New shower faucet
- New showerhead
- New handle(s)
- New cartridge
- New pipe fittings
- Plumbing tape
- Plumbers’ putty
- Flexible tubing or PEX pipes (if necessary)
Having all these materials ready will save you the hassle of running to the store in the middle of the installation process, ensuring a smoother and more efficient installation.
Now that you have gathered all the necessary tools and materials, you are ready to proceed with the installation process. In the next section, we will discuss the steps involved in installing a new shower faucet.
Removing The Old Shower Faucet
Before installing a new shower faucet, it is important to first remove the old one. This process involves shutting off the water supply, removing the handle and trim plate, and finally taking out the old valve. In this section, we will guide you through each step to ensure a smooth and successful removal of your old shower faucet.
Shutting off the water supply
The first step in removing your old shower faucet is to shut off the water supply. This ensures that you won’t have any water flowing while you work, preventing any potential leaks or water damage. To shut off the water supply:
- Locate the main water valve in your home.
- Turn the valve clockwise until it is fully closed.
- Once the water supply is shut off, open the faucet to relieve any remaining pressure and make sure there is no water running.
Removing the handle and trim plate
After shutting off the water supply, the next step is to remove the handle and trim plate of your old shower faucet. This will give you access to the valve for removal. Follow these steps:
- Identify any screws or bolts holding the handle in place.
- Using a screwdriver or an appropriate tool, carefully unscrew or unfasten these screws to release the handle.
- Once the handle is detached, locate the trim plate surrounding the valve.
- Inspect for any screws or bolts securing the trim plate and remove them accordingly.
- Gently pull the trim plate away from the wall, exposing the valve.
Taking out the old valve
Now that you have removed the handle and trim plate, you can proceed to take out the old valve. Follow these steps to complete the removal process:
- Inspect the valve for any screws or bolts that may be securing it in place and remove them.
- Gently pull the valve away from the wall, being cautious not to damage the surrounding pipes or plumbing.
- Once the valve is free, check for any remaining water or debris inside the pipe.
- Use a cloth or sponge to clean the area and ensure it is clear of any obstructions.
By completing these steps, you have successfully removed the old shower faucet, clearing the way for the installation of your new one. In the next section, we will cover the process of installing the new shower faucet.
Installing The New Shower Faucet
Once you have removed the old shower faucet and prepared the shower wall, it’s time to install the new shower faucet. This step-by-step guide will walk you through the process, ensuring a successful installation. Let’s get started!
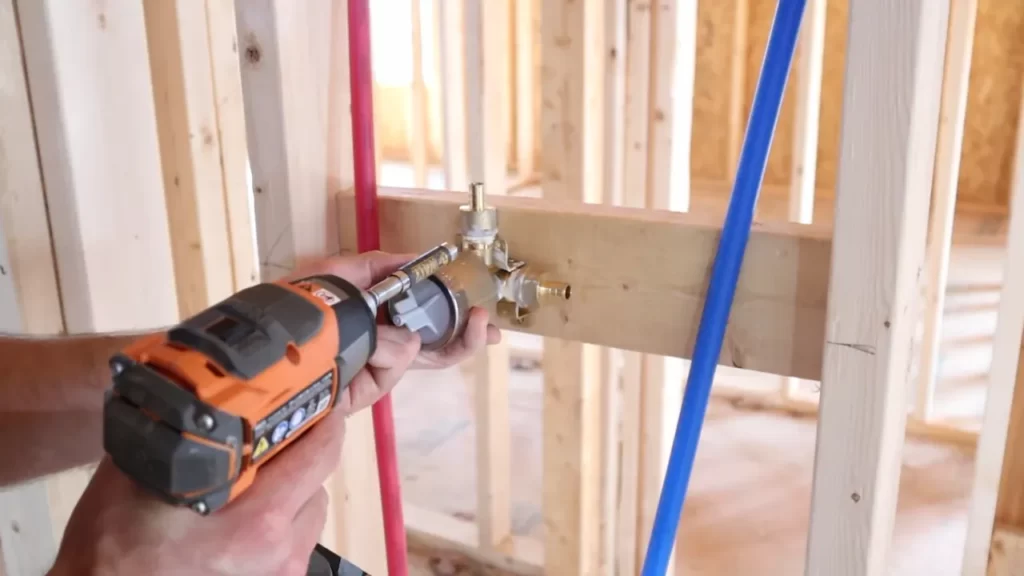
Positioning the new valve
Before connecting the new shower faucet, it’s important to position the valve correctly. The valve controls the water flow and temperature, so it needs to be easily accessible. Follow these steps:
- Measure and mark the desired height: Use a tape measure to determine the desired height for your new shower faucet. Mark this height on the wall with a pencil.
- Locate the center: Use a stud finder to locate the center of the wall where the new valve will be positioned. Mark this spot with a pencil.
- Prepare the valve: Remove any protective covers from the new valve. Place it against the wall, aligning it with the center mark you made earlier. Ensure the valve is level using a bubble level.
- Secure the valve: Once the valve is in position, use a drill and screws to secure it to the wall. Make sure it is firmly attached and will not move during the installation process.
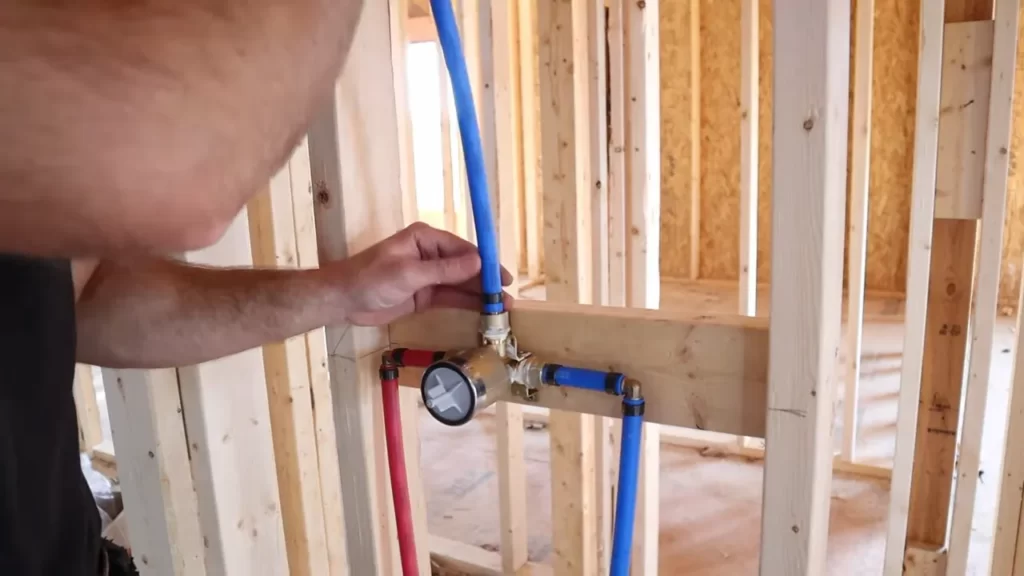
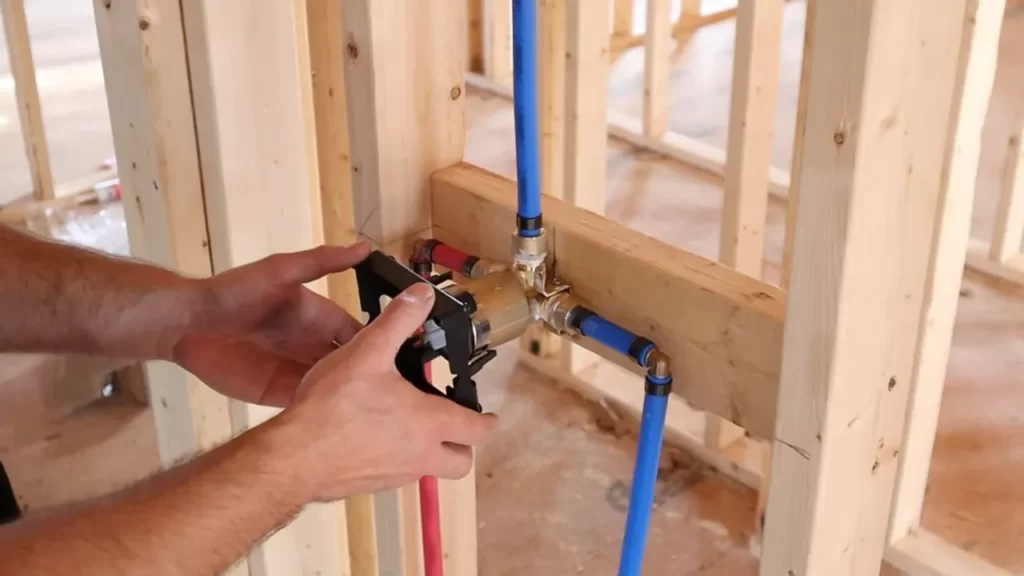
Connecting the water supply lines
With the new valve positioned and secured, it’s time to connect the water supply lines. Follow these steps:
- Tighten the fittings: Using an adjustable wrench, tighten the fittings on the water supply lines. Ensure they are secure but be careful not to overtighten and damage the connections.
- Connect the lines: Attach the hot and cold water supply lines to the corresponding fittings on the new valve. Again, use an adjustable wrench to tighten them securely.
- Turn on the water supply: Before proceeding further, turn on the water supply to check for any leaks. Inspect the connections and ensure water is flowing correctly. If there are any leaks, tighten the fittings as needed.
Attaching the handle and trim plate
Now that the water supply lines are connected, it’s time to attach the handle and trim plate to complete the installation. Follow these steps:
- Insert the handle: Slide the handle onto the valve stem and secure it with the provided screw or allen wrench, depending on the type of handle.
- Attach the trim plate: Position the trim plate over the valve and align it with the screw holes. Use the provided screws to attach it securely to the wall.
- Check the handle and trim plate: Ensure that the handle operates smoothly and the trim plate is properly aligned. Make any necessary adjustments to ensure a perfect fit.
Congratulations! You have successfully installed your new shower faucet. Enjoy the improved functionality and aesthetics of your updated shower. If you have any further questions or need assistance, don’t hesitate to reach out to a professional plumber.
Testing And Adjusting The Shower Faucet
Once you have successfully installed your new shower faucet, it is essential to test and adjust it to ensure it functions properly. This step is crucial as it allows you to check for any issues such as leaks and make necessary adjustments to the water temperature and flow. Follow the steps below to test and adjust your new shower faucet.
Turning on the water supply
Before testing the faucet, ensure that the water supply to your bathroom is turned on. Locate the shut-off valve, usually found near the water meter or in your utility room, and turn it on. This will allow water to flow to your shower.
Checking for leaks
Now that the water supply is on, carefully inspect the shower faucet for any leaks. Start by looking for visible signs of water dripping or pooling around the faucet or handles. If you notice any leaks, tighten the connections or replace any faulty parts as needed. Be sure to check all connections, including the pipes leading to the faucet.
Adjusting the water temperature and flow
Once you have confirmed that there are no leaks, it’s time to adjust the water temperature and flow. This step may vary depending on the type of shower faucet you have installed. Refer to the manufacturer’s instructions for specific guidance.
If your faucet has separate handles for hot and cold water, turn them to their desired positions. Test the water temperature by turning on the shower and allowing it to run for a few moments. Adjust the handles as needed to achieve the desired water temperature.
If your faucet has a single handle that controls both temperature and flow, you may need to follow a different adjustment process. Most single-handle faucets have a temperature limiter or adjustment screw that can be accessed by removing the handle or trim piece. Consult the manufacturer’s instructions to locate and make the necessary adjustments.
Once you have adjusted the water temperature, test the flow by turning on the shower and ensuring that it provides an adequate amount of water for your preference. If the flow is too weak, check for any obstructions or debris in the faucet. Clean or replace the aerator if necessary.
Remember to check the water temperature and flow at different times to ensure consistency. It is also a good idea to test the other features of your shower faucet, such as the handheld showerhead or any additional spray functions, to ensure they are working properly.
Troubleshooting Common Issues
If you are experiencing issues with your shower faucet, such as leaks, low water pressure, or uneven water temperature, it’s important to address these problems as soon as possible. By troubleshooting and fixing these common issues, you can ensure that your shower operates smoothly and efficiently. In this section, we will provide step-by-step instructions on how to tackle these issues effectively.
Dealing with leaks or drips
Leaky faucets not only waste water but can also lead to bigger problems if left unattended. To fix this issue, follow these simple steps:
- Turn off the water supply to your shower. This can usually be done by shutting off the main water valve in your house.
- Remove the faucet handle by loosening the screw or bolt that holds it in place.
- Inspect the cartridge or valve for any signs of damage or wear. Replace it if necessary.
- Apply plumber’s tape or thread sealant to the threads of the cartridge or valve.
- Reassemble the faucet handle and turn on the water supply to test for any leaks. If the problem persists, it may be necessary to call a professional plumber.
Fixing low water pressure
Low water pressure in your shower can be frustrating, but it’s a common issue that can often be resolved with a few simple steps. Here’s what you can do:
- Check if the water pressure issue is specific to the shower or if it affects other faucets in your home as well. If it’s only the shower, the problem may be localized.
- Remove the showerhead and clean it thoroughly, removing any debris or mineral deposits that may be restricting water flow.
- Inspect the shower faucet for any clogs or blockages. Use a small brush or toothbrush to remove any buildup.
- If the water pressure issue persists, it could be due to a faulty pressure regulator or a problem with your plumbing system. In such cases, it is recommended to seek the assistance of a professional plumber to identify and resolve the underlying cause.
Addressing uneven water temperature
If you find that your shower water temperature fluctuates between hot and cold, it’s important to address this issue for a more comfortable showering experience. Follow these steps:
- Check if the problem is specific to the shower or if it affects other faucets in your home as well.
- If the issue is isolated to the shower, adjust the temperature limiter on your shower faucet. This limiter prevents scalding and may need to be adjusted if the water temperature is inconsistent.
- If adjusting the temperature limiter doesn’t resolve the issue, it may be necessary to replace the shower cartridge or valve.
- Consult the manufacturer’s instructions or seek the assistance of a professional plumber to ensure the proper installation of the new shower cartridge or valve.
By following these troubleshooting steps, you can effectively address common issues with your shower faucet, ensuring a satisfying and enjoyable showering experience every time.
Enhancing Shower Functionality With Additional Features
Your shower faucet is an essential element of your bathroom, and by incorporating additional features, you can greatly enhance its functionality. These features not only improve your showering experience but also add convenience and efficiency to your daily routine. In this blog post, we will discuss three key ways to enhance your shower functionality: adding thermostatic valves for precise temperature control, installing a diverter for multiple showerhead options, and incorporating water-saving features.
Adding thermostatic valves for precise temperature control
One of the greatest frustrations in the shower is dealing with sudden temperature fluctuations. However, with the addition of thermostatic valves, you can say goodbye to drastic changes in water temperature. These valves allow for precise control over both the hot and cold water supply, ensuring that you always enjoy a comfortable shower. With a simple adjustment, you can set your desired temperature and rest assured that it will remain consistent throughout your shower.
To install thermostatic valves, you will need the following materials:
- Thermostatic valve
- Adjustable wrench
- Plumber’s tape
- Pipe cutter
- Plumbing fittings
Once you have gathered the necessary materials, follow these step-by-step instructions:
- Turn off the water supply to your shower.
- Remove the existing faucet handle.
- Use a pipe cutter to cut the hot and cold water supply lines.
- Attach the thermostatic valve to the cut pipes using plumbing fittings.
- Apply plumber’s tape to the threaded connections to ensure a tight seal.
- Turn the water supply back on and test the temperature control.
- Replace the faucet handle and enjoy your new precise temperature control.
Installing a diverter for multiple showerhead options
Do you dream of having a rain showerhead and a handheld showerhead in the same shower? With the installation of a diverter, your dream can become a reality. A diverter allows you to switch between multiple showerhead options with ease, giving you the freedom to customize your shower experience. Whether you prefer a gentle rainfall or a powerful stream, a diverter can accommodate your preferences.
To install a diverter, follow these simple steps:
- Turn off the water supply to your shower.
- Remove the existing showerhead.
- Apply plumber’s tape to the threaded end of the shower arm.
- Screw the diverter onto the shower arm, ensuring a tight seal.
- Attach the desired showerhead options to the corresponding outlets on the diverter.
- Turn the water supply back on and test the diverter.
- Enjoy the versatility of your new showerhead options.
Incorporating water-saving features
As environmental awareness grows, so does the importance of water conservation. By incorporating water-saving features into your shower faucet, you can reduce your water consumption without compromising on performance. Water-saving showerheads and aerators control the flow of water, minimizing waste without sacrificing the sensation of a refreshing shower.
Follow these steps to incorporate water-saving features:
- Turn off the water supply to your shower.
- Remove the existing showerhead or aerator.
- Install a water-saving showerhead or aerator in its place.
- Turn the water supply back on and test the flow rate.
- Feel good about conserving water while still enjoying a satisfying shower.
By adding thermostatic valves, installing a diverter, and incorporating water-saving features, you can transform your shower faucet into a functional and efficient system. Take the plunge and upgrade your shower experience today!
Maintenance And Care For Your Shower Faucet
Proper maintenance and care for your shower faucet are essential to ensure its longevity and optimal performance. By following these simple steps, you can keep your shower faucet looking and functioning like new for years to come.
Cleaning and maintaining the faucet’s finish
To maintain the pristine look of your shower faucet’s finish, regular cleaning is key. Here are a few steps you can follow:
-
Start by removing any visible dirt or debris from the faucet’s surface using a soft cloth or sponge.
-
Next, create a gentle cleaning solution by mixing warm water with mild soap or dish detergent.
-
Dip a clean cloth or sponge into the cleaning solution and gently scrub the faucet’s finish, paying particular attention to any spots or stains.
-
Rinse the faucet thoroughly with warm water to remove any soap residue.
-
Finally, dry the faucet with a soft, lint-free cloth to prevent water spots and maintain its shine.
Addressing any minor repairs
Occasionally, you may encounter minor issues with your shower faucet that require attention. By addressing these repairs early on, you can prevent them from escalating into more significant problems. Here’s what you can do:
-
Check for any leaks or drips coming from the faucet and address them promptly to avoid water wastage and potential damage.
-
If you notice reduced water flow or uneven water pressure, clean the aerator. Unscrew the aerator from the faucet spout and soak it in a mixture of vinegar and water to remove any mineral deposits. Rinse it thoroughly and reattach it to the spout.
-
If the shower diverter is not working correctly, preventing the water from diverting to the showerhead, it may need to be replaced. Consult the manufacturer’s instructions or seek professional assistance for this task.
Avoiding common mistakes to prolong the faucet’s lifespan
To ensure the prolonged lifespan of your shower faucet, it’s essential to steer clear of common mistakes that could cause unnecessary wear and tear. Here are a few tips to keep in mind:
-
Avoid using harsh chemical cleaners or abrasive cleaning tools. These can damage the faucet’s finish and internal components.
-
Do not overtighten any fittings when installing or repairing the faucet, as this can lead to leaks or damage.
-
Regularly inspect the showerhead and, if necessary, clean or replace it to maintain optimal water flow.
-
Keep an eye out for any signs of wear or damage, such as loose handles or leaks, and address them promptly.
By following these maintenance and care tips, you can enjoy a beautifully functioning shower faucet for years to come. Invest a little time and effort in taking care of your faucet, and it will reward you with reliable performance and an appealing aesthetic.
https://www.youtube.com/watch?v=j_tF5cLruew&pp=ygUgSG93IHRvIEluc3RhbGwgTmV3IFNob3dlciBGYXVjZXQ%3D
Frequently Asked Questions
How Do You Replace A Shower Faucet With No Access Panel?
To replace a shower faucet without an access panel, you will need to cut a hole in the wall behind the faucet. Use a reciprocating saw or a drywall knife to carefully create the opening. Once you have access, remove the old faucet and install the new one following the manufacturer’s instructions.
Can A Shower Faucet Be Replaced?
Yes, a shower faucet can be replaced.
Can You Replace A Shower Faucet Without Replacing The Valve?
Yes, you can replace a shower faucet without replacing the valve. It is possible to update the look and functionality of your shower without the need for valve replacement. Simply removing and replacing the faucet can give your shower a fresh new look.
Do Plumbers Install Shower Faucets?
Yes, plumbers can install shower faucets. They have the expertise to handle the installation process efficiently and ensure that the faucets work properly.
Conclusion
To sum up, installing a new shower faucet can be a straightforward and rewarding DIY project. With the right tools, materials, and step-by-step instructions, you can upgrade your bathroom in no time. Remember to turn off the water supply, remove the old faucet, and carefully install the new one.
Don’t forget to check for leaks and enjoy your refreshed shower experience. Happy plumbing!