Installing an American Standard Toilet is a straightforward process. Here’s a step-by-step guide.
Are you looking to install a new toilet in your bathroom? American Standard toilets are known for their quality and durability. Whether you’re replacing an old toilet or starting from scratch, installing an American Standard Toilet is a simple task that can be done in a few easy steps.
We’ll provide you with a concise and accurate guide on how to install an American Standard Toilet. By following these steps, you’ll have your new toilet up and running in no time, ensuring a comfortable and efficient bathroom experience for years to come. Now let’s jump right into the installation process.
Gathering The Necessary Tools And Materials
Before you begin the installation process for your new American Standard toilet, it’s important to gather all the necessary tools and materials. Having everything you need at your fingertips will help streamline the installation and ensure a smooth experience. Here are the essential tools and materials you’ll need:
Essential tools
- Adjustable wrench
- Phillips head screwdriver
- Tape measure
- Hacksaw or pipe cutter
- Plumber’s putty
- Level
- Pencil
- Bucket or large container
- Rags
Essential materials
Aside from the tools, you’ll also need a few materials to successfully install your American Standard toilet. These materials include:
- American Standard toilet (specific model to be identified later)
- Toilet wax ring
- Toilet mounting bolts
- Toilet seat and lid
- Water supply line
- Plumber’s tape
Now that you have a comprehensive list of the tools and materials required, it’s time to identify the specific American Standard model you’ll be installing. This step is crucial as different models may have slight variations in the installation process, and it’s important to have the right instructions at hand.

Preparing The Bathroom
Before you begin installing your brand-new American Standard toilet, it’s important to properly prepare your bathroom. This involves shutting off the water supply, emptying and cleaning the area around the current toilet, and removing the old toilet and disposing of it properly. Follow these steps to ensure a smooth and hassle-free installation process.
Shutting off the water supply
The first step in preparing the bathroom is to shut off the water supply. This is essential to prevent any potential water leaks during the installation process. Locate the water shut-off valve, which is usually located behind or near the toilet. Turn the valve clockwise until it is completely closed. This will stop the water flow to the toilet and allow you to proceed with the installation.
Emptying and cleaning the area around the current toilet
Next, you’ll want to empty and clean the area around the current toilet. Start by removing any items or accessories on or near the toilet. This includes toilet paper, rugs, and toilet seat covers. Place them in a safe location away from the working area.
Once the area is clear, it’s time to clean. Use a disinfectant cleaner to thoroughly clean the toilet bowl, tank, and surrounding floor. Pay close attention to any stains or buildup. Wipe down all surfaces and ensure they are dry before proceeding.
Removing the old toilet and disposing of it properly
Now it’s time to remove the old toilet. Begin by disconnecting the water supply line from the bottom of the tank. Use an adjustable wrench to loosen the nut and carefully remove the line. Be prepared for some water to drip from the line, so keep a towel or bucket handy to catch any spills.
Next, remove the bolts securing the toilet to the floor. These bolts are typically located at the base of the toilet. Use a wrench to loosen and remove them. Once the bolts are removed, carefully lift the toilet up and away from the floor. Be cautious, as toilets can be heavy and awkward to maneuver.
Properly disposing of the old toilet is crucial. Check with your local waste management facility for guidelines on how to dispose of it. Some areas allow for curbside pickup, while others require you to take it to a designated drop-off location. Follow your local guidelines to ensure proper disposal and environmental responsibility.
With the old toilet removed, you have successfully prepared your bathroom for the installation of your new American Standard toilet. Now you’re ready to continue with the next steps of the installation process.
Installing The American Standard Toilet
Assembling the parts of the American Standard toilet
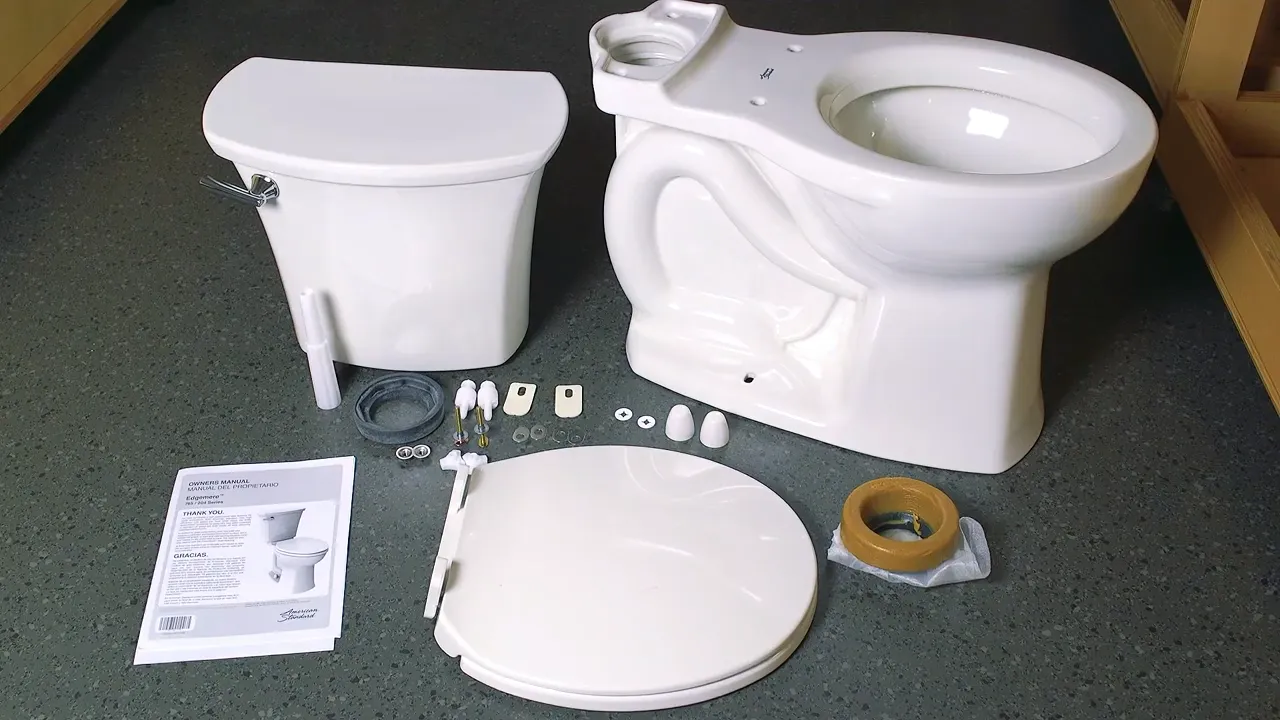
To begin the installation of your American Standard toilet, you will first need to assemble the various components that come with it. Ensure that you have all the necessary parts, including the toilet bowl, tank, wax ring, bolts, and the water supply line. Lay out all the parts on a clean, flat surface, and make sure you have a wrench and a screwdriver handy. This will make it easier to access everything as you progress through the installation.
Placing the wax ring and setting the toilet bowl
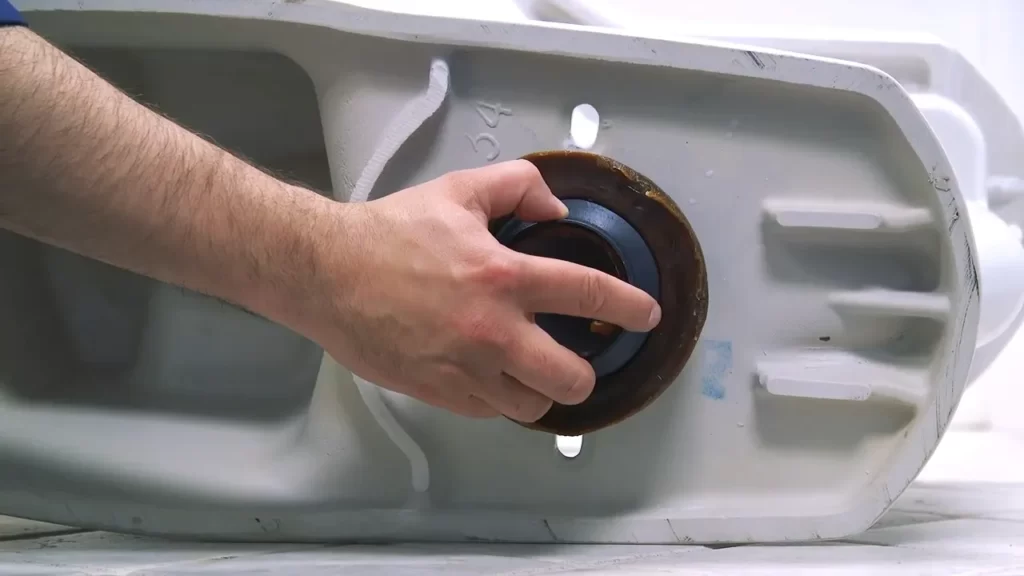
Once you have assembled the necessary parts, it’s time to place the wax ring and set the toilet bowl in place. Start by positioning the wax ring on the flange, ensuring a tight seal. The wax ring will help create a watertight connection between the toilet bowl and the floor. Carefully lower the toilet bowl onto the wax ring, making sure that the holes in the base of the bowl align with the flange bolts. Apply gentle pressure to firmly seal the wax ring, and ensure that the toilet bowl is level and centered before proceeding.
Securing the toilet bowl to the floor
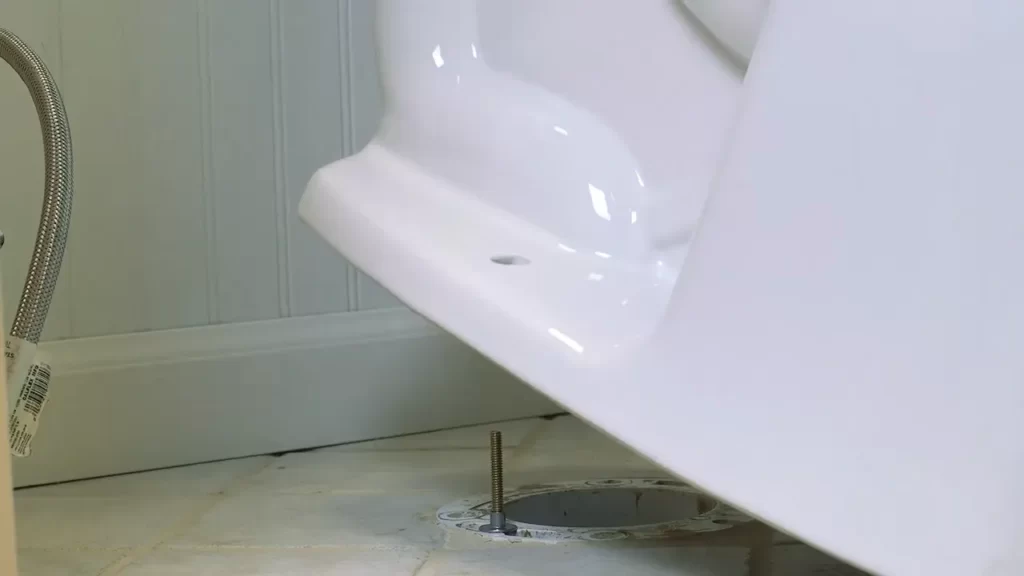
Once the toilet bowl is properly positioned, it’s time to secure it to the floor. Using the bolts provided with the toilet, insert them through the holes in the base of the toilet bowl and tighten them using a wrench. Make sure not to overtighten, as this can cause the porcelain to crack. Check to ensure that the toilet bowl is stable and does not wobble. If it does, you may need to adjust the bolts to ensure a secure fit.
Installing the tank and connecting the water supply
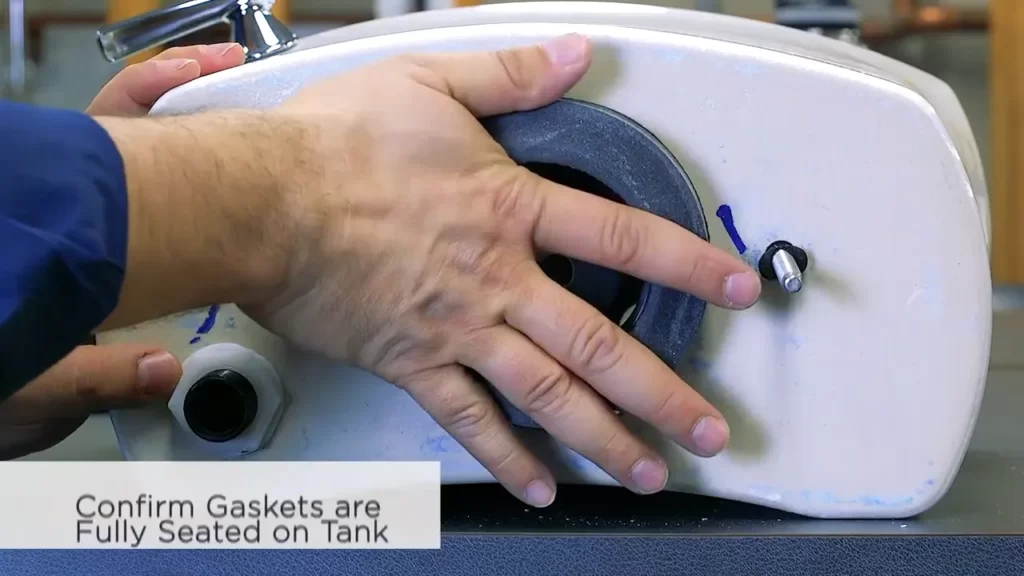
With the toilet bowl secured, it’s time to install the tank and connect the water supply. Start by placing the tank onto the bowl, aligning the holes on the tank with the bolts on the bowl. Use the provided nuts and washers to attach the tank to the bowl, tightening them with a wrench. Once the tank is securely attached, connect the water supply line to the fill valve on the bottom of the tank. Tighten the nut by hand, ensuring a snug fit.
Adjusting the tank components for optimal functioning
Before completing the installation, it’s important to adjust the tank components for optimal functioning. Start by adjusting the water level in the tank to the recommended level, usually indicated by a fill line. This can be done by adjusting the fill valve or float mechanism. Additionally, check for any leaks by flushing the toilet and inspecting the connections. Make any necessary adjustments to ensure a proper seal. Once everything is functioning correctly, you can secure the tank lid in place.
By following these steps, you can successfully install your American Standard toilet and enjoy its benefits for years to come. Remember to refer to the manufacturer’s instructions for specific details and precautions, and enjoy your newly installed toilet.
Testing And Finishing Touches
Once you have successfully installed your American Standard toilet, it’s time to move on to the crucial step of testing and adding the finishing touches. This will ensure that your toilet is functioning properly and has a neat and professional appearance. In this section, we will cover three important tasks: turning on the water supply and checking for leaks, making necessary adjustments to the flush settings, and caulking around the base of the toilet for a tidy finish.
Turning on the water supply and checking for leaks
To begin this step, locate the shut-off valve near the base of the toilet. Turn it in a clockwise direction to open the valve and allow water to flow into the tank. Once the water supply is turned on, carefully inspect the connections for any signs of leaking. Examine the water line, fill valve, and tank bolts to ensure they are tightly secured. If you notice any leaks, promptly tighten the connections or replace any faulty components.
Making necessary adjustments to the flush settings
Now that the water supply is turned on and there are no leaks, it’s time to ensure that the flush settings are properly adjusted. Lift the toilet lid and flush the toilet multiple times, observing the water level and the flush performance. Adjust the water level if it is too high or too low by turning the adjustment screw on the fill valve. It’s important to achieve the optimal water level for efficient flushing and water conservation.
If the flush performance is weak, you may need to adjust the flush settings. Locate the flush valve and adjust the chain length as needed. A longer chain will allow more water to flow for a stronger flush, while a shorter chain will reduce the amount of water used. Experiment with the chain length until you achieve the desired flush performance.
Caulking around the base of the toilet for a tidy finish
The final step in the installation process is to caulk around the base of the toilet to create a tidy and watertight seal. This will prevent any water from seeping between the toilet and the floor, ensuring a clean and professional appearance. Begin by applying a thin bead of caulk around the base of the toilet, making sure to cover any gaps between the toilet and the floor. Use a caulk gun for precise application and smooth the caulk with a damp cloth or your finger for a neat finish. Allow the caulk to dry completely before using the toilet.
By following these steps to test and add the finishing touches to your American Standard toilet installation, you can ensure that your toilet is functioning properly and looks great in your bathroom. Remember to always refer to the manufacturer’s instructions for specific guidance and enjoy your newly installed toilet!
Additional Considerations And Troubleshooting Tips
Dealing with Flange Issues or Uneven Floors
If you’re experiencing flange issues or have uneven floors, don’t worry! These common problems can be easily addressed during the installation process of your American Standard toilet.
Firstly, let’s talk about flanges. The flange is a crucial component that connects your toilet to the sewer pipe. If it’s damaged or not properly aligned, it can cause leaks or wobbling. To ensure a secure fit, consider the following tips:
- Inspect the flange: Take a look at the flange to check for any cracks, corrosion, or other signs of damage. If you notice any issues, it’s important to replace the flange before proceeding with the installation.
- Measure the flange height: It’s essential to measure the height of the flange to ensure a proper connection. If the flange is too low, you may need to use a wax ring with an extra-thick sleeve. On the other hand, if the flange is too high, you can use a double-wax ring or a waxless flange gasket to create a tight seal.
- Align the toilet: When placing the toilet over the flange, make sure it is properly aligned. Gently press down on the toilet to compress the wax ring and create a secure seal.
In the case of uneven floors, you may need to use shims to level the toilet. Shims are small, wedge-shaped pieces that can be placed under the toilet base to provide stability. By adjusting the height of the shims, you can ensure that your toilet sits perfectly level, minimizing any rocking or instability.
Addressing Common Installation Problems and Solutions
During the installation process, you may encounter a few common problems. Rest assured, there are simple solutions to tackle these issues:
- Leaking connections: If you notice leaks around the toilet base or at the water supply line, it’s important to check the tightness of the connections. Ensure that all nuts and bolts are securely tightened, but be cautious not to overtighten, as this can cause damage.
- Flush issues: If your toilet doesn’t flush properly or has a weak flush, it could be due to a clog or a problem with the flushing mechanism. Use a plunger or a toilet auger to clear any obstructions in the drain pipe, and if the problem persists, consider adjusting or replacing the flush valve.
- Water running continuously: A toilet that constantly runs can lead to a significant waste of water. If you’re faced with this problem, check the flapper valve for any damage or misalignment. Adjust or replace the flapper valve as needed to ensure a proper seal.
Tips for Maintaining and Prolonging the Lifespan of the American Standard Toilet
To ensure your American Standard toilet lasts for many years to come, follow these tips for proper maintenance:
- Regular cleaning: Clean your toilet regularly using a mild cleaner or vinegar solution to prevent the buildup of mineral deposits and stains. Avoid using abrasive cleaners or brushes that can scratch the surface.
- Check for leaks: Periodically inspect the toilet for any leaks by adding a few drops of food coloring into the tank. If the color appears in the bowl without flushing, it indicates a leak that needs to be addressed.
- Inspect and replace parts if necessary: Keep an eye on the various components of your toilet, such as the flapper valve, fill valve, and flush handle. If you notice any signs of wear or malfunctioning, promptly replace the affected parts to maintain optimal performance.
- Prevent clogs: Use a toilet plunger or an auger to clear minor clogs before they worsen. Additionally, make sure to avoid flushing excessive amounts of toilet paper or items that are not toilet-friendly.
By following these troubleshooting tips and implementing proper maintenance practices, your American Standard toilet will continue to deliver reliable performance and water efficiency for years to come.
Frequently Asked Questions
How Do You Install A Toilet Step By Step?
To install a toilet, follow these steps: 1. Turn off the water supply valve. 2. Remove the old toilet, starting with the tank and then the bowl. 3. Insert a new wax ring onto the drain flange. 4. Position the new toilet bowl on top of the wax ring.
5. Secure the toilet bowl to the floor with bolts and nuts, and connect the water supply line.
How To Install American Standard 4000 Toilet?
To install an American Standard 4000 toilet, first, remove the old toilet. Clean the flange and place a wax ring on it. Then, carefully position the new toilet over the wax ring and secure it to the flange with bolts.
Connect the water supply and check for leaks. Finally, attach the toilet seat.
How Do You Install An American Standard Dual Flush Valve?
To install an American Standard dual flush valve, follow these steps: 1. Shut off the water supply. 2. Flush the toilet to empty the tank. 3. Remove the tank cover and disconnect the supply line. 4. Unscrew the existing flush valve and remove it.
5. Install the new dual flush valve and tighten the screws. 6. Reconnect the supply line and turn on the water supply. 7. Test the flush valve to ensure it’s functioning properly.
How Do You Attach A Toilet Bowl To The Base?
To attach a toilet bowl to the base, you need to follow these steps: 1. Place the wax ring on the toilet flange. 2. Carefully lower the toilet bowl onto the wax ring, aligning the mounting bolts with the holes on the base.
3. Press down firmly to compress the wax ring and create a watertight seal. 4. Securely attach washers and nuts onto the mounting bolts. 5. Use a wrench to tighten the nuts, but be careful not to overtighten.
Conclusion
Installing an American Standard toilet is a simple task that can be done by following these step-by-step instructions. By carefully following the guidelines mentioned in this blog post, you can successfully install a toilet without any hassle. Remember to take proper measurements, use the right tools, and ensure a secure and leak-free installation.
With this comprehensive guide, you can confidently tackle your toilet installation project and enjoy a properly functioning American Standard toilet in your home. Happy plumbing!