
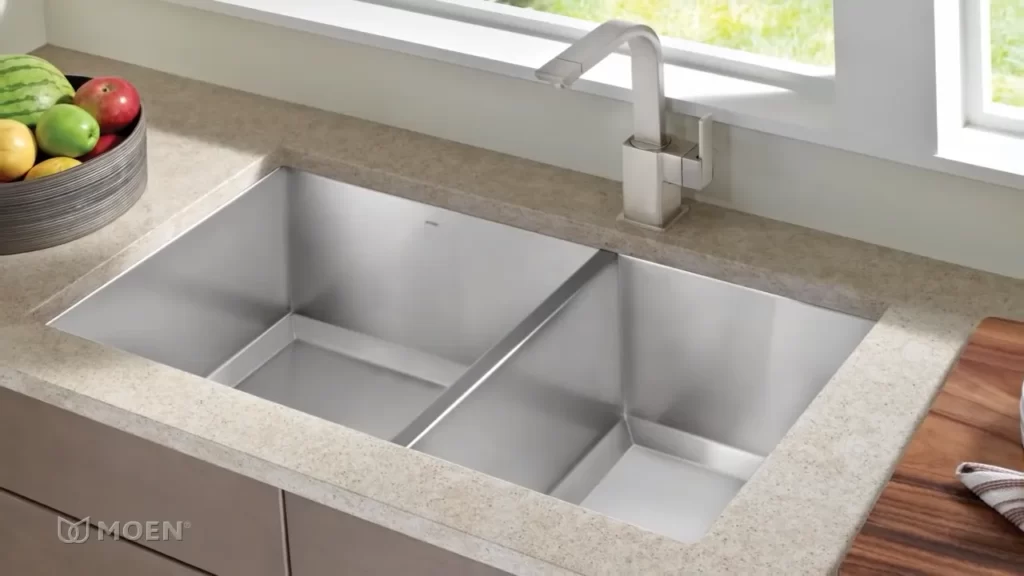
To install a stainless steel sink, first, measure the dimensions of the sink and the countertop cutout. Then, apply a silicone caulk to the sink rim, position it into the cutout, and secure it with clips or brackets.
Finally, connect the drain and water supply lines to complete the installation. Stainless steel sinks have steadily gained popularity due to their durability, easy maintenance, and sleek appearance. Whether you’re renovating your kitchen or replacing an old sink, knowing how to install a stainless steel sink will ensure a seamless and professional finish.
However, the installation process requires careful attention to detail to prevent leaks or damage to the surrounding surfaces. We will guide you through the step-by-step process of installing a stainless steel sink, enabling you to enhance both the functionality and aesthetics of your kitchen.
Choosing The Right Sink Material
Why stainless steel is a popular choice
When it comes to choosing the right sink material for your kitchen, there are numerous options available, each with its own unique set of benefits. However, stainless steel remains one of the most popular choices among homeowners and professional chefs alike. The durability and versatility of stainless steel make it an ideal option for any kitchen.
Factors to consider when selecting a durable sink material
Before making a decision, it is essential to consider a few factors that can greatly influence the durability and overall performance of your sink. Here are some key factors to keep in mind:
- Resistance to corrosion: The sink material should be resistant to corrosion, ensuring it can withstand daily use and exposure to water and various cleaning products.
- Strength and durability: A durable sink material will be able to handle heavy pots, pans, and dishes without denting or scratching easily.
- Maintenance and cleaning: Consider the ease of cleaning and maintenance required for the sink material. Opting for a sink that is easy to clean will save you time and effort in the long run.
- Heat resistance: The sink material should be able to withstand high temperatures to avoid any damage or discoloration caused by hot pots or pans.
- Style and aesthetics: Choose a sink material that complements your kitchen’s overall design and provides a visually appealing look.
Benefits of installing a stainless steel sink
A stainless steel sink offers a multitude of benefits that make it an excellent choice for any kitchen, whether it’s in a busy restaurant or a cozy home. Here are some advantages of installing a stainless steel sink:
- Durability: Stainless steel sinks are known for their exceptional strength, making them resistant to dents, scratches, and chipping. They can withstand heavy usage without compromising their structural integrity.
- Corrosion resistance: Stainless steel is highly resistant to corrosion, ensuring your sink will maintain its polished appearance for years to come.
- Easy maintenance: Cleaning a stainless steel sink is a breeze. The smooth surface of stainless steel prevents staining and makes wiping away residue effortless.
- Heat resistance: Stainless steel sinks can handle high temperatures without warping or discoloration, offering peace of mind when working with hot pots and pans.
- Versatility: Stainless steel sinks come in various sizes and configurations, making them suitable for any kitchen layout or design.
- Modern look: The sleek and shiny appearance of stainless steel instantly adds a touch of modernity to any kitchen decor, complementing both traditional and contemporary styles.
In conclusion, choosing the right sink material is essential for a functional and visually appealing kitchen. Stainless steel sinks have a range of advantages that make them a popular choice among homeowners and professionals. Their durability, resistance to corrosion, ease of maintenance, heat resistance, versatility, and modern look make them a reliable and stylish option for any kitchen.
Step 1: Measuring And Preparing The Sink Area
Before you can install a stainless steel sink, it’s important to accurately measure the cabinet and countertop dimensions to ensure a proper fit. Here are the essential steps to follow:
Accurately measuring the cabinet and countertop dimensions
To begin, measure the width, height, and depth of the cabinet where your new stainless steel sink will be installed. Use a measuring tape to get precise measurements, ensuring you account for any protruding pipes or other obstacles that may affect the sink’s installation. Make a note of these measurements to refer to later in the process.
Clearing the area and ensuring proper support for the sink
Once you have the cabinet and countertop measurements, it’s time to clear the area where the sink will be installed. This includes removing any items stored in the cabinet and clearing any debris or old caulk from the countertops.
Next, ensure that the cabinet has proper support for the weight of the stainless steel sink. If necessary, add additional supports or reinforcements to ensure stability and prevent the sink from sagging over time. A sturdy and level base will provide a solid foundation for your new sink.
Removing the old sink (if applicable) and cleaning the space
If you are replacing an old sink, you’ll need to remove it before installing the new stainless steel sink. Start by shutting off the water supply to the sink and disconnecting any plumbing connections. Use a wrench to loosen and remove any remaining mounting hardware.
Once the old sink is removed, thoroughly clean the space using a mild detergent and warm water. Remove any old caulk or adhesive residue to ensure a clean surface for the new sink. Take care not to scratch or damage the countertop during this process.
By accurately measuring the cabinet and countertop dimensions, clearing the area and ensuring proper support, and removing the old sink (if applicable) and cleaning the space, you’ll be well on your way to successfully installing a stainless steel sink.

Step 2: Gathering The Necessary Tools And Materials
Before you can begin installing your stainless steel sink, it’s important to gather all the necessary tools and materials. This will not only make the installation process smoother but also ensure that you have everything you need right at your fingertips. In this step, we will take a look at the list of tools required, the types of stainless steel sinks available in the market, and the additional materials you will need for a successful installation.
List of tools required for the installation process
Installing a stainless steel sink requires a specific set of tools to ensure a secure and precise fit. Here is a list of the tools you will need:
- Adjustable wrench
- Plumber’s tape
- Hacksaw or pipe cutter
- Utility knife
- Silicone adhesive
- Screwdriver
- Measuring tape
- Pencil or marker
Types of stainless steel sinks available in the market
When it comes to choosing a stainless steel sink for your installation, you’ll find a variety of options available in the market. Each type offers its own set of features and benefits. Here are a few common types:
| Type | Description |
|---|---|
| Topmount | A topmount stainless steel sink is installed by placing it on top of the countertop. It has a rim that overlaps the countertop, providing a traditional and timeless look. |
| Undermount | An undermount stainless steel sink is installed underneath the countertop, creating a sleek and seamless appearance. It requires special clips and adhesive for secure attachment. |
| Apron-Front | Also known as farmhouse sinks, apron-front stainless steel sinks have a large, exposed front surface that adds charm and character to any kitchen. |
Additional materials needed for a successful installation
In addition to the tools mentioned above, you will need a few additional materials to ensure a successful stainless steel sink installation:
- Plumber’s putty or silicone caulk
- Mounting brackets (if required)
- Strainer assembly
- Soap dispenser (optional)
By gathering these tools and materials, you’ll be well-prepared for the next step in the installation process. Now that you have everything you need, let’s move on to step 3: Preparing the Sink and Countertop.
Step 3: Preparing The Sink For Installation
Now that you have familiarized yourself with the basic steps of installing a stainless steel sink, it’s time to move on to the crucial third step: preparing the sink for installation. This step involves understanding the different components of the sink, cleaning and inspecting it for any defects or damages, and applying sealant or caulk to create a watertight seal. Let’s dive into each of these substeps further.
Understanding the different components of a stainless steel sink
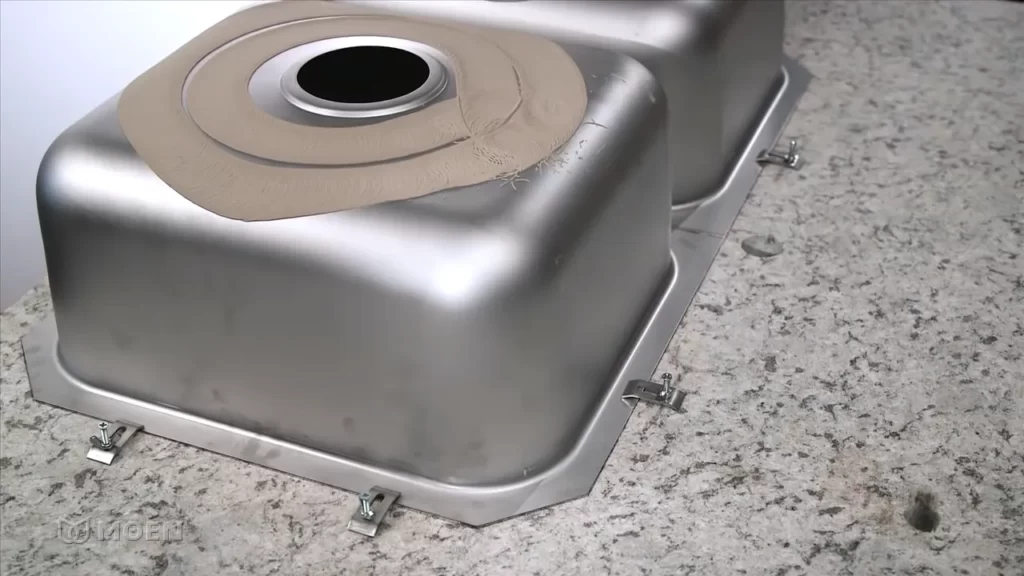
Before you install your stainless steel sink, it’s important to understand the different components that make up the sink. These components include the sink itself, the mounting hardware, and the drain assembly. The sink is typically made of stainless steel, a durable and corrosion-resistant material that is perfect for kitchen sinks. The mounting hardware, on the other hand, consists of clips, brackets, and screws that hold the sink securely in place. Finally, the drain assembly comprises the drain pipe and strainer that allow water to flow out of the sink.
Cleaning and inspecting the sink for any defects or damages
To ensure a successful installation, it’s crucial to clean and inspect the sink for any defects or damages. Begin by cleaning the sink thoroughly with a mixture of warm water and mild dish soap. Scrub the entire surface of the sink, including the edges and corners, to remove any dirt, dust, or debris. Once the sink is clean, inspect it carefully for any scratches, dents, or manufacturing defects. Pay close attention to the edges and corners, as these areas are more prone to damage. If you spot any defects or damages, it’s best to contact the manufacturer for a replacement before proceeding with the installation.
Applying sealant or caulk to create a watertight seal
To ensure that your sink is watertight and prevents any leakage, it’s crucial to apply sealant or caulk during the installation process. Begin by applying a thin bead of silicone sealant or caulk around the edge of the sink cutout on the countertop. This will create a watertight seal and prevent any water from seeping beneath the sink. Make sure to apply the sealant evenly and smoothly, using a caulk gun or your fingers. After applying the sealant, gently press the sink into place, ensuring that it fits snugly and securely on the countertop. Wipe away any excess sealant or caulk using a damp cloth.
Preparing your stainless steel sink for installation is a critical step in ensuring its longevity and functionality. By understanding the different components, cleaning and inspecting for defects or damages, and applying sealant or caulk for a watertight seal, you can proceed confidently to the next step of the installation process.
Step 4: Installing The Sink In The Cabinet
Now that you have prepared the countertop and made all the necessary connections, it’s time to install the stainless steel sink in the cabinet. This step is crucial as it ensures the sink is positioned securely, aligned properly, and stable for long-lasting use. Follow these steps to successfully complete this process and enjoy a functional and beautiful sink in your kitchen.
Positioning and aligning the sink in the designated area
To begin, carefully place the stainless steel sink in the designated area in the cabinet. Make sure the sink is centered and parallel to the edge of the countertop. Take measurements and adjust if needed to ensure an even and symmetrical appearance.
Securing the sink to the countertop or cabinet
Once the sink is properly positioned, it’s time to secure it to the countertop or cabinet. Use a caulk gun to apply a bead of silicone caulk around the edge of the sink, ensuring a watertight seal and preventing any water leakage. Be generous with the caulk, but also avoid excess caulk that may create a messy appearance.
For added support and stability, use clips or brackets provided by the manufacturer to attach the sink to the underside of the countertop or cabinet. These clips or brackets should be placed strategically around the perimeter of the sink, evenly distributing the weight and minimizing any potential movement.
Ensure proper alignment and stability of the sink by checking that it sits level and flush with the countertop surface. Adjust the clips or brackets as needed to achieve the desired alignment. It’s important to note that each sink model may have specific instructions, so refer to the manufacturer’s guidelines for the recommended method of securing the sink.
Ensuring proper alignment and stability of the sink
Finally, after securing the sink, ensure that it is aligned properly and stable. Gently press down on the sink, applying even pressure to the entire surface, to confirm that it doesn’t shift or move. This will help avoid any future issues such as leaks or damage caused by a loose sink.
Additionally, check for any visible gaps between the sink and the countertop. If necessary, use a clean cloth to wipe away any excess caulking that may have squeezed out during the installation process. This will give your sink a seamless appearance and prevent any potential water damage in hard-to-reach areas.
By following these steps and ensuring proper alignment and stability, you’ll have a neatly installed stainless steel sink in your cabinet. This not only enhances the overall look of your kitchen but also provides a durable and functional workspace for all your cooking and cleaning needs. Enjoy your new sink and the convenience it brings to your daily kitchen activities.
Step 5: Connecting The Plumbing And Drainage
Now that you have successfully installed your stainless steel sink and secured it in place, it’s time to tackle the next crucial step: connecting the plumbing and drainage. This step ensures that your sink functions properly and efficiently for all your washing and cleaning needs. In this step, we will cover the installation of the drain assembly in the sink, connecting the sink to the water supply lines, and testing for any leaks and making necessary adjustments.
Installing the drain assembly in the sink
First, let’s focus on installing the drain assembly in the sink. This component plays a vital role in allowing the water to flow out of the sink effectively. Follow these steps to ensure a proper installation:
- Start by applying a small amount of plumber’s putty or silicone caulk around the flange of the drain assembly.
- Insert the flange into the drain opening on the sink and press it firmly to create a watertight seal.
- Next, place the rubber gasket and washer onto the underside of the sink.
- Tighten the locknut onto the drain assembly from underneath the sink, ensuring a secure fit.
Once the drain assembly is properly installed, you’re ready to move on to connecting the sink to the water supply lines.
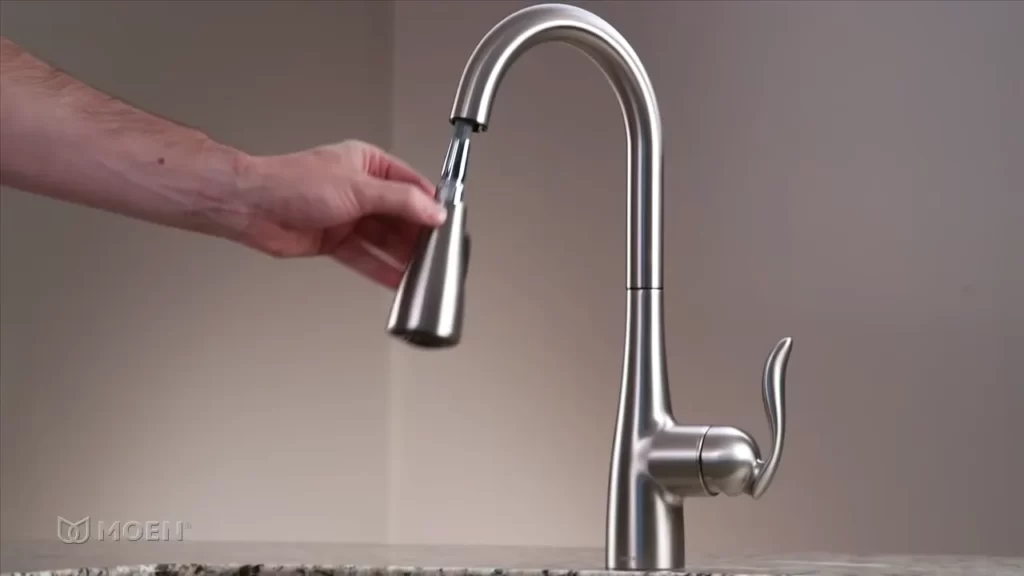
Connecting the sink to the water supply lines
To complete the plumbing installation for your stainless steel sink, you’ll need to connect it to the water supply lines. Here’s how:
- Locate the hot and cold water supply lines underneath your sink.
- Using a wrench, carefully connect the corresponding water supply lines to the hot and cold water valves.
- Tighten the connections snugly, but be cautious not to overtighten and cause damage.
- Double-check all the connections to ensure there are no leaks.
With the plumbing and drainage connections in place, it’s time to move on to the final step of this process.
Testing for any leaks and making necessary adjustments
To ensure that your stainless steel sink is fully functional and leak-free, you need to test the connections and make any necessary adjustments. Follow these steps:
- Turn on the water supply and let it run for a few minutes.
- Inspect all the connections, including the drain assembly and the water supply lines.
- If you notice any leaks, use a wrench to tighten the connections or replace any faulty components.
- Continue testing and making adjustments until all connections are secure and leak-free.
Remember, proper installation and connection of your sink’s plumbing and drainage are essential for its functionality and longevity. By following these steps and ensuring a tight and secure fit, you can enjoy a fully operational stainless steel sink that meets your needs for years to come.
Step 6: Sealing And Finishing The Installation
After successfully positioning and securing your stainless steel sink into the countertop, it’s time to seal and finish the installation. This step is crucial to prevent water damage, maintain a clean and hygienic workspace, and ensure the longevity of your sink.
Applying silicone or sealant around the edges of the sink
To create a watertight seal between the sink and the countertop, you’ll need to apply a silicone or sealant around the edges. This will prevent water from seeping into the gaps and causing damage to your cabinets or countertops. Follow these steps to apply the sealant:
- Cut the tip of the silicone or sealant tube at a 45-degree angle.
- Place the tube into a caulk gun and squeeze a small amount of sealant onto a paper towel to ensure a smooth flow.
- Starting from one corner, apply an even bead of silicone or sealant along the edge of the sink where it meets the countertop.
- Use a caulk smoothing tool or your finger to smooth and press the sealant into the gap, ensuring it adheres well to both surfaces.
- Wipe away any excess sealant with a damp cloth.
Checking for any gaps or uneven surfaces
After applying the sealant, it’s essential to check for any gaps or uneven surfaces that could compromise the integrity of the installation. Follow these steps to ensure a snug fit:
- Inspect the edges of the sink to make sure there are no visible gaps between the sink and the countertop.
- Check for any uneven surfaces where the sink may not lay flush with the countertop.
- If you notice any gaps or unevenness, remove the sink carefully and reposition it, making necessary adjustments.
- Reapply the silicone or sealant to secure the sink in its new position.
Properly cleaning and maintaining the stainless steel sink
To ensure the longevity and beauty of your stainless steel sink, proper cleaning and maintenance are essential. Follow these tips:
- Regularly clean your sink using mild soap or dish detergent and warm water.
- Use a non-abrasive sponge or cloth to scrub away any stains or food residue.
- Rinse the sink thoroughly and wipe it dry to prevent water spots or mineral deposits.
- Avoid using harsh chemicals or abrasive cleaners that can damage the surface of the sink.
- Consider using a stainless steel cleaner or polish to maintain a shiny and fingerprint-free appearance.
By following these installation and maintenance steps, you can ensure a properly sealed stainless steel sink that enhances the functionality and aesthetic of your kitchen for years to come.
Frequently Asked Questions
How Do You Install A Stainless Steel Undermount Sink?
To install a stainless steel undermount sink, start by measuring and marking the hole for the sink in the countertop. Then, cut the hole using a jigsaw or a router. Apply a bead of silicone caulk around the edge of the sink’s rim and carefully lower it into the hole.
Finally, secure the sink by tightening the clips provided.
How Do You Install A Top Mount Stainless Steel Sink?
To install a top mount stainless steel sink, start by measuring and marking the position. Apply a silicone sealant around the edges of the sink. Drop the sink into the cutout and secure it with clips. Connect the plumbing and ensure proper alignment.
Finally, test for leaks and make any necessary adjustments.
What Do You Put On The Bottom Of A Stainless Steel Sink?
To protect your stainless steel sink, place a sink grid or rubber mat on the bottom to prevent scratches and dents.
What Is The Best Adhesive For A Drop In Sink?
The best adhesive for a drop in sink is a silicone-based adhesive. It provides a strong and durable bond, preventing water leakage and ensuring a secure installation.
Conclusion
Installing a stainless steel sink is a straightforward process that can significantly enhance the aesthetics and functionality of your kitchen. By following the step-by-step guide provided in this blog post, you can successfully complete the installation with ease. Remember to gather the necessary tools and materials, prepare the workspace, and carefully follow the manufacturer’s instructions.
With proper care and maintenance, your stainless steel sink will bring long-lasting beauty and convenience to your kitchen. Happy sink installation!