
To install an RV toilet, first, locate the toilet flange and remove the old toilet. Then, install the new toilet by attaching it to the flange and connecting the water supply.
Factors To Consider When Selecting An Rv Toilet
Factors to Consider When Selecting an RV Toilet
When it comes to selecting an RV toilet, there are several important factors that you need to consider. The right toilet can make a significant difference in terms of comfort and convenience during your travels. From size and dimensions to water usage and flush type, understanding these factors can help you choose the perfect toilet for your RV.
Size and dimensions
One of the first factors to consider when selecting an RV toilet is the size and dimensions. RV toilets come in various sizes to accommodate different bathroom layouts. Before making a purchase, measure the available space in your RV’s bathroom to ensure that the toilet will fit properly. It’s also important to consider the height of the toilet. Check for options that offer optimal seating height for your comfort.
Water usage
Water usage is another crucial factor to consider when selecting an RV toilet. As you will be traveling with limited water resources, it’s essential to choose a toilet that conserves water efficiently. Look for models that offer low water consumption without compromising performance. This not only helps you save water but also allows you to extend your water supply during your trips.
Flush type
The flush type is an important consideration when choosing an RV toilet. There are two main types to choose from: gravity flush and macerator flush. Gravity flush toilets are the most common and use gravity to flush waste into the holding tank. On the other hand, macerator flush toilets use a macerating pump to break down waste before flushing it away. Consider your preferences and the toilet’s compatibility with your RV’s plumbing system when deciding on the flush type.
Installation requirements
Before purchasing an RV toilet, it’s crucial to understand the installation requirements. Different toilets may have varying installation processes and requirements. Some toilets may require an electrical connection, while others may need specific plumbing configurations. Ensure that you have all the necessary tools, equipment, and resources for a smooth installation process. Consider the complexity of the installation and whether you have the skills and knowledge required to do it yourself or if you need to hire a professional.
In conclusion, selecting the right RV toilet involves considering factors such as size and dimensions, water usage, flush type, and installation requirements. By carefully evaluating these factors, you can choose a toilet that perfectly fits your RV’s bathroom space, conserves water efficiently, operates with your preferred flush type, and can be installed without any complications. Take the time to research and compare different options to find the perfect toilet that meets your specific needs and enhances your overall RV experience.
Popular Rv Toilet Brands
Brand 1
One of the most popular RV toilet brands on the market is Brand 1. Known for their durable construction and innovative design, Brand 1 toilets are a favorite among RV enthusiasts. These toilets are specifically designed to fit the compact space in an RV bathroom while providing maximum comfort and convenience.
Brand 2
If you’re looking for a reliable and efficient RV toilet, Brand 2 is a brand worth considering. These toilets are known for their excellent flushing system, which ensures effective waste removal with minimal water usage. Brand 2 toilets also feature a comfortable seat and easy-to-clean surfaces, making maintenance hassle-free.
Brand 3
For those seeking a luxurious and high-end RV toilet experience, Brand 3 offers a range of premium options. These toilets are built with top-quality materials and incorporate advanced features such as soft-close seats and adjustable water pressure. Brand 3 toilets not only provide superior performance but also add a touch of elegance to your RV bathroom.
Gather The Necessary Tools And Supplies
Before you start installing an RV toilet, it’s essential to gather all the necessary tools and supplies. Having everything ready beforehand will make the installation process smoother and more efficient. Here’s a list of the tools and supplies you’ll need:
List of tools:
- Adjustable wrench
- Phillips head screwdriver
- Utility knife
- Plumbers tape
- Teflon tape
- Rubber gloves
- Safety goggles
- Bucket or container
List of supplies:
- New RV toilet
- New toilet seat
- New wax ring
- New water supply line
- New flange bolts with nuts and washers
- Clean rags or paper towels
- Bathroom cleaner
- Silicone sealant
With these tools and supplies at your disposal, you’ll be well-prepared to tackle the installation process. Gather them all and keep them within reach before you start working on installing your new RV toilet.
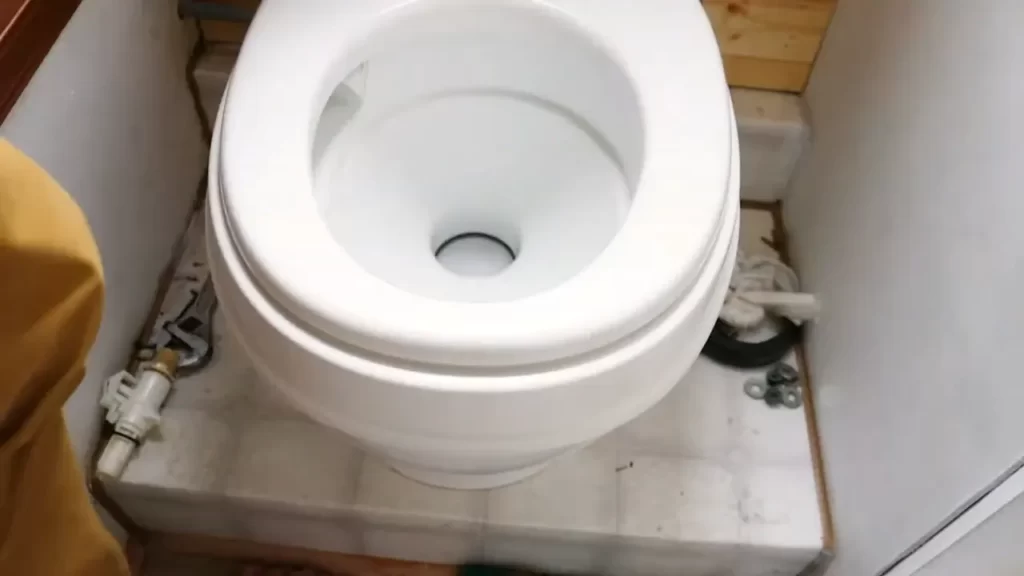
Remove The Old Rv Toilet
Step 1: Emptying and Cleaning the Holding Tank
To remove the old RV toilet, the first step is to empty and clean the holding tank. This is an important step to ensure a hygienic and odor-free installation of the new toilet. Here’s how you can do it:
1. Put on a pair of gloves and gather the necessary supplies: a hose, a bucket, and holding tank treatment chemicals.
2. Locate the holding tank release valve, usually situated at the bottom of the tank. Make sure the valve is closed before starting the process.
3. Place the bucket under the valve and slowly open it to release the contents into the bucket. Be cautious as the tank might contain liquids and solids.
4. Once the tank is emptied, close the valve securely.
5. Take the hose and connect it to a water source. Use the hose to rinse out the tank thoroughly, ensuring that all waste residue is flushed out.
6. Next, add the holding tank treatment chemicals as per the product instructions. These chemicals help eliminate odors and break down waste inside the tank.
7. Leave the chemicals to work their magic for the recommended amount of time, typically overnight.
8. Finally, rinse out the holding tank once again to ensure all traces of the cleaning chemicals are removed.
Step 2: Removing the Water Supply Line
Now that the holding tank is emptied and clean, the next step is to remove the water supply line connected to the old toilet. Follow these steps:
1. Locate the water supply valve near the back of the toilet. This valve controls the water supply to the toilet.
2. Turn the supply valve clockwise to shut off the water flow.
3. Once the water is shut off, use pliers or a wrench to loosen the coupling nut connecting the water supply line to the toilet.
4. Gently remove the water supply line from the toilet, ensuring no water spills during the process.
5. Set the water supply line aside for disposal or future use if it’s still in good condition.
Step 3: Removing the Bolts or Screws
The final step in removing the old RV toilet is to detach it from the floor by removing the bolts or screws that secure it in place. Follow these steps:
1. Locate the plastic caps covering the bolts or screws at the base of the toilet.
2. Use a screwdriver or a small pry tool to remove the caps carefully, revealing the bolts or screws underneath.
3. Use a wrench or screwdriver (depending on the type of fasteners) to loosen and remove the bolts or screws. Keep track of the hardware as they will be needed for the installation of the new toilet.
4. Once all the bolts or screws are removed, gently lift the old toilet up and off the mounting flange, ensuring not to damage the surrounding floor.
5. Set aside the old toilet for disposal or any required repairs.
With the old toilet successfully removed, you are now ready to install the new RV toilet. Stay tuned for our upcoming post on ‘How to Install an RV Toilet’ to complete this exciting renovation project.
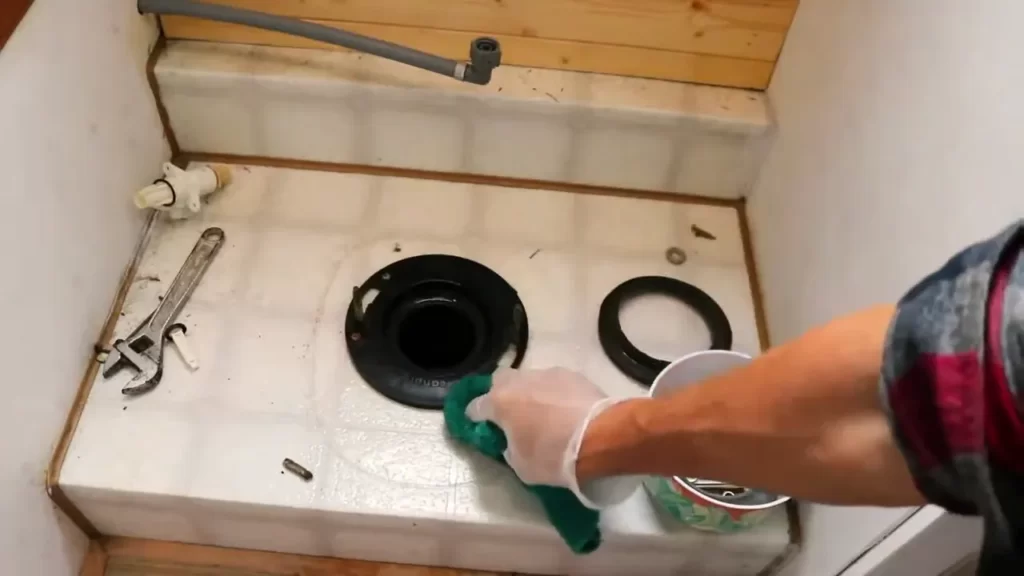
Prepare The Installation Area
Before installing your RV toilet, it is essential to prepare the installation area properly. This will ensure a smooth and hassle-free installation process, allowing you to enjoy your new toilet without any issues. In this section, we will guide you through the necessary steps to prepare the installation area.
Step 1: Clean and sanitize the area
The first step in preparing the installation area is to clean and sanitize it thoroughly. This is important to prevent any contamination and to provide a clean environment for your new RV toilet. To do this, follow these simple steps:
- Clear out any objects or debris from the area surrounding the installation site. This will make it easier to work and install the toilet.
- Using a mild detergent and warm water, clean the floor and walls surrounding the area. Make sure to remove any stains or grime.
- Rinse the area with clean water and ensure it is completely dry before proceeding with the installation.
- Once the area is clean, you can sanitize it using a disinfectant spray or wipes. Pay close attention to high-touch areas such as door handles or countertops.
Step 2: Ensure proper ventilation
Ensuring proper ventilation in the installation area is crucial to prevent odors and maintain a fresh and comfortable environment in your RV. Here are a few ways to create adequate ventilation:
- Open any windows or vents in your RV to allow for fresh air circulation.
- Place a portable fan or ventilation system nearby to improve airflow.
- If possible, position the toilet near an existing ventilation system or fan to enhance the overall ventilation in the area.
Step 3: Measure and mark the placement
Accurate measurements and proper placement of your RV toilet are essential to ensure optimal functionality and convenience. Follow these steps to measure and mark the placement:
- Measure the available space in your RV to determine the suitable toilet size and configuration.
- Using a pencil or marker, mark the center point of the toilet’s base on the floor. This will serve as your reference point during installation.
- Measure the distance from the marked point to the walls to ensure there is enough clearance for the toilet’s operation and maintenance.
- Consider any additional clearance requirements specified by the manufacturer, such as side or rear clearances.
By following these steps, you can ensure that your installation area is clean and properly prepared for the installation of your new RV toilet. This will help you avoid any issues and enjoy a seamless installation process. In the next section, we will guide you through the actual installation of the toilet itself.
Step 1: Positioning The New Toilet
Installing a new RV toilet is an important step towards enhancing the comfort and functionality of your recreational vehicle. In this guide, we will walk you through the process of installing an RV toilet, starting with Step 1: Positioning the New Toilet. This step is crucial as it ensures proper alignment and stability of the toilet, providing you with a hassle-free experience while on the road.
Step 1.1: Aligning the mounting holes with the marks
Before beginning the installation process, it is essential to identify the location where you want to install the new toilet. You need to ensure that the surface is level and sturdy enough to support the weight of the toilet.
Start by marking the position of the mounting holes on the floor. These marks will act as a guide when aligning the toilet during installation. Use a pencil or marker to make these markings, ensuring they are easily visible.
Step 1.2: Checking for level and stability
Once you have marked the location for the toilet, it’s time to check for level and stability. Place the toilet in the marked position, making sure that it is centered and aligned with the holes. This step is crucial as an unlevel toilet can cause water leakage and discomfort while using the RV bathroom.
Use a leveling tool to check if the toilet is parallel to the floor. Adjust the position if necessary until you achieve a perfectly level surface. In addition to being level, it’s crucial to ensure that the toilet is stable to prevent any wobbling or movement during use.
To determine stability, gently apply pressure to the toilet from different angles. If you notice any movement or rocking, you may need to readjust or make modifications to the installation area to ensure a sturdy and stable base.
By carefully aligning the mounting holes with the marks and checking for level and stability, you can ensure a solid foundation for your new RV toilet. This step is essential to prevent any issues in the future and to ensure a comfortable bathroom experience while traveling.
Step 2: Connecting The Water Supply
Once you have successfully installed the RV toilet in your recreational vehicle, the next step is to connect the water supply. This step is crucial as it ensures that you have a steady flow of water for your toilet to function optimally. In this section, we will guide you through the process of connecting the water supply line to the toilet.
Step 2.1: Connecting the water supply line to the toilet
To connect the water supply line to your RV toilet, follow these simple steps:
- Locate the water supply line connection on the back of the toilet.
- Take the attached water supply line or a separate hose and connect it to the water supply line connection. Make sure it is securely fastened.
- If necessary, use Teflon tape to ensure a watertight seal. Wrap the tape around the threaded ends of both the water supply line and the toilet connection before screwing them together.
- Once everything is connected, turn on the water supply valve to allow water to flow into the toilet.
By following these steps, you should have successfully connected the water supply line to your RV toilet. However, it is important to test for leaks to ensure everything is properly sealed.
Step 2.2: Testing for leaks
Testing for leaks is a crucial step to ensure that your RV toilet is functioning efficiently and that there are no water leaks that could cause damage. Here’s how you can test for leaks:
- Turn on the water supply to fill the toilet tank.
- Inspect all the connections, joints, and fittings for any signs of water leakage.
- Check for any water dripping or pooling around the base of the toilet.
- If you notice any leaks, tighten the connections or replace any faulty parts.
- Once you have resolved any leaks, flush the toilet a few times to ensure that water flows properly and there are no additional leaks.
Regularly checking for leaks and promptly addressing any issues will help you maintain the efficiency and longevity of your RV toilet.
With the water supply properly connected and leaks successfully eliminated, you have successfully completed the crucial step of connecting the water supply to your RV toilet. You can now move on to the next step in the installation process with confidence.
Step 3: Securing The Toilet
After successfully connecting the water supply and waste lines in Steps 1 and 2, it’s time to secure your RV toilet in place. This step ensures stability and prevents any unwanted movement while you’re on the road.
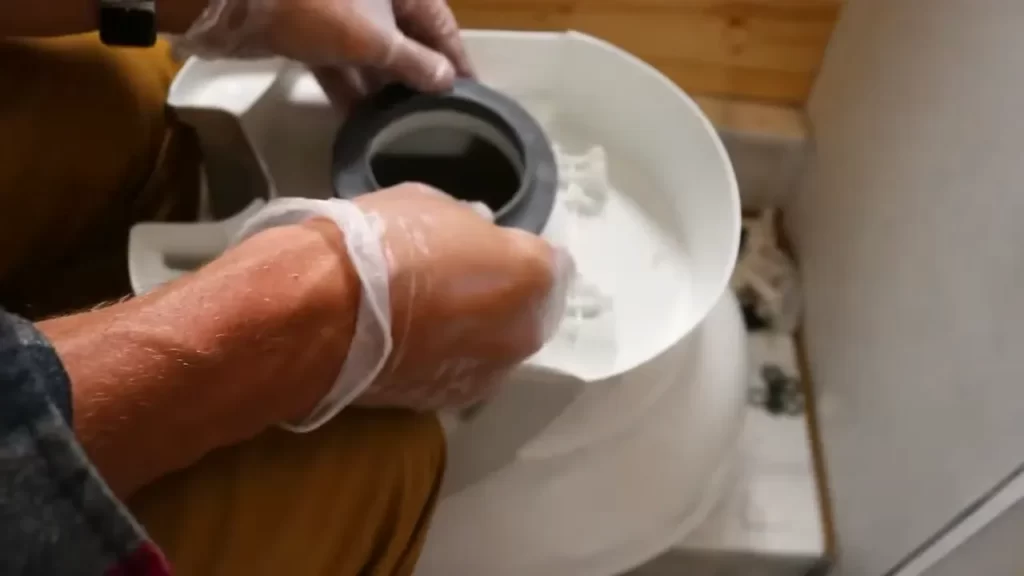
Step 3.1: Attaching the toilet to the floor
Before attaching the toilet to the floor, make sure you have selected the appropriate location for it. Take into consideration the proximity to the waste line and the water supply. Once you have determined the ideal position, follow these steps to attach the toilet to the floor:
- Place the toilet on top of the mounting flange, ensuring that the closet bolts protrude through the holes in the base of the toilet.
- Taking note of the bolt holes in the toilet base, temporarily remove the toilet and apply a small amount of clear silicone sealant to the area where the toilet will rest on the floor. This will provide a watertight seal and prevent any leaks from occurring.
- Place the toilet back on top of the mounting flange, aligning the bolt holes with the closet bolts.
Once you have aligned the toilet with the bolt holes, press down firmly to seat the toilet against the sealant and ensure a proper bond with the floor. This will help prevent any movement or rocking.
Step 3.2: Tightening the bolts or screws securely
Now that your toilet is in place, it’s time to secure it tightly to the floor. This step is crucial to maintaining a stable and functional RV toilet. Follow these steps to properly tighten the bolts or screws:
- Using a wrench or screwdriver, tighten the nuts on the closet bolts in a crisscross pattern. This will ensure even pressure and prevent any warping or cracking of the toilet base.
- Be careful not to over-tighten the bolts, as this can cause damage. Tighten them until the toilet feels secure and there is minimal movement when pressure is applied.
Make sure you periodically check the tightness of the bolts or screws, as they may loosen over time due to vibrations while driving. By following these steps and regularly inspecting the tightness, you can ensure a stable and secure RV toilet that will provide years of reliable use.
Testing The Rv Toilet
Step 1: Filling the Water Tank
Before testing your RV toilet, you need to ensure that the water tank is properly filled. Follow these steps:
- Locate the water tank fill valve, usually located on the outside of your RV.
- Remove the cap on the fill valve and attach the water hose.
- Turn on the water supply, allowing the tank to fill up.
- Monitor the water level through the RV’s control panel or gauge.
- Once the tank is full, remove the water hose and securely replace the cap on the fill valve.
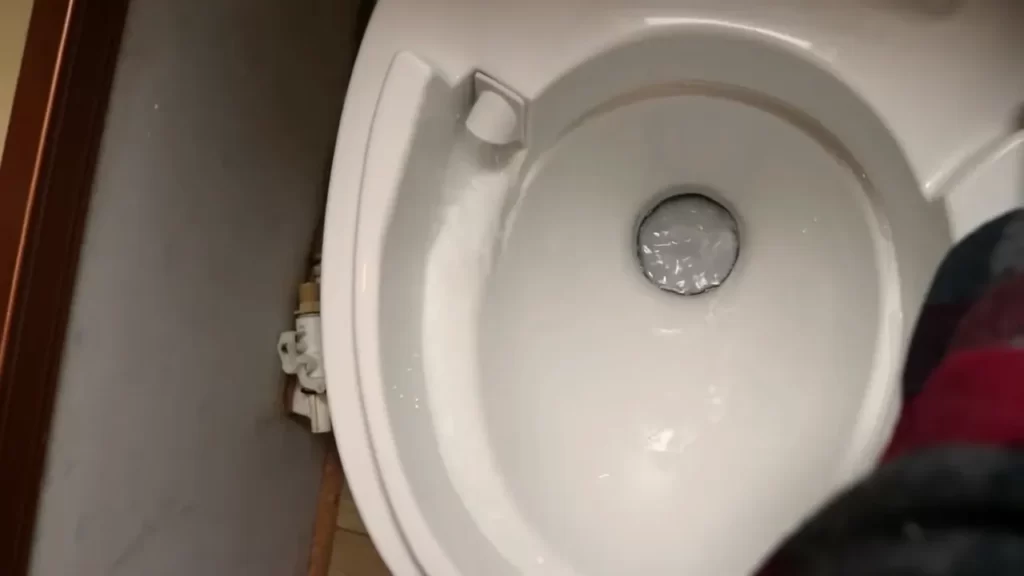
Step 2: Flushing the Toilet
Now that the tank is filled, it’s time to test the flushing mechanism of your RV toilet. Follow these instructions:
- Locate the toilet’s flush lever or button.
- Press or pull the lever/button to activate the flushing mechanism.
- Observe the water flow as it flushes down into the waste tank.
- Check for any unusual noises or blockages during the flushing process.
- If the flush is successful and the water flows smoothly, proceed to the next step.
Step 3: Checking for Proper Water Flow and Drainage
After flushing the toilet, you need to ensure that the water flows properly and there are no issues with drainage. Follow these steps:
- Open the valve leading to the waste tank.
- Observe the water flow as it drains into the waste tank. It should flow freely without any obstructions.
- Check for any leaks or spills around the toilet base or connections.
- If you notice any issues with water flow or drainage, consult the RV toilet’s user manual or seek professional assistance.
- If everything appears to be in good working order, congratulations! Your RV toilet is ready to use.
Regularly testing and maintaining your RV toilet ensures that it functions optimally and provides a comfortable experience during your travels. By following these steps, you can be confident in the performance of your RV’s toilet system.
Troubleshooting Common Issues
While installing an RV toilet can be a straightforward process, it is not uncommon for some common issues to arise. Here, we will discuss three of the most common problems that RV owners may encounter when installing an RV toilet and provide you with possible solutions.
Issue 1: Water leaks
One of the primary concerns that RV owners may face is water leaks in their RV toilets. These leaks can occur for a variety of reasons, such as loose fittings, worn-out seals, or cracked water lines. To troubleshoot this issue, follow these steps:
- Inspect all the water connections and fittings for any signs of looseness. Tighten them if necessary.
- Check the condition of the seals, particularly the wax ring, and replace them if they appear worn or damaged.
- Examine the water lines for any visible cracks or leaks. If you find any, replace the water lines immediately.
- Once you have addressed these potential causes, test the toilet by running water and checking for any signs of leakage. Repeat the process until all leaks are resolved.
Issue 2: Weak flush
If you are experiencing a weak flush in your RV toilet, it can be quite frustrating. Here are a few troubleshooting steps you can take:
- Check the water supply to the toilet and ensure the water pressure is adequate. Low water pressure can result in a weak flush.
- Inspect the toilet valve and make sure it is clean and free from any debris or obstructions. Use a soft brush or cloth to clean it if necessary.
- Examine the flushing mechanism, including the flapper, and ensure it is functioning properly. Replace any worn-out parts if needed.
- If the issue persists, you may need to consult a professional plumber or RV technician to identify and resolve the problem.
Issue 3: Clogs and blockages
Clogs and blockages are another common issue that RV owners may encounter with their toilets. Here’s how you can troubleshoot this problem:
- Use a plunger to attempt to unclog the toilet. Apply firm and consistent pressure until the clog is cleared.
- Consider using a toilet auger or snake to clear any stubborn clogs that the plunger cannot remove.
- Inspect the waste holding tank and make sure it is not full or near capacity. Empty the tank if necessary.
- Prevent future clogs by using RV-friendly toilet paper and avoiding flushing any foreign objects down the toilet.
By following these troubleshooting steps, you should be able to address common issues such as water leaks, weak flushes, and clogs. If you are unable to resolve the problem on your own, it is always advisable to consult a professional for assistance.
Regular Cleaning
Maintaining a clean RV toilet is crucial to keeping your recreational vehicle fresh and hygienic. Regular cleaning not only ensures that you have a pleasant bathroom experience during your travels, but it also helps prevent unpleasant odors and the build-up of bacteria. In this article, we will guide you through the necessary steps for cleaning your RV toilet effectively.
Step 1: Emptying and Cleaning the Holding Tank
Besides keeping the toilet bowl clean, it is vital to address the holding tank – the container that stores waste. Regularly emptying and cleaning the holding tank will help eliminate odors and maintain its functionality. Follow these steps to clean the tank:
- Prepare your equipment: Before starting the cleaning process, make sure you have protective gloves, a hose dedicated to RV toilet sanitation, and an appropriate cleaning solution. Check your RV’s manual for any specific instructions on the type of cleaner to use.
- Empty the holding tank: Find the appropriate location at your campsite or designated RV dump station to empty the holding tank. Follow the instructions provided by the manufacturer to ensure safe and efficient emptying.
- Rinse the holding tank: After emptying the tank, use the dedicated hose to thoroughly rinse the inside of the tank. This step helps remove any remaining waste or debris.
- Clean the tank: Fill a bucket with the recommended cleaning solution and pour it into the holding tank. Allow it to sit for the recommended duration specified by the cleaner manufacturer.
- Flush the tank: Once the cleaning solution has had sufficient time to work, flush the holding tank with clean water. This step ensures the removal of any residue from the cleaning process.
Step 2: Cleaning the Toilet Bowl and Seat
Keeping your RV toilet bowl and seat clean is essential for optimal hygiene. Follow these steps to ensure a spotless bowl and seat:
- Gather your supplies: Before beginning the cleaning process, gather the necessary supplies such as rubber gloves, a toilet brush designated for RV use, and a reliable toilet bowl cleaner that won’t damage the toilet’s components.
- Apply the cleaner: Apply the toilet bowl cleaner to the sides and bottom of the bowl. Ensure that the cleaner reaches under the rim and covers all areas where bacteria tend to accumulate.
- Scrub the bowl: Using the designated toilet brush, scrub the inside of the bowl thoroughly. Pay special attention to the waterline and areas with visible staining or buildup.
- Clean the seat: To clean the seat, utilize a mild cleaner or disinfecting wipes. Wipe down the seat, both on the top and underside, to remove any bacteria or grime.
- Rinse and dry: After thoroughly cleaning the bowl and seat, flush the toilet to remove any remaining cleaner. Dry the toilet seat with a clean, dry cloth.
Regularly cleaning your RV toilet, including the holding tank, bowl, and seat, is crucial for maintaining a fresh and sanitary environment. By following these simple yet effective steps, you can ensure a pristine toilet experience throughout your travels.
Preventive Maintenance
When it comes to RV toilets, preventive maintenance plays a crucial role in ensuring their longevity and optimal functionality. By following a few simple steps on a regular basis, you can keep your RV toilet in top shape and avoid any unexpected mishaps.
Step 1: Inspecting and tightening connections
One of the first things you should do as part of your preventive maintenance routine is to inspect and tighten connections. Over time, vibrations from the road can cause fittings and connections to loosen, leading to leaks and potential damage. To avoid this, carefully examine all the connections of your RV toilet, including the water supply line, the mounting bolts, and the flange. If you notice any looseness, grab a wrench and gently tighten them up. This simple step can go a long way in preventing future headaches.
Step 2: Checking seals and gaskets
Another important aspect of preventive maintenance for your RV toilet is checking the seals and gaskets. The seals and gaskets form a vital barrier between the toilet bowl and the waste tank, ensuring a tight seal and preventing any leakage or odors. Inspect these seals and gaskets regularly for signs of wear, cracks, or degradation. If you notice any issues, it’s crucial to replace them promptly. A small investment in new seals and gaskets can save you from major repairs down the line.
When inspecting the seals and gaskets, pay close attention to the toilet flange seal. This is a crucial area that often experiences leaks if not properly maintained. Ensure that the seal is intact and in good condition. If needed, remove the old seal and replace it with a new one, making sure to align it correctly to ensure a watertight fit.
Additionally, check the seals around the base of the toilet and the water valve. Look for any signs of leaks, such as water stains or dampness. If you notice any issues, address them promptly by tightening connections or replacing seals.
By following these preventive maintenance steps for your RV toilet, you can extend its lifespan and avoid costly repairs. Regularly inspecting and tightening connections, as well as checking and replacing seals and gaskets when necessary, will keep your RV toilet in optimal condition for years to come. Take the time to maintain your RV toilet, and you’ll be rewarded with worry-free adventures on the open road!
Frequently Asked Questions
How Are Rv Toilets Attached To The Floor?
RV toilets are securely attached to the floor using bolts or screws. These fasteners go through the toilet base and into the floor’s mounting flange. This ensures stability and prevents the toilet from moving or shifting during travel.
How Is An Rv Toilet Plumbed?
An RV toilet is plumbed using a plumbing system connected to a holding tank. Waste from the toilet flows into the tank, which can be emptied at a designated dump station. The plumbing system ensures proper disposal of waste while maintaining cleanliness in the RV.
Do I Need To Put Anything In My Rv Toilet?
No, it is not necessary to put anything in your RV toilet. It is designed to handle waste efficiently without the need for additional products. Just ensure proper use and regular maintenance to keep it in good working condition.
Can You Install A Real Toilet In An Rv?
Yes, it is possible to install a real toilet in an RV. This allows for a more comfortable and convenient experience while traveling.
Conclusion
Installing an RV toilet is a straightforward process that can greatly enhance your camping experience. By following the steps outlined in this guide, you can ensure a smooth and efficient installation. From choosing the right model to connecting the necessary plumbing, each step is crucial to achieving optimal functionality and comfort.
So, go ahead and embark on this DIY project to upgrade your RV bathroom and make your next adventure even more enjoyable.