To install a tile countertop edge, start by measuring and cutting the tiles to fit the edges of the countertop, then apply adhesive and press the tiles firmly into place.
The Importance Of A Stunning Tile Countertop Edge
The countertop edge plays a significant role in enhancing the overall look and aesthetics of your kitchen or bathroom. Often overlooked, the tile countertop edge can make a huge difference in the visual appeal of your space. With the right choice of tile and installation techniques, you can create a stunning focal point that adds a touch of elegance and sophistication to your countertop.
The role of a countertop edge in enhancing the overall look of the kitchen or bathroom
When it comes to designing your kitchen or bathroom, every detail matters. From the flooring to the cabinets, each element contributes to the overall aesthetic of the space. The countertop, being one of the largest surface areas, demands special attention. A beautiful tile countertop edge can add definition and style to your kitchen or bathroom, elevating the entire look and feel of the room.
By choosing the right countertop edge, you can create a cohesive and harmonious design that complements the rest of your kitchen or bathroom. Whether you prefer a sleek and modern look or a traditional and timeless feel, the countertop edge can help you achieve that desired aesthetic.
How a beautiful tile countertop edge can transform the space
A beautiful tile countertop edge has the power to transform the entire space, turning it into a stunning focal point. With the right tile choice, color scheme, and installation technique, you can create a seamless transition from the countertop to the wall, creating a visually appealing and cohesive look.
Not only does a tile countertop edge enhance the aesthetic appeal of your kitchen or bathroom, but it also adds functionality and durability. The edge of the countertop is susceptible to wear and tear from daily use, and having a sturdy tile edge offers protection while maintaining its beauty.
Moreover, a tile countertop edge allows for customization and creativity. You can choose from a wide range of tile options, including ceramic, porcelain, glass, or even natural stone, to match your personal style and design preference. With different shapes, sizes, and textures available, you can create a unique and one-of-a-kind countertop edge that reflects your individuality.
In conclusion, the countertop edge plays a crucial role in enhancing the overall look and feel of your kitchen or bathroom. Don’t overlook this important detail when designing your space. Invest in a stunning tile countertop edge that not only improves the aesthetics but also adds functionality and durability to your countertops.
Assessing The Existing Countertop
Before embarking on your tile countertop edge installation project, it’s crucial to thoroughly assess the current condition of your countertop. By examining the countertop for any damage or unevenness, you can determine whether it is suitable for a tile edge installation. Taking the time to conduct this assessment ensures that you have a solid foundation for your project and helps you avoid potential issues down the line.
Examining the current countertop for any damage or unevenness
The first step in assessing the existing countertop is to carefully examine it for any signs of damage or unevenness. Look out for cracks, chips, or any other structural issues that may compromise the integrity of the countertop. These issues need to be addressed before proceeding with the tile edge installation to ensure a smooth and durable finish.
Additionally, it’s essential to check for any uneven surfaces on the countertop. Use a level to determine if there are any noticeable deviations from a flat plane. Unevenness can make the installation process more challenging and may result in an unprofessional-looking final result. If you identify any uneven areas, consider using a leveling compound to correct them before proceeding further.
Determining whether the countertop is suitable for a tile edge installation
Not all countertops are suitable for a tile edge installation, especially those made from materials that are not compatible with tile adhesives or may warp or crack under the weight of the tiles. To determine if your countertop is suitable, consider the following factors:
- Material compatibility: Some countertop materials, such as laminate or butcher block, may not provide a suitable surface for tile adhesion. Make sure the material of your countertop is compatible with the tile adhesive you plan to use.
- Weight tolerance: Tiles can add significant weight to a countertop. Ensure that your existing countertop can handle the added weight without compromising its structural integrity. Consult the manufacturer’s guidelines or a professional if you are unsure.
- Surface preparation: A smooth and clean surface is essential for a successful tile edge installation. If your countertop has a glossy finish or is waxed, it may be necessary to roughen the surface or remove the wax to promote proper adhesion.
By considering these factors, you can determine whether your countertop is suitable for a tile edge installation. If you have any doubts or concerns, it’s always a good idea to consult with a professional to ensure the best possible outcome for your project.
Planning And Preparation
When it comes to installing a tile countertop edge, proper planning and preparation are key to ensure a successful and professional-looking result. This stage of the project involves important tasks such as choosing the right type of tile, calculating the amount of tile needed, and gathering the necessary tools and materials for the installation. In this guide, we’ll walk you through each step of the planning and preparation process, providing you with useful tips and guidelines to make your tile countertop edge installation project a breeze.
Choosing the right type of tile for the countertop edge
When choosing the tile for your countertop edge, it’s important to consider both aesthetics and durability. You’ll want to select a tile that complements the overall design of your kitchen or bathroom while also being able to withstand the wear and tear of daily use. Here are a few factors to keep in mind:
- Material: Tiles come in a variety of materials, including ceramic, porcelain, natural stone, and glass. Each material has its own unique characteristics and maintenance requirements, so choose one that suits your needs and preferences.
- Color and Finish: Consider the color palette of your countertop and surrounding area to ensure the tile complements the overall aesthetic. Additionally, think about the desired finish – matte, glossy, or textured – and how it will enhance the look and feel of your space.
- Size and Shape: Tiles come in various sizes, shapes, and patterns. Decide whether you want a uniform look with traditional square or rectangular tiles, or if you prefer a more intricate design with mosaic or decorative tiles.
Calculating the amount of tile needed for the project
Accurately calculating the amount of tile needed is essential to avoid running out of materials or ending up with excess. To determine the quantity of tile required for your countertop edge, follow these simple steps:
- Measure the countertop edge: Use a tape measure to determine the length of the countertop edge that needs to be tiled. Record this measurement for reference.
- Consider tile spacing: Depending on the design, you might want to leave a small gap between each tile for grout. Take this into account when calculating the number of tiles needed.
- Calculate the number of tiles: Divide the length of the countertop edge by the width of the tile (including the desired spacing) to obtain the approximate number of tiles needed.
- Account for cuts and waste: It’s always wise to purchase extra tiles to account for cuts, breakage, and future repairs. Adding around 10% to your calculated quantity should suffice.
Gathering the necessary tools and materials for the installation
Before starting the installation process, it’s crucial to gather all the tools and materials you’ll need. Having everything prepared and within reach will help ensure a smooth and efficient installation. Here’s a list of the essential tools and materials:
| Tools | Materials |
|---|---|
|
|
By gathering the necessary tools and materials in advance, you’ll be well-prepared to start the installation process without any delays or interruptions. Make sure to check that you have everything on the list before diving into the project.
Step-By-Step Installation Process
Installing a tile countertop edge can add a stylish and finished look to your kitchen or bathroom. Follow these step-by-step instructions to achieve a professional-looking result.
Preparing the countertop surface for tile installation
Before you start the installation process, it is important to properly prepare the countertop surface for the tile. Here’s what you need to do:
- Clean the countertop surface thoroughly to remove any dirt, grease, or debris. A mixture of warm water and mild detergent should do the trick.
- Once the surface is clean and dry, use a sandpaper or sanding block to roughen the surface slightly. This will help the adhesive bond better with the countertop.
- If there are any existing tiles or backsplash in the area where you want to install the new tile, remove them carefully to create a clean and smooth surface.
Applying adhesive and placing the tiles on the edge
With the countertop surface prepared, it’s time to apply adhesive and start placing the tiles on the edge. Follow these steps:
- Choose a suitable adhesive for your tile. Make sure it is appropriate for the material of your countertop and the tiles you are using. Refer to the manufacturer’s instructions for guidance.
- Apply a thin layer of adhesive to the back of the tile using a notched trowel. This will create a textured surface that helps the tile stick to the countertop.
- Press the tile firmly onto the edge of the countertop, making sure it is level and aligned with the adjacent tiles. Use tile spacers to maintain consistent spacing between the tiles.
- Continue applying adhesive and placing tiles until you reach the end of the countertop edge. Cut tiles as necessary to fit the corner or end of the countertop.
Cutting and fitting tiles to ensure a seamless look
To achieve a seamless and professional look for your tile countertop edge, cutting and fitting the tiles properly is crucial. Here’s how to do it:
- Measure and mark the tiles that need to be cut to fit the corner or end of the countertop. Use a tile cutter or wet saw to make the cuts, following the manufacturer’s instructions for the specific tool.
- Once the tiles are cut, place them on the edge and check for any gaps or unevenness. Make any necessary adjustments to ensure a snug fit.
- Use tile adhesive to attach the cut tiles to the countertop edge, following the same process as before. Press them firmly into place and check for levelness and alignment.
Grouting and finishing the tile countertop edge
The final step in the tile countertop edge installation process is grouting and finishing. Follow these steps to complete the project:
- Mix the grout according to the manufacturer’s instructions. Use a grout float to apply the grout to the spaces between the tiles, making sure to fill them completely.
- Wipe off any excess grout from the tile surface using a damp sponge. Be gentle to avoid removing too much grout from the spaces.
- Allow the grout to dry for the recommended amount of time specified by the manufacturer.
- Once the grout is dry, use a soft cloth to buff the tiles and remove any remaining grout haze.
Congratulations! You have successfully installed a tile countertop edge. Take a step back and admire your new, beautiful and functional countertop that will surely enhance the overall look and feel of your kitchen or bathroom.

Tips For A Flawless Installation
When installing a tile countertop edge, attention to detail is key. To achieve a flawless result, follow these essential tips:
Ensuring Proper Alignment and Spacing of the Tiles
Alignment and spacing are crucial factors in achieving a professional-looking tile countertop edge. To ensure proper alignment, start by measuring and marking the center line of the countertop, and snap a chalk line as a guide. This will serve as a reference point for laying the tiles.
Next, use tile spacers to ensure consistent spacing between each tile. These small plastic wedges are available in various sizes and will help you achieve perfectly aligned grout lines. Insert the spacers between the tiles as you go along, making sure they are snugly in place.
Using Tile Spacers for Consistent Grout Lines
To maintain a neat and professional appearance, it is essential to use tile spacers for consistent grout lines. These spacers will help you achieve even spacing between the tiles, ensuring that the grout lines are uniform throughout the countertop edge.
Insert the spacers between each tile, pushing them flush against the adjacent tiles. Take care to remove any excess adhesive that may squeeze out during the tile installation process. This will ensure that the grout lines remain clear and even.
Removing Any Excess Adhesive or Grout for a Clean Finish
After completing the tile installation, it is important to clean up any excess adhesive or grout for a clean and polished finish. This can be done by using a damp sponge to wipe away any residue from the tile surface.
For adhesive removal, scrape off any excess adhesive using a putty knife or a grout float. Take care not to damage the tiles while doing this. Once the adhesive is removed, allow it to dry completely before proceeding to the next step.
Similarly, for grout removal, wait until the grout has partially dried, and then use a grout sponge to remove the excess. Gently wipe the sponge diagonally across the grout lines to avoid disturbing the newly installed tiles. This will ensure a clean and professional finish.
By following these tips for a flawless installation, you can transform your tile countertop edge into a stunning focal point of your kitchen or bathroom. Pay attention to alignment, spacing, and cleanliness throughout the process, and you’ll achieve a result that is both aesthetically pleasing and durable in the long run.
Maintaining And Caring For The Tile Countertop Edge
Regular Cleaning and Maintenance to Preserve the Appearance of the Tiles
Maintaining and caring for your tile countertop edge is crucial to preserve its beauty and ensure its longevity. Regular cleaning and maintenance routines should be integrated into your kitchen cleaning habits to prevent the accumulation of dirt, grime, and stains that can mar the appearance of the tiles.
To keep your tile countertop edge looking pristine, follow these cleaning and maintenance tips:
- Wipe spills and stains immediately using a soft cloth or sponge. This will prevent any lingering residue from seeping into the grout lines or tiles, potentially causing discoloration.
- Use a pH-neutral, non-abrasive tile cleaner and warm water to regularly clean the surface. Avoid harsh chemicals and abrasive scrubbing pads that can scratch or damage the tiles.
- For tougher stains or stubborn grime, create a paste using baking soda and water. Apply the paste to the affected area, let it sit for a few minutes, and then gently scrub with a soft brush or sponge. Rinse thoroughly.
- Avoid using abrasive cleaners or scouring pads, as they can scratch the surface of the tiles. If you’re unsure about the suitability of a cleaning product, test it on a small, inconspicuous area first.
- Regularly clean the grout lines to prevent the buildup of dirt and grime. Use a grout brush or an old toothbrush and a mild grout cleaner to scrub the grout lines gently. Rinse thoroughly and dry the countertop after cleaning.
- To maintain the shine and luster of the tiles, apply a tile sealer once every few months. The sealer will create a protective layer that helps repel stains and moisture.
- Consider using coasters, trivets, or cutting boards to protect the tile countertop edge from hot pans, sharp knives, and abrasive objects. This will help prevent scratches, chips, and other damages.
- Regularly inspect the tiles and grout lines for any signs of damage or deterioration. Addressing any issues promptly can prevent further problems and ultimately save you from costly repairs or replacements.
Preventing Damage and Addressing Any Issues Promptly
Despite your best efforts in maintaining a clean and well-cared-for tile countertop edge, accidents and issues can still occur. It’s essential to promptly address any signs of damage or deterioration to prevent further problems and ensure the longevity of your countertop.
Here are some steps to follow in preventing damage and dealing with any potential issues:
- Regularly inspect the countertop for cracks, chips, or loose tiles. If you notice any damage, address it as soon as possible to prevent further spreading or potential injury.
- For minor chips or cracks, you may be able to repair them yourself using a tile repair kit. Follow the instructions carefully and ensure the repaired area blends seamlessly with the surrounding tiles.
- If you’re dealing with more significant damage or extensive wear and tear, it’s advisable to contact a professional tile installer or countertop specialist for assessment and repair. They will have the expertise and tools necessary to handle the issue effectively.
- If you experience water damage or notice signs of mold or mildew, it’s crucial to address the problem promptly. Mold and mildew can not only damage the tiles but also pose health risks. Use a mildew cleaner and thoroughly dry the affected area.
- Ensure that the grout lines are in good condition and not crumbling or deteriorating. If you notice any issues with the grout, such as cracks or gaps, consider regrouting to prevent further damage and maintain the integrity of the countertop.
- Lastly, if you’re uncertain about how to address a specific issue or believe the damage is beyond repair, consult with a professional to determine the best course of action. They can provide expert advice tailored to your unique situation.
Caring for your tile countertop edge does not have to be a daunting task. By implementing regular cleaning and maintenance routines, preventing damage, and addressing any issues promptly, you can enjoy a beautiful and long-lasting countertop that adds style and functionality to your kitchen.
Remember, proper care and maintenance go a long way in preserving the appearance and functionality of your tile countertop edge, ensuring that it remains an asset in your home for years to come.
Enhancing The Look With Decorative Options
Adding decorative elements such as mosaic tiles or trim pieces
When it comes to installing a tile countertop edge, don’t limit yourself to just plain tiles. Enhancing the look with decorative options can give your countertop a unique and personalized touch. One way to achieve this is by adding mosaic tiles or trim pieces to the edge of your countertop.
Mosaic tiles are small, intricately designed tiles that can be arranged in various patterns to create a stunning visual effect. Whether you opt for a bold and vibrant mosaic or a more subtle and understated design, adding mosaic tiles to your countertop edge can instantly elevate its overall appearance.
Trim pieces, on the other hand, are often used to provide a finished and polished look. They can be made from a variety of materials, such as metal, ceramic, or natural stone, and come in various shapes and sizes. By incorporating trim pieces into your tile countertop edge, you can create a seamless transition between the countertop surface and the edge, giving it a cohesive and sophisticated look.
Exploring different tile patterns and designs for a unique countertop edge
A tile countertop edge doesn’t have to be limited to a simple straight line. Exploring different tile patterns and designs can help you create a truly unique and eye-catching edge for your countertop. The possibilities are endless!
One popular option is to use diagonal or herringbone patterns. These patterns can add visual interest and depth to your countertop edge, making it stand out from traditional straight-edged countertops. Alternatively, you can experiment with geometric patterns, such as chevron or arabesque, to bring a modern and artistic touch to your countertop edge.
Another way to make your countertop edge truly distinctive is by using contrasting tile colors or textures. For example, you can combine light and dark tiles to create a striking contrast, or mix glossy and matte finishes for a unique texture. This interplay of colors and textures can add dimension and character to your countertop edge, making it a focal point in your kitchen or bathroom.
Remember, the key to achieving a unique countertop edge is to let your creativity run wild. Don’t be afraid to experiment with different tile patterns, designs, and colors until you find the perfect combination that suits your style and enhances the overall look of your space.
Frequently Asked Questions (Faqs)
In this section, we’ll address some of the most common questions about installing tile countertop edges. Whether you’re a DIY enthusiast or simply looking to update your kitchen, these FAQs will provide you with all the information you need to successfully install a tile edge on your countertop.
Are tile countertop edges difficult to install?
Installing tile countertop edges may seem intimidating at first, but it’s actually a fairly straightforward process. With the right tools and a little patience, you can achieve professional-looking results. Keep in mind that prior experience in tile installation can be beneficial, but it’s not necessarily a requirement. As long as you follow the proper steps and take your time, you’ll be able to tackle this project successfully.
Can I install a tile edge on a laminate countertop?
Yes, you can install a tile edge on a laminate countertop. However, it’s important to note that the laminate surface must be in good condition before starting the installation process. If the laminate is peeling or damaged, it’s recommended to repair or replace it before proceeding with the tile installation. Additionally, keep in mind that the tile edge may add some height to the countertop, so make sure it doesn’t interfere with any nearby appliances or fixtures.
How long does the installation process typically take?
The duration of the tile countertop edge installation process can vary depending on several factors, including the size of the countertop and the complexity of the design. On average, you can expect the process to take a few days. This allows time for preparing the countertop, installing the tiles, grouting, and allowing the adhesive and grout to dry properly. It’s important to follow the manufacturer’s recommendations regarding drying times to ensure that the tile edge is properly set before using the countertop.
Frequently Asked Questions
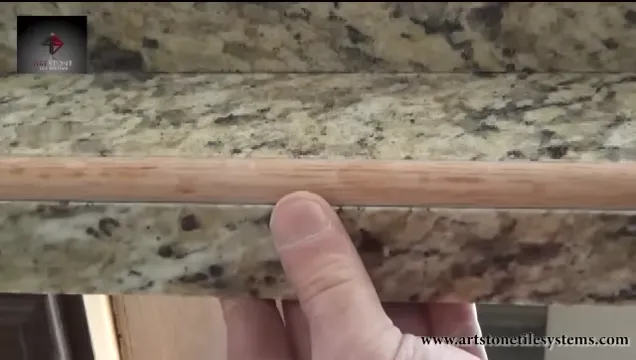
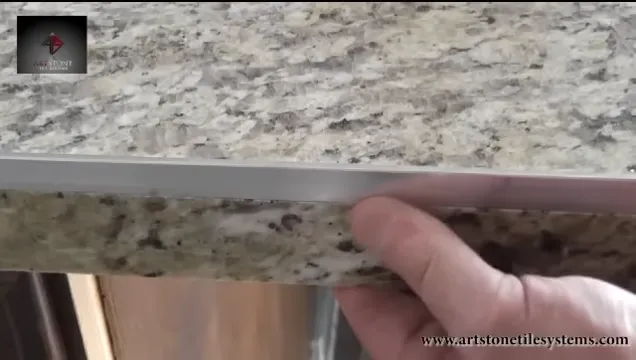
How Do You Finish The Edges Of Tile Countertops?
To finish the edges of tile countertops, you can use bullnose tiles, metal edge strips, or wooden trim. Bullnose tiles are curved tiles that provide a smooth finish. Metal edge strips offer a sleek, modern look, and wooden trim adds a warm, traditional touch.
How Do You Tile Edge Trim?
To tile edge trim, follow these steps: 1. Measure and cut the trim to fit the edges using a tile cutter or hacksaw. 2. Apply adhesive to the back of the trim and press it firmly onto the edge of the tiles.
3. Use tile spacers to maintain an even gap between the trim and tiles. 4. Allow the adhesive to dry completely before grouting the tiles. 5. Finally, apply grout to fill in the gaps between the tiles and trim, and clean off any excess.
Do You Need Tile Edge Trim?
Tile edge trim is essential to provide a finished and polished look to your tile installation. It helps to protect the edges of the tiles from chipping and breaking, while also creating a smooth transition between different tile surfaces. Without trim, your tile installation may appear incomplete and prone to damage.
How Do You Finish Tile Edges Without Bullnose?
Finish tile edges without bullnose by using alternative methods like metal edging, pencil trim, or wood molding. These options provide a clean and appealing edge to your tiles. Avoid the hassle of finding bullnose tiles and achieve a polished look with these alternatives.
Conclusion
Installing a tile countertop edge can be a rewarding project that adds beauty and functionality to your kitchen or bathroom. By following the step-by-step guide outlined in this blog post, you can achieve professional-looking results. From choosing the right materials to carefully cutting and installing the tiles, this process requires attention to detail and precision.
Remember to take your time and follow the instructions closely to ensure a successful installation. With a little patience and effort, you can enjoy a stunning tile countertop edge that will elevate the aesthetic appeal of your space for years to come.