To install a garage floor drain, you need to locate the lowest point of the floor, remove a section of concrete, install a drain pipe with a slope towards an outlet, and secure the drain grate. Garage floor drains are an essential component for maintaining a clean and organized garage, preventing water buildup, and avoiding potential damage.
By following these steps, you can easily install a garage floor drain and ensure a safe and efficient drainage system for your garage. It is essential to install a floor drain properly to avoid any future complications and ensure the effective drainage of water and other liquids from your garage.
Why Install A Garage Floor Drain: Benefits And Importance
Installing a garage floor drain may not be the first thing that comes to mind when it comes to home improvement projects. However, it offers a multitude of benefits and plays a critical role in maintaining the functionality and cleanliness of your garage space. In this blog post, we will explore the importance and advantages of installing a garage floor drain, highlighting how it prevents water damage, promotes cleanliness and hygiene, and enhances the overall functionality of your garage.
1. Prevents Water Damage
Water damage can be a nightmare for any homeowner, and your garage is no exception. Without proper drainage, rainwater, snowmelt, or even accidental spills can accumulate and cause serious issues. From structural damage to mold and mildew growth, the consequences of prolonged water exposure are extensive and can be both expensive and time-consuming to fix. By installing a garage floor drain, you can effectively channel water away from your garage, preventing potential damage and saving you from unnecessary headaches down the line.
2. Promotes Cleanliness and Hygiene
Garages are often subject to dirt, debris, and various chemicals. By having a floor drain in place, you can easily wash down your garage floor, removing dirt, oil stains, and other grime. This not only keeps your garage looking clean and presentable but also contributes to overall hygiene. A cleaner environment reduces the risk of slips and falls, prevents the spread of bacteria and odors, and ensures a safer and healthier workspace.
3. Enhances Functionality of the Garage Space
Whether you use your garage primarily as a parking space, a workshop, or a storage area, a garage floor drain can significantly enhance its functionality. Imagine being able to wash your car or clean your tools without worrying about water accumulation. With a properly installed floor drain, the excess water is efficiently carried away, allowing you to utilize your garage space to its full potential. Additionally, a dry and well-maintained garage is less susceptible to damage, extending the lifespan of your belongings and expensive equipment.
In conclusion, a garage floor drain is an essential addition to any garage space. It offers a range of benefits including preventing water damage, promoting cleanliness and hygiene, and enhancing the overall functionality of your garage. By investing in this simple yet effective solution, you can protect your home, keep your garage clean, and make the most out of your valuable space.
Factors To Consider Before Installing A Garage Floor Drain
Factors to Consider Before Installing a Garage Floor Drain
Installing a garage floor drain can be a great solution to prevent water accumulation and potential damage to your garage. However, before diving into the installation process, there are a few important factors that you should consider. By taking the time to address these factors properly, you can ensure that your garage floor drain is placed correctly and functions effectively. In this section, we will discuss the key factors you should keep in mind when planning to install a garage floor drain.
Drainage Requirements:
The first factor to consider is the drainage requirements of your garage. Think about the amount of water that typically accumulates in your garage and how quickly it needs to be drained. Identify any potential sources of water, such as rainwater or melted snow, as well as any other liquids that may be spilled or leaked in your garage. Consider the slope of your garage floor, and how water flows towards the drain area. Understanding your specific drainage needs will help you determine the capacity and placement of the floor drain.
Placement and Size Considerations:
The placement and size of the floor drain are crucial factors to determine before installation. You need to identify the area in your garage where water tends to accumulate the most. This might be near the entrance, underneath a vehicle, or in a specific corner. Once you’ve identified the location, you can determine the appropriate size of the floor drain. A larger drain is generally recommended for garages that experience heavy water flow, while a smaller one may suffice for areas with lesser water accumulation. Ensure that the drain is positioned in a way that allows for easy access and efficient drainage.
Required Tools and Materials:
Before you embark on installing a garage floor drain, it is important to gather all the necessary tools and materials. Here is a list of items commonly used for installing a floor drain:
– Drainage pipe: PVC pipes are often used due to their durability and resistance to corrosion.
– Check valve: This valve prevents backflow and keeps water from returning into the drain pipe.
– Grate: A sturdy and corrosion-resistant metal grate covers the drain pipe and prevents debris from clogging the pipe.
– Waterproofing membrane: To ensure the area surrounding the drain is waterproofed and protected from water damage.
– Epoxy or concrete adhesive: Used for securing the drain cover to the garage floor.
In addition to these materials, you may need tools such as a shovel, level, tape measure, hacksaw, and pipe wrench. Gathering all the necessary tools and materials beforehand will help streamline the installation process and make it more efficient.
By considering these factors – drainage requirements, placement and size considerations, and required tools and materials – you can ensure that your garage floor drain is installed correctly and effectively. Taking the time to plan and prepare before installation will save you from potential headaches in the long run, as a properly functioning garage floor drain can help keep your garage clean and free from water damage.
Step 1: Preparing For Installation
Before you can install a garage floor drain, it’s important to properly prepare the area for the installation process. This will help ensure a smooth and successful installation. In this step, we will cover the essential tasks you need to undertake to get your garage ready for the drain installation. Let’s get started!
Clearing the garage space
The first thing you need to do is clear out your garage space. Remove any vehicles, tools, or other items that might be in the way. Make sure you have enough room to work comfortably and safely. It’s also a good idea to sweep and clean the garage floor to remove any dirt or debris that could interfere with the installation process. This will help provide a clean and smooth surface for the drain.
Measuring and marking the drain location
Next, you’ll need to measure and mark the location for your garage floor drain. This will depend on the layout of your garage and where you want the drain to be positioned. Use a measuring tape to determine the exact placement and mark it with a pencil or chalk. Ensure that you choose a location that is convenient for efficient drainage and consider any existing plumbing connections that may need to be taken into account.
Gathering the necessary tools and materials
Now that you’ve cleared the space and marked the drain location, it’s time to gather all the tools and materials you’ll need for the installation. This will ensure that you have everything on hand and can work efficiently. Here’s a list of the essential tools and materials you’ll need:
| Tools | Materials |
|---|---|
|
|
By gathering all the necessary tools and materials in advance, you’ll be well-prepared for the installation process and can minimize any interruptions or delays.
Now that you’ve completed the first step of preparing for installation, you’re ready to move on to the next step: Excavating the floor for the drain. Stay tuned for our next blog post in this series for a detailed guide on this important step!
Step 2: Creating The Drainage Channel
Once you have determined the location of the garage floor drain and completed the necessary preparations, it’s time to move on to creating the drainage channel. This step involves excavating the garage floor, installing a slope for proper drainage, and placing the drain channel system.
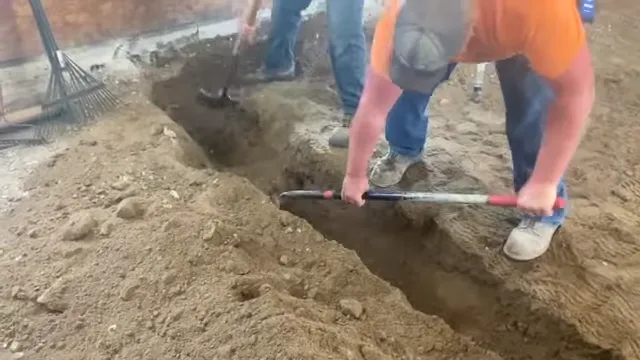
Excavating the garage floor
The first task in creating the drainage channel is to excavate the garage floor. This is done by removing a portion of the flooring material to make space for the drain channel system. It’s important to ensure that the excavation is wide enough to accommodate the drain system and allow for proper water flow.
Installing a slope for proper drainage
Proper drainage is essential for a functional garage floor drain. To achieve this, it’s necessary to install a slope. The slope helps direct water towards the drain channel, preventing puddles and water accumulation. To create the slope, start by identifying the high point in your garage and then gradually lower the floor towards the drain location.
Here’s a simple three-step process to install the slope:
- Mark the high point of your garage floor. This will serve as a reference for the slope installation.
- Using a self-leveling compound, apply it to the marked high point. Follow the manufacturer’s instructions to ensure proper application and drying time.
- Once the self-leveling compound is dry, use a long straightedge and a level to verify that the slope is uniform and slopes towards the drain location. Make any necessary adjustments to ensure proper drainage.
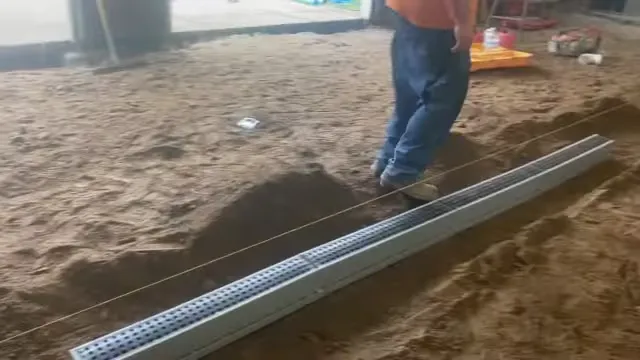
Placing the drain channel system
Now that the garage floor is excavated and the slope is installed, it’s time to place the drain channel system. The drain channel system consists of the drain channel itself and a grate that covers the channel, allowing water to flow in while preventing larger debris from entering.
To place the drain channel system:
- Carefully position the drain channel in the excavated area, ensuring it aligns with the slope and is centered.
- Secure the drain channel using epoxy or another suitable adhesive, following the manufacturer’s instructions.
- Place the grate on top of the drain channel, ensuring it fits securely and provides a flush surface with the surrounding floor.
Remember to double-check the alignment and positioning of the drain channel system before moving on to the next steps of the installation process. This ensures that the system functions properly and allows for efficient drainage of water from your garage.
Step 3: Installing The Garage Floor Drain
Once you have prepared the area and laid the foundation, it’s time to move on to the installation of the garage floor drain. This step is crucial to ensure proper drainage and prevent water damage in your garage. In this section, we will discuss three important steps to consider when installing the garage floor drain.
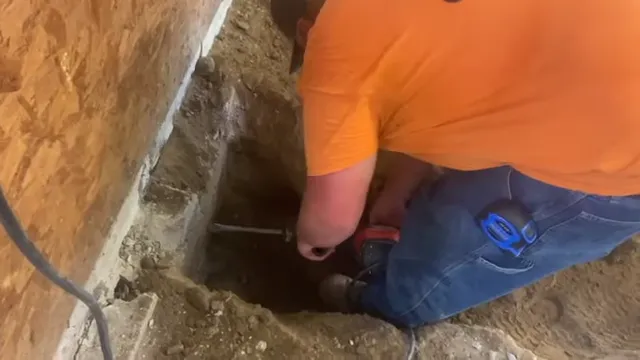
Connecting the drainpipe to the main sewage system
One of the key aspects of installing a garage floor drain is connecting it to the main sewage system. This ensures that the water and other fluids collected by the drain flow out of your garage effectively. Here’s how you can accomplish this:
- Locate the main sewage line: Before you start connecting the drainpipe, you need to locate the main sewage line near your garage. This is usually situated underground, and you may need to consult with a professional plumber to find it.
- Measure and cut the drainpipe: Once you have located the main sewage line, measure the distance between it and the garage floor drain. Cut a section of the drainpipe to match the measured length, using a handsaw or a pipe cutter.
- Attach the drainpipe: Once you have the appropriate length of drainpipe, connect one end of it to the drain opening on the garage floor drain. Then, connect the other end of the drainpipe to the main sewage line using PVC couplings and PVC cement. Ensure that the connections are tight and secure.
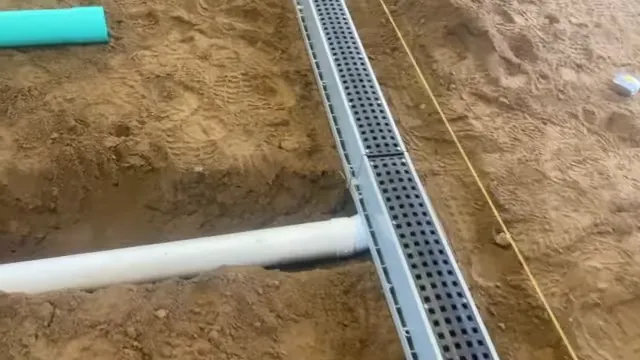
Securing the drain channel system
After connecting the drainpipe, the next step is to secure the drain channel system. This will ensure its stability and prevent any movement or damage. Follow these steps to secure the drain channel system:
- Position the drain channel: Place the drain channel in the desired location on the garage floor. Make sure it aligns with the drainpipe and provides optimal drainage.
- Secure the drain channel: Use concrete screws or a strong adhesive to secure the drain channel to the floor. Ensure that it is firmly attached and there are no gaps between the channel and the floor.
- Check for stability: After securing the drain channel, test its stability by applying pressure to different areas. If there is any movement or instability, reinforce the attachment points or seek professional assistance to ensure a secure installation.
Ensuring proper sealing and waterproofing
Proper sealing and waterproofing are essential to prevent water leakage and maintain the longevity of your garage floor drain. Follow these steps to achieve a watertight seal:
- Apply waterproofing sealant: Before installing the drain channel system, apply a waterproofing sealant to the surrounding area. This will create a barrier against moisture and enhance the effectiveness of the drain.
- Seal the connections: After connecting the drainpipe to the main sewage system, ensure that all connections are sealed properly using PVC cement. This will prevent any leaks or water seepage.
- Use a rubber gasket: To further ensure a watertight seal, place a rubber gasket between the drain channel and the garage floor. This will prevent water from seeping through any gaps or cracks between the two.
By following these steps and ensuring proper installation, you can effectively install a garage floor drain that will help keep your garage dry and free from water damage.
Step 4: Testing And Maintenance
Once the installation of your garage floor drain is complete, it’s time to move on to the important step of testing and maintenance. This step ensures that the drain is functioning properly and can effectively remove any excess water or spills that may occur in your garage. Here’s what you need to know:
Conducting a water flow test
To determine if your garage floor drain is working as it should, conducting a water flow test is essential. Here’s how you can do it:
- Take a large bucket of water and pour it slowly into the drain.
- Observe how the water flows through the drain and if it drains efficiently.
- Check for any signs of blockages or restrictions in the flow.
- If the water drains smoothly without any issues, your drain is working well.
If you notice any problems during the water flow test such as slow drainage or pooling water, it’s important to address them as soon as possible. This could indicate a clogged drain or improper installation that needs to be fixed.
Inspecting for leaks
Regularly inspecting your garage floor drain for leaks is crucial to ensure its longevity and effectiveness. Here are a few steps you can follow:
- Visually inspect the drain and look for any signs of water leakage.
- Check the connections and joints for any loose or damaged parts that could lead to leaks.
- Run water through the drain and carefully examine the surrounding area for any signs of water seepage.
- If you notice any leaks or potential issues, it’s important to repair them promptly to prevent further damage.
Regular maintenance and cleaning tips
Maintaining and cleaning your garage floor drain on a regular basis not only helps to keep it in optimal condition but also prevents clogs and foul odors. Here are some tips to follow:
- Remove any debris or dirt that may accumulate on the drain grate using a broom or vacuum cleaner.
- Flush the drain with water periodically to remove any built-up residue.
- Consider using a drain cleaner specifically formulated for garage floor drains to prevent clogs.
- Inspect and clean the floor drain trap regularly to prevent odors and blockages.
By following these maintenance and cleaning practices, you can ensure that your garage floor drain remains in optimal working condition and provides efficient water drainage.
Remember, testing and regular maintenance are essential to keep your garage floor drain functioning effectively. Being proactive in identifying any issues and addressing them promptly will save you from potential problems down the road.
Frequently Asked Questions
Can I Install A Drain In My Garage Floor?
Yes, you can install a drain in your garage floor. It is a practical solution for managing water and preventing flooding. Ensure proper installation and maintenance to ensure its effectiveness.
Can You Add A Drain To An Existing Garage?
Yes, it is possible to add a drain to an existing garage.
How Do You Install A Floor Drain On A Concrete Slab?
To install a floor drain on a concrete slab, follow these steps: 1. Mark the desired location for the drain on the slab. 2. Use a jackhammer to break up the concrete around the marked area. 3. Dig a small trench to accommodate the drain pipe.
4. Connect the drain pipe to the main plumbing system. 5. Fill the trench with gravel to provide a stable base. Finally, pour new concrete to cover the drain and smooth the surface.
How Deep Should A Garage Drain Be?
A garage drain should be at least 6 inches deep to effectively drain water and prevent flooding.
Conclusion
Overall, installing a garage floor drain is a vital step in maintaining a clean and functional space. By following these straightforward steps, you can ensure that water and debris are effectively managed, preventing damage and potential hazards. Remember to plan ahead, gather the necessary materials, and take your time during the installation process.
With proper installation, you can enjoy a dry and organized garage, providing peace of mind and a solid foundation for all your projects.