
To install a Kerdi Drain, follow these steps: Remove the shower base, clean the subfloor, and dry fit the drain.
Importance Of A Well-Installed Drain System
When it comes to creating a shower that is both functional and durable, a well-installed drain system is of utmost importance. The drain system plays a crucial role in ensuring efficient water drainage, preventing water damage and mold growth, and ultimately increasing the lifespan of your shower. In this article, we will discuss the significance of a well-installed drain system and how it contributes to creating a safe and long-lasting shower.
Ensuring Efficient Water Drainage
Efficient water drainage is essential in any shower. Standing water can not only be uncomfortable but can also pose serious health risks. A properly installed drain system, such as the Kerdi Drain, ensures that water flows quickly and effectively down the drain, preventing any pooling or accumulation of water in your shower.
By ensuring efficient water drainage, you can enjoy a shower that is not only more comfortable but also reduces the risk of slip and fall accidents. With the Kerdi Drain, specifically designed to handle high flow rates, you can rest assured that water will be effectively whisked away, leaving your shower dry and safe.
Preventing Water Damage and Mold Growth
Water damage and mold growth are two common problems that can arise from a poorly installed or malfunctioning drain system. When water seeps into the walls or flooring due to improper drainage, it can cause structural damage and create an ideal environment for mold to thrive.
With a well-installed drain system like the Kerdi Drain, you can prevent such issues. The Kerdi Drain, featuring a waterproofing membrane that securely connects to the shower base, effectively directs water into the drain and away from vulnerable areas. This prevents water damage and helps to inhibit the growth of mold, ensuring a healthier and safer showering environment.
Increasing the Lifespan of Your Shower
A well-installed drain system not only contributes to the immediate functionality and safety of your shower but also increases its overall lifespan. By preventing water damage and mold growth, the Kerdi Drain helps to maintain the structural integrity of your shower, reducing the likelihood of costly repairs or renovations in the future.
The Kerdi Drain, made from durable materials and designed for long-lasting performance, offers a reliable solution that can withstand the test of time. By investing in a properly installed drain system, you are not only ensuring optimum functionality but also increasing the longevity of your shower, providing years of enjoyment without the worry of potential issues.
In conclusion, a well-installed drain system, such as the Kerdi Drain, is a crucial component in creating a shower that is both functional and durable. Ensuring efficient water drainage, preventing water damage and mold growth, and increasing the overall lifespan of your shower are just a few of the benefits that come with a properly installed drain system. By choosing the right drain system and ensuring its correct installation, you can create a shower that is not only stylish and comfortable but also built to last.

Why Choose A Kerdi Drain
With countless drain options available in the market, it can be overwhelming to select the best one for your shower installation project. However, if you prioritize superior waterproofing, an easy installation process, longevity and durability, and compatibility with various shower systems, then a Kerdi Drain should be your top choice.
Benefits of Using a Kerdi Drain
Kerdi Drains offer a multitude of benefits that make them the ideal choice for your shower installation. Let’s delve into some of the major advantages:
Superior Waterproofing
One of the standout features of a Kerdi Drain is its exceptional waterproofing capabilities. When installed correctly, it creates a watertight seal that prevents any leakage or water damage. The integrated Kerdi membrane ensures that water is directed towards the drain, eliminating the risk of prolonged moisture exposure and potential mold or mildew growth.
Easy Installation Process
Installing a Kerdi Drain is a breeze, even for beginners. The installation process is straightforward and requires minimal time and effort. With a few simple steps, you can have your drain set up and ready for tiling. The user-friendly design and clear instructions provided by the manufacturer make it a stress-free DIY project or a quick job for professional installers.
Longevity and Durability
When investing in a drain, durability should be a top priority. Kerdi Drains are constructed using high-quality materials that are resistant to corrosion and degradation over time. This ensures the longevity of the drain, providing you with a reliable solution that will withstand heavy use and remain in excellent condition for years to come.
Compatibility with Various Shower Systems
Another advantage of choosing a Kerdi Drain is its compatibility with various shower systems. Whether you have a traditional mortar bed, a pre-sloped shower tray, or a Schluter shower system, the Kerdi Drain can seamlessly integrate into any setup. This versatility allows you to incorporate it into your shower project with confidence, knowing that it will work harmoniously with your chosen system.
In conclusion, opting for a Kerdi Drain brings several undeniable benefits to your shower installation process. Its superior waterproofing, easy installation process, longevity and durability, as well as compatibility with various shower systems, make it a reliable and efficient choice. So, why settle for anything less when you can choose a Kerdi Drain for your next project?
Required Tools And Materials
Before you begin installing a Kerdi drain, it’s essential to gather all the necessary tools and materials. Having everything you need at hand will make the installation process smoother and more efficient. In this section, we will discuss the required tools and materials for this project.
Gathering the Necessary Tools
When it comes to installing a Kerdi drain, you will need several tools to ensure a successful installation. Here are the tools you need:
Trowel, Measuring Tape, and Level
A trowel is necessary for applying the adhesive and waterproof membrane. The measuring tape is essential for accurately measuring the drain and the surrounding area. And finally, a level will help ensure that the drain is installed correctly and on a level surface.
Drill and Screwdriver
A drill is required for creating holes in the shower base and the drain assembly. It will also come in handy for securing the drain to the subfloor. A screwdriver is needed to tighten the screws and ensure a secure fit.
Pipe Cutter and Deburring Tool
A pipe cutter will be necessary for cutting the PVC pipe to the appropriate length. It is crucial to have a clean and precise cut to ensure a proper fit. After cutting the pipe, a deburring tool will help remove any rough edges for a smooth connection.
Materials Needed for Installation
In addition to the tools, you will also need specific materials to complete the installation. Here are the materials you will need:
Kerdi Drain Kit
The Kerdi drain kit includes all the necessary components for a waterproof connection. It typically includes a stainless steel drain grate, a drain body, and an adjustable-height collar.
Waterproof Membrane and Adhesive
A waterproof membrane is essential for protecting the shower base from any water damage. It will create a barrier that prevents moisture from seeping through. Additionally, you will need a suitable adhesive to securely fasten the membrane to the shower base and walls.
PVC Pipe and Fittings
PVC pipes and fittings are required to connect the drain assembly to the plumbing system. It is important to choose the correct size and type of PVC pipe and fittings to ensure a proper connection and prevent any leaks.
Silicone Sealant
Lastly, silicone sealant is needed to create a watertight seal around the edges of the drain assembly. This will prevent any water from escaping and causing damage to the surrounding areas.
Measuring And Planning The Installation
When it comes to installing a Kerdi drain in your shower, proper measurement and planning are essential for a successful installation. This crucial step ensures that your drain is placed correctly, the slope of the shower floor is calculated accurately, and the necessary drainage area is determined. In this section, we will guide you through the process of measuring and planning the installation of a Kerdi drain.
Determining the Drain Placement
One of the first steps in measuring and planning the installation of a Kerdi drain is determining the ideal placement for the drain within your shower. The drain should be positioned in a central location that allows water to flow towards it efficiently.
To determine the drain placement, consider the size and shape of your shower. For rectangular showers, the drain is typically positioned along the shorter side, ensuring water flows towards it easily. For square or circular showers, the drain is usually placed in the center.
Calculating the Slope and Drainage Area
Once the drain placement is established, the next step is calculating the slope and determining the drainage area. The slope ensures that water flows properly towards the drain, preventing pooling and potential water damage.
To calculate the slope, start by measuring the distance between the drain and the walls of the shower. This is typically done by measuring from the center of the drain to the wall. Divide this distance by the length of the shower floor to determine the slope ratio.
The drainage area is the space where water will collect before draining into the Kerdi drain. This area should be slightly larger than the size of the shower floor to ensure efficient water drainage. Measure the dimensions of the shower floor and add a few inches to each side to determine the appropriate drainage area.
Marking the Shower Floor for Installation
With the drain placement, slope, and drainage area determined, it’s time to mark the shower floor for installation. Start by marking the center point of the drain on the floor using a pencil or marker. From there, use a level and a straight edge to mark the slope lines towards the drain.
Ensure that the slope lines are consistent and meet the necessary slope ratio. Use a measuring tape or ruler to mark the boundaries of the drainage area, ensuring it exceeds the size of the shower floor. This will create a guide for the installation process.
By measuring and planning the installation of a Kerdi drain carefully, you can ensure a seamless and efficient installation process. Take the time to determine the drain placement, calculate the slope and drainage area accurately, and mark the shower floor accordingly. These steps will lay the foundation for a successful Kerdi drain installation in your shower.
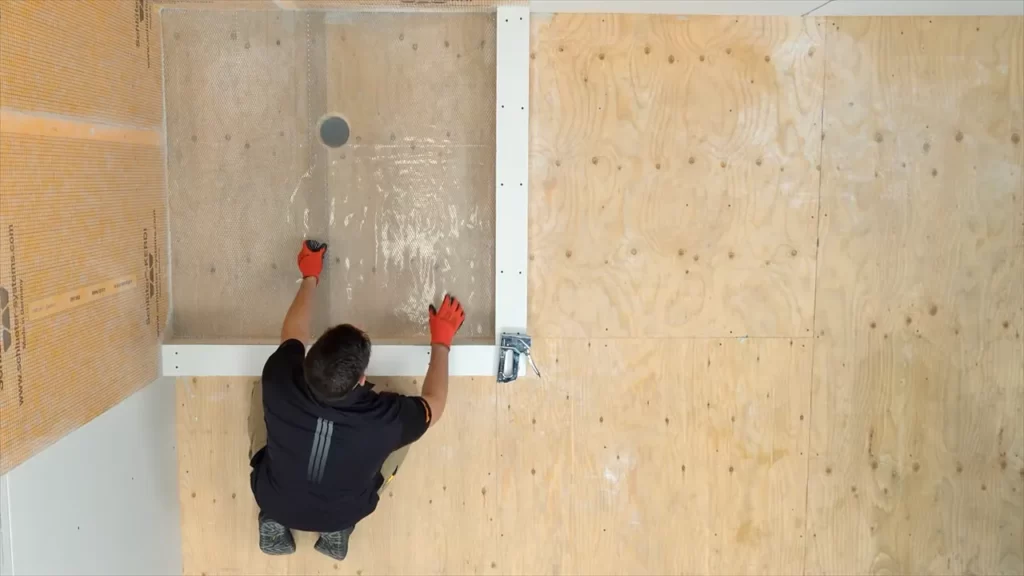
Preparing The Shower Floor
Before installing a Kerdi drain in your shower, it is crucial to properly prepare the shower floor. This process involves removing the existing floor and substrate, ensuring a level and clean surface, and applying a waterproof membrane. By following these steps, you can ensure that your shower floor is ready for the installation of a Kerdi drain.
Removing the Existing Floor and Substrate
The first step in preparing the shower floor is to remove the existing floor and substrate. This may involve removing tiles, linoleum, or any other type of flooring material that is currently in place. Use a chisel and hammer to carefully remove the floor, taking care not to damage the underlying structure. Once the floor is removed, inspect the substrate for any signs of damage or deterioration. Repair or replace any damaged areas before moving on to the next step.
Ensuring a Level and Clean Surface
After removing the existing floor and substrate, it is important to ensure that the surface is level and clean. Use a level to check the floor for any inconsistencies or slopes. If any areas are not level, use a leveling compound to even out the surface. Once the floor is level, thoroughly clean the area to remove any dust, debris, or adhesive residue. A clean and smooth surface will ensure proper adhesion of the waterproof membrane.
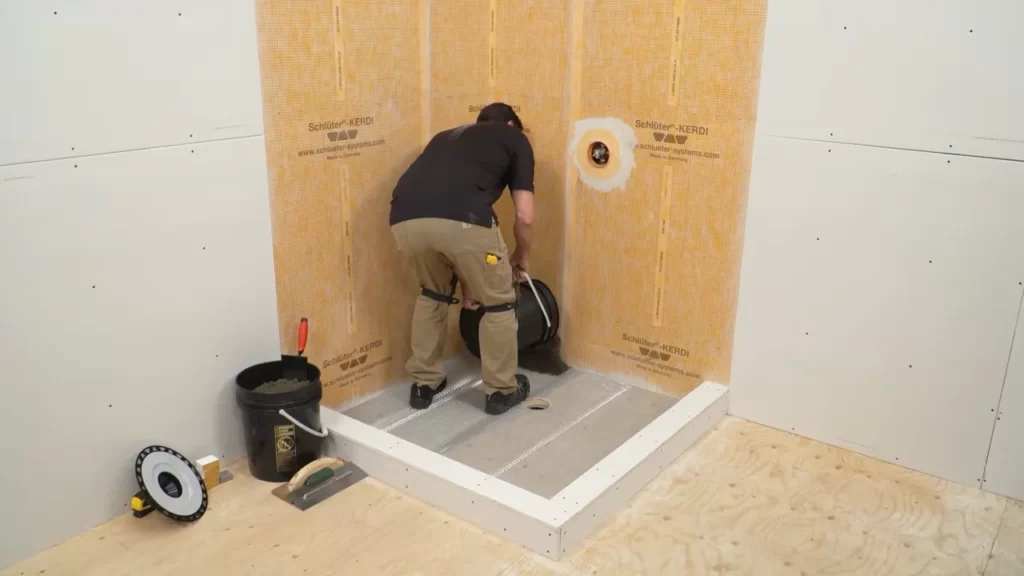
Applying the Waterproof Membrane
Now that the shower floor is prepared, it is time to apply the waterproof membrane. The waterproof membrane, such as the popular Kerdi membrane, is essential for preventing water damage and leaks. It is recommended to follow the manufacturer’s instructions for applying the membrane, as the process may vary slightly depending on the product used. Typically, the membrane is applied using a trowel, ensuring an even and consistent coverage. Take care to overlap the membrane at seams and corners to create a watertight seal.
Once the membrane is applied, allow it to dry according to the manufacturer’s instructions before proceeding with the installation of the Kerdi drain. Properly preparing the shower floor by removing the existing floor and substrate, ensuring a level and clean surface, and applying a waterproof membrane will help ensure a successful installation of a Kerdi drain.
Assembling The Drain Components
Understanding the Kerdi Drain Kit Components
Before you start assembling the drain components, it’s essential to familiarize yourself with the different parts that make up the Kerdi Drain Kit. Understanding each component will make the installation process much smoother.
The Kerdi Drain Kit consists of:
- Drain Grate
- Flange
- Waterproofing Membrane (Kerdi)
- Drain Pipe
- Drain Body
- Strainer
Each of these components plays a crucial role in ensuring a properly functioning shower drain system.
Attaching the Drain Grate and Flange
Once you have a good grasp of the different components, it’s time to move on to attaching the drain grate and flange. This step is essential for guaranteeing a secure and watertight seal.
To attach the drain grate and flange:
- Begin by inserting the drain grate into the drain body. Ensure that it fits snugly and sits flush with the shower floor.
- Next, take the flange and position it over the drain body, allowing it to overlap the surrounding shower membrane.
- Secure the flange to the drain body by tightening the screws provided. This will create a watertight seal, preventing any potential leaks.
By following these simple steps, you can ensure that the drain grate and flange are properly attached, providing a solid foundation for the rest of the installation process.
With the drain grate and flange securely in place, you’re ready to move on to the next steps of installing the Kerdi Drain. Stay tuned for our next segment on applying the waterproofing membrane, which is a crucial component in ensuring a leak-free shower.
Connecting The Drain To The Waste Pipe
Connecting the drain to the waste pipe is a crucial step in installing a Kerdi drain. It ensures proper drainage and prevents any leaks or water damage. In this section, we will discuss the steps involved in measuring and cutting the PVC pipe, applying primer and cement, and connecting the drain to the waste pipe.
Measuring and Cutting the PVC Pipe
Before connecting the drain to the waste pipe, you need to measure and cut the PVC pipe to the appropriate length. Follow these steps:
- Measure the distance between the drain outlet and the waste pipe using a measuring tape. Make sure to account for any fittings or elbows that need to be connected.
- Mark the measurement on the PVC pipe using a pencil or marker.
- Using a PVC pipe cutter or a hacksaw, carefully cut the pipe along the marked line. Ensure a clean and straight cut to ensure a proper fit.
- Debur the edges of the cut pipe using a deburring tool or sandpaper. This step will help prevent any leaks or blockages in the future.
Applying Primer and Cement
Once you have cut the PVC pipe to the desired length, you need to apply primer and cement to create a strong and secure connection. Follow these steps:
- Using a clean rag or brush, apply PVC primer to the outer edge of the pipe and the inner socket of the drain outlet. The primer will clean and soften the surfaces, allowing for better adhesion.
- Allow the primer to dry for a few seconds until it becomes tacky.
- Apply PVC cement to both the primed pipe and the drain outlet, making sure to cover the entire surface area. The cement creates a chemical bond, ensuring a watertight connection.
- Quickly insert the primed pipe into the drain outlet and give it a slight twist. Hold the connection firmly for a few seconds to allow the cement to set.
Now that you have measured, cut, primed, and cemented the PVC pipe, it’s time to connect the drain to the waste pipe. Follow these steps:
- Apply a thin layer of PVC cement to the end of the waste pipe.
- Insert the end of the waste pipe into the PVC socket on the other end of the drain outlet.
- Give the connection a quarter turn to ensure a proper and secure fit.
- Hold the connection in place for a few seconds to allow the cement to set.
Once the drain is securely connected to the waste pipe, it’s essential to test the installation by running water through the system. Check for any leaks or drainage issues and make any necessary adjustments.
Installing The Waterproofing Membrane
One crucial step in the installation of a Kerdi drain is applying the waterproofing membrane. This step ensures that your shower area is protected against water damage, mold, and mildew. The process involves two key tasks: applying the membrane over the entire shower surface and sealing the membrane around the drain.
Applying the Membrane Over the Entire Shower Surface
To start, ensure that your shower surface is clean and free from any debris or moisture. This will help the membrane adhere properly and create a strong waterproof barrier.
Once the surface is prepared, you can begin applying the membrane. The Kerdi waterproofing membrane is a pliable material that comes in rolls. Cut the membrane into the appropriate sizes, allowing enough material to cover the entire shower area, including walls and the floor.
Begin by positioning the membrane on the walls, starting from the bottom and working your way up. Press the membrane against the wall, ensuring it is firmly in place. Smooth out any wrinkles or air bubbles by using a trowel or a similar tool. Repeat this process for each wall.
Next, apply the membrane on the shower floor. Start from the drain area and work your way towards the walls, ensuring that the membrane overlaps the walls by at least a few inches. Smooth out any wrinkles or air bubbles as you go along.
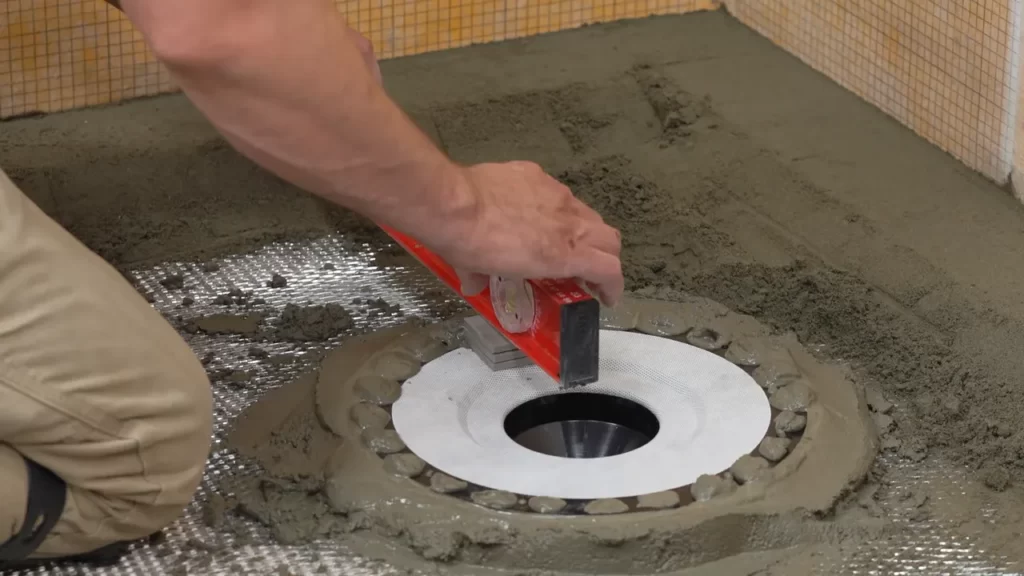
Sealing the Membrane Around the Drain
The next step is crucial for preventing water leakage around the drain. It involves sealing the membrane around the drain area securely.
First, cut a hole in the membrane that aligns with the drain opening. Ensure that the hole is slightly smaller than the diameter of the drain to create a tight seal.
Then, apply a generous amount of Kerdi-fix or a similar sealant around the drain flange. Press the membrane onto the sealant, making sure to cover the entire flange. Apply additional sealant around the edges to reinforce the seal.
Take caution to avoid covering the weep holes in the drain with the membrane. These holes allow any trapped water to escape, preventing potential water damage.
Ensuring Proper Overlapping and Sealing Techniques
Throughout the application of the waterproofing membrane, it is crucial to ensure proper overlapping and sealing techniques for optimal protection against water damage.
When applying the membrane, make sure that each piece overlaps the adjacent piece by a few inches. This overlap creates a strong bond and prevents water from seeping through the seams.
Use a roller or a similar tool to firmly press the membrane onto the surface, ensuring proper adhesion. Pay close attention to corners and edges, as these areas are prone to leaks if not properly sealed.
Inspect the entire membrane installation to ensure there are no gaps or areas that require additional sealing. If any gaps are found, simply apply more membrane or sealant to reinforce the waterproof barrier.
By following these steps and ensuring proper overlapping and sealing techniques, you can successfully install a Kerdi drain with a waterproofing membrane, creating a durable and water-resistant shower area.
Testing The Drain For Leakage
Once you have successfully installed a Kerdi Drain in your shower, it is important to test it for any leaks or issues. Testing the drain for leakage is a crucial step in ensuring that your shower will function properly without any water damage or mold growth.
Filling the Shower Base with Water
To begin the testing process, start by filling the shower base with water. Make sure the water level covers the drain completely. It is recommended to use a bucket or a hose to pour water into the base. Keep an eye on the water level to prevent overflow.
Inspecting for Any Leaks or Issues
Once the shower base is filled with water, carefully inspect the drain and its surrounding area for any signs of leakage or issues. Look for any visible water seeping through the drain or any unusual wet spots or dampness around the drain. A flashlight can be useful to closely examine the drain.
If you notice any leaks or issues, it is important to address them promptly. Leaks can indicate improper installation or a faulty drain, which can lead to long-term water damage if left unattended. Take note of the specific areas where leaks or issues are present for further evaluation and possible repair.
If you are confident that the drain is installed correctly and there are no leaks or issues, you can proceed with the final steps of your shower installation. Testing the drain for leakage is an essential step to ensure the longevity and functionality of your shower. Don’t underestimate the importance of this final check to prevent any potential water damage in the future.
Finalizing The Shower Floor
Finalizing the Shower Floor
After completing the necessary steps for installing a Kerdi Drain in your shower, it’s time to finalize the shower floor. This involves adding the tile or flooring material, grouting and sealing the tile, and cleaning and maintaining the Kerdi Drain. By following these steps, you can ensure that your shower floor is not only functional but also aesthetically pleasing.
Adding the Tile or Flooring Material
Once the Kerdi Drain is securely in place, you can proceed with adding the tile or flooring material of your choice. Make sure to have all the necessary tools and materials ready, including the tile adhesive or thin-set mortar, trowel, and spacers.
To ensure proper installation, start by applying the adhesive or mortar to the shower floor using the trowel at a 45-degree angle. Spread the adhesive evenly, ensuring full coverage.
Next, carefully place each tile or flooring material onto the adhesive, pressing firmly to ensure proper adhesion. Make use of spacers to maintain equal gaps between each tile for a professional-looking finish.
Once all the tiles are in place, allow the adhesive or mortar to dry according to manufacturer instructions before moving on to the next step.
Grouting and Sealing the Tile
After the tile adhesive or mortar has dried, it’s time to grout the tile. Grout not only fills in the gaps between tiles but also provides structural support and helps to prevent water penetration.
Using a rubber grout float, apply the grout mixture diagonally across the tile joints, making sure to fill them completely. Remove any excess grout using the float, keeping it at a 45-degree angle to avoid removing too much grout.
Allow the grout to set for a while, typically around 15-20 minutes, before gently removing any haze on the tile surface using a damp sponge. Rinse the sponge frequently and avoid using excessive water, as it can weaken the grout.
Once the grout has fully dried, it’s essential to seal the tile. Apply a suitable tile sealer using a paintbrush or roller, following the manufacturer’s instructions. This will help protect the tile from stains, mold, and mildew, ensuring its longevity and maintaining its appearance.
Cleaning and Maintaining the Kerdi Drain
Regular cleaning and maintenance of the Kerdi Drain are crucial for its proper functioning and longevity. Follow these simple steps to keep your drain in top condition:
- Remove any debris or hair from the drain cover by using a brush or your fingers.
- Wipe down the drain cover and surrounding area with a mild soap and water solution to remove any dirt or grime.
- Periodically inspect the drain’s waterproofing membrane and reseal any areas that show signs of wear or damage.
- Ensure that the drain is clear of any blockages by using a plunger or drain snake if necessary.
- Finally, to maintain proper water flow, periodically pour boiling water down the drain to dissolve any clogs or buildup.
By following these cleaning and maintenance steps, you can keep your Kerdi Drain in optimal condition and avoid any potential issues in the future.
Troubleshooting Common Installation Problems
Even with proper preparation and careful installation, issues can occasionally arise when installing a Kerdi drain. Here, we will address some common problems that you may encounter and provide solutions to help you overcome them.
Adjusting the Drain Height
One common issue that can occur during the installation of a Kerdi drain is an incorrect drain height. If the drain is too high or too low, it can result in improper water flow and drainage problems. Here are some steps to troubleshoot and adjust the drain height:
- Start by checking the drain height using a level. Ensure that the drain is level with the surrounding floor or slightly below it.
- If the drain is too high, you can adjust it by removing the Kerdi membrane and cutting down the drain pipe. Use a hacksaw to carefully trim the pipe to the desired height.
- If the drain is too low, you can add a spacer or extension ring to raise the drain height. Place the spacer or extension ring over the drain pipe and secure it in place with screws.
- Once you have adjusted the drain height, reapply the Kerdi membrane and ensure that it is properly sealed to prevent any leaks.
Addressing Leaks or Drainage Issues
Leaking or drainage problems can occur if the installation of the Kerdi drain is not done correctly. Here are some troubleshooting steps to help you address these issues:
- Inspect the drain connection to ensure that it is properly aligned and tightly secured. If the connection is loose, water can leak out.
- Check for any cracks or damage in the Kerdi membrane. Even a small hole can lead to leaks. If you find any damage, repair or replace the damaged section of the membrane.
- Ensure that the drain is not clogged with debris or any obstructions. Use a plumber’s snake or a drain auger to remove any blockages.
- If you are still experiencing drainage issues, consider checking the slope of the floor. The floor should have a slight slope towards the drain to ensure proper water flow.
By following these troubleshooting steps, you can address common installation problems that may arise when installing a Kerdi drain. Remember to always double-check your work and take the necessary steps to ensure a successful and watertight installation.
Frequently Asked Questions
How Far Off The Wall Should A Kerdi Line Drain Be?
A Kerdi line drain should be placed about 1/4 inch (6 mm) off the wall to ensure proper water drainage.
How Big Of A Hole Do You Need For A Schluter Drain?
A Schluter drain requires a hole that is sized to fit the specific drain model. The hole should be large enough to accommodate the drain grate, typically measuring around 4 to 6 inches in diameter.
How Do You Plug A Schluter Drain For A Water Test?
To plug a Schluter drain for a water test, use a Schluter-KERDI-DRAIN-BODY or a temporary test plug. Insert the plug into the drain opening and ensure it is secure. Fill the shower base with water to conduct the test.
Do You Have To Use Kerdi Drain With Schluter Shower Pan?
Yes, it is recommended to use a Kerdi drain with a Schluter shower pan for optimal performance and compatibility. The Kerdi drain is specifically designed to work with the Schluter system, ensuring a watertight seal and efficient drainage for your shower.
Conclusion
Installing a Kerdi drain is a simple but crucial step in achieving a waterproof and long-lasting tiled shower. By following the steps outlined in this blog post, you can ensure a seamless installation process. Remember to carefully measure and prepare the area, choose the right drain size, and apply the proper adhesive and waterproofing membrane.
With the right tools, materials, and attention to detail, you’ll have a functional and leak-free shower for years to come. Happy installing!