To install a laundry tub, first assemble the necessary tools and materials. Then, follow these steps: (write the steps here) Installing a laundry tub can make your laundry room more functional and efficient.
Whether you’re replacing an old tub or adding a new one, it’s important to follow the proper installation process. By carefully assembling the required tools and materials, you can ensure a successful installation. We will provide a step-by-step guide on how to install a laundry tub, allowing you to complete the task with ease and confidence.
With our easy-to-follow instructions, you’ll have your new laundry tub up and running in no time. So, let’s dive in and get started on the installation process.
Planning Your Laundry Tub Installation
Planning your laundry tub installation is a crucial step that sets the foundation for a successful project. By carefully considering the location, space, and necessary plumbing and electrical requirements, you can ensure that your laundry tub is installed in the most efficient and convenient manner. In this section, we will guide you through the process of planning your laundry tub installation, starting with determining the location for your tub.
Determine the location for your laundry tub
The first step in planning your laundry tub installation is to determine the best location for your tub. Consider factors such as proximity to your washer and dryer, ease of access, and available space. Ideally, the tub should be located near your washer and dryer for convenience.
Assess the space and measurements
Once you have determined the location, it’s essential to assess the space and take accurate measurements. Measure the length, width, and height of the area where the tub will be installed. This will help you ensure that the tub fits properly and allows for comfortable usage. Consider any existing plumbing or electrical fixtures in the area and make note of their positions.
Consider plumbing and electrical requirements
Before proceeding with your laundry tub installation, it’s important to consider the plumbing and electrical requirements. Check if there is existing plumbing nearby that can be easily connected to the tub. If not, you may need to consult a professional plumber to extend the plumbing lines. Similarly, ensure that there is a nearby electrical outlet for powering the tub if it requires electricity.
In summary, planning your laundry tub installation involves determining the location, assessing space and measurements, and considering the necessary plumbing and electrical requirements. By carefully planning these aspects, you can ensure a smooth and successful installation process.

Gathering The Required Tools And Materials
Before starting the installation of a laundry tub, it is important to gather all the necessary tools and materials. By having everything prepared beforehand, you can save time and ensure a smooth installation process. In this section, we will provide you with a list of the tools and materials you will need, as well as some safety precautions to keep in mind.
List of tools and materials needed for the installation
To install a laundry tub, you will require the following tools and materials:
| Tools | Materials |
|---|---|
|
|
Safety precautions to keep in mind
While installing a laundry tub, it is crucial to prioritize your safety. Here are some safety precautions to keep in mind:
- Always wear safety goggles and gloves to protect your eyes and hands from any potential hazards.
- Make sure to turn off the water supply before starting the installation to prevent any leakages or accidents.
- Use caution while handling sharp tools, such as a hacksaw or pipe cutter, to avoid any injuries.
- Keep the area well-ventilated to avoid inhaling any harmful fumes from plumbing materials.
- If you are not confident in your plumbing skills, it is advisable to consult a professional plumber to ensure a safe and accurate installation.
By gathering all the necessary tools and materials and following the safety precautions, you can proceed with the installation process confidently and efficiently.
Preparing The Area For Installation
Before you can start installing a laundry tub, it’s important to properly prepare the area where it will be installed. This step is crucial as it ensures a smooth and hassle-free installation process. In this section, we will guide you through the essential tasks you need to complete to prepare the installation area.
Clearing and Cleaning the Installation Area
The first step in preparing the area is to clear out any clutter or debris that might be in the way. Remove any items or obstacles that could hinder the installation process. It’s important to create a clean and spacious area for the laundry tub to be installed.
Once the area is cleared, it’s time to clean. Use a broom or vacuum cleaner to remove any dust, dirt, or loose particles from the floor. Wipe down any surfaces that will come into contact with the laundry tub, such as countertops or walls. This will ensure a clean and hygienic installation area.
Checking and Addressing Any Existing Plumbing or Electrical Issues
Before proceeding with the installation, it’s crucial to check for any existing plumbing or electrical issues that may need attention. Inspect the current plumbing connections and pipes to ensure they are in good condition and don’t have any leaks or damage.
If you identify any issues, such as a leaky pipe or faulty electrical connection, it’s important to address them before proceeding with the installation. This will help prevent any complications or future problems once the laundry tub is installed.
Ensuring Proper Ventilation in the Area
Proper ventilation is essential in the area where the laundry tub will be installed. This is especially important if the installation area is in a closed space, such as a utility room or basement. Without proper ventilation, moisture can build up, leading to mold and mildew growth.
To ensure proper ventilation, consider installing a ventilation fan or opening a window to allow fresh air to circulate. This will help to prevent any moisture-related issues and create a more comfortable and hygienic space.
By following these steps and preparing the area properly, you’ll be one step closer to successfully installing your laundry tub. Next, we will guide you through the actual installation process, so stay tuned for the next section.
Installing The Drain And Water Supply Lines
Measuring and cutting the pipes
Before you begin installing the drain and water supply lines for your laundry tub, it’s important to accurately measure and cut the pipes to ensure a proper fit. This will help prevent leaks and ensure a seamless installation process.
When measuring the pipes, use a tape measure to measure the distance between the laundry tub and the main water supply line. Take note of the measurements and make sure to account for any bends or turns that may be necessary.
Once you have your measurements, it’s time to cut the pipes. Using a pipe cutter, carefully cut the pipes to the desired length. Make sure to wear appropriate safety gear, such as gloves and eyewear, during this process.
Connecting the drain and water supply lines
Once you have measured and cut the pipes, it’s time to connect the drain and water supply lines to your laundry tub.
Begin by attaching the drain line to the laundry tub. Apply PVC cement to the end of the drain pipe and then insert it into the drain hole on the laundry tub. Make sure it is securely attached and allow the PVC cement to dry for the recommended amount of time.
Next, connect the water supply lines to the laundry tub. Depending on the type of plumbing system you have, you may need to use compression fittings or soldering techniques. Consult with a professional if you are unsure about the best method for your specific plumbing system.
Securing the connections with appropriate fittings and techniques
Once you have connected the drain and water supply lines to the laundry tub, it’s important to secure the connections with appropriate fittings and techniques. This will help prevent leaks and ensure a long-lasting installation.
If you are using PVC pipes, use PVC primer and cement to secure the connections. Apply the primer to the outside of the pipe and the inside of the fitting, then apply the cement to both surfaces. Push the pipe into the fitting and hold it in place for a few seconds to allow the cement to set.
If you are using copper pipes, use soldering techniques to secure the connections. Clean the ends of the pipes and the inside of the fittings with sandpaper or a pipe cleaning brush. Apply flux to both the pipe and the fitting, then heat the joint with a torch. Once the joint is hot enough, apply solder to the joint and allow it to flow into the connection.
After securing the connections, make sure to check for any leaks. Turn on the water supply and inspect the connections for any signs of leaks. If you notice any leaks, tighten the fittings or reapply cement/solder as necessary.
By following these steps and techniques, you can successfully install the drain and water supply lines for your laundry tub. Remember to always consult with a professional if you are unsure about any part of the installation process.
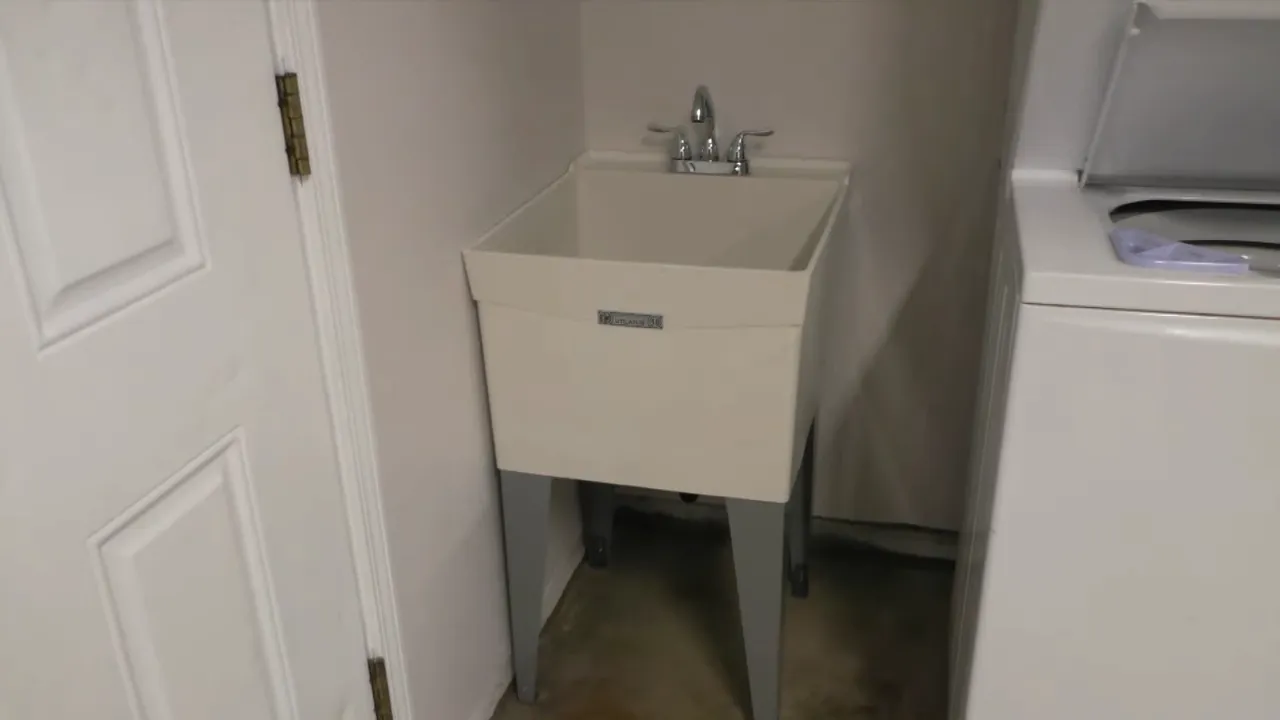
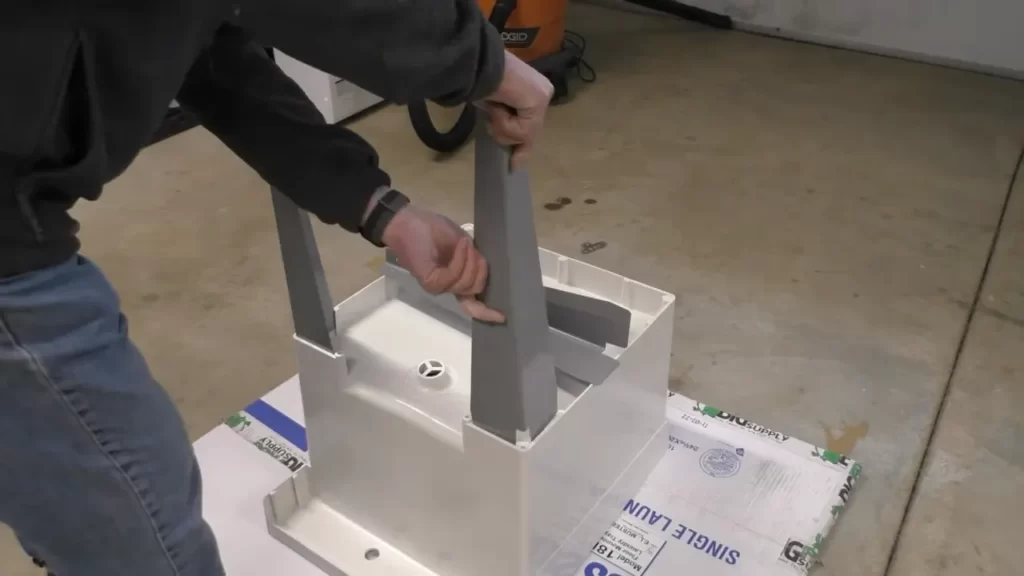
Mounting And Securing The Laundry Tub
When it comes to installing a laundry tub, one of the most important steps is mounting and securing the tub properly. This ensures that it stays in place and can withstand the weight and pressure of regular use. In this section, we will guide you through the process of determining the appropriate mounting method for your tub, installing the mounting brackets or straps, and ensuring the tub is securely attached to the wall or floor.
Determining the appropriate mounting method for your tub
Before you begin the installation process, it is crucial to determine the appropriate mounting method for your laundry tub. This will depend on factors such as the type of tub you have and the existing plumbing setup. Here are a few common mounting methods:
| Mounting Method | Description |
|---|---|
| Wall-mounted | The tub is attached to the wall using brackets or straps. |
| Freestanding | The tub is not attached to any surface and may require additional support from the floor. |
| Cabinet-mounted | The tub is installed within a cabinet structure and secured in place. |
Installing the mounting brackets or straps
Once you have determined the appropriate mounting method for your laundry tub, you can proceed with installing the mounting brackets or straps. Here’s how:
- Measure the height at which you want to mount the tub.
- Mark the positions on the wall or floor where the brackets or straps will be installed.
- Drill pilot holes at the marked positions.
- Secure the brackets or straps using screws or bolts, ensuring they are level and sturdy.
- Double-check the alignment and make adjustments if necessary.
Ensuring the tub is securely attached to the wall or floor
Once the mounting brackets or straps are in place, it’s time to ensure that the laundry tub is securely attached to the wall or floor. Here are a few essential steps to follow:
- Position the tub onto the mounting brackets or straps.
- Check that the tub is level and adjust as needed.
- Secure the tub to the brackets or straps using the appropriate screws or bolts.
- Apply pressure to test the stability of the tub. If there is any movement, tighten the screws or bolts.
- Inspect the connections and fittings for leaks or potential issues.
By following these steps, you can ensure that your laundry tub is properly mounted and securely attached to the wall or floor. This will provide a sturdy and functional setup for all your laundry needs.
Connecting The Plumbing
Connecting the Plumbing
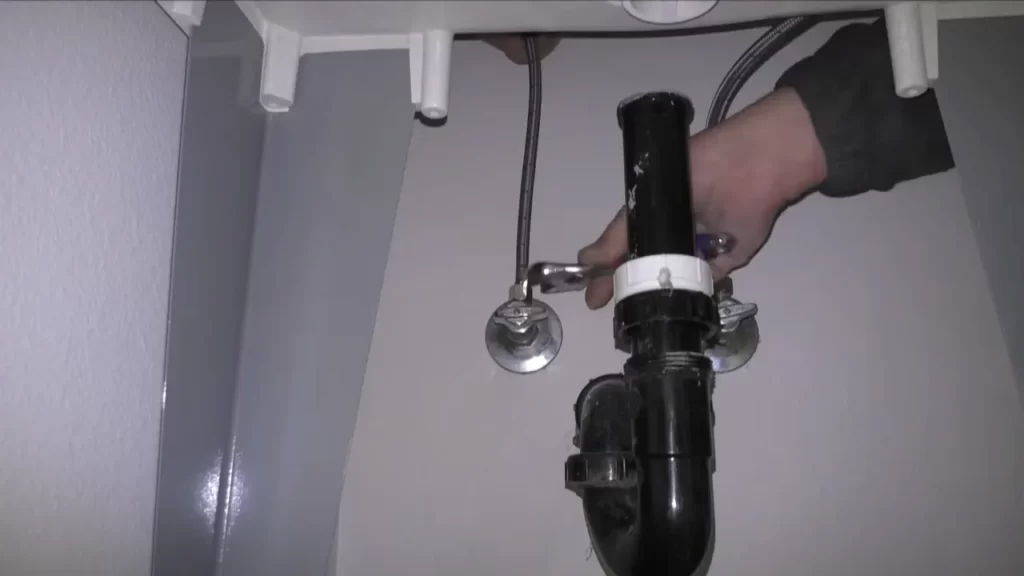
Attaching the drain pipe to the laundry tub:
To start the plumbing installation for your laundry tub, you will need to attach the drain pipe to the tub. This ensures proper drainage for your laundry tub and prevents any potential leaks. Follow these steps to attach the drain pipe:
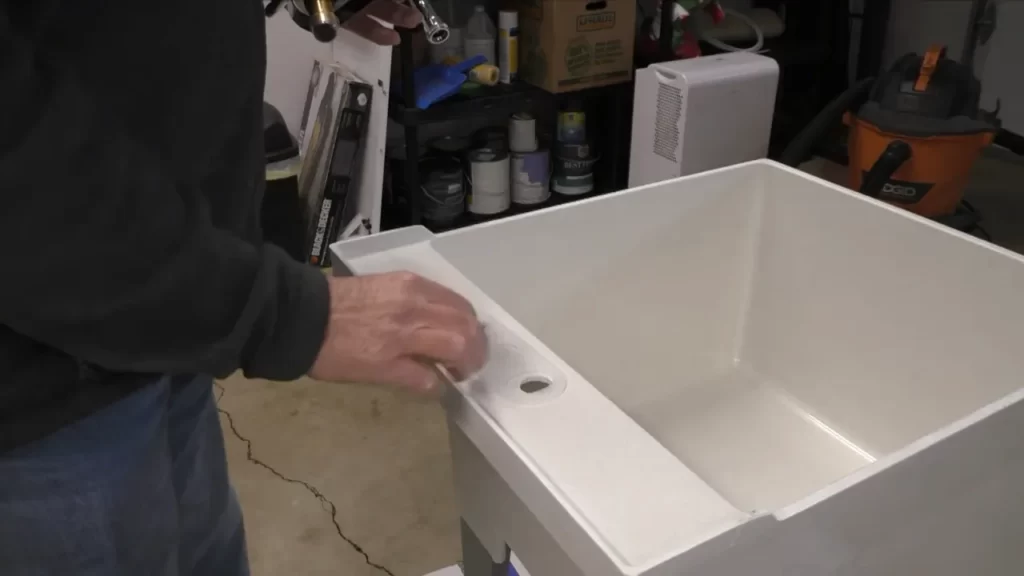
1. Firstly, locate the drain hole on the laundry tub. This hole is typically located at the bottom of the tub and is designed to accommodate the drain pipe.
2. Before attaching the drain pipe, ensure that the pipe is the appropriate size for your laundry tub. It is important to have a properly sized drain pipe to prevent any issues with water flow.
3. Apply plumber’s putty or silicone around the drain hole to create a watertight seal. This step is crucial in preventing any leaks. Ensure that the putty or silicone is evenly spread around the hole.
4. Insert the drain pipe into the drain hole. Push it firmly until it fits snugly. You can use a wrench to tighten any connecting nuts if necessary. Make sure it is securely connected to avoid any leaks.
Connecting the water supply lines to the tub’s faucets:
Once the drain pipe is securely attached, the next step is to connect the water supply lines to the laundry tub’s faucets. Here’s what you need to do:
1. Before connecting the supply lines, turn off the main water supply to your home. This will prevent any water from flowing while you work on the installation.
2. Locate the hot and cold water supply lines under the sink or nearby plumbing. These lines should already be in place, connected to your home’s water supply.
3. Attach a flexible hose to each of the hot and cold water supply lines. Ensure that the hoses are long enough to reach the laundry tub’s faucets and are of the correct size for a secure connection.
4. Connect the other end of the flexible hoses to the corresponding hot and cold water inlets on the laundry tub’s faucets. Tighten the connection using a wrench, being careful not to overtighten and damage the fittings.
Checking for any leaks and making necessary adjustments:
Once you have connected the plumbing, it is essential to check for any leaks and make any necessary adjustments. Follow these steps:
1. Turn on the main water supply and let the water flow into the laundry tub. Keep a close eye on all the connections and joints for any signs of leakage.
2. If you notice any leaks, tighten the connections gently with a wrench. Be cautious not to overtighten, as this can cause damage to the fittings.
3. Inspect the drain pipe connection and ensure it is securely attached to the laundry tub. Use plumber’s putty or silicone to seal any gaps if needed.
4. Finally, run some water in the laundry tub and check for any additional leaks. Make sure the water flows freely down the drain without any obstruction.
By following these steps to connect the plumbing, you are ensuring a proper installation of your laundry tub. Remember to take necessary precautions such as turning off the main water supply before beginning the installation and checking for leaks thoroughly to avoid any future issues.
Testing And Finishing Up
Once you have successfully installed your laundry tub, it’s time to test the drainage and water supply to ensure everything is working smoothly. Additionally, you’ll want to check for any leaks or issues that may need to be addressed. Lastly, cleaning up the installation area and tidying up the surroundings will give your laundry room a polished and professional look.
Run water to test the drainage and water supply
To test the drainage of your newly installed laundry tub, simply turn on the faucet and let the water flow. Observe how quickly the water drains and make sure there are no clogs or blockages. If you notice any issues with the drainage, you may need to disassemble the plumbing connections and check for any obstructions. Once the drainage is confirmed to be working properly, move on to testing the water supply.
To test the water supply, turn on both the hot and cold water faucets and check for a steady flow. Ensure that the water pressure is adequate and that there are no leaks around the connections. If you detect any leaks or issues, tighten the connections or replace any faulty parts as necessary.
Check for any leaks or issues
It’s crucial to thoroughly inspect the installation for any leaks or issues before considering it complete. Carefully examine all the joints and connections, looking for any signs of dripping or moisture. If you notice any leaks, tighten the fittings or replace any damaged components. Pay special attention to the areas where the pipes and faucets connect to the laundry tub, as these are commonly prone to leaks.
Additionally, check for any water stains or discoloration on the surrounding walls or floors. This could indicate a leak that is not immediately visible. If you detect any issues, it’s important to resolve them promptly to prevent further damage and maintain the integrity of your laundry room.
Cleaning up the installation area and tidying up the surroundings
Now that your laundry tub installation is complete, it’s time to clean up the installation area and ensure everything looks neat and tidy. Begin by removing any debris or leftover materials such as packaging or plastic wrap. Wipe down the surfaces of the laundry tub to remove any fingerprints or smudges.
Next, take a moment to tidy up the surroundings of the laundry tub. Sweep or vacuum the floor to get rid of any dust or dirt. If necessary, wipe down the walls or cabinets near the tub to remove any splatters or stains. Lastly, organize any laundry supplies or tools that may have been displaced during the installation process.
By taking the time to clean up and tidy the area, you not only improve the overall appearance of your laundry room, but you also create a more functional and enjoyable space for completing your laundry tasks.
Troubleshooting Common Installation Problems
Installing a laundry tub can be a rewarding DIY project, but like any installation, it can come with its fair share of challenges. In this section, we’ll discuss some common issues that may arise during the installation process and provide tips on how to troubleshoot them.
Identifying and addressing common issues during installation
During the installation of a laundry tub, you may encounter certain issues that can hinder the smooth process. Being able to identify and address these issues promptly can save you time and frustration. Here are some common issues to be aware of:
1. Uneven or unstable installation surface
Before installing your laundry tub, ensure that the surface is level and sturdy. An uneven surface can lead to instability and potential leaks. To address this, use a level and shims to ensure a stable base for your tub. Additionally, check for any underlying structural issues that may need to be addressed before proceeding with the installation.
2. Inadequate or incorrect plumbing connections
Proper plumbing connections are vital for the functionality of your laundry tub. Ensure that the water supply lines and drain pipes are correctly connected. Leaks or connection issues can occur if the connections are not tight enough or if the wrong type of fittings are used. Double-check all connections and use sealant or plumber’s tape as necessary to prevent leaks.
3. Insufficient space for the laundry tub
Before purchasing a laundry tub, measure the space where it will be installed to ensure a proper fit. If the tub is too large for the designated area, it can lead to installation complications. Consider the depth, width, and height of the tub, as well as any additional space needed for plumbing connections. If space is limited, you may need to explore alternative options or consider a smaller tub.
Tips for troubleshooting leaks, drainage problems, or other complications
Even with careful installation, leaks, drainage problems, or other complications can still occur. Here are some tips for troubleshooting these common issues:
- Leak troubleshooting:
- Inspect all plumbing connections for leaks. Tighten any loose connections and apply sealant or plumber’s tape if necessary.
- Check the rubber gaskets or washers in your plumbing fixtures. Replace any damaged or worn-out parts that may be causing leaks.
- Examine the drainage system for any clogs or blockages. Use a plunger or plumbing snake to remove any obstructions.
- Drainage problem troubleshooting:
- Ensure that the drain pipes are properly connected and aligned. Misalignment can lead to poor drainage.
- If you notice slow drainage, try using a chemical drain cleaner or a mixture of baking soda and vinegar to break down any buildup in the pipes.
- Other complication troubleshooting:
- If you encounter issues with the functionality of the laundry tub, consult the manufacturer’s instructions or contact their customer support for assistance.
- Consider hiring a professional plumber if the issues persist or if you are unsure about handling more complex problems.
By following these troubleshooting tips, you can address common installation problems and ensure that your laundry tub installation is a success.
Maintenance And Care Tips
Proper maintenance and care of your laundry tub are essential for its longevity and efficient functioning. By following these maintenance and care tips, you can ensure that your laundry tub remains in top condition for years to come.
Regular maintenance to keep your laundry tub in top condition
To maintain the optimal performance of your laundry tub, regular maintenance is key. Here are some important steps to include in your maintenance routine:
- Check for any leaks or cracks in the tub and address them promptly.
- Inspect the plumbing connections regularly to ensure there are no loose or damaged parts.
- Keep the area around the tub clean and free from debris.
- Regularly clean the lint trap or filter to prevent clogs and reduce strain on the drain system.
- Check and clean the drain regularly to remove any build-up of soap scum, hair, or other debris.
Cleaning and sanitizing the tub properly
Regular cleaning and sanitizing of the laundry tub are essential to maintain proper hygiene. Follow these steps to clean and sanitize your tub effectively:
- Start by removing any items from the tub and drain any standing water.
- Use a mild detergent or cleaner specifically designed for laundry tubs.
- Scrub the tub with a soft brush or sponge, paying special attention to corners and hard-to-reach areas.
- Rinse the tub thoroughly with clean water to remove any residue.
- To sanitize the tub, mix a solution of bleach and water (1 part bleach to 10 parts water) and apply it to the tub’s surfaces. Let it sit for a few minutes before rinsing it off.
- After cleaning and sanitizing, dry the tub with a clean towel or allow it to air dry.
Preventive measures to avoid future issues
Prevention is better than cure, and this holds true for laundry tub maintenance as well. By taking preventive measures, you can avoid potential issues in the future. Consider the following preventive measures:
- Install a lint trap or filter to catch lint, hair, and other debris before they enter the drain system.
- Avoid pouring grease, oil, or other substances down the drain to prevent clogs.
- Be mindful of the weight you put on the tub and avoid overloading it to prevent damage.
- Regularly check the water supply hoses and replace them if they show signs of wear or damage.
By incorporating these maintenance and care tips into your laundry tub routine, you can ensure its optimal performance, hygiene, and longevity.
Frequently Asked Questions
How Do You Secure A Laundry Tub To A Concrete Floor?
Secure a laundry tub to a concrete floor by following these steps: 1. Position the tub in the desired location on the floor. 2. Use a marker or pencil to mark the mounting holes’ positions on the floor. 3. Drill holes into the concrete floor at the marked positions.
4. Insert concrete anchors into the drilled holes. 5. Use screws or bolts to secure the tub to the concrete floor through the anchors.
How Much Does It Cost To Install A Laundry Sink?
The cost to install a laundry sink typically ranges from $200 to $500, depending on factors such as the type of sink, plumbing requirements, and labor fees.
How Do You Install A Utility Sink In Laundry?
To install a utility sink in your laundry, follow these steps: 1. Locate a suitable spot near existing plumbing and drainage. 2. Shut off the water supply and drain any existing pipes. 3. Install a faucet and connect it to the hot and cold water lines.
4. Attach the drain pipe to the sink and connect it to the existing sewer line. 5. Secure the sink to the wall or cabinet and turn on the water supply.
Is It Hard To Add A Laundry Sink?
Adding a laundry sink is not hard. Just make sure you have the necessary plumbing connections and space to accommodate it. It’s a simple task for a professional plumber.
Conclusion
Installing a laundry tub can bring convenience and functionality to your laundry room. With the step-by-step guide provided in this blog post, you can confidently tackle this DIY project. Remember to gather all necessary tools and materials before starting, and always prioritize safety.
By following our instructions, you can successfully install a laundry tub and enhance your laundry experience. Happy washing!