The wax ring installation process involves placing the ring over the flange and securing the toilet on top of it. Installing a wax ring is an essential step in the process of setting up a toilet.
The purpose of the wax ring is to create a watertight seal between the toilet flange and the base of the toilet. This ensures that no water or sewage leaks occur around the base of the toilet. Although it may sound like a complicated task, installing a wax ring is actually quite simple.
In this guide, we will walk you through the steps of installing a wax ring to help you successfully complete this crucial part of your toilet installation. So let’s get started and ensure a leak-free toilet installation.
Factors To Consider
When it comes to installing a wax ring for your toilet, there are several factors that you need to consider. These factors will ensure a proper and secure installation, preventing any leaks or damage in the future. Here are three important factors that you should keep in mind:
Toilet Type
Before you start the installation process, it’s important to know the type of toilet you have. The two most common types are two-piece toilets and one-piece toilets. Two-piece toilets have a separate bowl and tank, while one-piece toilets have a combined bowl and tank. Understanding the type of toilet you have will help you determine the appropriate size and type of wax ring to use.
Flange Height and Size
The flange is the part of the toilet drain pipe that connects the toilet to the waste pipe in the floor. It’s crucial to ensure that the flange height and size align with the wax ring you’re installing. If the flange is too low, it may not provide a proper seal, leading to leaks. On the other hand, if the flange is too high, it may cause the toilet to wobble. Measure the flange height and size accurately before purchasing the wax ring to ensure a secure and leak-proof fit.
Sealing Ability
The wax ring’s sealing ability is of utmost importance to prevent any water leakage. It forms a watertight seal between the toilet base and the flange, preventing water from seeping out. It’s essential to choose a wax ring that has a strong sealing ability and is resistant to deterioration over time. Look for wax rings with extra thickness or ones that have additional sealing features to ensure a long-lasting and reliable seal.

Gathering The Necessary Tools And Materials
Before starting the installation process of a wax ring, it is crucial to gather all the necessary tools and materials. This step will ensure a smooth and efficient installation, saving time and hassle later on. Following are the essential tools and materials that you will need:
Wax Ring
The wax ring is the primary component required for installing a toilet. It acts as a seal between the toilet flange and the toilet bowl, preventing leaks and foul odors. Choose a high-quality wax ring that fits the specific toilet you are installing. You can find wax rings at your local hardware store or home improvement center.
Gloves
When working with toilet installations, it is important to prioritize safety. Wearing gloves will protect your hands from dirt, bacteria, and any harmful substances that you may encounter during the installation process. Make sure the gloves fit well and provide adequate protection.
Adjustable Wrench
An adjustable wrench is an essential tool for loosening and tightening nuts and bolts. You will need it to remove the bolts that hold the toilet in place and secure them back during the installation. Ensure that the wrench is of good quality and suitable for the size of the bolts on your toilet.
Bucket
Having a bucket nearby during the installation process is highly recommended. It will serve multiple purposes, such as catching any water or debris that may spill during the removal of the old toilet. Additionally, it can be used to store the old wax ring and any other waste materials, making cleanup easier and more organized.
By acquiring these essential tools and materials beforehand, you will be well-prepared to install the wax ring and complete the toilet installation process smoothly and efficiently. Proceeding with caution and attention to detail will result in a leak-free and properly functioning toilet that you can enjoy for years to come.
Removing The Old Wax Ring
Before installing a new wax ring, you’ll need to remove the old one. This process may seem daunting, but with a bit of patience and the right tools, you’ll have it done in no time. In this section, we’ll go over the step-by-step process of removing the old wax ring, ensuring a clean and efficient installation.
Turning off the water supply
The first step in removing the old wax ring is to turn off the water supply to the toilet. This prevents any water from flowing into the tank or bowl during the removal process. Locate the shut-off valve, typically located on the wall or floor behind the toilet, and turn it clockwise to shut off the water. This will ensure a dry and hassle-free removal process.
Emptying the toilet tank and bowl
Once the water supply is turned off, it’s time to empty the tank and bowl of any remaining water. To do this, simply flush the toilet and hold down the handle until all the water is drained. Use a sponge or towel to soak up any remaining water in the tank and bowl, ensuring a dry and clean working area.
Unscrewing the bolts
Next, you’ll need to unscrew the bolts that secure the toilet to the floor. These bolts are typically located at the base of the toilet, on either side. Use a wrench to loosen and remove the nuts from the bolts. Once the nuts are removed, carefully lift the toilet straight up, ensuring not to twist or tilt it to prevent any damage to the toilet or the floor.
Note: It’s important to lift the toilet with caution as it can be heavy and fragile. It’s recommended to have someone assist you in this step if needed.
Lifting off the toilet
With the bolts removed, you can now lift off the toilet and expose the old wax ring. Gently lift the toilet straight up and set it aside on a towel or cloth to protect the floor. Take a moment to inspect the old wax ring for any damage or debris. If necessary, clean the area around the flange and ensure it’s free from any remnants of the old wax ring.
Note: It’s a good idea to wear gloves during this process to protect your hands from any residual wax or debris.
In conclusion
Removing the old wax ring is an essential step in installing a new one. By following these steps, you can ensure a clean and efficient removal process, preparing the way for a successful installation. With the old wax ring out of the way, you’re one step closer to a fully functional and leak-free toilet.
Cleaning The Flange And Bowl
Removing any residue
If you are installing a new wax ring for your toilet, it is crucial to ensure that the flange and bowl are clean and free from any residue. Leftover residue can create an uneven surface, which can lead to leaks and damage over time. To remove any residue, start by gently scraping off any old wax or debris from the flange using a putty knife. Be careful not to damage the surface of the flange or bowl while doing this.
Cleaning with a disinfectant
Once you have removed any residue, it is important to thoroughly clean the flange and bowl with a disinfectant. This step not only helps to remove any lingering bacteria or germs but also ensures a clean surface for the new wax ring to adhere to. Choose a disinfectant that is safe for use on toilet surfaces and follow the manufacturer’s instructions for usage.
To clean the flange, spray the disinfectant directly onto the surface, making sure to cover all areas. Use a clean cloth or a scrub brush to gently scrub the flange, paying extra attention to any crevices or hard-to-reach areas. Wipe away any excess disinfectant with a separate clean cloth.
Next, move on to the bowl. Spray the disinfectant inside the bowl, focusing on the areas around the flange. Use a toilet brush to scrub the bowl thoroughly, including under the rim and inside the trapway. Flush the toilet to rinse away any remaining disinfectant.
Once both the flange and bowl are clean and disinfected, use a clean cloth or paper towel to dry them completely. Any moisture left behind can interfere with the wax ring’s ability to create a watertight seal, so take your time to ensure everything is dry.
These steps of cleaning the flange and bowl are essential before installing a new wax ring. By removing any residue and cleaning with a disinfectant, you are creating a clean and solid foundation for your toilet installation. Remember to always follow the manufacturer’s instructions for specific cleaning products and techniques.
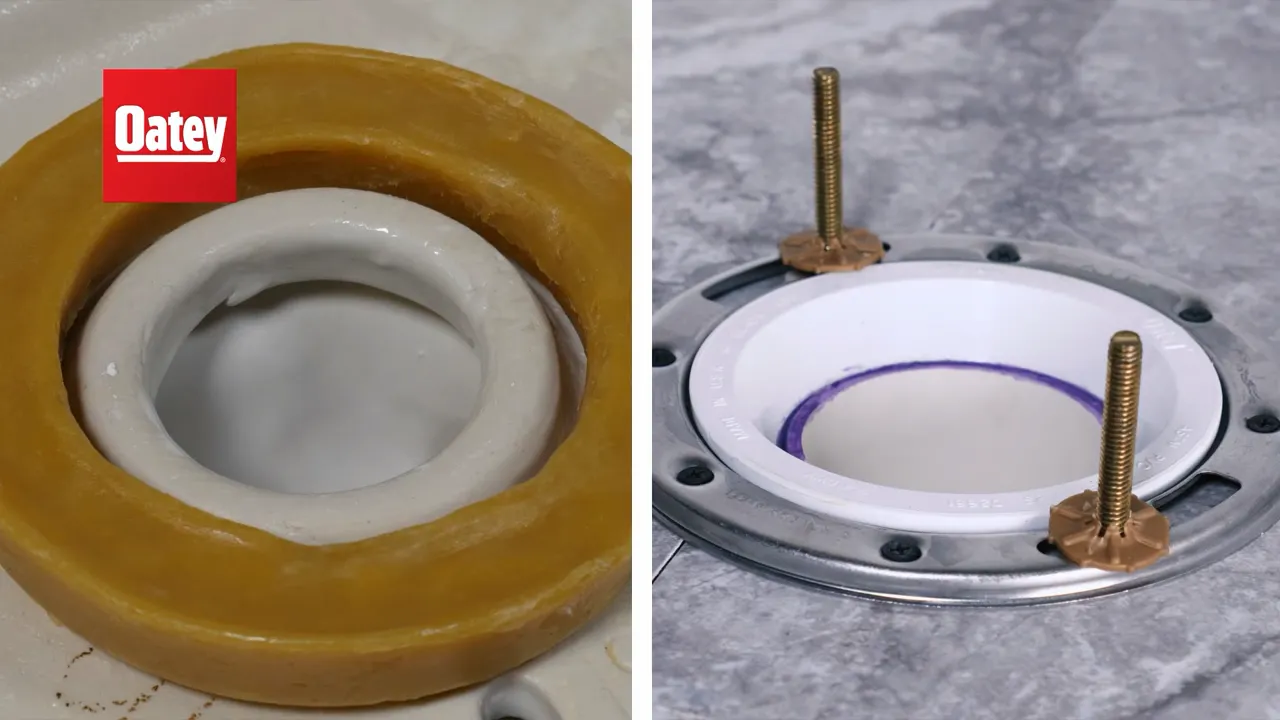
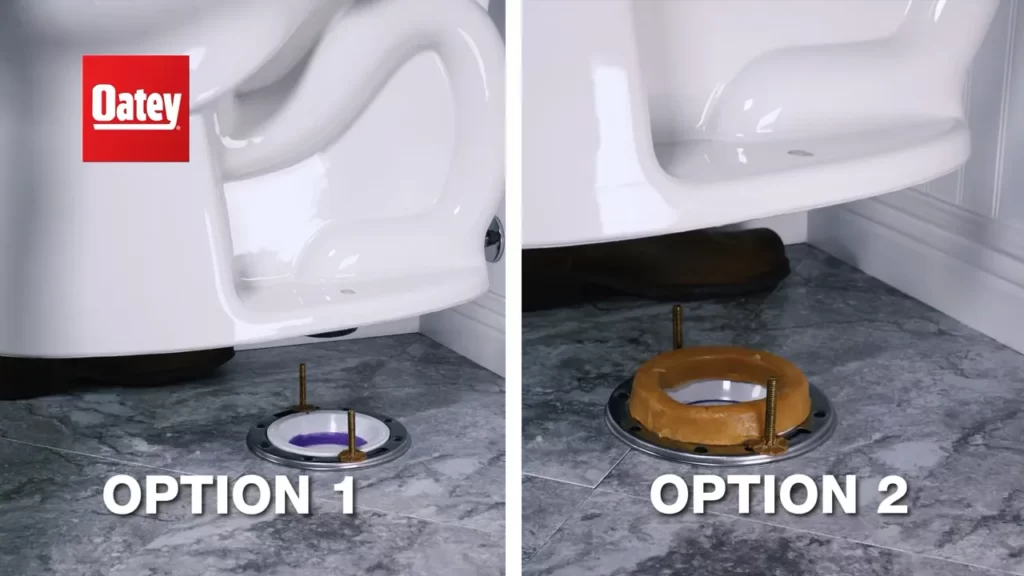
Placing The Wax Ring
Properly placing the wax ring is essential to ensure a watertight seal between your toilet and the flange. This step-by-step guide will walk you through the process of positioning the wax ring and ensuring a proper fit.
Positioning it on the flange
The first step is to position the wax ring on the flange, which is a metal or plastic ring connected to the sewer pipe. The flange is typically located on the floor beneath the toilet. Here’s how to do it:
- Start by turning the wax ring upside down, so the rounded side is facing up. This will make it easier to position on the flange.
- Carefully place the wax ring over the flange, ensuring that it is centered and aligned with the flange opening. Take your time to ensure proper placement, as this will greatly affect the seal.
- Gently press down on the wax ring to secure it in place. Make sure it adheres firmly to the flange.
Ensuring a proper fit
Once the wax ring is properly positioned on the flange, you need to ensure that it fits the toilet bowl correctly. This will help prevent leaks and ensure a proper seal. Follow these steps to ensure a proper fit:
- Lift the toilet bowl and carefully lower it onto the wax ring. Make sure the bolts in the flange align with the holes in the toilet base.
- Apply gentle pressure to the toilet bowl, gradually pushing it down onto the wax ring. The weight of the toilet should compress the wax ring, creating a tight seal.
- Once the toilet bowl is in place, check for any gaps between the toilet base and the floor. If there are any gaps, you may need to add additional wax or use a thicker wax ring to ensure a proper fit.
By following these steps, you can ensure that the wax ring is positioned correctly on the flange and fits the toilet bowl properly. This will help prevent any potential leaks and ensure a watertight seal, allowing your toilet to operate efficiently and effectively.
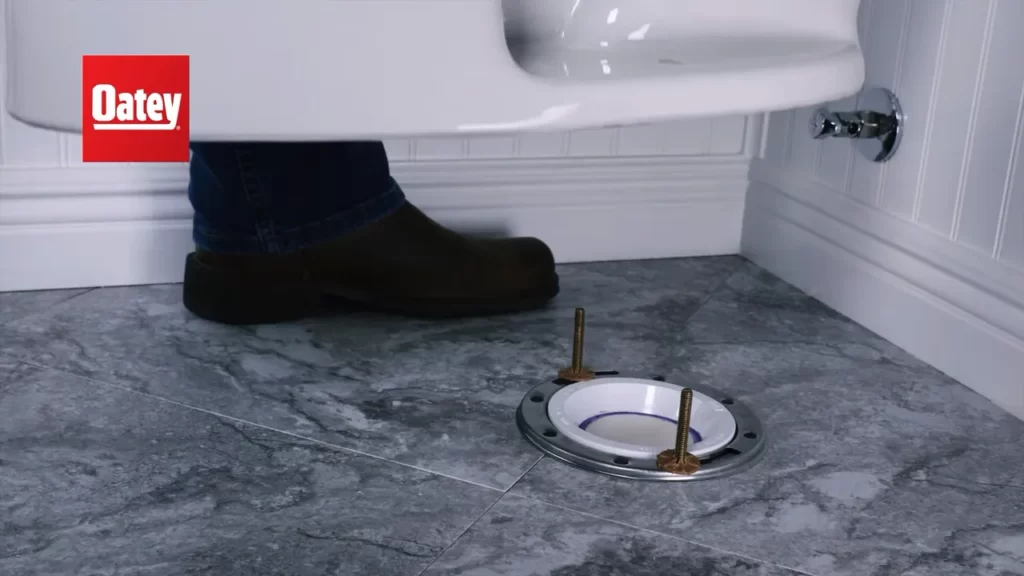
Securing The Toilet
Securing the toilet is a vital step in the installation process to ensure a tight seal and prevent any leaks. Following these simple steps will help you properly secure your toilet after installing the wax ring.
Aligning the toilet with the flange
First, make sure to align the toilet with the flange on the floor. The flange is the circular pipe fitting that connects the toilet to the sewer drain. To align it properly:
- Position the toilet bowl directly over the flange, ensuring that the bolt holes on the base of the toilet align with the holes on the flange.
- Make any necessary adjustments to ensure that the toilet is centered and level. A level tool can come in handy to check if the toilet is sitting evenly.
- Double-check that the wax ring is properly in place and centered on the flange. This ensures a proper seal and helps avoid any leaks.
Lowering it onto the wax ring
Once the toilet is aligned with the flange, it’s time to lower it onto the wax ring:
- Hold the toilet by the bowl, not the tank, and carefully lower it onto the wax ring.
- Apply even pressure to the toilet, pushing it down gently. This will help the wax ring form a secure seal between the toilet bowl and the flange.
Applying pressure
After lowering the toilet onto the wax ring, apply some pressure to ensure a tight seal:
- Gently sit on the toilet to push it down and apply pressure. This helps the wax ring compress and create a watertight seal.
- Rock the toilet back and forth slightly to evenly distribute the wax and form a solid seal.
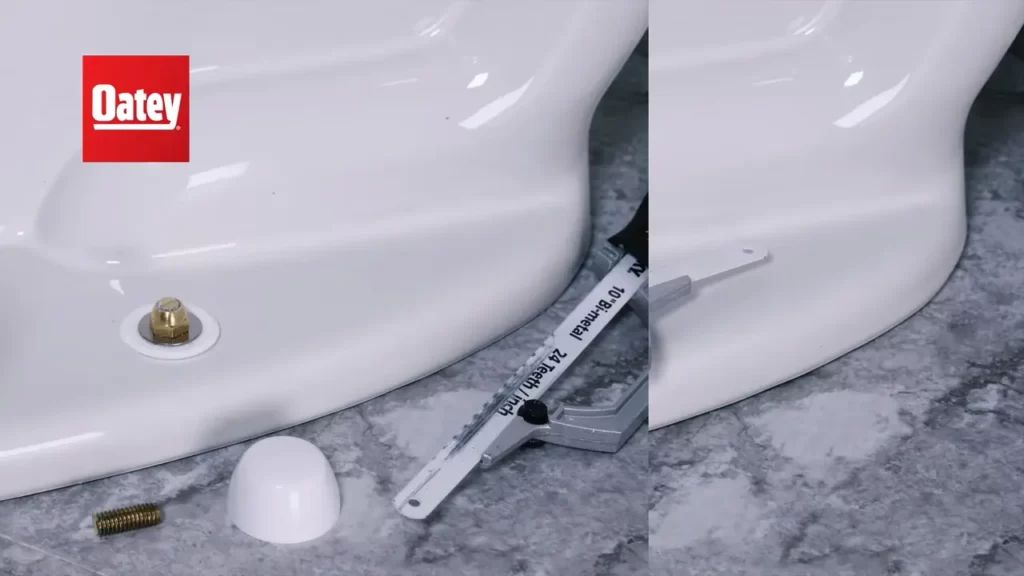
Tightening the bolts
Finally, it’s time to tighten the bolts that secure the toilet to the floor:
- Place a washer and nut on each bolt and tighten them alternately, using a wrench or pliers.
- Be careful not to overtighten the bolts, as this can crack the porcelain of the toilet bowl.
- Once the bolts are snug, test the toilet for any wobbling or movement. If it feels secure, you’re on the right track.
Congratulations, you have successfully secured your toilet! This is an important step to ensure a leak-free and functional toilet installation. Now you can proceed with connecting the water supply and testing for any potential leaks before enjoying your newly installed toilet.
Reconnecting The Water Supply
The final step in installing a wax ring is reconnecting the water supply. This ensures that the toilet is fully functional and ready for use. By following these simple steps, you can easily reconnect the water supply and have your toilet back in working order.
Turning on the water valve
The first thing you need to do is locate the water valve. This is typically located behind or near the toilet. Once you have found the valve, turn it clockwise to shut off the water supply. It’s important to do this step before reconnecting the water supply to avoid any leaks or water damage. Once the water valve is turned off, move on to the next step.
Checking for leaks
After reconnecting the water supply, the next step is to check for leaks. This is an important step to ensure that everything is secure and there are no issues with the installation. It’s recommended to check for leaks after turning on the water valve to avoid any potential problems.
To check for leaks, start by visually inspecting the area around the wax ring and water supply line. Look for any signs of water or moisture. If there are no visible leaks, you can proceed to the next step. However, if you notice any leaks, it’s important to address them immediately. Tighten any loose connections or consider replacing any faulty parts. Taking care of a leak promptly can prevent further damage down the line.
Checking For Proper Seal
One of the most crucial steps in installing a wax ring for your toilet is checking for a proper seal. A properly sealed wax ring ensures that there are no leaks or odors coming from your toilet. It also helps to prevent any potential water damage to your floor or subfloor. In this section, we will guide you through the process of checking for a proper seal by looking for signs of leakage and testing the flush performance of the toilet.
Looking for any signs of leakage
After installing the wax ring and securing the toilet bowl in place, it’s essential to carefully inspect for any signs of leakage. Even a tiny leak can potentially cause significant damage if left unnoticed. Here are a few steps to help you ensure that your wax ring has created a secure seal:
- Firstly, visually inspect the base of the toilet. Look for any moisture or water stains around the area where the toilet meets the floor. Pay close attention to the back and sides of the toilet base, as leaks can sometimes occur in these areas.
- Next, gently rock the toilet bowl back and forth. If you notice any movement or hear a squishing sound, there may be a problem with the seal. Even the slightest movement suggests that the wax ring isn’t providing a tight seal.
- Additionally, carefully check the floor bolts that secure the toilet base to the floor. Look for any signs of water or moisture around the bolts. If you notice dampness or corrosion, it indicates a potential leakage issue.
By closely inspecting these areas, you can quickly identify any leaks or potential problems with the seal and take appropriate measures to rectify them before they cause any extensive damage.
Testing flush performance
Once you have ensured there are no signs of leakage, the next step is to test the flush performance of the toilet. A proper seal not only prevents leaks but also ensures efficient flushing. Here’s how you can test the flush performance:
- Start by flushing the toilet with a small amount of toilet paper. Observe the water flow and ensure that it creates a strong, forceful flush.
- Check if the water drains properly and fills up the bowl again without any delays or issues.
- If you notice weak flushing or slow drainage, it may indicate a problem with the seal. In this case, you might need to reinstall the wax ring to ensure a better seal and improve the flush performance.
By testing the flush performance, you can verify that the wax ring is providing an adequate seal and allowing proper water flow in the toilet bowl.
Remember, a proper seal is crucial for the overall functionality and longevity of your toilet. By following these steps and carefully checking for signs of leakage and flush performance, you can ensure that your wax ring installation is successful and will provide a watertight seal for years to come.
Troubleshooting Tips
In some cases, installing a wax ring can present challenges that require troubleshooting. This section will provide you with tips on how to address common issues that may arise during the installation process. Whether you need to adjust the wax ring, check the flange for damage, or seek professional assistance, these troubleshooting tips will help you overcome any hurdles along the way.
Adjusting the wax ring if necessary
After placing the wax ring on the flange, you might find that it needs some adjustments. This can happen if the toilet does not fit correctly on top of the ring or if you notice a gap between the bottom of the toilet and the floor. To rectify this situation, follow these steps:
- Remove the toilet: Disconnect the water supply and unscrew the nuts securing the toilet to the floor. Gently lift the toilet and set it aside on a stable surface.
- Inspect the wax ring: Check the condition of the wax ring to ensure it is still pliable and in good shape. If it appears damaged or worn out, replace it with a new one.
- Reposition the wax ring: Carefully lift the original wax ring off the flange, making sure not to damage the flange. Install a new wax ring, aligning it with the flange.
- Reinstall the toilet: Slowly lower the toilet onto the wax ring, ensuring the bolts on the flange align with the holes on the base of the toilet. Press down firmly to create a proper seal.
- Tighten the nuts: Gently tighten the nuts on the floor bolts, being careful not to over-tighten and crack the toilet.
- Check for stability: Sit on the toilet to check for any movement or rocking. If necessary, adjust the wax ring further or consider using shims to stabilize the toilet.
Checking the flange for damage
The flange, which connects the toilet to the sewer pipe, is a critical component for a secure and leak-free installation. If you encounter any issues with the wax ring or suspect damage to the flange, follow these steps to assess and address the situation:
- Remove the toilet: Turn off the water supply and disconnect the nuts securing the toilet. Lift the toilet off the flange and set it aside.
- Inspect the flange: Examine the flange for any signs of damage, such as cracks or breaks. Additionally, ensure the flange is properly secured to the floor.
- Repair the flange: If you notice any damage, you may need to repair or replace the flange. Depending on the extent of the damage, you may be able to use a repair kit or seek assistance from a professional plumber.
- Reinstall the toilet: Once the flange is repaired or replaced, carefully lower the toilet onto the wax ring, ensuring a proper alignment with the bolts on the flange. Secure the nuts, but avoid over-tightening.
- Check for stability: Sit on the toilet to confirm that it is stable and does not rock. If needed, make further adjustments or use shims to achieve a stable installation.
Seeking professional help if issues persist
If you have followed the troubleshooting tips but continue to experience problems with the wax ring installation, it may be time to seek professional assistance. Plumbing experts have the knowledge and experience to diagnose and resolve complex issues that can arise during toilet installations. Don’t hesitate to contact a licensed plumber to ensure the proper functioning and long-term durability of your toilet installation.
Frequently Asked Questions
Do I Put The Wax Ring On The Toilet Or The Flange?
The wax ring should be placed on the flange underneath the toilet.
Which Way Do You Install A Wax Ring?
To install a wax ring, place it on the flange, making sure it’s centered. Gently press down to secure it in place. Then, carefully position the toilet bowl over the flange and press it down firmly to create a watertight seal.
Be cautious not to overtighten the bolts as it may crack the toilet bowl.
Can I Replace Wax Ring Myself?
Yes, you can replace a wax ring yourself. Simply follow the steps in a DIY guide or tutorial to ensure proper installation.
Is Wax Seal Better Than Rubber Seal For Toilets?
Wax seals are not better than rubber seals for toilets. Rubber seals are more durable and less likely to fail over time. They provide a better and longer-lasting seal, preventing leaks and minimizing the risk of water damage.
Conclusion
Installing a wax ring is a crucial step in ensuring a watertight seal for your toilet. By following the simple steps outlined in this blog post, you can confidently tackle this DIY project and avoid any potential leaks or odors.
Remember to gather all the necessary materials and take your time during the installation process. With a little patience and attention to detail, you’ll have a sturdy and reliable wax ring that will support your toilet for years to come.
Happy DIY-ing!