To install a Roman tub faucet, follow these steps: Position the faucet on the tub deck, secure it using screws or nuts, connect the water supply lines, and tighten the connections. Now, let’s dive into the details of how to successfully install a Roman tub faucet.
A Roman tub faucet adds a touch of elegance and luxury to your bathroom. Whether you’re renovating your bathroom or simply upgrading the existing tub, installing a Roman tub faucet is a fairly straightforward process. In this guide, we’ll walk you through the step-by-step instructions on how to install a Roman tub faucet.
By the end, you’ll have a beautiful faucet that not only enhances the aesthetic appeal of your bathroom but also provides a relaxing and enjoyable bathing experience. So, let’s get started!
Factors To Consider When Selecting A Roman Tub Faucet
Choosing the right roman tub faucet for your bathroom can significantly enhance both the functionality and aesthetics of your space. With so many options available in the market, selecting the perfect faucet can be overwhelming. To help you make an informed decision, here are three essential factors you should consider when choosing a roman tub faucet:
Style and Design
The style and design of the roman tub faucet play a vital role in complementing the overall decor of your bathroom. It’s essential to select a faucet that matches your personal taste and the existing theme of your space. Whether you prefer a modern, contemporary, or traditional look, there is a wide variety of styles and designs to choose from.
When selecting a faucet, consider the architectural elements and materials used in your bathroom. If your space features sleek lines and minimalist designs, a simple and streamlined faucet will blend seamlessly. On the other hand, if your bathroom exudes classic elegance, choosing a faucet with intricate detailing and vintage-inspired curves can elevate its charm.
Size and Dimensions
The size and dimensions of the roman tub faucet are crucial to ensure a proper fit on your bathtub. Before purchasing a faucet, measure the width and height of your tub to determine the required size. It’s essential to choose a faucet that is proportionate to the size of your bathtub and won’t overpower the overall aesthetics.
Moreover, consider the spout reach and height. The spout should be long enough to reach the center of the tub, allowing for comfortable water flow and minimizing splashing. Additionally, the height of the faucet should provide adequate space for filling up the tub without any inconvenience.
Material and Finish
The material and finish of the roman tub faucet not only impact its durability but also contribute to the overall visual appeal. Opting for high-quality materials ensures long-term performance and minimizes the risk of corrosion or wear. Common materials used for faucets include brass, stainless steel, and zinc alloy.
Furthermore, the finish of the faucet should complement the color palette of your bathroom and other fixtures. Popular finishes include chrome, brushed nickel, oil-rubbed bronze, and matte black. Select a finish that enhances the cohesive look of your bathroom and creates a harmonious ambiance.
By carefully considering the style and design, size and dimensions, as well as the material and finish when selecting a roman tub faucet, you can transform your bathroom into a stylish and functional oasis. Take your time to explore different options, and remember to choose a faucet that suits your personal preference while seamlessly integrating into the overall aesthetic of your space.
Where To Purchase A Roman Tub Faucet
When it comes to installing a Roman tub faucet, one of the first steps is to find a reliable source to purchase it from. Luckily, there are several options available both online and in physical stores. In this article, we will explore the different avenues where you can purchase a Roman tub faucet, including online retailers, home improvement stores, and plumbing supply stores. Let’s dive in!
Online Retailers
Online retailers provide a convenient way to browse and purchase a wide range of products, including Roman tub faucets. These retailers often offer a variety of brands, styles, and price ranges to suit your needs. Some popular online retailers to consider when looking for a Roman tub faucet include:
| Retailer | Website |
|---|---|
| Amazon | www.amazon.com |
| Wayfair | www.wayfair.com |
| Home Depot | www.homedepot.com |
These online retailers often have user reviews, detailed product descriptions, and helpful customer service to assist you in making the right choice for your Roman tub faucet. Plus, you can compare prices and easily find the best deal without leaving the comfort of your home.
Home Improvement Stores
If you prefer a more hands-on approach and want to see the Roman tub faucet in person before making a purchase, home improvement stores are an excellent option. These stores typically have dedicated plumbing sections where you can find a variety of faucets, including Roman tub faucets. Some well-known home improvement stores that offer a range of options include:
- Lowes
- Menards
- ACE Hardware
By visiting these stores, you can get a better sense of the faucet’s quality, design, and finishes, allowing you to make a more informed decision. You can also consult with knowledgeable staff who can provide guidance and answer any questions you may have about the installation and functionality of the Roman tub faucet.
Plumbing Supply Stores
For those who want to explore a wider selection of high-end and specialty Roman tub faucets, plumbing supply stores are an excellent choice. These stores specialize in plumbing fixtures and carry a comprehensive range of products. Some prominent plumbing supply stores to consider visiting include:
- Ferguson
- Plumbing Express
- Supreme Plumbing Supply
Plumbing supply stores often have knowledgeable staff who can provide expert advice on choosing the right Roman tub faucet for your specific needs. They may also offer additional services such as custom orders or professional installation assistance, ensuring a seamless and successful installation process.
To summarize, whether you prefer the convenience of online shopping or the in-person experience of visiting a physical store, there are plenty of options available when it comes to purchasing a Roman tub faucet. Whether you choose to explore online retailers, home improvement stores, or plumbing supply stores, be sure to consider factors such as price, quality, and customer reviews to find the perfect Roman tub faucet that complements your bathroom design and enhances your bathing experience.
Reviewing Roman Tub Faucet Options
Popular Brands and Models
When it comes to installing a new Roman tub faucet, reviewing different options is crucial to finding the right fit for your bathroom design and budget. With numerous brands and models available, it can be overwhelming to choose the perfect one. However, with the information provided below, you can make an informed decision and select a Roman tub faucet that meets your specific preferences.
Roman tub faucets are manufactured by several popular brands, known for their quality and durability. These brands include Delta, Moen, Kohler, and Pfister, among others. Each brand offers a diverse range of models, ensuring there is a faucet to suit different bathroom styles and individual tastes.
Customer Reviews and Ratings
Before making a purchase, it’s always a good idea to consider customer reviews and ratings. Real-life experiences shared by other customers can provide valuable insights into the performance and quality of Roman tub faucets. User reviews can highlight pros and cons, potential issues, and overall satisfaction levels.
It’s also important to pay attention to ratings. Higher ratings generally indicate customer satisfaction, while lower ratings may be a red flag. By investing some time in reading customer feedback, you can gather valuable information, helping you make an informed decision before purchasing a Roman tub faucet.
Price Range and Budget
The price range for Roman tub faucets can vary significantly depending on the brand, model, and additional features offered. Before finalizing your decision, it’s essential to determine your budget and expectations regarding the faucet’s pricing. By setting a budget, you can narrow down your options and focus on faucets that fall within your desired price range.
Roman tub faucets can range from affordable options to more premium models. It’s important to note that price doesn’t always equate to quality, as some reasonably priced faucets can deliver exceptional performance and durability. By evaluating the features, materials, and customer feedback, you can identify the best value for your money and choose a Roman tub faucet that meets both your aesthetic and financial requirements.
In conclusion, reviewing Roman tub faucet options is a crucial step in the installation process. By considering popular brands and models, customer reviews and ratings, as well as your budget, you can confidently select a Roman tub faucet that not only complements your bathroom decor but also ensures long-lasting satisfaction. Remember to take your time and thoroughly research each option, as finding the perfect faucet will enhance your bathing experience while adding a touch of elegance to your bathroom aesthetic.
Tools Required For Installing A Roman Tub Faucet
The installation of a Roman tub faucet requires a few essential tools to ensure a smooth and successful process. Having the right tools handy will help you save time and frustration during the installation. Let’s take a look at the tools you will need.
Adjustable Wrench
An adjustable wrench is an indispensable tool for any plumbing project. It allows you to tighten and loosen nuts and bolts of varying sizes, making it perfect for securing the connections of your Roman tub faucet. Make sure to have an adjustable wrench with a comfortable grip to make the installation process more effortless.
Screwdriver
A screwdriver, particularly a Phillips head or flathead screwdriver, will be necessary for installing and adjusting screws that hold certain components of the faucet together. It’s crucial to choose the right size and type of screwdriver, ensuring that it fits perfectly into the screws without slipping or causing damage.
Plumber’s Putty
Plumber’s putty is a versatile adhesive sealant used in plumbing installations. It is particularly useful for creating a watertight seal between the base of the faucet and the tub surface. Applying plumber’s putty will prevent any leaks and provide added stability to the faucet. Remember to use high-quality plumber’s putty to ensure durability and longevity.
Pipe Cutter
If some adjustments need to be made to the water supply lines, a pipe cutter is an essential tool. A pipe cutter allows you to easily cut through copper or plastic pipes, ensuring a precise and clean cut. This tool will come in handy if you need to shorten or modify the water supply lines to fit the new Roman tub faucet.
Teflon Tape
Teflon tape, also known as plumber’s tape, is an essential item for creating leak-free connections between threaded fittings. Wrapping Teflon tape around the threaded ends of the water supply lines before installation creates a tight seal, preventing any water leaks. This simple yet effective tool can save you from a lot of plumbing headaches in the long run.
Silicone Caulk
Silicone caulk is a waterproof sealant that is ideal for sealing gaps and joints. In the case of a Roman tub faucet installation, silicone caulk can be used to seal the edges and gaps around the base of the faucet, ensuring a watertight seal and preventing any water from seeping underneath. Choose a high-quality silicone caulk that is designed for bathroom use to guarantee long-lasting results.
With these essential tools by your side, you are well-prepared to tackle the installation of a Roman tub faucet. Remember to double-check the instructions provided by the manufacturer and follow the proper steps for installing your specific faucet model. Following the correct installation process combined with the right tools will result in a functional and visually appealing Roman tub faucet in your bathroom.
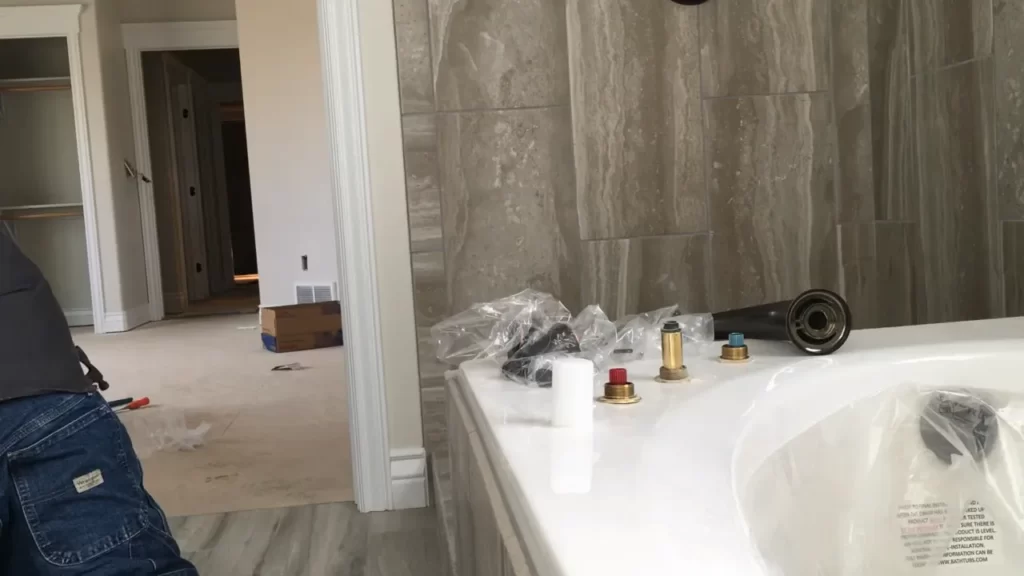
Materials Needed For Installing A Roman Tub Faucet
Before beginning the installation process of a roman tub faucet, it’s important to gather all the necessary materials. By having everything ready, you can ensure a smoother and more efficient installation. Here are the essential materials you will need:
Roman Tub Faucet
The centerpiece of your new roman tub faucet is, of course, the faucet itself. Make sure to choose a roman tub faucet that suits your personal style and complements your bathroom décor. With a variety of designs and finishes available in the market, you can find the perfect faucet to enhance the overall aesthetics of your tub area.
Tub Deck Mounting Kit
A tub deck mounting kit is essential for securely installing the roman tub faucet to your tub deck. It typically includes the necessary hardware such as screws, nuts, and brackets to ensure a sturdy and reliable connection. This kit will provide you with everything you need to securely fasten the faucet to the deck surface.
Hot and Cold Water Supply Lines
Proper water supply lines are crucial for the functionality of your roman tub faucet. Ensure you have both hot and cold water supply lines that are compatible with your faucet model. These lines will connect the faucet handles to the main water supply, allowing you to control the water temperature and flow. Make sure to choose high-quality supply lines to prevent leaks and ensure a long-lasting installation.
Drain and Overflow Assembly
A drain and overflow assembly is a necessary component of any tub installation. It ensures proper drainage and prevents overflowing, keeping your tub area clean and free from water damage. The assembly typically includes a drain, overflow plate, and necessary hardware to connect it to the plumbing beneath your tub. Make sure to choose an assembly that matches the design and finish of your roman tub faucet for a cohesive look.
By having all the necessary materials ready, you can streamline the process of installing a roman tub faucet. Gathering these essential items beforehand will save you time and prevent disruptions during the installation. With the right materials at hand, you’ll be one step closer to transforming your tub area into a stunning and functional space.
Shutting Off The Water Supply
Before starting the installation of a Roman Tub Faucet, it is crucial to shut off the water supply to prevent any potential water leakage or damage. In this section, we will guide you through the process of locating the water shut-off valves and turning off the water supply.
Locating the Water Shut-Off Valves
First and foremost, you need to locate the water shut-off valves. These valves can usually be found near the tub, underneath the sink, or in a utility room. They are typically connected to the main water supply line.
To easily locate the shut-off valves, you can follow these steps:
- Start by identifying the hot and cold water supply lines that connect to the tub faucet. These lines are usually marked with red and blue indicators.
- Trace the lines backward until you find the shut-off valves. They should be connected to the main water supply.
- If you are unable to locate the shut-off valves, refer to the plumbing layout of your house. This diagram can usually be found with the construction plans or in the utility room.
Once you have successfully located the shut-off valves, you are ready to turn off the water supply.
Turning Off the Water Supply
To turn off the water supply, you will need to follow these steps:
- Identify the shut-off valves for both hot and cold water. They are typically circular or lever-style valves.
- Rotate the valves clockwise until they are fully closed. This will stop the flow of water to the tub faucet.
- Once the valves are closed, it is recommended to test the water flow to ensure that the supply has been successfully shut off. Turn on the tub faucet and check if any water is flowing.
Remember, shutting off the water supply is a crucial step to ensure a smooth and leak-free installation of your Roman Tub Faucet. Taking the time to locate and turn off the shut-off valves will save you from potential water damage and make the installation process much easier.
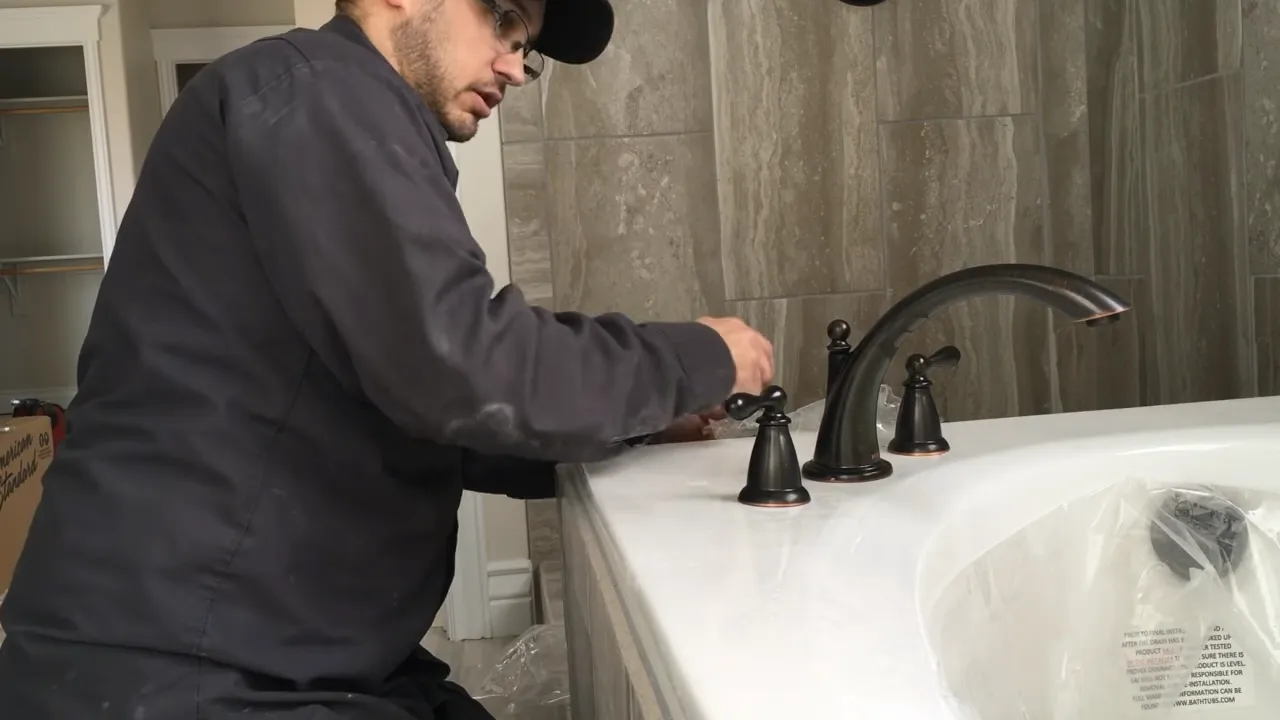
Removing The Handles And Trim
Before you can install a new Roman tub faucet, you’ll need to remove the existing handles and trim. This step may seem intimidating, but with the right tools and a little know-how, you can easily accomplish it. In this guide, we’ll walk you through the process of removing the handles and trim for your Roman tub faucet.
Removing the Handle Screws
The first step in removing the handles is to locate the handle screws. These screws typically secure the handles to the stem of the faucet. To begin, you’ll need a screwdriver or an Allen wrench, depending on the type of screw used. Carefully inspect the handle for any coverings or decorative elements that may conceal the screws.
Once you’ve located the screws, use the appropriate tool to loosen and remove them. It’s important to note that some screws are reverse-threaded, meaning you’ll need to turn them clockwise to loosen. Keep a firm grip on the handle while removing the screws to prevent it from accidentally falling and causing damage.
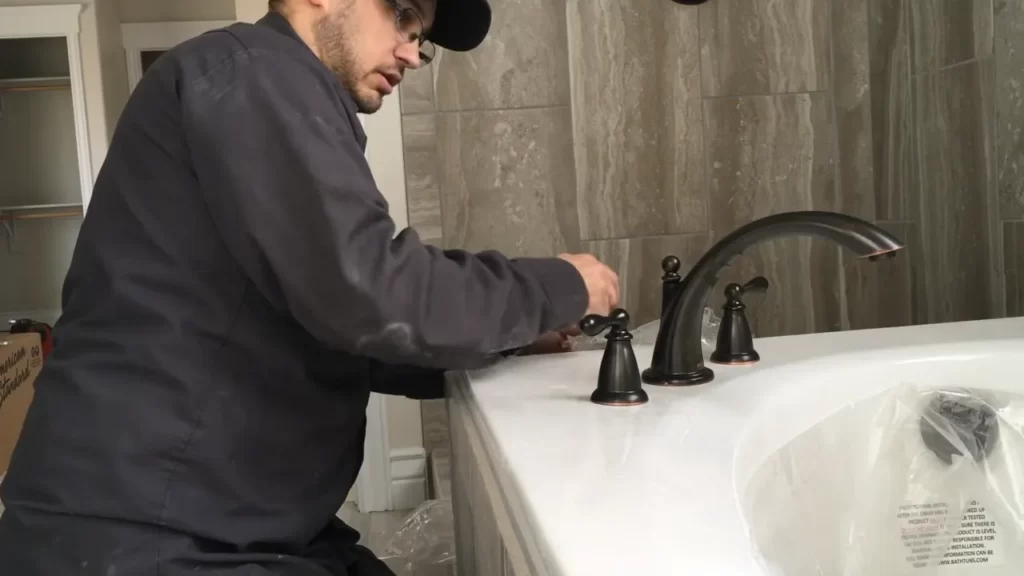
Detaching the Handle Assembly
With the screws removed, you can now detach the handle assembly from the faucet. Gently pull the handle away from the stem to expose the inner components. Pay attention to any washers or O-rings that may be attached to the handle assembly.
Inspect the handle assembly for any signs of wear or damage, such as cracks or corrosion. If you notice any issues, this may be a good time to replace the handle assembly entirely. Otherwise, set the assembly aside in a safe place until you’re ready to install the new faucet.
Taking off the Trim Plate
After removing the handles, you’ll need to take off the trim plate. The trim plate is the decorative covering that surrounds the stem of the faucet and is typically held in place by screws or mounting brackets. Refer to the manufacturer’s instructions or consult your plumber’s guide for the specific removal method for your particular faucet model.
Once you’ve identified how the trim plate is secured, carefully remove the screws or brackets. Keep them in a safe place, as you may need them when it’s time to install the new trim plate. With the screws or brackets removed, gently pull the trim plate away from the wall, exposing the valve stem and the plumbing connections.
Now that you’ve successfully removed the handles and trim plate, you’re one step closer to installing your new Roman tub faucet. In the next section, we’ll guide you through the process of installing the new faucet components.
Disconnecting The Water Supply Lines
Loosening the Nut with a Wrench
One of the first steps in disconnecting the water supply lines of a Roman tub faucet is to loosen the nut that secures the lines to the faucet. To do this, you will need a wrench with the appropriate size for the nut. Take note of the specific size of the nut to ensure you have the right wrench for the job.
Start by identifying the nut that needs to be loosened. This nut is usually located near the base of the faucet where the supply lines are attached. Position the wrench around the nut, making sure it is secure and tight. Then, turn the wrench counterclockwise to start loosening the nut.
It’s important to note that some nuts may be tightly secured, especially if the faucet has been in place for a long time. In such cases, you may need to apply a bit more force to loosen the nut. Just be careful not to use excessive force that could damage the nut or the plumbing connections.
Detaching the Supply Lines from the Faucet
Once the nut is sufficiently loosened, the next step is to detach the supply lines from the faucet. Before doing this, it’s a good idea to place a towel or a small bucket underneath the faucet to catch any water that may come out during the disconnection process.
To detach the supply lines, firmly grasp the line near the connection point and twist counterclockwise. This twisting motion helps to break any seal or grip between the line and the faucet. It may take some effort, especially if the lines have been in place for a while. In some cases, using a pair of pliers may provide a better grip for twisting.
Once the supply lines are detached, inspect the area for any signs of leakage or damage. It’s a good idea to check the condition of the lines and replace them if necessary, especially if there are noticeable cracks or wear.
Remember to turn off the main water supply before disconnecting the supply lines to prevent any water from flowing out uncontrollably. This will help to minimize mess and potential water damage.
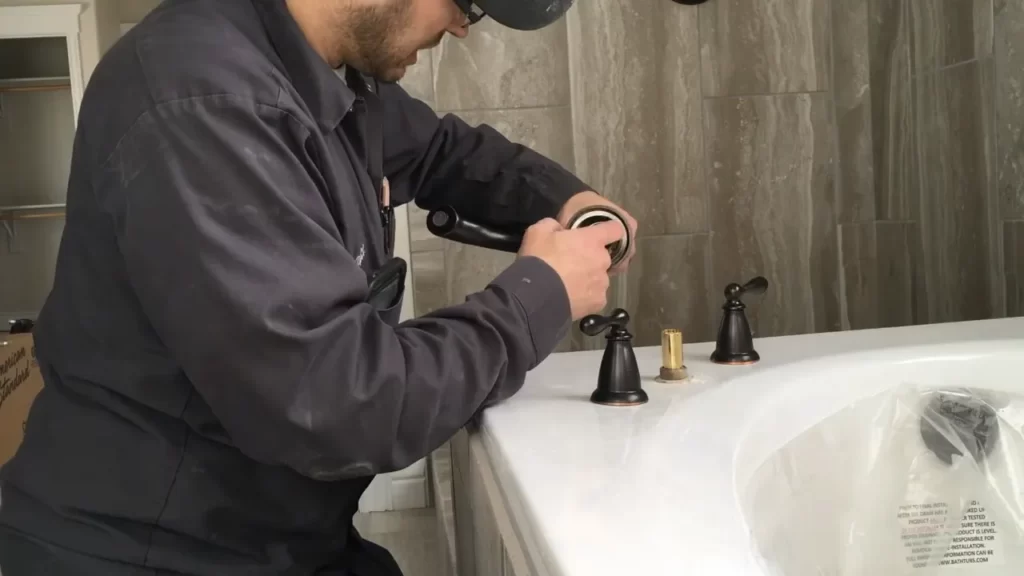
Applying Plumber’S Putty And Teflon Tape
Preparing the Faucet Base with Plumber’s Putty
Before installing a Roman tub faucet, it’s crucial to properly prepare the faucet base with plumber’s putty. Plumber’s putty serves as a sealant between the faucet base and the tub, preventing any water leakage. The following steps will guide you through this process:
- Clean the surface: Start by cleaning the area where the faucet base will be installed. Ensure that the surface is free from any debris, dirt, or old putty.
- Remove excess putty: If there is an old putty residue, gently remove it using a putty knife or a plastic scraper. Be cautious not to damage the surface in the process.
- Prepare the plumber’s putty: Take a small amount of plumber’s putty and knead it in your hands until it is soft and pliable. This will make it easier to work with.
- Apply putty to the base: Roll the plumber’s putty into a rope-like shape and place it around the bottom perimeter of the faucet base. Ensure that the entire base is covered with a uniform layer of putty.
- Position the faucet: Gently place the faucet base onto the pre-determined installation location. Press down firmly to create a tight seal between the putty and the surface.
- Remove excess putty: Carefully remove any excess putty that may have squeezed out from beneath the faucet base. Wipe away the residue with a clean cloth.
Wrapping Threads with Teflon Tape
In addition to using plumber’s putty, wrapping the threads of the Roman tub faucet with Teflon tape is necessary to create a watertight connection. Follow these steps to ensure a proper application of Teflon tape:
- Clean the threads: Before applying Teflon tape, make sure that the threads on both the faucet spout and the tub spout adapter are clean and free from debris.
- Cut the tape: Take a roll of Teflon tape and cut a small strip, about 4-6 inches long, using a sharp knife or scissors. Be cautious not to stretch or tear the tape.
- Start wrapping: Beginning at the end of the threads, hold the Teflon tape at a slight angle and start wrapping it clockwise around the threads. Ensure that the tape is applied smoothly and evenly.
- Overlap the tape: As you continue wrapping, overlap the tape by around 50%. This helps to create a secure seal and prevent any leaks.
- Cut off excess tape: Once the threads are completely covered with Teflon tape, cut off any excess tape that may be hanging over the edges. This will ensure a neat and tidy appearance.
- Tighten the connection: Carefully screw the faucet spout onto the tub spout adapter, turning it clockwise. Make sure not to overtighten, as this can cause damage to the threads.
By applying plumber’s putty and wrapping the threads with Teflon tape, you can install a Roman tub faucet with confidence, knowing that it is properly sealed and secure. Follow these steps carefully to ensure a successful installation and enjoy the luxurious bathing experience that a Roman tub faucet provides.
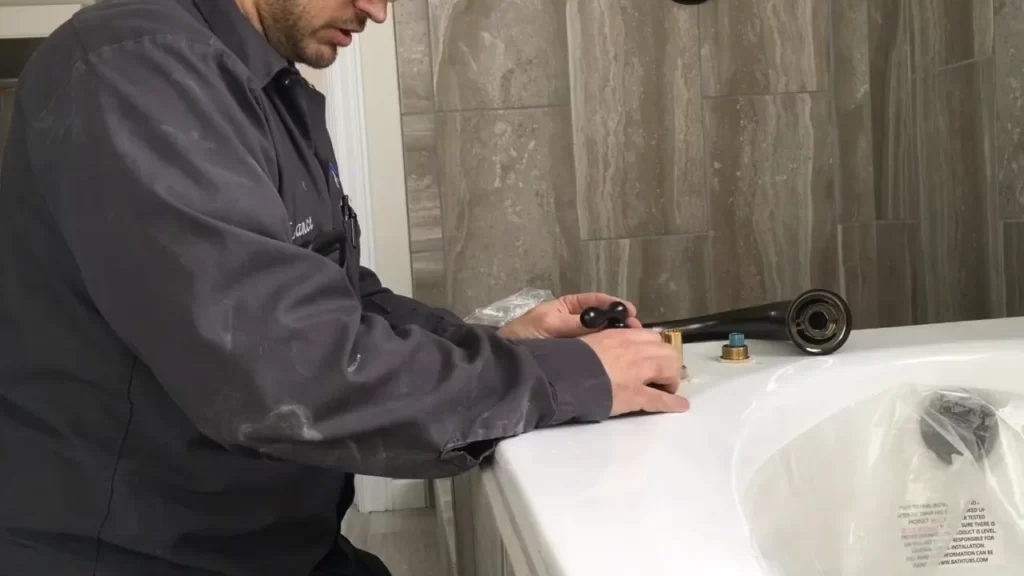
Attaching The Faucet To The Tub Deck
Now that you have successfully installed the mounting hardware for your Roman tub faucet, it’s time to attach the faucet to the tub deck. This step is crucial in ensuring a secure and stable installation. Follow the steps below to securely attach the faucet to the tub deck.
Inserting the Faucet Base into the Mounting Holes
The first step in attaching the faucet to the tub deck is to insert the faucet base into the mounting holes. These holes are pre-drilled into the deck of your tub and are specifically designed to fit the size and shape of your faucet base. To insert the faucet base, follow these steps:
- Carefully align the mounting holes on the tub deck with the holes on the faucet base.
- Slide the faucet base into the mounting holes, ensuring that it sits flush against the deck surface. This will provide a sturdy foundation for the faucet.
Securing the Base with Mounting Nuts
Once the faucet base is inserted into the mounting holes, the next step is to secure it using mounting nuts. These nuts are specifically designed to fit onto the threaded shanks of the faucet base and provide a secure hold. Follow these steps to secure the base:
- Place a mounting nut onto each threaded shank of the faucet base.
- Tighten the mounting nuts by hand, ensuring that they are snug against the base.
- Use an adjustable wrench to further tighten the mounting nuts, but make sure not to overtighten to avoid damaging the faucet or the tub deck.
By securely attaching the faucet base to the tub deck, you can prevent any wobbling or instability that may occur during use. This ensures a long-lasting and reliable installation that you can enjoy for years to come.
Now that you have successfully attached the faucet to the tub deck, the next step is to connect the water supply lines. This will allow water to flow through the faucet and provide you with a functional and stylish addition to your bathroom. In the next section, we will guide you through the process of connecting the water supply lines.
Connecting The Water Supply Lines
Once you have successfully installed the Roman tub faucet to the deck, the next step is to connect the water supply lines. Properly connecting the supply lines is crucial to ensure the faucet functions optimally and there are no leaks or drips.
Attaching the Hot and Cold Supply Lines to the Faucet
To begin, locate the hot and cold water supply valves beneath the tub. These valves are typically located on the wall near the tub or under the sink. Once you have found the valves, turn them off by rotating them clockwise until they are fully closed.
Next, grab the hot supply line and align it with the hot water inlet on the faucet. Insert the supply line into the inlet and hand-tighten the nut clockwise until it is snug. Repeat the same process for the cold supply line, aligning it with the cold water inlet on the faucet.
Ensure that both supply lines are securely attached to the faucet before moving on to the next step.
Tightening the Nut with a Wrench
After hand-tightening the supply lines, you will need to use an adjustable wrench to ensure a secure connection. Place the wrench on the nut and turn it clockwise to tighten. Avoid overtightening, as this can cause damage to the faucet or the supply lines.
If you have plastic supply lines, be extra cautious not to overtighten, as they are more prone to damage. Follow the manufacturer’s instructions for recommended torque settings or use your best judgment to tighten the nut firmly but not excessively.
Inspect the connections to ensure there are no visible gaps or leaks. If you notice any leaks, tighten the nuts a bit more until the leak stops. However, be careful not to overtighten, as this can lead to other problems.
Finally, turn on the water supply valves slowly and check for any leaks or drips around the connections. If you spot any leaks, shut off the valves and recheck the connections to ensure they are tight. Repeat the process until there are no leaks.
With the water supply lines securely connected, you are one step closer to enjoying your new Roman tub faucet. The next and final step is to test the faucet’s functionality and make any necessary adjustments to ensure smooth operation.
Installing The Drain And Overflow Assembly
Installing the drain and overflow assembly is an essential step in the process of installing a Roman tub faucet. This assembly ensures that water doesn’t overflow from the tub and allows for efficient draining. In this section, we will walk you through the steps of attaching the drain flange to the tub and connecting the drain and overflow pipes.
Attaching the Drain Flange to the Tub
The first step in installing the drain and overflow assembly is attaching the drain flange to the tub. The drain flange is the piece that sits flush with the tub’s surface and connects to the drain pipe. To attach the drain flange:
- Apply a generous amount of plumber’s putty to the underside of the drain flange.
- Insert the drain flange into the drain hole in the tub, making sure it sits flush with the surface.
- Tighten the retaining nut from underneath the tub to secure the drain flange in place. Use a wrench or pliers to ensure a tight fit.
Once the drain flange is securely attached to the tub, you can move on to connecting the drain and overflow pipes.
Connecting the Drain and Overflow Pipes
Now that the drain flange is in place, it’s time to connect the drain and overflow pipes. These pipes are responsible for draining the water from the tub and preventing overflow. Follow these steps to connect the drain and overflow pipes:
- Insert the overflow pipe into the overflow opening on the tub, ensuring a tight fit.
- Attach the drain pipe to the drain flange, tightening the connection with a wrench.
- Connect the other end of the drain pipe to the main drain line, securing it tightly.
Make sure all connections are secure and leak-free before proceeding to the next step of the installation process.
By following these steps, you can successfully install the drain and overflow assembly for your Roman tub faucet. This ensures proper drainage and prevents any potential water overflow, allowing you to enjoy your tub without any worries.
Turning On The Water Supply
Once you have successfully installed the Roman tub faucet, the next step is to turn on the water supply. This is a crucial step to ensure that your faucet is functioning properly and providing you with the desired water flow. In this section, we will discuss how to open the water shut-off valves and ensure proper water flow.
Opening the Water Shut-Off Valves
Before turning on the water supply, you need to locate the shut-off valves. These valves are typically located beneath the sink or behind the tub faucet. To access them, you may need to remove the panel or use a wrench to unscrew any nuts holding them in place.
Ensure the Shut-Off Valves Are Fully Open:
- Locate the shut-off valves.
- Using a wrench, turn the valve handles counterclockwise to fully open them.
- Check the valves to ensure they are in the “on” position.
Check for Leaks:
After opening the shut-off valves, it is essential to check for any leaks. Look closely at the valve connections and the surrounding areas for any signs of water leakage. If you notice a leak, tighten the connections or consider contacting a professional plumber for assistance.
Ensuring Proper Water Flow
Once the shut-off valves are open, you can now test the water flow to ensure it is working correctly. Follow these steps:
- Turn on the faucet handles.
- Gradually increase the water flow to your desired level.
- Check for any irregularities in the water flow, such as low pressure or sputtering.
Adjusting Water Flow:
If you experience low water flow, there may be a blockage or sediment buildup in the faucet. To fix this issue, follow these steps:
- Turn off the water supply to the faucet.
- Remove the aerator from the faucet spout.
- Inspect the aerator for any debris or sediment.
- Clean the aerator under running water, removing any buildup.
- Reattach the aerator and turn on the water supply.
By following these steps, you can ensure that the water supply to your new Roman tub faucet is turned on correctly and that you have a steady, uninterrupted water flow. If you encounter any issues during the installation or notice any leaks, it is always recommended to seek professional assistance to avoid further damage or complications.
Checking For Leaks
After successfully installing your roman tub faucet, it’s crucial to check for any potential leaks. Leaks can not only cause damage to your bathroom but also lead to wastage of water and increased utility bills. By inspecting the connections for leaks and making any necessary adjustments, you can ensure that your new faucet operates smoothly without any issues.
Inspecting the Connections for Leaks
Once the installation is complete, visually inspect all the connections of your roman tub faucet. Start by checking the connection between the faucet and the main water supply. Look for any signs of dripping or moisture around the connection points. Additionally, examine the connection points between the faucet handles and the main body for any potential leaks.
If you notice any water seepage or leaks, it’s essential to address them promptly to prevent further damage. Start by tightening the connections that appear loose using an adjustable wrench. Ensure that the connections are snug but not overly tightened to avoid any damage. If the leak persists, you may need to consider replacing the faulty gaskets or washers.
Making Any Necessary Adjustments
In some cases, you may need to make adjustments to the faucet handles to ensure a proper fit and prevent leaks. If you notice water leaking from the handles, it could indicate that the handles are not aligned correctly.
To resolve this issue, remove the handles and inspect the handle mechanism. Carefully realign the handles to ensure they are properly aligned with the faucet base. Once aligned, reattach the handles securely. Test the faucet again for any remaining leaks.
Another adjustment you may need to make is to the water pressure. If you notice excessive water splashing or an abnormally strong flow, it could indicate high water pressure. High water pressure can strain the faucet and cause leaks. To regulate the pressure, consider installing a pressure-reducing valve.
Remember, regularly checking for leaks and making any necessary adjustments can help you maintain the performance and longevity of your roman tub faucet. By addressing leaks promptly, you can avoid costly repairs and ensure a pleasant bathing experience for years to come.
Applying Silicone Caulk
Sealing the Edges of the Faucet Base with Caulk
Once you have successfully positioned the Roman tub faucet onto the tub deck, it’s time to move on to the next crucial step: applying silicone caulk. This step is vital to ensure that water does not seep into the space between the faucet base and the tub deck, preventing any potential damage or leakage. Sealing the edges of the faucet base with caulk also adds a neat and professional finish to the overall installation.
Smoothing Out the Caulk for a Neat Finish
After applying silicone caulk around the edges of the faucet base, it’s important to take the extra time to create a smooth and visually appealing finish. This not only enhances the appearance of your newly installed Roman tub faucet but also ensures the caulk effectively seals all gaps.
To achieve a neat finish, follow these simple steps:
- Begin by taking a caulk smoothing tool or a dampened finger and gently run it along the edges of the caulk. This helps eliminate any excess caulk or air bubbles, providing a smooth appearance.
- Next, wipe away any excess caulk with a damp cloth or sponge. Make sure to do this gently to avoid disturbing the caulk that has been properly applied.
- Continue smoothing out the caulk until you are satisfied with the appearance. This may involve going over the caulk multiple times to achieve the desired result.
- Lastly, allow the caulk to dry according to the manufacturer’s instructions before using the tub or exposing it to water. This ensures that the caulk sets properly, providing long-lasting protection and preventing any potential damage.
Conclusion
Applying silicone caulk is a crucial step in the installation process of a Roman tub faucet. By sealing the edges of the faucet base with caulk and carefully smoothing it out for a neat finish, you can ensure that your faucet is securely installed and protected from any water damage or leakage. Following these steps will not only enhance the visual appeal of your tub but also provide a long-lasting and reliable installation.
Cleaning Up And Enjoying Your New Roman Tub Faucet
Congratulations! You have successfully installed a Roman tub faucet in your bathroom, adding a touch of elegance and functionality to your space. Now that the hard part is done, it’s time to clean up any debris or excess caulk and make final adjustments to ensure a seamless installation. Once everything is in order, you can sit back, relax, and enjoy your upgraded bathroom experience.
Removing any Debris or Excess Caulk
Before you can fully appreciate your new Roman tub faucet, it’s important to clean up any debris or excess caulk left behind during the installation process. Follow these steps to ensure a clean and polished finish:
- Start by wiping away any dust, dirt, or loose debris with a soft cloth or sponge.
- Next, inspect the area around the tub faucet for any excess caulk. If you notice any, carefully scrape it off using a plastic scraper or putty knife.
- Once the excess caulk is removed, clean the area with a mild soap and water solution. Be sure to dry it thoroughly with a clean cloth to prevent any damage or staining.
- If there are any stubborn caulk residue or stains, you can use a caulk remover or a mixture of vinegar and water to tackle them. Apply the solution and let it sit for a few minutes before gently scrubbing the area with a sponge or brush.
- Finally, rinse the area with clean water and dry it completely. Your Roman tub faucet should now be free from any debris or caulk remnants, ready to shine in your bathroom.
Making Final Adjustments and Enjoying the Upgraded Bathroom Experience
With the cleaning process complete, it’s time to make final adjustments to your new Roman tub faucet and fully enjoy the upgraded bathroom experience. Here are a few things to keep in mind:
- Check all the connections, such as the handles, spout, and shower diverter, to ensure they are securely fastened and functional.
- Test the water flow and temperature by turning on the faucet and adjusting the handles accordingly. Make any necessary adjustments to achieve your desired settings.
- If you notice any leaks or irregularities, tighten or adjust the connections as needed. It’s essential to have a leak-free and efficient Roman tub faucet.
- Once you are satisfied with the performance and functionality of your new faucet, take a moment to appreciate the transformation it has brought to your bathroom.
- Invite friends and family over to show off your newly upgraded bathroom and enjoy the luxurious experience your Roman tub faucet provides.
Remember, regular maintenance and care will help prolong the lifespan of your Roman tub faucet and keep it looking pristine. Clean it regularly with mild soap and water, and avoid using abrasive cleaners or tools that can damage the finish. With proper care, your Roman tub faucet will continue to be a stylish and functional centerpiece in your bathroom for years to come.
Frequently Asked Questions
What Is The Difference Between A Garden Tub Faucet And A Roman Tub Faucet?
A garden tub faucet is for smaller tubs, while a Roman tub faucet is for larger tubs. They differ in size and design.
What Is A Roman Style Tub Faucet?
A Roman style tub faucet is a type of faucet that is designed to resemble the traditional Roman bath spouts. It typically features a tall and elegant design with separate handle controls for hot and cold water. It adds a touch of classical sophistication to any bathroom decor.
How Far Apart Are Roman Tub Faucet?
Roman tub faucets are typically installed with a distance of 8 to 16 inches apart.
Can You Add A Hand Shower To A Roman Tub Faucet?
Yes, you can add a hand shower to a Roman tub faucet.
Conclusion
To wrap it up, installing a Roman tub faucet can seem like a daunting task, but with the right steps and tools, it can be a manageable DIY project. From shutting off the water supply to properly connecting the water lines, this guide has provided you with a step-by-step process.
Remember to pay attention to details and take your time throughout the installation. With a little patience and some basic plumbing knowledge, you’ll have a beautiful and functional Roman tub faucet in no time. Happy installing!