
To install a new tub drain, you should start by removing the old drain using a drain removal tool. Then, insert the new drain into the drain hole and tighten it securely using a drain wrench.
Choosing The Right Tub Drain
When it comes to installing a new tub drain, choosing the right one is essential for both functionality and aesthetics. There are various factors to consider, such as the type of tub you have, your personal preference, and your budget. Understanding the different types of tub drains available in the market can help you make an informed decision. Let’s take a closer look at these factors and the different types of tub drains you can choose from.
Factors to consider when selecting a new tub drain
Before you rush into buying a new tub drain, there are a few factors you should keep in mind:
- Tub type: The first thing to consider is the type of tub you have. Different tubs require different types of drains. For example, a freestanding tub may require a floor-mounted tub drain, while a standard built-in tub may use a regular bathtub drain.
- Drain size: It is important to measure the diameter of your existing drain to ensure compatibility. Most tub drains have a size of 1 ½ inches, but it is always best to double-check.
- Material: Tub drains are available in various materials, including brass, stainless steel, and plastic. Each material has its own pros and cons, so consider factors like durability, maintenance, and appearance when making your choice.
- Style: Tub drains come in different styles and finishes, so choose one that matches the overall aesthetic of your bathroom. Whether you prefer a modern, minimalist look or a more traditional design, there is a tub drain for every style.
- Budget: Last but not least, consider your budget. Tub drains can range in price depending on the material, brand, and features. Determine how much you are willing to spend and look for options that fit within your budget.
Understanding the different types of tub drains available in the market
Now that you have considered the important factors, let’s explore the different types of tub drains you can choose from:
| Type | Description |
|---|---|
| Toe-tap drain | A toe-tap drain is operated by pressing it with your foot, making it convenient and hygienic. This type of drain is a popular choice for those who want a hands-free operation. |
| Lift-and-turn drain | This type of drain requires twisting the stopper to open or close it. It is a simple and reliable option that offers good water drainage. |
| Pop-up drain | A pop-up drain is controlled by a lever located on the overflow plate. When the lever is lifted, the stopper pops up, allowing water to drain. This type of drain offers easy operation and is commonly found in modern bathrooms. |
| Cable-driven drain | A cable-driven drain uses a cable mechanism to open and close the stopper. It offers smooth operation and precise control over water flow. |
| Push-pull drain | A push-pull drain has a mechanism where you push the stopper down to close it and pull it up to open it. This type of drain is simple and easy to operate. |
By understanding the different types of tub drains available in the market and considering the factors mentioned above, you can choose the right tub drain that suits your needs and preferences. Remember to measure carefully, select a material and style that complements your bathroom, and stay within your budget. With the right tub drain, you can enjoy a functional and visually appealing bathtub for years to come.
Tools And Materials Required For Tub Drain Installation
Are you looking to install a new tub drain but feeling overwhelmed by the process? Don’t worry – with the right tools and materials, you can easily complete the installation and enjoy a leak-free tub for years to come. In this section, we’ll discuss the essential tools and materials you’ll need for a smooth tub drain installation.
List of tools required for a smooth installation process
Before you start the tub drain installation, make sure you have the following tools on hand:
- Plumbers Wrench: This tool is essential for loosening and tightening the drain fittings. Make sure you have an adjustable plumber’s wrench that can fit securely around the drain connections.
- Hacksaw: A hacksaw will come in handy if you need to cut any pipes or remove old drain components.
- Screwdriver: Keep a flathead or Phillips screwdriver nearby in case you encounter any screws or fasteners during the installation process.
- Plumber’s Putty: Plumber’s putty is used to create a watertight seal around the drain components. Make sure you have a fresh container of plumber’s putty to apply during the installation.
- Teflon Tape: Teflon tape is a thin, white tape that is wrapped around threaded connections to create a seal that prevents leaks. You’ll need a roll of Teflon tape to secure the connections in your tub drain installation.
- Plunger: While not necessarily a tool specific to tub drain installation, a plunger may come in handy if you encounter any clogs or blockages during the process.
Essential materials needed to install a new tub drain
In addition to the tools mentioned above, you’ll also need a few key materials to successfully install a new tub drain. These materials include:
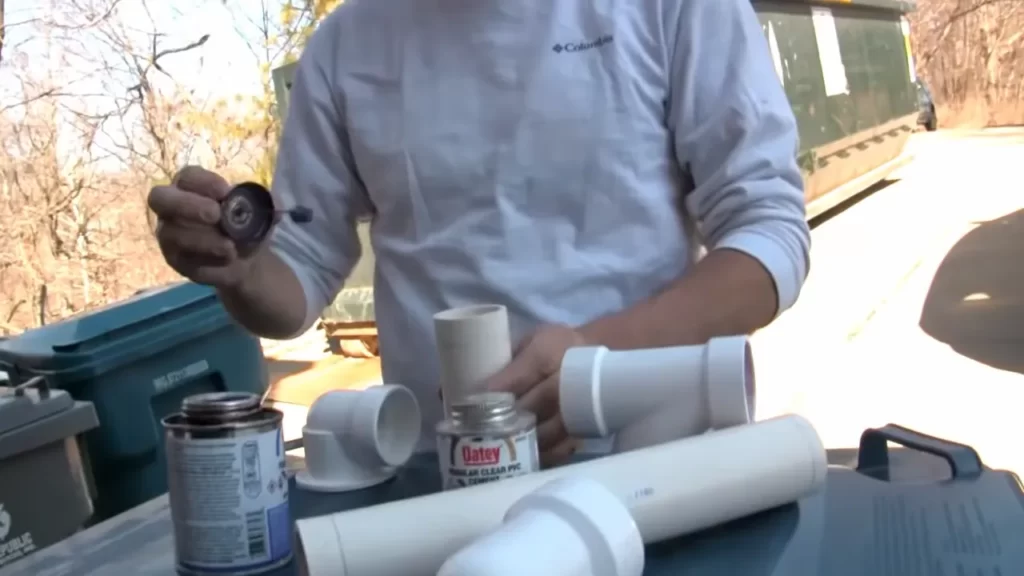
- New Tub Drain Kit: Purchase a new tub drain kit that includes all the necessary components for a complete installation. This may include a drain flange, drain body, and drain elbow. Make sure the kit is compatible with your tub model.
- Pipe Compound: Pipe compound, also known as pipe dope, is a paste-like substance that is applied to threaded connections to prevent leaks. Ensure you have a tube of pipe compound to use during the installation.
- Plumber’s Tape: Similar to Teflon tape, plumber’s tape is a thicker tape used for sealing larger pipe connections. It’s important to have plumber’s tape on hand if your tub drain installation requires any larger pipe fittings.
- Rag or Cloth: Have a rag or cloth nearby to wipe away excess putty, compound, or water during the installation process. Keeping the area clean will ensure a professional-looking and watertight installation.
By gathering these essential tools and materials before starting your tub drain installation, you’ll be well-prepared to tackle the job with confidence. Remember, a successful installation begins with the right supplies!
Step-By-Step Guide To Installing A New Tub Drain
Installing a new tub drain can be a challenging task, but with the right guidance and tools, you can do it yourself. In this step-by-step guide, we will walk you through the process of installing a new tub drain. From preparing the bathtub to ensuring proper sealing and leak prevention, each step will be explained in detail. So, let’s get started and give your bathtub a brand new drain!
The first step to installing a new tub drain is to prepare the bathtub. Here’s what you need to do:
- Ensure the bathtub is completely clean and free from any debris or residue.
- Inspect the drain hole and surrounding area for any damage or signs of wear
- Measure the diameter of the drain hole to determine the size of the new tub drain you’ll need.
- Gather all the necessary tools and materials, including a plumber’s putty, drain wrench, and the new tub drain.
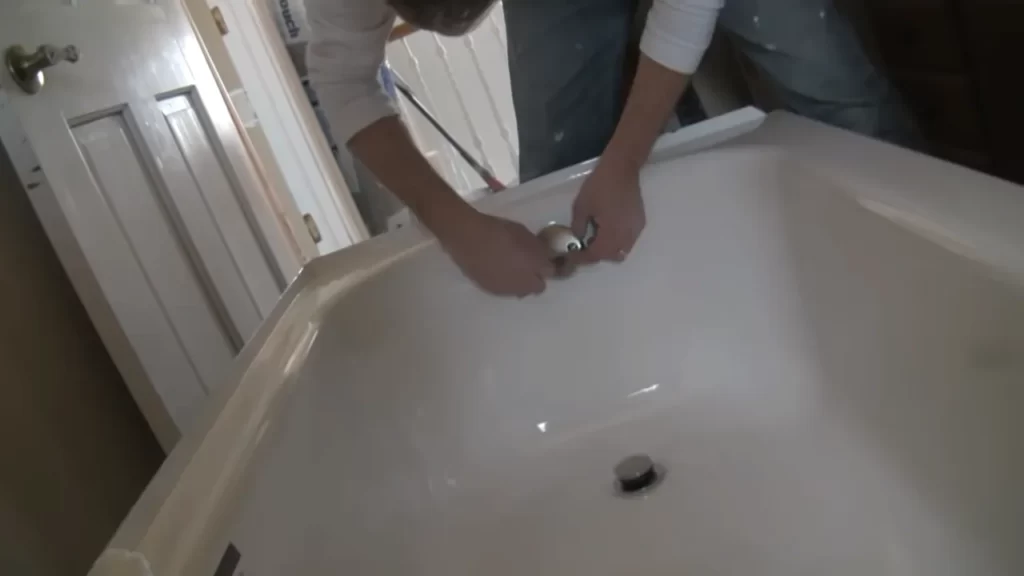
Before installing the new tub drain, you’ll need to remove the old one. Follow these steps:
- Locate the drain flange, which is the visible part of the drain in the bathtub.
- Using a drain wrench, turn the flange counterclockwise to loosen it.
- Once loose, lift the flange and the attached drain stopper out of the drain hole.
- Clean the drain hole and remove any old plumber’s putty or sealing material.
With the old drain removed, it’s time to install the new tub drain. Here’s how:
- Apply a layer of plumber’s putty to the underside of the new drain flange.
- Insert the new drain flange into the drain hole and press it firmly into place.
- Screw the drain flange clockwise to tighten it securely.
- Attach the drain stopper to the drain flange, ensuring it moves up and down smoothly.
Proper sealing and leak prevention are crucial to prevent water damage and maintain the functionality of your bathtub. Follow these steps:
- Check the tightness of the drain flange to ensure a secure fit.
- Inspect the area around the drain for any gaps or spaces.
- If necessary, apply a bead of silicone caulk around the edges of the drain flange for added sealing.
- Allow the silicone caulk to dry completely before testing the drain for leaks.
By following these step-by-step instructions, you can successfully install a new tub drain in your bathtub. Remember to take your time and double-check each step to ensure a proper fit and leak-free installation. Enjoy your freshly installed tub drain!
Preparing The Bathtub For Drain Installation
Before installing a new tub drain, it’s crucial to prepare the bathtub surface properly. This will ensure a clean and secure installation, preventing any future leaks or damages. In this section, we will cover the steps to clean the bathtub surface and remove any old caulk or residue that may hinder the drain installation.
Cleaning the Bathtub Surface
To begin, you’ll need to clean the bathtub surface thoroughly. This will remove any dirt, grime, or soap scum that could interfere with the drain installation. Follow these steps to ensure a clean surface:
- Start by **wiping down** the entire bathtub with a damp cloth or sponge.
- Use a mild **cleaning solution** specifically formulated for bathtubs. Avoid abrasive cleaners that could damage the surface.
- Apply the cleaning solution to the surface and **scrub gently** with a soft-bristle brush or sponge.
- Rinse the bathtub with clean water to remove any residue leftover from the cleaning solution.
- Once rinsed, **thoroughly dry** the bathtub surface using a clean towel or cloth.
Removing any Old Caulk or Residue
If there is any old caulk or residue present around the drain area, it’s essential to remove it before installing the new tub drain. Follow these steps to ensure a clean and smooth surface:
- Start by **softening the old caulk**. You can do this by applying a caulk remover or warm soapy water and letting it sit for a few minutes.
- Using a **caulk removal tool** or a utility knife, carefully **scrape away** the old caulk. Be gentle to avoid scratching the bathtub surface.
- After removing the caulk, **clean the area** using a mild cleaning solution and a soft cloth or sponge. This will ensure that all residue is completely removed.
- Once the area is clean and dry, **inspect** for any remaining caulk or residue. If necessary, repeat the caulk removal process.
By following these steps to clean the bathtub surface and remove any old caulk or residue, you’ll be ready to install your new tub drain with confidence. Remember to take your time and ensure that the surface is clean and dry before proceeding with the installation process.
Removing The Old Drain
When it’s time to install a new tub drain, the first step is to remove the old drain. This process may seem daunting, but with the right tools and method, it can be accomplished with ease. In this section, we will guide you through the process of identifying the type of drain and its removal method, using the appropriate tools, and dealing with stubborn or rusted drain parts.
Identifying the type of drain and its removal method
Before you start removing the old drain, it’s important to identify the type of drain you have and the appropriate method to remove it. There are two common types of tub drains: pop-up drains and lift-and-turn drains.
If you have a pop-up drain, you can identify it by the presence of a stopper above the drain. To remove it, you will need to unscrew the stopper from the drain. Use a pair of pliers or a screwdriver to grip the stopper and turn it counterclockwise until it comes loose. Once the stopper is removed, you can proceed with removing the drain.
If you have a lift-and-turn drain, it will have a knob or lever on top that controls the drain stopper. To remove this type of drain, start by lifting the stopper to the open position. Then, use a pair of pliers or a specialized drain key to grip the crossbars on the drain. Turn the drain counterclockwise to loosen it, and continue turning until it can be fully removed.
Using the appropriate tools to remove the old drain
Now that you have identified the type of drain and its removal method, it’s time to gather the appropriate tools. Here are the tools you may need:
| Tool | Purpose |
|---|---|
| Pliers | To grip and turn the drain stopper or crossbars |
| Screwdriver | To unscrew the stopper from the drain |
| Drain key | To grip and turn the crossbars on a lift-and-turn drain |
Make sure to have these tools readily available before you start the removal process. Having the right tools will make the job much easier and prevent any damage to the drain or surrounding areas.
Dealing with stubborn or rusted drain parts
Sometimes, you may encounter stubborn or rusted drain parts that are difficult to remove. In such cases, it’s important to proceed with caution to avoid damaging the drain or tub.
If the drain is rusted, you can try using a rust penetrant spray on the affected area. Allow the spray to sit for a few minutes, then use pliers or a wrench to grip and turn the drain. Applying gentle pressure and using a back-and-forth motion can help break loose the rusted parts.
If the drain still refuses to budge, you may need to resort to using a drain extractor tool. This tool is specifically designed to remove stuck drains and can provide the necessary leverage to break free stubborn parts. Follow the manufacturer’s instructions for the drain extractor tool to safely remove the old drain.
By following these steps and being prepared with the right tools, you can successfully remove the old tub drain and make way for the installation of a new one.
Installing The New Tub Drain
When it comes to updating your bathroom, installing a new tub drain can help give your bathtub a fresh and clean look. Whether you’re replacing an old and worn-out drain or upgrading to a new style, this step-by-step guide will walk you through the process of installing a new tub drain.
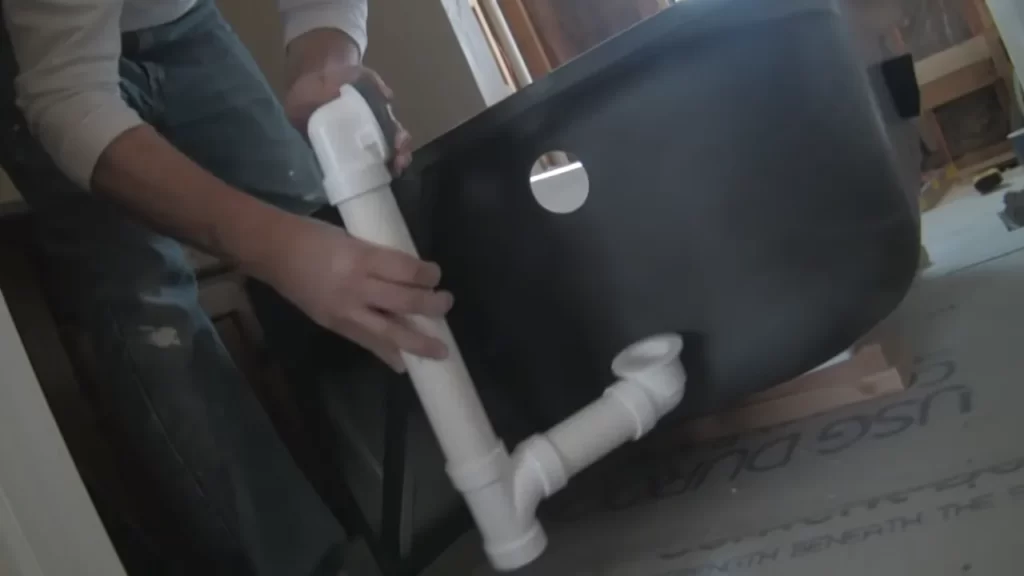
Understanding the anatomy of a tub drain
Before getting started, it’s important to have a good understanding of the anatomy of a tub drain. A typical tub drain consists of several components, including the drain shoe, drain body, overflow drain, and stopper. These parts work together to allow water to flow out of the tub efficiently while preventing any leaks.
To install the new tub drain properly, you need to ensure that you have the correct replacement drain based on the old drain type.
Choosing the right replacement drain based on the old drain type
Choosing the right replacement drain is crucial to ensure a proper fit and functionality. There are different types of tub drains such as trip lever, lift and turn, and push-pull drains. Each type has its own unique mechanism and requires a specific replacement drain.
To determine the type of your old drain, you can visually inspect it or consult the manufacturer’s documentation. Once you have identified the old drain type, you can easily find a compatible replacement drain at your local home improvement store or online.
Make sure to select a replacement drain that matches the dimensions and specifications of your old drain to ensure a seamless installation process and prevent any compatibility issues.
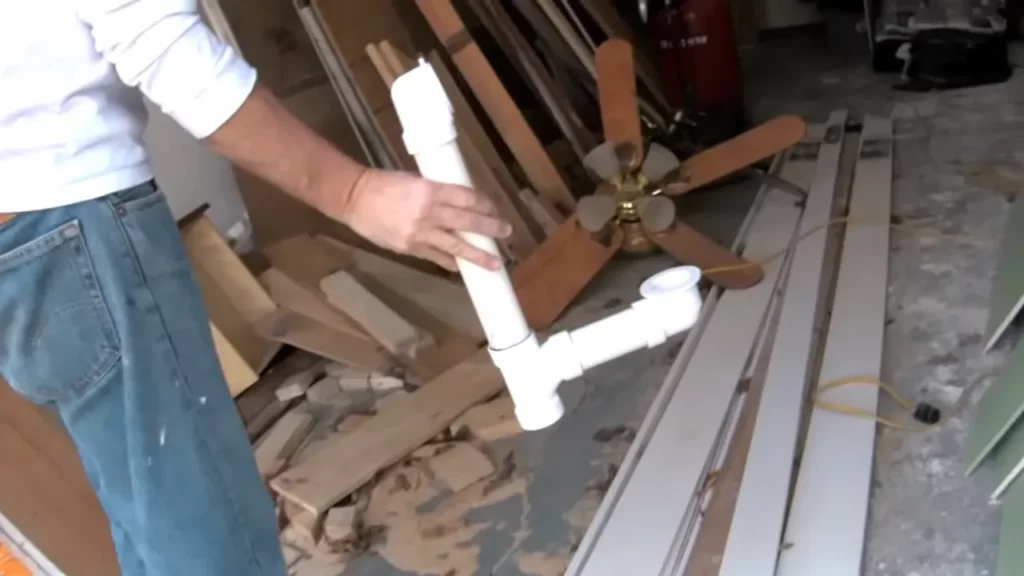
Aligning and fitting the new drain with the bathtub’s plumbing system
Now that you have the right replacement drain, you can start aligning and fitting it with the bathtub’s plumbing system. This step requires careful attention to detail to ensure a proper fit without any leaks.
Here’s a step-by-step process to help you with the alignment and fitting:
- Begin by removing the old drain by unscrewing it counterclockwise using a drain key or pliers.
- Once the old drain is removed, clean the area around the drain thoroughly to ensure a clean surface for the new drain.
- Apply plumber’s putty on the underside of the new drain flange.
- Insert the new drain into the drain hole and press it firmly onto the bathtub surface.
- Secure the drain by tightening the locknut underneath the tub using a wrench.
- Connect the overflow drain to the new drain body, ensuring a secure and watertight connection.
- Finally, test the new tub drain by filling the bathtub with water and checking for any leaks. If there are no leaks, you have successfully installed the new tub drain.
By following these steps, you can easily install a new tub drain and enjoy a refreshed and functioning bathtub. Remember to always consult the manufacturer’s instructions and seek professional help if needed.
Ensuring Proper Sealing And Leak Prevention
Applying Plumber’s Putty or Silicone Sealant
Before installing the new tub drain, it is crucial to ensure proper sealing and leak prevention. Applying plumber’s putty or silicone sealant is an important step in achieving a watertight seal. Plumber’s putty is a soft, moldable substance that is commonly used for sealing drains, faucets, and other plumbing fixtures. Silicone sealant, on the other hand, is a flexible and adhesive material that provides excellent water resistance.
To apply plumber’s putty or silicone sealant, follow these steps:
- Start by removing the old drain flange and cleaning the area around the drain opening. Make sure to remove any residue or debris.
- Take a small amount of plumber’s putty or silicone sealant and knead it in your hands to soften it.
- Roll the putty into a thin rope-like shape and wrap it around the underside of the drain flange. Ensure that the putty covers the entire circumference of the flange.
- With the putty in place, press the drain flange firmly into the drain opening. This will create a seal between the flange and the tub.
- Wipe away any excess putty or sealant that may have squeezed out during installation.
Installing Drain Flange and Gasket for a Watertight Seal
In addition to using plumber’s putty or silicone sealant, it is crucial to properly install the drain flange and gasket to ensure a watertight seal. The drain flange is the metal or plastic piece that fits into the drain opening, while the gasket is a rubber or neoprene ring that provides additional sealing.
Follow these steps to install the drain flange and gasket:
- Place the drain flange into the drain opening, ensuring that it is centered and aligned correctly.
- Insert the gasket onto the drain flange, making sure it fits snugly.
- Thread the drain body into the drain flange from underneath the tub. Tighten it securely, but be careful not to overtighten, as it can damage the gasket.
- Use pliers or a wrench to further tighten the drain body, if necessary.
Checking for Any Leaks or Loose Connections
Once the new tub drain is installed, it is essential to check for any leaks or loose connections before using the tub. Even the smallest of leaks can lead to water damage and costly repairs.
Follow these steps to check for leaks and loose connections:
- Fill the tub with water and let it sit for a few minutes.
- Inspect the area around the drain for any signs of water leakage. Pay close attention to the drain flange, gasket, and connections.
- If you notice any leaks, tighten the connections or adjust the drain flange as needed.
- Test for leaks again by refilling the tub and checking for any sign of water escaping.
- If everything appears to be watertight and leak-free, congratulations! You have successfully installed a new tub drain.
Ensuring proper sealing and leak prevention during the installation of a new tub drain is essential for the long-term functionality and durability of your tub. By following these steps and paying attention to detail, you can enjoy a worry-free bathing experience in your newly installed tub.
Common Challenges And Troubleshooting Tips
Installing a new tub drain may seem like a straightforward task, but there can be some common challenges that you may encounter along the way. However, with the right troubleshooting tips, you can overcome these obstacles and successfully complete the installation. In this section, we will address the common challenges that you may face when installing a new tub drain and provide you with practical solutions to tackle them.
Dealing with stripped threads or damaged drain pipes
If you come across stripped threads or damaged drain pipes during your tub drain installation, don’t panic. This is a common issue that can be resolved with a few simple steps. Here’s what you can do:
- Tighten the drain flange using an adjustable wrench, ensuring that it is securely fastened. If the threads are stripped, you may need to use a thread repair kit to restore them.
- If the drain pipe is damaged, you can replace it with a new one. Make sure to measure the pipe accurately and select a replacement that matches the dimensions.
- Use plumber’s putty or silicone caulk to create a watertight seal between the drain flange and the tub’s surface. This will help prevent any leaks or water damage.
By following these troubleshooting tips, you can handle stripped threads or damaged drain pipes effectively and ensure a smooth installation process.
Addressing issues with drain alignment or fitting
When installing a new tub drain, you may encounter challenges in aligning the drain or ensuring a proper fit. However, with the right approach, you can overcome these issues. Here’s what you need to do:
- Check the drain components for any obstructions or debris that may hinder proper alignment. Clear away any blockages and ensure a clean, smooth pathway for water flow.
- Use a plunger or a drain snake to dislodge any clogs further down the drain pipe that may be causing alignment problems.
- Apply a lubricant to the drain fittings and gently twist or adjust the components to align them properly. Avoid using excessive force to prevent further damage.
- Use a level to ensure that the drain is properly aligned with the tub’s surface. Adjust as necessary to achieve a level orientation.
By following these troubleshooting tips, you can address issues with drain alignment or fitting and ensure that your new tub drain functions efficiently.
Tips for preventing common installation mistakes
Preventing common installation mistakes is crucial to ensuring a successful tub drain installation. By keeping the following tips in mind, you can avoid potential issues and enjoy a hassle-free experience:
- Read the manufacturer’s instructions carefully before starting the installation process. Familiarize yourself with the specific requirements and guidelines for your tub drain model.
- Ensure that all the necessary tools and materials are readily available before you begin. This will help minimize disruptions and save you time during the installation.
- Take accurate measurements of the drain components and the tub’s surface to ensure a proper fit. Incorrect measurements can lead to leaks or inefficient drainage.
- Apply an appropriate sealant, such as plumber’s putty or silicone caulk, to create a watertight seal between the drain components and the tub’s surface.
- Regularly inspect and maintain your tub drain to prevent future issues. Clean any debris or buildup that may accumulate over time, and address any signs of leaks or water damage promptly.
By incorporating these tips into your tub drain installation process, you can prevent common mistakes and achieve a professional-quality result.
Final Thoughts
Installing a new tub drain can seem like a daunting task, but with the right guidance and a little bit of patience, you can achieve a successful installation. In this final section, we will recap the key steps involved in the installation process, emphasize the importance of proper installation for long-term functionality, and provide maintenance and care tips to ensure your drain system operates smoothly.
Recap of Key Steps in Installing a New Tub Drain
| Step | Description |
|---|---|
| 1 | Remove the old drain by unscrewing it counterclockwise. |
| 2 | Clean the drain hole and apply plumber’s putty to the new drain’s flange. |
| 3 | Insert the new drain into the hole, pushing it firmly to create a watertight seal. |
| 4 | Tighten the drain from below the tub using a drain key or drain wrench. |
| 5 | Check for any leaks and make necessary adjustments if needed. |
By following these steps, you can ensure a successful installation of your new tub drain and enjoy a functional and leak-free bath experience for years to come.
Importance of Proper Installation for Long-Term Functionality
Proper installation of a new tub drain is crucial to its long-term functionality. A poorly installed drain can lead to leaks, which can cause water damage to your bathroom floor and walls. Additionally, an improperly installed drain can result in slow drainage, unpleasant odors, and even clogged pipes. To avoid these issues, it is important to follow the correct installation steps and ensure a tight and secure fit for your new tub drain.
Maintenance and Care Tips for a Well-Functioning Drain System
To maintain a well-functioning drain system, follow these maintenance and care tips:
- Regularly clean the drain by removing any hair or debris that may accumulate over time.
- Use a drain snake or a plunger to clear any clogs in the drain.
- Avoid pouring grease, oil, or harsh chemicals down the drain, as they can cause clogs and damage to the pipes.
- Install a drain cover or strainer to prevent large objects from entering the drain and causing blockages.
- Consider using a drain cleaner occasionally to prevent buildup and maintain optimal drainage.
By following these maintenance and care tips, you can ensure a well-functioning drain system and avoid common plumbing problems in the future.
Remember, a properly installed and well-maintained tub drain can provide years of reliable and hassle-free use. Take the time to install your new drain correctly and keep up with regular maintenance to ensure a smooth and functioning drain system in your bathroom.
Frequently Asked Questions
Is It Easy To Replace Bathtub Drain?
Yes, replacing a bathtub drain is relatively easy. Simply remove the old drain and replace it with a new one. There are several online tutorials and step-by-step guides available to help you throughout the process. With a few basic tools and some patience, you can successfully replace the bathtub drain yourself.
Do You Use Plumbers Putty On Tub Drain?
Yes, plumbers putty is commonly used on tub drains to create a watertight seal.
How Long To Wait After Installing New Tub Drain?
Wait at least 24 hours after installing a new tub drain before use. This allows the adhesive or sealant to properly set and create a watertight seal. Doing so ensures a secure and leak-free installation, giving you peace of mind.
How Do You Replace A Bathtub Drain Stopper?
To replace a bathtub drain stopper, follow these steps: 1. Remove the drain cover by unscrewing it counterclockwise. 2. Detach the old stopper from the drain pipe using pliers. 3. Insert the new stopper into the drain pipe and tighten it using pliers.
4. Screw the drain cover back on clockwise to secure it. 5. Test the stopper by filling the bathtub with water and checking for leaks.
Conclusion
Installing a new tub drain is a relatively simple task that can be accomplished with just a few basic tools and some patience. By following the steps outlined in this blog post, you can ensure a leak-free and functional tub drain that will provide years of reliable service.
Remember to always consult the manufacturer’s instructions for your specific tub model, and don’t hesitate to seek professional help if you are unsure about any step of the process. Happy DIY-ing!