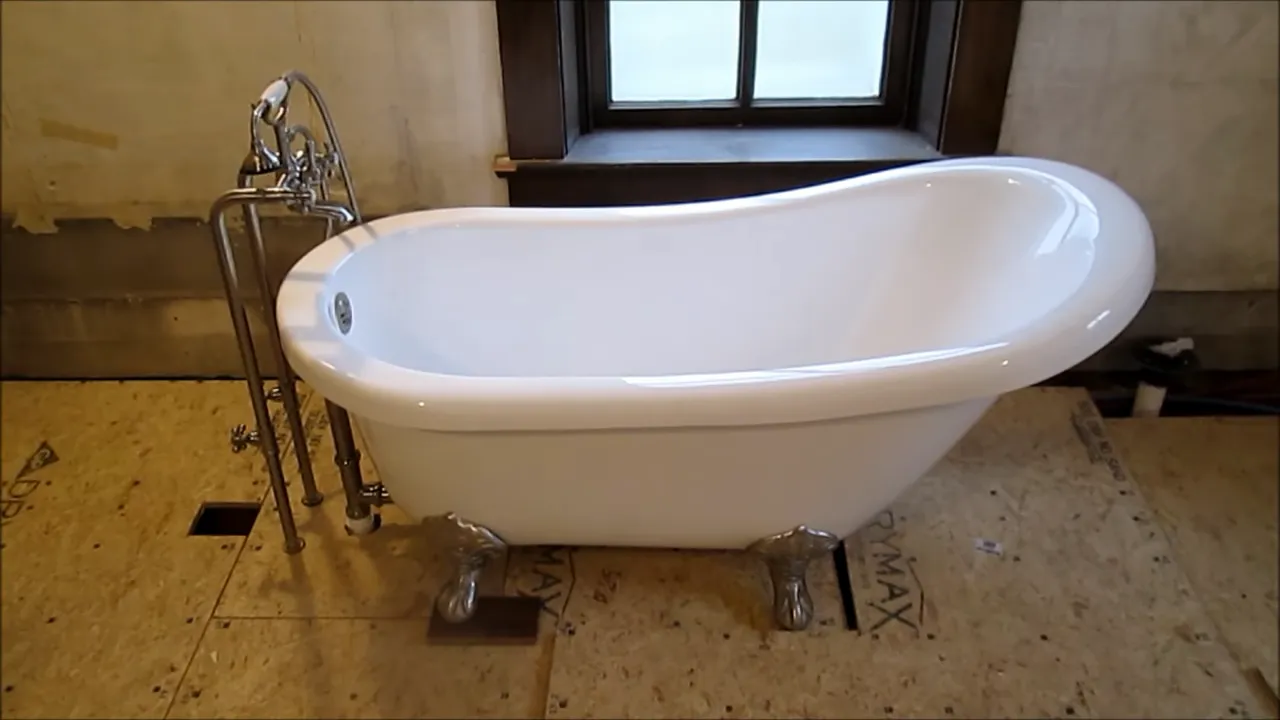
To install a clawfoot tub, first, ensure that the area is prepped and the necessary plumbing connections are in place. Then, carefully position the tub and secure it to the floor using anchors or brackets.
Choosing The Perfect Clawfoot Tub
When it comes to creating a luxurious and timeless look in your bathroom, nothing beats a clawfoot tub. These freestanding tubs have been a staple in traditional and vintage-inspired bathrooms for decades, and they can add both elegance and charm to any space. If you’re considering installing a clawfoot tub in your bathroom, it’s important to choose the perfect one that not only fits your personal style but also fits the dimensions of your bathroom. In this article, we’ll explore the factors to consider when selecting a clawfoot tub, the different types and styles available, and how to determine the right size and dimensions for your space.
Factors to Consider When Selecting a Clawfoot Tub
Choosing the right clawfoot tub involves taking several factors into account to ensure that it perfectly complements your bathroom and meets your specific needs. Here are some important factors to consider:
- Style: Clawfoot tubs come in various styles, including classic rolltop, slipper, and double-ended. Each style offers its unique aesthetic, so it’s essential to choose one that aligns with your personal taste.
- Material: Clawfoot tubs are typically made from cast iron, acrylic, or fiberglass. Cast iron provides durability and heat retention, while acrylic and fiberglass are lighter and easier to maintain.
- Finish: The finish of the tub, such as polished chrome, brushed nickel, or oil-rubbed bronze, can greatly impact the overall look of your bathroom. Select a finish that complements your existing fixtures.
- Feet Style: The feet of a clawfoot tub play a significant role in its appearance. Choose from various designs, such as ball and claw, lion paw, or ornate scrolled feet, based on your desired aesthetic.
- Budget: Consider your budget when selecting a clawfoot tub. Prices can range considerably based on the material, size, and brand of the tub, so it’s essential to determine your spending limit before starting your search.
Different Types and Styles of Clawfoot Tubs Available
Clawfoot tubs are available in a range of types and styles, each with its unique design elements and features. Here are some popular choices to consider:
| Type | Description |
|---|---|
| Classic Rolltop | With a slightly sloping backrest and rolled rim, this type offers a traditional and timeless look. |
| Slipper | Featuring one raised end for added comfort and relaxation, slipper tubs are perfect for long soaks. |
| Double-Ended | Equipped with centerset faucets, these tubs have both ends rounded, allowing for convenient bathing from either side. |
How to Determine the Right Size and Dimensions for Your Bathroom
Before purchasing a clawfoot tub, it’s crucial to measure your bathroom space to ensure that the tub will fit comfortably. Follow these steps to determine the right size and dimensions:
- Measure the length and width of the available space in your bathroom.
- Consider the layout of your bathroom and the placement of other fixtures, such as sinks and toilets, to determine the best location for your clawfoot tub.
- Take into account the required clearance space around the tub for comfortable use and access for cleaning.
- Consult the manufacturer’s specifications for the dimensions of different clawfoot tub models to find one that fits within your measured space.
By carefully considering these factors and correctly measuring your bathroom, you’ll be able to select a clawfoot tub that not only fits your space but also enhances the overall ambiance of your bathroom with its style and elegance.

Preparing Your Bathroom For Installation
Before you can enjoy the luxury and charm of a clawfoot tub in your bathroom, you need to properly prepare the space for installation. This involves measuring the area, removing the old bathtub, and making necessary plumbing considerations and adjustments. By following these steps, you can ensure a smooth and successful installation process.
Measuring the Space and Ensuring Proper Fit
The first step in preparing your bathroom for a clawfoot tub installation is to measure the available space. This will help you determine if the tub will fit comfortably in your bathroom without obstructing doorways or other fixtures. To measure the space, follow these simple steps:
- Use a measuring tape to measure the length and width of the area where the tub will be placed.
- Take into account the necessary clearance for the tub, considering any walls, fixtures, or obstructions nearby.
- If you’re unsure about the fit, create a mock-up using cardboard or tape to visualize the tub’s dimensions in your bathroom.
By carefully measuring the space, you’ll ensure that your new clawfoot tub fits perfectly in your bathroom, creating an elegant focal point.
Removing the Old Bathtub and Preparing the Area
Before installing your new clawfoot tub, you’ll need to remove the old bathtub and prepare the area for the installation. Here are the steps to follow:
- Turn off the water supply to the bathroom and ensure there is no water flowing into the old bathtub.
- Disconnect the plumbing connections, including the drain and faucet.
- Remove any trim or caulking around the bathtub edges.
- Once the connections and trim are removed, carefully lift and remove the old bathtub from the area.
- Inspect the area for any damage or leaks and repair as necessary.
- Clean the area thoroughly and prepare it for the installation of the new clawfoot tub.
Removing the old bathtub can be a physically demanding task, so it’s important to take necessary precautions and ask for assistance if needed. Once the area is cleared and prepared, you’re ready to move on to the next step.
Plumbing Considerations and Adjustments
Installing a clawfoot tub may require some plumbing considerations and adjustments to ensure proper functionality. Here are important steps to follow:
- Locate and access the existing plumbing connections in your bathroom.
- Measure the height and location of the drain and faucet to ensure they align properly with the new tub.
- If necessary, adjust the plumbing connections to fit the specifications of the clawfoot tub.
- Ensure proper sealing and waterproofing around the plumbing connections to prevent leaks.
- Consider any additional features, such as a hand-held shower or faucet extension, and make the necessary adjustments.
By carefully considering and adjusting the plumbing connections, you’ll ensure that your clawfoot tub functions properly and seamlessly integrates into your bathroom design.
Preparing your bathroom for the installation of a clawfoot tub involves measuring the space, removing the old bathtub, and making necessary plumbing adjustments. By following these steps, you’ll lay a solid foundation for a successful installation and ultimately enjoy the timeless beauty and relaxation of your new clawfoot tub.
Step-By-Step Installation Process
When it comes to adding a touch of vintage charm to your bathroom, installing a clawfoot tub is a perfect choice. With its elegant design and classic appeal, a clawfoot tub can instantly transform your bathroom into a stylish and inviting space. If you’re ready to take on the installation process yourself, this step-by-step guide will walk you through the process, ensuring a successful and hassle-free installation.
Gathering the necessary tools and materials
Before you begin the installation, make sure you have all the necessary tools and materials at hand. This will save you time and frustration later on. Here is a list of what you’ll need:
- Clawfoot tub
- Drain and overflow assembly
- Water supply lines
- Adjustable wrench
- Plumber’s tape
- Screwdriver
- Level
- Plumbing putty
- Pipe cutter
- Teflon tape
- Plumbing fittings
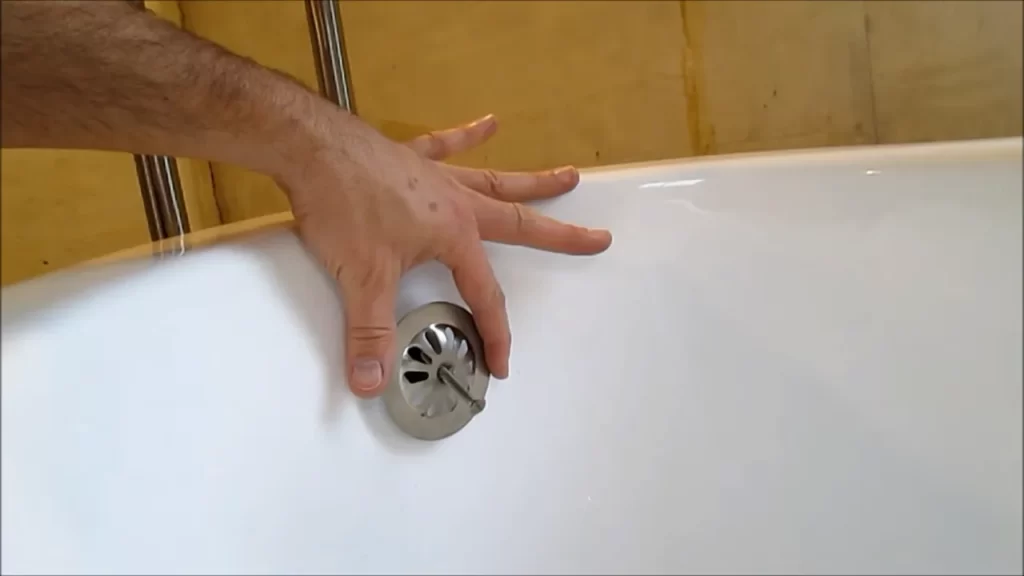
Installing the drain and overflow assembly
Start by installing the drain and overflow assembly. Follow these steps:
- Apply plumber’s tape to the threads of the drain and overflow pipes to ensure a watertight seal.
- Insert the drain and overflow pipes into their respective openings on the bottom of the tub.
- Tighten the nuts on the underside of the tub using an adjustable wrench.
- Apply plumber’s putty around the drain and overflow assemblies to create a seal.
- Secure the overflow cover plate and the drain stopper according to the manufacturer’s instructions.
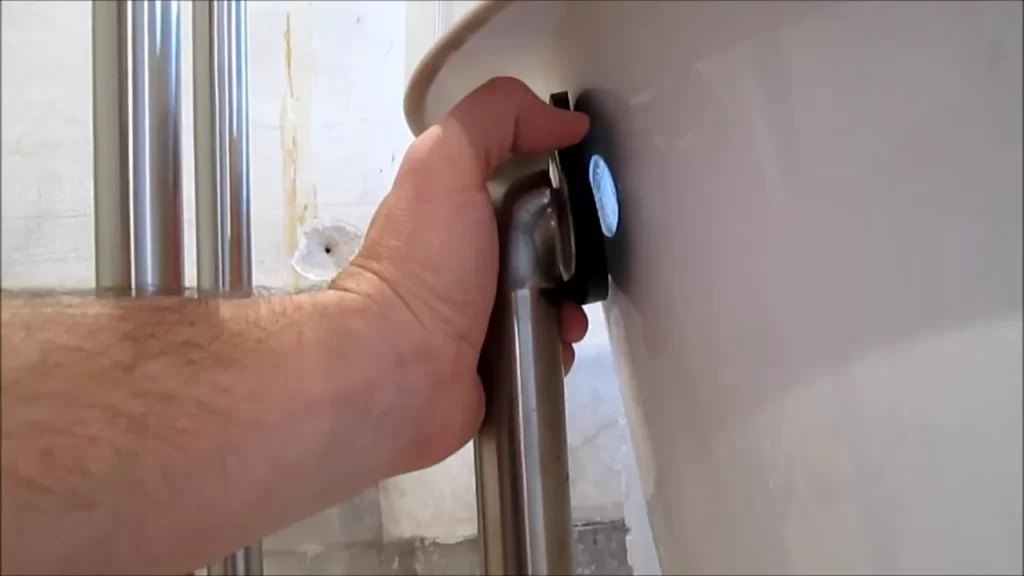
Connecting the water supply lines
Next, you’ll need to connect the water supply lines to the tub. Follow these steps:
- Attach the water supply lines to the hot and cold water pipes using plumbing fittings.
- Use an adjustable wrench to securely tighten the fittings.
- Apply Teflon tape to the threads of the water supply connections to prevent leaks.
Securing the tub feet and leveling the tub
Once the drain and water supply connections are in place, it’s time to secure the tub feet and ensure the tub is level. Follow these steps:
- Attach the tub feet to the underside of the tub using the provided hardware.
- Use a level to check if the tub is even on all sides.
- If needed, adjust the height of the feet to level the tub.
- Secure the feet in place by tightening the nuts using a wrench.
Testing for leaks and ensuring proper functionality
Finally, before enjoying your new clawfoot tub, it’s important to test for leaks and ensure proper functionality. Follow these steps:
- Fill the tub with water and let it sit for a few minutes.
- Check all the connections, including the drain, overflow, and water supply lines, for any signs of leakage.
- If you notice any leaks, tighten the connections further or add plumber’s tape to create a tighter seal.
- Test the functionality of the drain and overflow by opening and closing them to ensure smooth operation.
Once you’ve completed these steps and are satisfied with the installation, you can now enjoy the luxury and beauty of your clawfoot tub. Sit back, relax, and indulge in a truly timeless bathing experience.
Additional Considerations And Tips
When it comes to installing a clawfoot tub, there are a few additional considerations and tips that can enhance your overall experience. From adding a shower enclosure or curtain rod to caring for and maintaining your tub, these tips will ensure that your installation is seamless and your tub is well-maintained for years to come. In some cases, hiring a professional for installation might be necessary to ensure everything is done correctly. Read on to learn more.
Adding a Shower Enclosure or Curtain Rod
If you’re looking to optimize the functionality of your clawfoot tub, adding a shower enclosure or curtain rod is a great option. This allows you to enjoy the benefits of both a tub and a shower, offering convenience and flexibility for your daily routine. To achieve this, you’ll first need to install a showerhead and faucet set for your tub.
Next, you’ll need to choose between a shower enclosure or a curtain rod. A shower enclosure provides a more seamless and enclosed bathing experience, while a curtain rod offers a traditional and customizable touch. Make sure to measure the dimensions of your tub and bathroom space accurately, as this will help you determine the ideal size and style of enclosure or curtain rod to select.
Tips for Caring and Maintaining Your Clawfoot Tub
Proper care and maintenance are essential for preserving the beauty and longevity of your clawfoot tub. Here are a few tips to keep in mind:
- Regular Cleaning: Clean your tub regularly using a non-abrasive cleaner and a soft cloth or sponge to avoid scratching the surface. Avoid using harsh chemicals that can damage the finish.
- Removing Stains: For stubborn stains, create a paste using baking soda and water. Apply the paste to the stained area, let it sit for a while, and then gently scrub it away with a soft brush or cloth.
- Preventing Rust: To prevent rust from developing on the exposed metal parts of your tub, such as the feet and drain, dry them thoroughly after each use. Applying a thin coat of petroleum jelly can also help protect against rust formation.
- Avoiding Impact: Be cautious when placing or moving heavy objects near your tub to avoid any accidental damage. Dropping items on the surface can lead to chips or cracks.
- Reapplying Sealant: Over time, the sealant around your tub may deteriorate. Periodically check for any signs of wear or damage and reapply sealant as needed to prevent leaks.
Recommendations for Professional Installation if Needed
If you’re unsure about your DIY skills or simply prefer the peace of mind that comes with professional installation, it’s recommended to hire a qualified plumber or contractor. They have the expertise and experience to handle the intricacies of clawfoot tub installation, ensuring everything is done correctly and efficiently from start to finish.
When selecting a professional, make sure they have specific experience with clawfoot tubs and can provide references or reviews from previous clients. Also, discuss the installation process in detail with them to ensure they understand your preferences and requirements.
A professional installation guarantees that your clawfoot tub is properly secured, the plumbing connections are correctly aligned, and any potential issues or challenges are addressed by an expert.
By following these additional considerations and tips, your clawfoot tub installation will be a success, providing you with a stylish and functional centerpiece for your bathroom. Whether you choose to add a shower enclosure or curtain rod, care for your tub diligently, or opt for professional installation, these tips will help you enjoy your clawfoot tub to the fullest while ensuring its longevity.
Frequently Asked Questions
How Far From The Wall Should Claw Foot Tub Be?
The claw foot tub should be placed approximately 2-4 inches away from the wall for proper installation and aesthetic appeal.
How Do You Anchor A Clawfoot Tub To The Floor?
To anchor a clawfoot tub to the floor, follow these steps: 1. Mark the position of the feet on the floor. 2. Drill holes into the floor at the marked spots. 3. Insert expanding anchors into the holes. 4. Place the tub over the anchors.
5. Secure the tub to the floor by tightening the nuts on the anchors.
How Does A Claw Tub Drain?
A claw tub drains through a built-in drain near the bottom. The water flows out through the drain, allowing the tub to empty.
Where Does The Water Drain In A Claw Foot Tub?
The water in a claw foot tub drains through a hole located at the bottom of the tub.
Conclusion
Installing a clawfoot tub is a straightforward process that can transform your bathroom into a luxurious oasis. By following the steps outlined in this blog post, you can successfully install a clawfoot tub in your own home. From preparing the space to connecting the plumbing and ensuring proper support, this guide covers everything you need to know.
Start enjoying the elegance and comfort of a clawfoot tub in no time!