
To install a bathtub drain stopper, you need to locate the drain, remove the old stopper, insert the new stopper, and secure it in place with the provided screws or nuts. Installing a bathtub drain stopper is a simple process that can be done with a few steps.
Whether you want to replace a broken stopper or update your bathroom, learning how to install a bathtub drain stopper is essential. We will provide you with a step-by-step guide on how to install a bathtub drain stopper effectively. By following these instructions, you can easily install a new drain stopper and ensure efficient drainage in your bathtub.
So, let’s get started!
Tools And Materials Needed
Screwdriver
A screwdriver is an essential tool for installing a bathtub drain stopper. It helps to remove and tighten screws, making the installation process easier and more efficient. A flathead or Phillips head screwdriver may be required, depending on the type of screws used in your drain stopper assembly kit. Make sure to choose the appropriate screwdriver size that fits the screws properly.
Adjustable Pliers
Another tool you’ll need is a pair of adjustable pliers. These versatile tools are used to grip and twist various components during the installation process. Adjustable pliers come in handy when you need to tighten or loosen nuts, bolts, or other fittings. They provide a firm grip and allow you to exert the necessary force without damaging the parts. Ensure that the pliers are adjusted to the correct size for your specific needs.
Plumber’s Putty
Plumber’s putty is a waterproof sealant that is commonly used in plumbing applications. When installing a bathtub drain stopper, plumber’s putty helps create a watertight seal around the drain area to prevent leaks. Applying a thin layer of plumber’s putty between the drain flange and the bathtub surface ensures a tight fit and prevents water from seeping through. Remember to follow the manufacturer’s instructions for the correct application and usage of plumber’s putty.
Rubber Gloves
Protecting your hands during the installation process is crucial, and that’s where rubber gloves come in handy. Rubber gloves provide a barrier between your skin and any potentially harmful substances, such as chemicals or dirty water. They also offer a better grip when handling slippery parts or applying sealant. Wearing rubber gloves not only promotes safety but also helps maintain hygiene during the installation.
Drain Stopper Assembly Kit
The most important material you’ll need is a drain stopper assembly kit, which typically includes all the necessary components for installing a bathtub drain stopper. These kits may vary depending on the specific style and type of drain stopper you choose. Ensure that you have the correct kit for your bathtub model and follow the manufacturer’s instructions for a seamless installation process. The assembly kit usually includes the drain flange, gasket, stopper mechanism, and any additional parts required for the installation.

Removing The Old Drain Stopper
Identifying the type of drain stopper
First, you need to identify the type of drain stopper that you have in your bathtub. There are several types of drain stoppers, including the lift-and-turn, the push-pull, and the trip lever. Each type requires a slightly different method for removal, so it’s important to know which one you have before you begin. To identify your drain stopper, look for a small lever or knob near the drain. This will help you determine the type of stopper you have and the steps you’ll need to take to remove it.
Removing the overflow cover plate
Next, you’ll need to remove the overflow cover plate. This plate is located on the side of the bathtub, usually in the area above the drain. To remove it, you’ll need a screwdriver. Look for the screws holding the overflow cover plate in place and carefully unscrew them. Once the screws are removed, you should be able to lift the cover plate off and set it aside. Be sure to keep the screws in a safe place so that you don’t lose them during the installation process.
Disconnecting the linkage from the overflow cover
After removing the overflow cover plate, you’ll need to disconnect the linkage from the cover. The linkage is a metal rod or chain that connects the overflow cover to the drain stopper. To disconnect it, locate the small clip or nut that is securing the linkage to the cover. Use a pair of pliers or a wrench to loosen and remove the clip or nut. Once it is removed, you should be able to detach the linkage from the cover and set it aside.
Removing the old drain stopper
Now that the overflow cover plate and linkage are removed, you can finally remove the old drain stopper. Depending on the type of stopper you have, this may involve unscrewing it, lifting it out, or pulling it up. Refer to the manufacturer’s instructions or do some research to determine the best method for your specific stopper. Once the old drain stopper is removed, you can proceed with installing the new one.
In conclusion, removing the old drain stopper is a crucial step in installing a new one. By identifying the type of stopper, removing the overflow cover plate, disconnecting the linkage, and removing the old stopper, you’ll be well on your way to a successful installation. Remember to take your time and follow the instructions carefully to ensure a proper fit and functioning drain stopper.

*Image source: [source-url]*
Choosing The Right Replacement Drain Stopper
When it comes to installing a new drain stopper for your bathtub, choosing the right replacement is crucial. The drain stopper not only helps fill up the tub but also prevents water from draining out. With the wide range of options available, it can be overwhelming to select the perfect one for your bathtub. To simplify the process, here are some key factors to consider when choosing a replacement drain stopper.
Understanding the different types of drain stoppers available
Before diving into the selection process, it’s essential to understand the various types of drain stoppers available. Each type has its unique mechanism and functions differently. Here’s a brief overview of the most common ones:
- Pop-up drain stopper: These stoppers have a lever mechanism that allows you to push it down to close the drain and pull it up to open it. They are easy to use and maintain.
- Lift-and-turn drain stopper: As the name suggests, these stoppers need to be lifted and turned to close or open the drain. They provide a secure seal and are suitable for bathtubs with a separate overflow hole.
- Push-and-pull drain stopper: These stoppers require you to push and pull to control the drain. They are simple and functional, ideal for bathtubs without an overflow hole.
- Toe-touch drain stopper: These stoppers are operated by using your toe to press, making them convenient if you prefer hands-free operation. They are perfect for bathtubs with a built-in overflow drain.
Considering the compatibility with your bathtub’s drain
Compatibility is another vital factor to think about when choosing a replacement drain stopper. Not all stoppers fit every bathtub drain, so it’s crucial to ensure that the new stopper is compatible with your existing drain. Check the size and threading of your drain to determine which type of stopper will fit snugly.
Selecting a suitable replacement drain stopper
Now that you know the types of drain stoppers and have considered the compatibility aspect, it’s time to select a suitable replacement. Here are a few additional factors to keep in mind:
- Material: Make sure the replacement stopper is made of durable and corrosion-resistant material, such as stainless steel or high-quality plastic. This will ensure longevity and prevent any damage.
- Aesthetics: Consider the overall aesthetics of your bathroom and choose a stopper that complements the existing fixtures and decor. Whether you prefer a sleek and modern design or a classic look, there are options available to suit every style.
- Functionality: Think about how you want your drain stopper to function. Do you prefer a simple and straightforward mechanism or one with additional features like a built-in hair catcher? Consider your priorities and select accordingly.
By taking into account the different types of drain stoppers, compatibility with your bathtub’s drain, and other essential factors, you can confidently choose the right replacement drain stopper. Remember to measure accurately and carefully read the product specifications to ensure a hassle-free installation process.
Step 1: Preparing The Bathtub Drain
When it comes to installing a bathtub drain stopper, the first step is crucial – preparing the bathtub drain. This involves cleaning the drain area and applying plumber’s putty to the bottom of the drain flange. Follow these simple steps to ensure a smooth and successful installation.
Cleaning the Drain Area
Cleaning the drain area is an essential part of preparing the bathtub drain for the installation of a new stopper. Here’s how you can do it:
- Start by removing any debris or hair that may have accumulated in the drain. Use a wire hanger or a drain snake to clear any blockage.
- Next, use a scrub brush or a toothbrush to clean the drain opening thoroughly. Make sure to remove any residue or grime that may have built up over time.
- Rinse the drain area with warm water to ensure it is clean and free from any leftover debris.
Applying Plumber’s Putty to the Bottom of the Drain Flange
Once the drain area is clean, it’s time to apply plumber’s putty to the bottom of the drain flange. Plumber’s putty is a versatile and waterproof sealant that helps create a watertight seal around the drain. Follow these steps to apply it correctly:
- Take a small amount of plumber’s putty and roll it into a rope-like shape.
- Place the putty around the bottom edge of the drain flange, ensuring complete coverage.
- Press the drain flange firmly into the drain opening, making sure it sits flush against the bathtub surface.
- Remove any excess putty around the edges of the drain flange.
It’s important to note that plumber’s putty should not be used with certain materials, such as certain types of plastic or rubber. Be sure to check the manufacturer’s instructions before applying the putty. Additionally, properly sealing the drain flange will prevent any leaks from occurring.
In conclusion, preparing the bathtub drain is the first step in installing a new bathtub drain stopper. By cleaning the drain area and applying plumber’s putty to the bottom of the drain flange, you’ll create a solid foundation for the rest of the installation process.
Step 2: Installing The Drain Flange
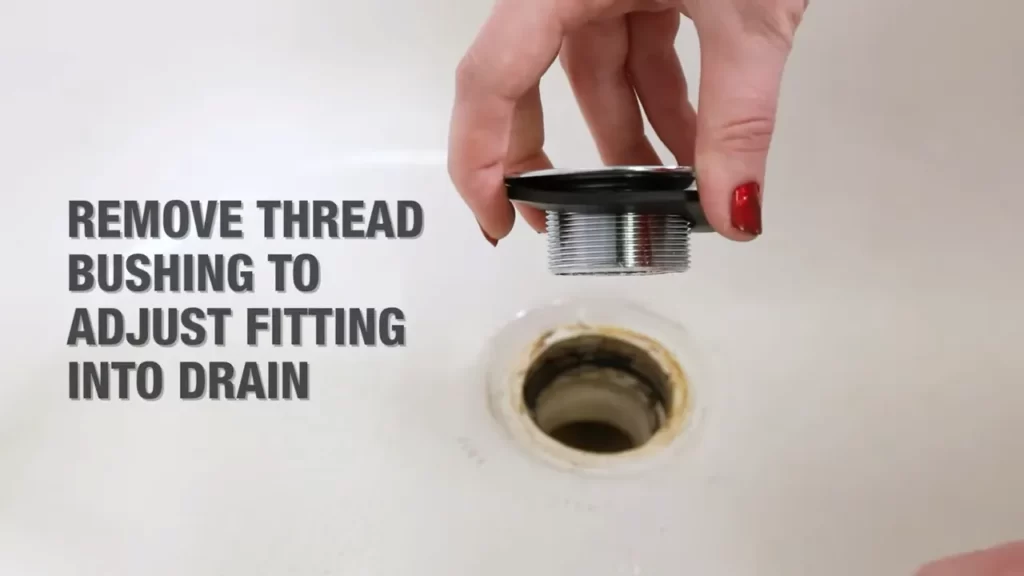
Once you have prepared the drain hole, it’s time to move on to the next step: installing the drain flange. The drain flange is an important component that helps seal the drain and prevents water leakage. Proper installation is key to ensuring a tight fit and preventing any future plumbing issues. In this step, we will guide you through the process of inserting the drain flange into the drain hole and tightening it using adjustable pliers.
Inserting the drain flange into the drain hole
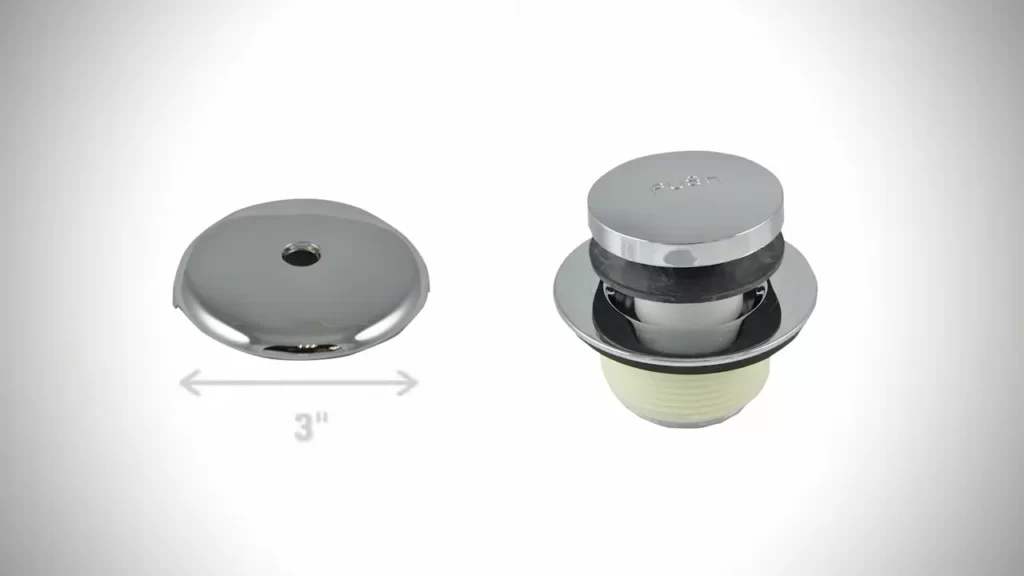
To start, make sure you have the drain flange ready. The drain flange typically consists of two parts: the outer flange that sits on top of the drain hole and the inner flange that connects to the bottom of the bathtub. Here’s how you insert the drain flange into the drain hole:
1. Take the outer flange and place it over the drain hole. Ensure that it sits flush with the surface of the bathtub.
2. Align the screw holes on the outer flange with the corresponding holes on the drain hole. This will allow you to secure the flange tightly later on.
3. Gently press the outer flange down to insert it into the drain hole. Make sure it fits snugly.
4. If needed, use a rubber mallet to tap the outer flange lightly, helping it settle into the drain hole. Be careful not to apply too much force, as it may damage the flange or the bathtub surface.
Tightening the drain flange with adjustable pliers
Now that the drain flange is inserted into the drain hole, it’s time to tighten it securely. For this step, you’ll need a pair of adjustable pliers. Follow these steps to tighten the drain flange effectively:
1. Place the adjustable pliers on the outer edges of the drain flange, ensuring a firm grip.
2. Begin turning the pliers clockwise to tighten the drain flange. Apply steady pressure, but avoid excessive force, as it may cause the flange to crack or break.
3. Continue tightening the drain flange until it is secure. Ensure that it is firmly attached to the bathtub and does not wobble.
4. Once the drain flange is tightened, check if it is aligned properly with the bathtub surface. Make any necessary adjustments to ensure a uniform appearance.
Congratulations, you have successfully installed the drain flange! With this essential component in place, your bathtub drain is now ready for the next step in the installation process. Stay tuned for Step 3, where we will guide you through installing the bathtub drain stopper, bringing you one step closer to a fully functional bathtub.
Step 3: Connecting The Linkage To The Overflow Cover
Attaching the linkage to the new drain stopper
To successfully connect the linkage to the overflow cover, you first need to attach it to the new drain stopper. This step is crucial in ensuring that the stopper is properly connected to the mechanism that opens and closes it. Here’s how you can do it:
- Start by finding the small hole on the bottom of the drain stopper.
- Take the linkage and insert it into the hole, making sure it is securely attached.
- Some drain stoppers may require you to twist or turn the linkage to lock it in place. If this is the case, follow the instructions provided with the specific drain stopper you are installing.
Inserting the linkage through the overflow drain opening
Once you have successfully attached the linkage to the drain stopper, the next step is to insert it through the overflow drain opening. This is where the linkage will connect to the overflow cover. Follow these steps to complete this part of the installation:
- Locate the overflow drain opening, which is usually located below the bathtub spout.
- Insert the linkage through the opening, ensuring that it goes all the way through.
- Make sure the linkage is straight and not bent or kinked. If necessary, adjust it before moving on to the next step.
Securing the linkage to the overflow cover
The final step in connecting the linkage to the overflow cover involves securing it in place. This ensures that the drain stopper will operate correctly when you want to open or close it. Follow these steps to complete the installation:
- Align the linkage with the holes on the overflow cover.
- Insert the linkage into the holes, ensuring a snug fit.
- Depending on the type of overflow cover you have, there may be screws or other mechanisms to secure the linkage in place. Follow the manufacturer’s instructions to secure the linkage properly.
Once you have completed these steps, your bathtub drain stopper should be properly connected to the overflow cover. You can now test it by opening and closing the stopper to ensure it functions correctly. If you encounter any issues, refer to the manufacturer’s instructions or seek professional help.
Step 4: Installing The Drain Stopper Assembly
Now that you have successfully removed the old drain stopper assembly, it’s time to install the new one. This step is crucial in ensuring a properly functioning and leak-free bathtub drain. Follow the steps below to complete the installation.
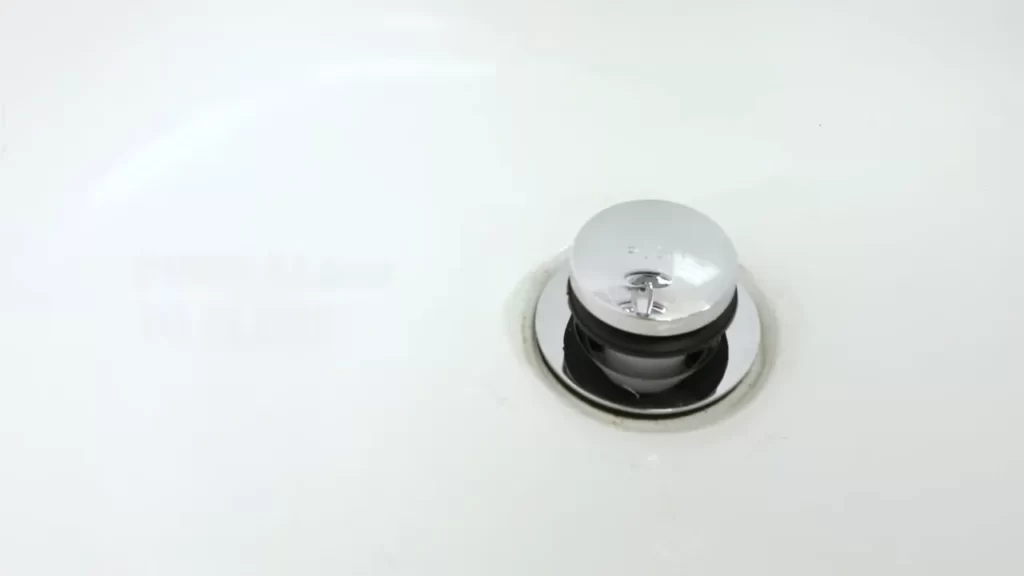
Placing the drain stopper assembly into the drain flange
Begin by taking the new drain stopper assembly and inserting it into the drain flange. Make sure it fits securely and is centered properly.
If your drain stopper assembly comes with a gasket or rubber washer, place it over the drain flange before inserting the assembly. This will help create a watertight seal.
Checking the movement of the drain stopper
After placing the drain stopper assembly, it’s important to test its movement to ensure it opens and closes smoothly. Pull up on the stopper lever or turn the knob, depending on the type of drain stopper you have installed.
Observe if the stopper moves freely without any resistance. If you encounter any difficulties or the stopper doesn’t move as expected, proceed to the next step for adjustments.
Adjusting the linkage if necessary
If you find that the drain stopper’s movement is restricted or it doesn’t seal the drain completely, adjustments may be necessary. Luckily, most drain stopper assemblies come with a linkage system that allows for easy adjustments.
Using a pair of pliers, locate the linkage under the bathtub and adjust its position to ensure the stopper moves freely and tightly seals the drain when closed.
Once the linkage is properly adjusted, test the movement of the drain stopper again to ensure it functions smoothly.
Remember, a properly installed and functioning drain stopper assembly is essential in maintaining the integrity of your bathtub drain system. By following these simple steps, you’ll be able to install and adjust the drain stopper assembly with ease.
Testing And Troubleshooting
Once you have successfully installed your new bathtub drain stopper, it’s crucial to test it for proper functioning. This step will ensure that your drain stopper operates correctly and doesn’t cause any issues in the future. In this section, we will guide you on how to check for proper functioning, how to adjust the drain stopper if it does not operate correctly, and common troubleshooting tips to resolve any issues that may arise.
Checking for Proper Functioning of the New Drain Stopper
After installing the new drain stopper, it’s important to make sure it functions as intended. Here is a simple step-by-step guide to checking its functionality:
- Fill the bathtub with water, ensuring that the water level reaches above the drain stopper.
- Activate the drain stopper by pushing it down or turning it to the closed position.
- Observe whether the drain stopper effectively seals the drain, preventing any water from escaping.
- Let the water sit for a few minutes to ensure the drain stopper maintains a tight seal. If water starts to leak out, proceed to the next section on adjusting the drain stopper.
- Activate the drain stopper again to open the drain and allow the water to flow out. Ensure the drain stopper provides a clear opening for effective drainage.
Adjusting the Drain Stopper if it Does Not Operate Correctly
If you have observed any issues during the functionality test, it might be necessary to make adjustments to the drain stopper. Here are the steps you should follow:
- Carefully remove the drain stopper from the bathtub drain.
- Inspect the stopper for any visible obstructions, buildup, or damage. Clean or replace the stopper if necessary.
- If the stopper is adjustable, check the position of the stopper adjustment mechanism and ensure it is set correctly.
- Reinstall the drain stopper back into the bathtub drain, making sure it is aligned properly.
- Repeat the testing steps mentioned earlier to check if the adjustments have resolved the issue. If not, move on to the troubleshooting section.
Troubleshooting Common Issues with Bathtub Drain Stoppers
If you encounter any issues with your bathtub drain stopper, here are some common troubleshooting tips:
| Issue | Troubleshooting Tips |
|---|---|
| The drain stopper doesn’t seal properly and allows water to escape. | Ensure the stopper is clean and free from any debris. Check for proper alignment of the stopper in the drain. Adjust or replace the stopper if necessary. |
| The drain stopper is difficult to open or close. | Apply a lubricating agent, such as WD-40, to the moving parts of the stopper mechanism. If the issue persists, consider replacing the stopper. |
| Water drains slowly or not at all. | Clear any clogs or debris from the drain or stopper assembly. Use a plunger or a drain snake to remove any blockages. If the problem persists, consult a professional plumber. |
By following these testing, adjusting, and troubleshooting steps, you can ensure that your bathtub drain stopper operates smoothly and effectively. Don’t hesitate to reach out to a professional if you encounter any persistent issues or require further assistance.
Maintenance Tips For Longevity
Proper maintenance of your bathtub drain stopper is crucial for ensuring its longevity and smooth operation. By following these simple maintenance tips, you can keep your drain stopper functioning efficiently for years to come.
Regularly Cleaning the Drain Stopper and Surrounding Area
Regular cleaning of the drain stopper and the surrounding area is vital to prevent the accumulation of debris and soap residue. This not only helps in maintaining optimal performance but also prevents unpleasant odors from forming. To clean the drain stopper:
- Gently remove the stopper by unscrewing it or lifting it, depending on the type of stopper you have.
- Use a soft cloth or sponge to wipe away any dirt, hair, or grime that has accumulated on the stopper and around the drain area.
- Rinse the stopper thoroughly with warm water to remove any remaining residue.
- Once clean, dry the stopper and reattach it to the drain.
Avoiding the Use of Harsh Chemicals That May Damage the Stopper
Harsh chemicals, such as bleach or drain cleaners, can cause damage to your bathtub drain stopper over time. Avoid using these chemicals as they can corrode the stopper’s materials or cause it to deteriorate. Instead, opt for natural cleaning solutions:
- Mix equal parts of vinegar and water in a spray bottle. Spray the solution directly onto the drain stopper, let it sit for a few minutes, and then wipe it clean with a cloth.
- Baking soda can also be effective in removing stubborn grime. Sprinkle some baking soda onto the stopper, scrub gently with a soft brush, and rinse thoroughly.
Inspecting and Replacing Any Worn-out Parts as Needed
Regular inspection of your bathtub drain stopper is crucial to identify any worn-out or damaged parts that may impact its effectiveness. Inspect the stopper periodically and look for signs of wear, such as cracks, discolouration, or loose connections. If any parts are damaged or worn-out, it is important to replace them promptly to avoid further issues. Consult the manufacturer’s instructions or seek the help of a professional if needed.
Maintaining your bathtub drain stopper doesn’t require much effort but can significantly extend its lifespan. By following these maintenance tips, you can enjoy a smooth and hassle-free bathroom experience for years to come.
Frequently Asked Questions
How Do You Put A Drain Stopper Back In A Bathtub?
Inserting a drain stopper in a bathtub is simple. First, remove the stopper by pulling it up or unscrewing it. Then, align the stopper over the drain opening and push it down firmly until it fits snugly. Voila! Your drain stopper is back in place.
Why Won T My Bath Plug Stay Down?
There are a few reasons why your bath plug won’t stay down. It could be due to a clogged drain, worn out plug mechanism, or a faulty seal. To fix the issue, try cleaning the drain, replacing the plug mechanism, or adjusting the seal.
How Do You Install A Push Up Tub Drain?
To install a push-up tub drain, follow these steps: 1. Begin by removing the old drain and cleaning the area. 2. Apply plumber’s putty to the flange of the new drain. 3. Insert the drain into the drain hole and tighten the locking nut underneath.
4. Connect the overflow cover to the drain. 5. Finally, test the drain to ensure proper installation.
How Does A Pop Up Bathtub Drain Stopper Work?
A pop-up bathtub drain stopper works by utilizing a lever mechanism connected to the overflow plate. When the lever is pressed down, the stopper rises, allowing water to drain through the bathtub’s drain opening. When the lever is released, the stopper lowers, sealing the drain and preventing water from escaping.
Conclusion
To sum up, installing a bathtub drain stopper is a simple yet essential task for any homeowner. By following the step-by-step guide provided in this blog post, you can ensure a smooth and hassle-free process. Remember to gather all the necessary tools, take precautions, and refer to the manufacturer’s instructions if needed.
With a functional drain stopper, you’ll be able to enjoy relaxing baths without any worries. Happy plumbing!