To install a towel bar, start by locating the wall studs and marking the desired height for the bar. Then, use a drill to create pilot holes, insert wall anchors, and secure the mounting brackets.
Finally, attach the towel bar to the brackets and tighten the screws.
The Benefits Of Installing A Towel Bar In Your Bathroom
When it comes to creating an organized and functional bathroom, one small addition can make a big difference – installing a towel bar. Not only does a towel bar help create a clean and tidy space, but it also offers several benefits that can enhance your daily routine. From maximizing space utilization to preventing towels from developing a musty smell, a towel bar is an essential addition to any bathroom. Let’s explore these benefits in detail:
Maximize space utilization
One of the primary benefits of installing a towel bar in your bathroom is maximizing space utilization. Bathrooms often have limited space, and finding a spot to hang towels can be a challenge. Installing a towel bar allows you to make the most of your available wall space, freeing up valuable shelf and counter space for other bathroom essentials. By utilizing vertical space, you can keep your towels within reach without sacrificing precious storage.
Keep towels organized and easily accessible
Another advantage of having a towel bar in your bathroom is keeping your towels organized and easily accessible. Instead of leaving your towels crumpled and scattered around, a towel bar provides a designated spot for each towel. This not only keeps your bathroom neat and tidy but also makes it effortless to find the towel you need, when you need it. Whether you prefer to hang your towels individually or neatly folded, a towel bar gives you the flexibility to organize them according to your preference.
Prevent towels from developing a musty smell
We all know how unpleasant it is when towels develop a musty smell. By installing a towel bar, you can prevent this issue and ensure that your towels remain fresh and clean. Hanging wet towels on a towel bar allows them to air dry properly, preventing the growth of mold and mildew that cause that unpleasant odor. This not only extends the lifespan of your towels but also ensures that they are ready for use whenever you need them.
By taking advantage of the benefits of installing a towel bar in your bathroom, you can create a space that is functional, organized, and pleasant to use. Maximize your space utilization, keep your towels organized and easily accessible, and say goodbye to musty towel smells. Installing a towel bar is a simple yet effective way to improve your bathroom experience.

Different Types Of Towel Bars Available
When it comes to adding a towel bar to your bathroom, you have several options to choose from. Each type of towel bar serves a specific purpose and can enhance the functionality and aesthetics of your bathroom. In this section, we will explore the different types of towel bars available, including single towel bars, double towel bars, wall-mounted towel bars, and freestanding towel bars.
Single Towel Bars
A single towel bar is the most common type of towel bar found in bathrooms. It consists of a single rod attached to the wall, allowing you to hang one towel at a time. Single towel bars are typically installed near the sink or shower for easy access to hand towels or bath towels. They come in a variety of materials, including chrome, stainless steel, and brass, to suit different bathroom styles. Whether you prefer a sleek and modern look or a vintage-inspired design, there is a single towel bar to suit your taste.
Double Towel Bars
If you have a larger family or simply need more space to hang your towels, a double towel bar might be the perfect solution. As the name suggests, a double towel bar consists of two rods mounted parallel to each other. This allows you to hang multiple towels simultaneously, making it ideal for shared bathrooms or households with multiple family members. Double towel bars are available in various lengths and finishes, enabling you to find the perfect match for your bathroom decor.
Wall-Mounted Towel Bars
Wall-mounted towel bars are the most popular and conventional option for installing a towel bar in your bathroom. These towel bars are attached directly to the wall using screws or adhesive, providing a sturdy and permanent solution. Wall-mounted towel bars can be installed at any height, making them suitable for both adults and children. They are available in a range of styles, including modern, traditional, and minimalist designs, allowing you to personalize your bathroom space.
Freestanding Towel Bars
If you prefer a more flexible and versatile option, a freestanding towel bar might be the right choice for you. Freestanding towel bars do not require any installation and can be moved around as needed. They typically consist of a sturdy base and an adjustable rod, allowing you to hang towels at different heights. Freestanding towel bars are a great option for those who want to add towel storage to their bathroom without drilling into the walls. They come in various materials and styles, making it easy to find one that complements your bathroom decor.
Essential Tools Needed For Installation
Installing a towel bar in your bathroom is a simple and rewarding DIY project. To ensure a successful installation, you will need a few essential tools. In this section, we will discuss the tools required to complete the job efficiently.
Drill
A drill is a crucial tool for installing a towel bar securely. It allows you to create pilot holes and attach the bar firmly to the wall. When selecting a drill, consider the size of the holes needed for the chosen towel bar and ensure that the drill bits match those specifications.
Screwdriver
Another essential tool for installing a towel bar is a screwdriver. You will use it to drive the screws into the wall, holding the towel bar in place. Make sure to choose a screwdriver that matches the type and size of screws included with your towel bar.
Level
A level is necessary to ensure that your towel bar is installed straight. It helps you avoid a tilted or uneven appearance, providing a professional and finished look. Place the level on top of the bar to ensure it is perfectly horizontal before securing it to the wall.
Measuring Tape
Accurate measurements are crucial for proper towel bar installation. A measuring tape allows you to determine the precise placement and spacing of your towel bar. Measure the distance between the mounting brackets to ensure they are aligned correctly and provide adequate support.
By using these essential tools, you can confidently install a towel bar in your bathroom. Keep them handy and follow the manufacturer’s instructions for a successful and secure installation.
Required Materials For Installing A Towel Bar
Before you can hang up your new towel bar, it’s important to gather all the necessary materials. This will ensure a smooth and successful installation process. Below, we’ve compiled a list of the essential items you’ll need:
Towel bar
The first item on our list is, of course, the towel bar itself. This may seem obvious, but it’s crucial to choose a towel bar that suits your preferences and matches the overall style of your bathroom. Whether you opt for a sleek and modern design or a more traditional look, make sure to select a towel bar that meets your aesthetic needs.
Mounting brackets
Mounting brackets are an essential component for installing a towel bar. These brackets provide the necessary support to keep the towel bar securely in place and prevent it from falling off the wall. When selecting mounting brackets, ensure they are compatible with the towel bar you have chosen.
Mounting screws
Mounting screws are the hardware that will secure the mounting brackets to the wall. It is crucial to select screws that are suitable for the type of wall material you are working with. Different walls require different types of screws, such as wood screws for wooden walls or drywall screws for drywall surfaces. Be sure to use the appropriate screws to ensure a secure and lasting installation.
Wall anchors
Wall anchors are particularly important if you are installing a towel bar on a hollow wall such as drywall. These anchors provide extra stability and support, preventing the towel bar from coming loose over time. Choosing the right type of wall anchor is essential, as it should match the weight capacity of your towel bar and the type of wall you are working with.
By gathering all these materials before you begin, installing your new towel bar will be a breeze. Whether you’re updating your bathroom’s style or simply looking for a reliable place to hang your towels, a towel bar is a versatile and practical addition. So, let’s dive into the installation process and get started!
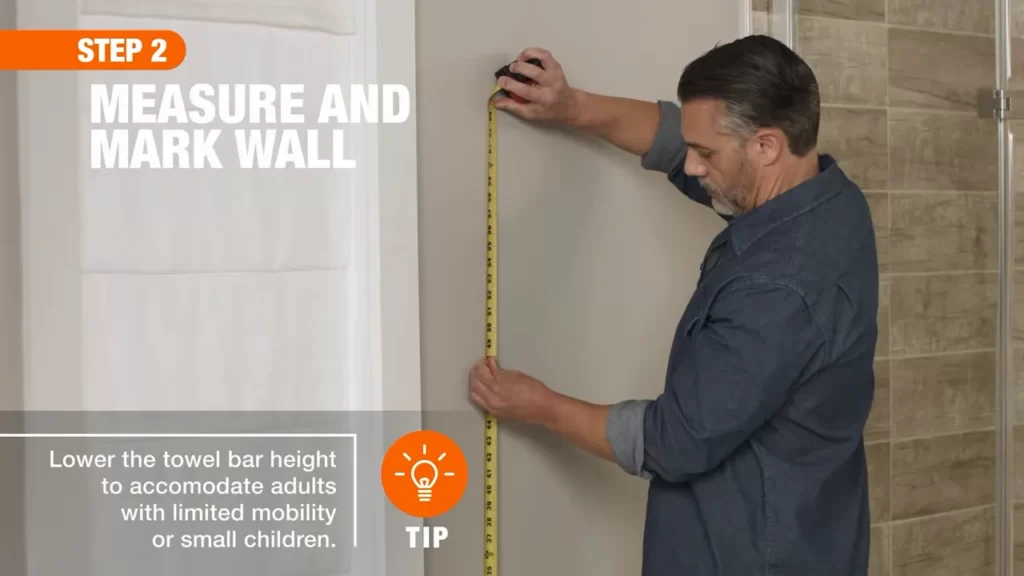
1. Measuring And Marking
When it comes to installing a towel bar, the first step is to measure and mark the desired height on the wall. By carefully following this process, you can ensure that the towel bar is positioned at the perfect height for easy access and convenience. Here’s a step-by-step guide on how to measure and mark the height for your towel bar installation.
Measure and mark the desired height for the towel bar on the wall
Start by determining the ideal height for your towel bar. Consider factors such as the height of the users and the length of the towel. A typical height for a towel bar is around 48 inches from the floor. However, you can adjust this height based on personal preference and your specific needs.
Once you have decided on the height, use a tape measure to measure and mark the desired position on the wall. Measure from the floor or an adjacent fixture, such as a countertop or sink. Ensure that the mark is level and straight.
Ensuring accuracy
To ensure accuracy, double-check the measurements before proceeding. Use a level to make sure that the mark is perfectly straight. Adjust if necessary.
In addition to height, you should also consider the spacing between multiple towel bars if you plan to install more than one. The general rule of thumb is to leave at least 12 inches of space between each bar to allow for easy hanging and drying of towels.
If your towel bar comes with a template, you can use it to mark the screw holes on the wall as well. Align the template with the height mark and tape it securely in place. Then, use a pencil to mark the locations of the screw holes through the pre-drilled template holes. This will make the installation process even more precise and hassle-free.
Once you have completed the measuring and marking step, you are now ready to move on to the next phase of the towel bar installation process. This includes drilling the holes, attaching the mounting brackets, and securing the towel bar in place. By following each step diligently, you can successfully install a towel bar that not only enhances the functionality of your bathroom but also adds a touch of style to the space.
2. Preparing The Mounting Brackets
Now that you have gathered all the necessary tools and materials, it’s time to move on to the next step: preparing the mounting brackets for your new towel bar installation. This crucial step ensures that your towel bar is securely attached to the wall, providing a stable and functional addition to your bathroom. In this section, we will guide you through the process step by step, so let’s get started!
Attach the mounting brackets to the wall according to the marked measurements
The first step in preparing the mounting brackets is to attach them to the wall. But before you grab your tools, double-check that you have marked the measurements correctly to ensure that your towel bar is installed at the desired height.
Now, let’s dive into attaching the mounting brackets. Follow these simple instructions:
- Carefully place one of the mounting brackets against the wall at the marked height, ensuring it is level.
- With a pencil, mark the screw holes of the bracket on the wall for easy reference.
- Repeat the same process for the second mounting bracket, making sure it is aligned with the first one.
- Now that both brackets are in place, remove them from the wall and set them aside momentarily.
By attaching the mounting brackets according to the marked measurements, you ensure that your towel bar will be installed correctly and will serve its purpose effectively. Remember to maintain a level position to prevent any imbalance in the final installation.
With the mounting brackets securely in place, you are now one step closer to completing your towel bar installation. Take a moment to appreciate the progress you have made so far!
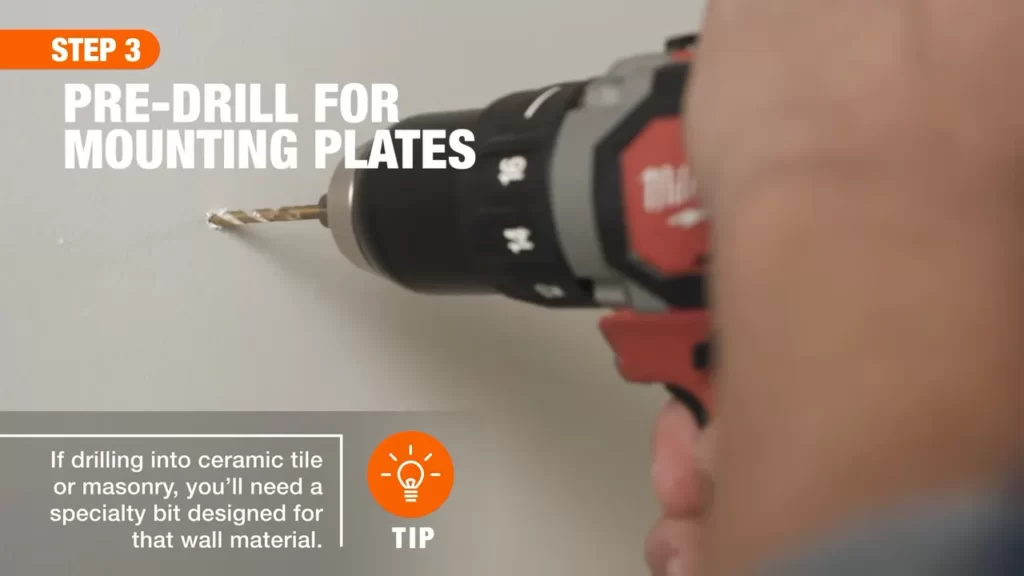
3. Installing Wall Anchors (If Necessary)
If you are installing a towel bar on a drywall or any other surface that lacks sufficient anchor points, it is crucial to utilize wall anchors for added stability. Wall anchors act as a support system, ensuring that your towel bar remains securely attached to the wall even when it bears weight. Follow the steps below to successfully install wall anchors:
- Measure and mark the location: Prior to installing the wall anchors, accurately measure the spacing between the mounting holes on the towel bar. Use a tape measure or ruler to mark the exact positions on the wall where you intend to insert the anchors.
- Choose suitable wall anchors: There are various types of wall anchors available in the market, such as plastic anchors, toggle bolts, or expansion anchors. Consider the weight of the towel bar and choose wall anchors that can handle the load.
- Prep the wall: Clear the designated areas of any debris, dust, or paint drips. Make sure the surface is clean and smooth for proper adherence of the wall anchors and the towel bar.
- Drill pilot holes: With the help of an electric drill and an appropriate drill bit, carefully drill pilot holes at the marked locations on the wall. The size of the pilot hole should match the diameter of the wall anchors you are using.
- Install the wall anchors: Gently tap the wall anchors into the pilot holes using a hammer. Ensure that they are inserted firmly, flush with the wall surface. If using expansion anchors, follow the manufacturer’s instructions on tightening or expanding them properly.
- Attach the towel bar: Once the wall anchors are securely in place, align the mounting holes of the towel bar with the wall anchors. Insert and tighten the screws provided with the towel bar into the anchors, using either a screwdriver or an appropriate drill bit.
- Ensure stability: Give the installed towel bar a gentle tug to ensure that it is securely attached to the wall. If it feels wobbly, check the tightness of the screws and make necessary adjustments.
Installing wall anchors when necessary provides the much-needed stability to your towel bar, preventing it from coming loose or potentially causing damage to your wall. By following these steps, you can confidently complete the installation process and enjoy a secure and functional towel bar in your bathroom.
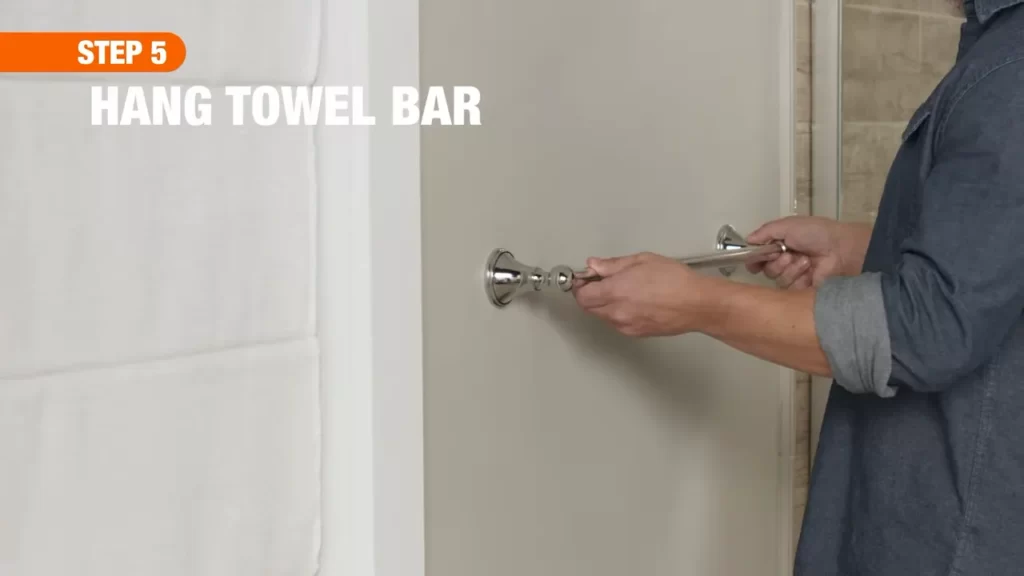
4. Attaching The Towel Bar
Once you have prepared the wall and mounted the brackets, it’s time to attach the towel bar. Follow these simple steps to ensure proper installation:
- Align the towel bar with the mounting brackets: Place the towel bar over the mounting brackets, ensuring that it is positioned correctly. Take a moment to double-check the alignment and make any necessary adjustments. It’s important to ensure that the towel bar is centered and level on the wall, providing a balanced and aesthetically pleasing look.
- Secure with screws: Using a screwdriver or an appropriate power tool, start attaching the towel bar to the brackets. Insert the screws into the holes on the underside of the towel bar and tighten them until the bar is securely fastened. Be sure not to overtighten the screws, as this could damage the towel bar or the mounting brackets. It’s always a good idea to follow the manufacturer’s instructions for the specific towel bar you are installing.
By aligning the towel bar with the mounting brackets and securing it with screws, you can ensure a sturdy and reliable installation. Preventing any unnecessary movement or wobbling, your towel bar will be ready to withstand the everyday use of hanging towels and adding convenience to your bathroom.
5. Checking For Level
One of the most important steps when installing a towel bar is to ensure that it is straight and level. A towel bar that is not level can create an imbalance in the bathroom and make it look unprofessional. Here are some simple steps to follow to check for level:
Use a level to ensure the towel bar is straight and adjust if necessary
After attaching the towel bar brackets to the wall, it’s time to check if they are level. A level is a tool that has a bubble in the middle. The goal is to get the bubble to be centered between the two lines in the level. Here is how you can use a level to check if the towel bar is straight:
- Place the level on top of the towel bar. Make sure it is positioned horizontally.
- Check the bubble in the level. If it is centered between the two lines, then your towel bar is level.
- If the bubble is not centered, you will need to make adjustments to the towel bar brackets.
Here are a few things you can do to adjust the towel bar and make it level:
- Loosen the screws on the towel bar brackets, allowing you to make small adjustments.
- Use a level to guide you as you reposition the brackets.
- Tighten the screws once the towel bar is level.
Remember, it’s important to regularly check the level of the towel bar while making adjustments to ensure it remains straight.
By following these steps, you can feel confident that your towel bar is correct and level, adding a professional touch to your bathroom.
6. Finalizing The Installation
Now that you have successfully hung your towel bar and followed the necessary steps, it’s time to finalize the installation. This includes tightening all screws and ensuring that the towel bar is securely attached to the wall. By doing this, you can be confident that your towel bar will stay in place and provide the convenience you need in your bathroom.
Follow these simple steps to complete the finalization of your towel bar installation:
- Tighten all screws: Using a screwdriver or a appropriate screwdriver bit, make sure to tighten all screws on the towel bar. This will ensure that the bar is firmly attached to the wall and won’t wobble or come loose over time. It’s important to check each screw, including those holding the mounting brackets and any decorative end pieces, to make sure they are properly tightened.
- Securely attach the towel bar to the wall: After tightening all screws, gently give the towel bar a small tug to ensure it is securely attached to the wall. If you feel any movement or notice that it is not tightly secured, go back and recheck the screws. It’s better to take the time to make sure everything is secure now rather than having to fix it later.
- Inspect for any gaps or unevenness: Once you have tightened the screws and ensured that the towel bar is secure, take a step back and visually inspect the installation. Look for any gaps between the towel bar and the wall or any unevenness in the alignment. If you notice any issues, gently adjust the towel bar to correct them. This will not only enhance the aesthetic appearance but also prevent any potential hazards.
By following these final steps, you can ensure that your towel bar is properly installed and will serve its purpose effectively. Remember, a well-installed towel bar adds both functionality and a touch of style to your bathroom. Enjoy the convenience of having your towels easily accessible while adding a finishing touch to your bathroom decor.
Choose The Right Location
When it comes to installing a towel bar in your bathroom, one of the most important considerations is choosing the right location. The placement of your towel bar can greatly impact its convenience and accessibility, making it essential to carefully assess your options before proceeding with the installation. In this section, we will discuss some key factors to keep in mind when deciding where to install your towel bar.
Consider the Size of the Bathroom
The size of your bathroom plays a crucial role in determining the ideal location for your towel bar. If you have a smaller bathroom, you will want to choose a spot that maximizes available space while providing easy access to your towels. Consider areas such as the back of the door or a narrow wall that is not obstructed by other fixtures. On the other hand, if you have a spacious bathroom, you have more flexibility in terms of placement. You could opt for a prominent spot on the wall, closer to the shower or bathtub, for added convenience.
Evaluate the Distance from Shower or Bathtub
When deciding on the placement of your towel bar, it’s important to evaluate its distance from the shower or bathtub. Ideally, you want your towel bar to be within arm’s reach of these areas to ensure quick and easy access to your towel after bathing. Placing the towel bar too far away could be inconvenient and require you to take unnecessary steps, especially when you are wet. Be sure to measure the distance carefully and consider the layout of your bathroom to find the most suitable location.
Take into Account Preferences and Usage
Consider your personal preferences and usage patterns when determining the location of your towel bar. Think about how you use your bathroom and where it would be most convenient to have your towel within reach. Do you prefer to hang your towel before entering the shower, or do you prefer to have it easily accessible as you exit? Identifying your preferences will help you choose a location that aligns with your specific needs and enhances your overall bathroom experience.
Ensure Proper Wall Mounting
Lastly, when installing your towel bar, ensure proper wall mounting. It is essential to install the towel bar securely, so it can withstand the weight of wet towels. Use measuring tape to mark the desired height and ensure the bar is level before drilling holes. Anchor the towel bar securely to the wall using appropriate screws or anchors, depending on the type of wall material. By taking the time to mount the towel bar correctly, you can avoid any future issues with stability and ensure its longevity.
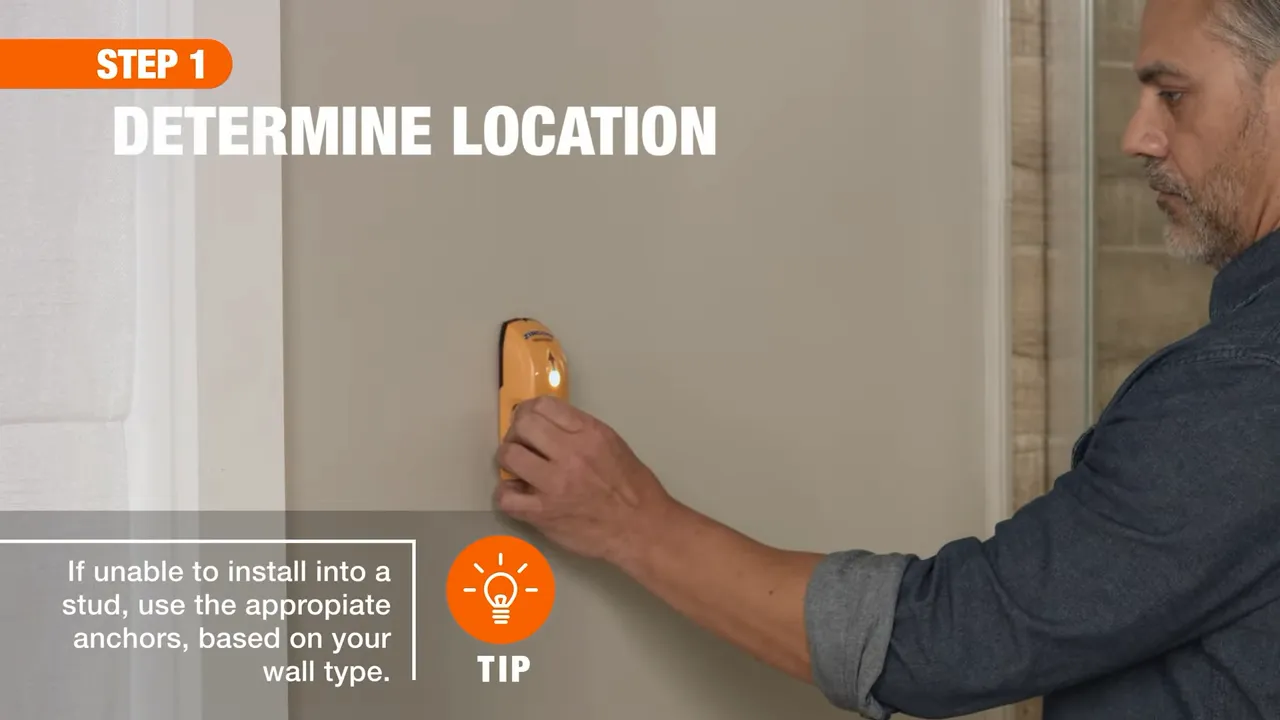
Use A Stud Finder
If possible, locate the wall studs for extra strength and stability when installing the towel bar
When it comes to installing a towel bar, ensuring proper attachment to the wall is crucial for its strength and stability. That’s where a stud finder comes in handy. Using a stud finder allows you to locate the wall studs, which are vertical wooden beams behind the drywall that provide substantial support. By securing your towel bar to these studs, you’ll enhance its durability and prevent any accidental damage.
Here’s a step-by-step guide on how to use a stud finder to locate the wall studs:
Step 1: Prepare the stud finder
- Start by reading the instructions manual of your stud finder to familiarize yourself with its features and operation.
- Insert fresh batteries if necessary to ensure optimal performance.
- Place the stud finder on a flat surface and let it calibrate according to the manufacturer’s instructions.
Step 2: Begin scanning the wall
Now that your stud finder is ready, it’s time to start scanning the wall to locate the studs. Follow these steps:
- Hold the stud finder against the wall, ensuring that it is parallel to the floor or ceiling.
- Activate the scanning mode on your stud finder. This may involve pressing a button or sliding a switch.
- Slowly move the stud finder horizontally across the wall surface, maintaining steady contact.
- Pay attention to the stud finder’s indicators, such as lights, beeps, or visual displays. They will alert you when a stud is detected.
- Mark the location of each stud using a pencil or masking tape.
Keep in mind that stud finders may differ in their features and functionality. Some models may offer additional options or enhanced accuracy, so consulting the manual provided by the manufacturer is always beneficial.
Additional tips
To ensure the success of your towel bar installation, consider the following:
- If your stud finder fails to locate any studs, try scanning the adjacent area as studs are typically spaced 16 to 24 inches apart.
- If your towel bar is wider than the distance between two adjacent studs, you may need to install additional support, such as a wall anchor, to provide stability.
- It’s recommended to double-check the stud locations by measuring from the corner of the wall or using other techniques like tapping lightly on the wall to listen for a solid sound.
- Before drilling, ensure you have the necessary tools and hardware for proper installation, including a drill, drill bit, screws, and a level.
By taking the time to use a stud finder and locate the wall studs, you’ll be able to install your towel bar with confidence, knowing it will withstand the weight and usage over time. Remember, a sturdy towel bar not only adds functionality to your bathroom but also enhances its aesthetic appeal.
Avoid Over-Tightening Screws
When it comes to installing a towel bar, one important aspect to keep in mind is to avoid over-tightening the screws. This is crucial as over-tightening can lead to damage to the mounting brackets or even the wall surface, making your installation less secure and potentially causing unnecessary repairs. To ensure a successful and durable installation, here are some key points to keep in mind:
1. Use gentle force: While it might be tempting to use excessive force when tightening the screws, it is important to remember that towel bars are not meant to hold a significant amount of weight. Applying too much force can damage the mounting brackets, causing them to bend or break. Instead, use gentle force while tightening the screws to ensure a secure but not overly tight fit.
2. Check for stability: As you tighten the screws, periodically check the stability of the towel bar to ensure that it is securely attached to the wall. If you notice any wobbling or instability, it may be a sign that the screws are too loose. Take the time to adjust the tightness of the screws until the towel bar feels stable and secure.
3. Use a level: Before tightening the screws, make sure that the towel bar is level. Using a level ensures that the towel bar is installed correctly and will hang straight. Once you have confirmed that it is level, proceed with tightening the screws gradually and evenly. Tightening the screws in a balanced manner helps distribute the pressure evenly, reducing the risk of damage.
4. Consider wall type: The type of wall surface you are working with can also impact the amount of force you should apply when tightening the screws. For example, if you are installing the towel bar on a drywall, be cautious as it is more susceptible to damage. In this case, it may be beneficial to use drywall anchors to provide additional support and prevent damage caused by over-tightening.
By keeping these points in mind, you can avoid over-tightening the screws when installing a towel bar, ensuring a secure and long-lasting installation. Remember to use gentle force, periodically check for stability, use a level to ensure proper alignment, and consider the type of wall surface you are working with. Taking these precautions will help protect your mounting brackets and wall surface from damage, while also providing a reliable and attractive towel bar for your bathroom.
Regularly Check And Tighten
It’s important to regularly check the screws and brackets of your towel bar to ensure that it remains securely attached to the wall. Over time, constant use and everyday wear and tear can cause the towel bar to become loose, which can not only be frustrating but can also pose a safety risk. By taking a few minutes every couple of months to check and tighten the screws and brackets, you can prevent any accidents and ensure that your towel bar stays in place.
Here’s a simple step-by-step guide on how to regularly check and tighten your towel bar:
Step 1: Gather the Necessary Tools
Before you begin, make sure you have the necessary tools on hand. You will need a screwdriver and possibly an adjustable wrench, depending on the type of towel bar you have. It’s also a good idea to have a small container or bag to collect any loose screws or brackets that may need to be replaced.
Step 2: Inspect the Screws and Brackets
Start by carefully inspecting the screws and brackets of your towel bar. Look for any signs of damage or wear, such as rust or stripped screws. If you notice any issues, it’s important to replace the necessary parts before proceeding.
Step 3: Tighten the Screws
Using a screwdriver or adjustable wrench, begin tightening any loose screws found on the towel bar brackets. Start from one end and work your way to the other, ensuring that each screw is securely tightened.
Step 4: Check the Brackets
After tightening the screws, check the brackets themselves to ensure that they are still securely attached to the wall. If you notice any wobbling or movement, this may indicate that the brackets need to be repositioned or tightened further.
Step 5: Reposition or Replace Brackets, if Necessary
If the brackets are loose and cannot be tightened, you may need to reposition them or replace them altogether. Use a level to ensure that the brackets are properly aligned, and use a pencil to mark the new hole locations if you need to reposition the brackets. If you need to replace the brackets, remove the old ones and install the new ones according to the manufacturer’s instructions.
Step 6: Double-check and Test
Once you have tightened the screws and checked the brackets, give the towel bar a gentle tug to ensure that it is securely attached to the wall. If it feels stable and doesn’t move, you have successfully checked and tightened your towel bar.
By regularly checking and tightening the screws and brackets of your towel bar, you can ensure that it remains securely attached to the wall, providing a safe and reliable place to hang your towels. This simple maintenance task takes just a few minutes but can save you from potential accidents and the hassle of a loose towel bar.
Frequently Asked Questions
Do Towel Bars Need To Be Installed In Studs?
Yes, towel bars should be installed in studs to ensure stability and prevent them from falling. Installing a towel bar directly into a stud provides the necessary support to hold the weight of towels and prevents damage to the wall.
How Do You Support A Towel Bar?
Support a towel bar by following these steps: 1. Locate and mark the desired position on the wall. 2. Use a stud finder to find a stud in the wall. 3. If no stud is found, use wall anchors for support.
4. Drill pilot holes and attach the towel bar using screws. 5. Ensure it is level and securely mounted.
Do You Need Drywall Anchors For Towel Bar?
Yes, it is recommended to use drywall anchors for a towel bar. Drywall anchors provide extra support and prevent the towel bar from coming loose or falling off the wall. Using anchors ensures a secure installation and helps to maintain the longevity of the towel bar.
How Far Should Towel Bar Be From Floor?
The towel bar should typically be placed around 48-54 inches above the floor.
Conclusion
Installing a towel bar can be a simple yet functional upgrade to your bathroom. By following these step-by-step instructions, you can easily complete this DIY project in no time. Remember to measure and mark your desired location, use the right tools, and secure the towel bar properly.
Now you can enjoy a neatly organized and stylish bathroom while keeping your towels conveniently within reach.