To install a jet tub, start by securing the tub in place and connecting the drain and overflow pipes. Then, connect the water supply and power source before sealing the tub and testing for leaks.
Jet tubs offer a luxurious and relaxing experience right in the comfort of your own bathroom. If you’re considering installing one, it’s essential to understand the proper steps to ensure a successful installation. This guide will walk you through the process of installing a jet tub, from securing the tub in place to testing for leaks.
By following these instructions, you’ll be able to enjoy the soothing jets of your new tub in no time. So, let’s dive in and learn how to install a jet tub.
Preparing For Installation
Before installing a jet tub in your bathroom, it’s important to properly prepare the space. This step includes gathering the necessary tools and materials, measuring and assessing the bathroom space, and ensuring proper electrical and plumbing connections. By following these steps, you can ensure a smooth and successful installation process.
Gathering the Necessary Tools and Materials
Before starting the installation, make sure you have all the required tools and materials at hand. This will help you save time and avoid unnecessary trips to the hardware store. Here are some of the essential tools and materials you’ll need:
- Adjustable wrench
- Screwdriver set
- Power drill
- Tape measure
- Level
- Pliers
- Pipe cutter
- Plumber’s tape
- Plumbing fittings
- Electrical wiring
Measuring and Assessing the Bathroom Space
Proper measurements are crucial when installing a jet tub. Start by measuring the dimensions of your bathroom to determine if there is enough space for the tub. Consider the length, width, and height of the tub, as well as any additional space needed for access and maintenance. Assess if the floor can support the weight of the tub and if there are any structural obstacles that may need to be addressed.
Additionally, ensure that there is sufficient clearance around the tub for easy installation and future repairs. It’s important to measure the doorways, hallways, and other pathways leading to the bathroom to ensure the tub can fit through without any issues.
Ensuring Proper Electrical and Plumbing Connections
Installing a jet tub involves electrical and plumbing connections, and it’s crucial to ensure these connections are done correctly and safely. For electrical connections, consult a licensed electrician to handle the wiring and ensure compliance with local building codes.
When it comes to plumbing connections, it’s important to ensure that the existing plumbing system can support the jet tub. Assess the water supply and drainage requirements of the tub, and make any necessary modifications to the plumbing system. This may involve installing new pipes, valves, and fittings.
Moreover, ensure all connections are properly sealed with plumber’s tape to prevent leaks. Leaks can cause extensive damage to the surrounding areas, so it’s essential to take the necessary precautions to avoid any water-related issues.
By gathering the necessary tools and materials, measuring and assessing the bathroom space, and ensuring proper electrical and plumbing connections, you can lay the groundwork for a successful jet tub installation. Taking the time to prepare properly will contribute to a smooth and hassle-free installation process, allowing you to enjoy the luxury and relaxation that a jet tub brings to your bathroom.
Choosing The Right Jet Tub
Installing a jet tub can be a luxurious addition to any bathroom. Not only does it bring a spa-like experience, but it also provides therapeutic benefits. However, with so many options available in the market, choosing the right jet tub can be a daunting task. In this section, we will discuss the factors you should consider when selecting a jet tub, ensuring that you make an informed decision that suits your needs and preferences.
Considering Different Jet Tub Options
When it comes to jet tubs, there are various options to choose from. Each option offers unique features and benefits, so it’s essential to understand the differences before making a decision.
- Air Jet Tubs: These jet tubs use air to create a soothing and gentle massage experience. They are known for providing a soft and relaxing sensation, perfect for those who enjoy a mild massage.
- Water Jet Tubs: Water jet tubs, also known as whirlpool tubs, use water pressure to provide a more vigorous massage. The adjustable jets target specific areas of the body, offering a revitalizing experience.
- Combination Jet Tubs: If you can’t decide between air and water jets, combination jet tubs offer the best of both worlds. These tubs feature both air and water jets, giving you the flexibility to choose the type of massage you prefer.
Determining the Appropriate Size and Style
The size and style of the jet tub are crucial factors to consider. You need to ensure that the tub fits perfectly in your bathroom and complements your existing decor.
To determine the appropriate size, measure the available space in your bathroom. Consider factors such as the length, width, and depth required to accommodate the tub comfortably. Additionally, take into account any space restrictions, such as doors or obstructions.
When it comes to style, consider the overall aesthetic of your bathroom. Look for jet tubs that match the color scheme and style, whether it’s modern, traditional, or transitional. Choosing a jet tub that blends seamlessly with your bathroom decor will create a harmonious and visually appealing space.
Assessing the Budget and Available Features
Before making a final decision, it’s important to assess your budget and determine the available features that fit within that budget. Jet tubs can vary significantly in terms of price, depending on factors such as size, style, material, and additional features.
Make a list of the features that are essential to you, such as adjustable jets, built-in lighting, or a built-in sound system. Once you have determined your priorities, compare different jet tub models and their corresponding prices. This will help you find the best value for your budget while ensuring that you get the features that enhance your bathing experience.
Remember, investing in a high-quality jet tub is a long-term investment in your relaxation and well-being. Take the time to research, compare options, and make an informed decision that meets your requirements and preferences.
Removing The Old Tub
Removing the old tub is the first step when installing a new jet tub. While this task may seem daunting, with the right preparation and steps, you can complete it successfully. This section will guide you through three important aspects of removing the old tub: draining and disconnecting the existing tub, safely removing surrounding tiles or panels, and disposing of the old tub responsibly. Following these steps will ensure a smooth transition to your new jet tub.
Draining and Disconnecting the Existing Tub
The first step is to drain and disconnect the existing tub. Before you start, turn off the water supply to prevent any mishaps. Make sure to prepare a bucket and towels to catch any excess water.
To drain the tub, locate the drain valve underneath the tub and attach a hose to it. Direct the other end of the hose to a floor drain or an appropriate drainage area. Open the valve to allow the water to drain completely. Once drained, disconnect any pipes, hoses, or electrical connections attached to the tub.
Safely Removing Surrounding Tiles or Panels
Next, you’ll need to remove any tiles or panels surrounding the old tub. Begin by examining the edges and corners to determine if there are any caulking or adhesive materials holding them in place. Use a putty knife or a scraper to gently loosen the caulk or adhesive.
Once the caulk or adhesive is loosened, carefully lift and remove the tiles or panels using a pry bar or a similar tool. Take extra caution not to damage any adjacent surfaces or structures. If necessary, use a heat gun to soften the adhesive, making it easier to remove without causing any harm.
Disposing of the Old Tub Responsibly
Proper disposal of the old tub is crucial to minimize environmental impact. Contact your local waste management facility to inquire about any specific guidelines or regulations for disposing of large items like bathtubs.
If feasible, consider donating the old tub to a local charity or nonprofit organization that accepts building materials. This way, you can contribute to a good cause and potentially benefit from a tax deduction. Alternatively, you can also explore recycling options in your area that accept fiberglass or porcelain materials.
Before disposing of the old tub, make sure to clean it thoroughly to remove any debris or contaminants. This will help ensure the safety of those handling the tub and prevent any potential hazards during the disposal process.
Installing The Jet Tub
Installing a jet tub can be an exciting project that brings luxury and relaxation to your bathroom. However, the process may seem daunting if you’re unsure where to start. In this guide, we’ll walk you through the process of installing a jet tub step by step. In this section, we’ll cover the key steps involved in correctly positioning and leveling the jet tub, connecting the drain and overflow components, and attaching the faucet and showerhead.
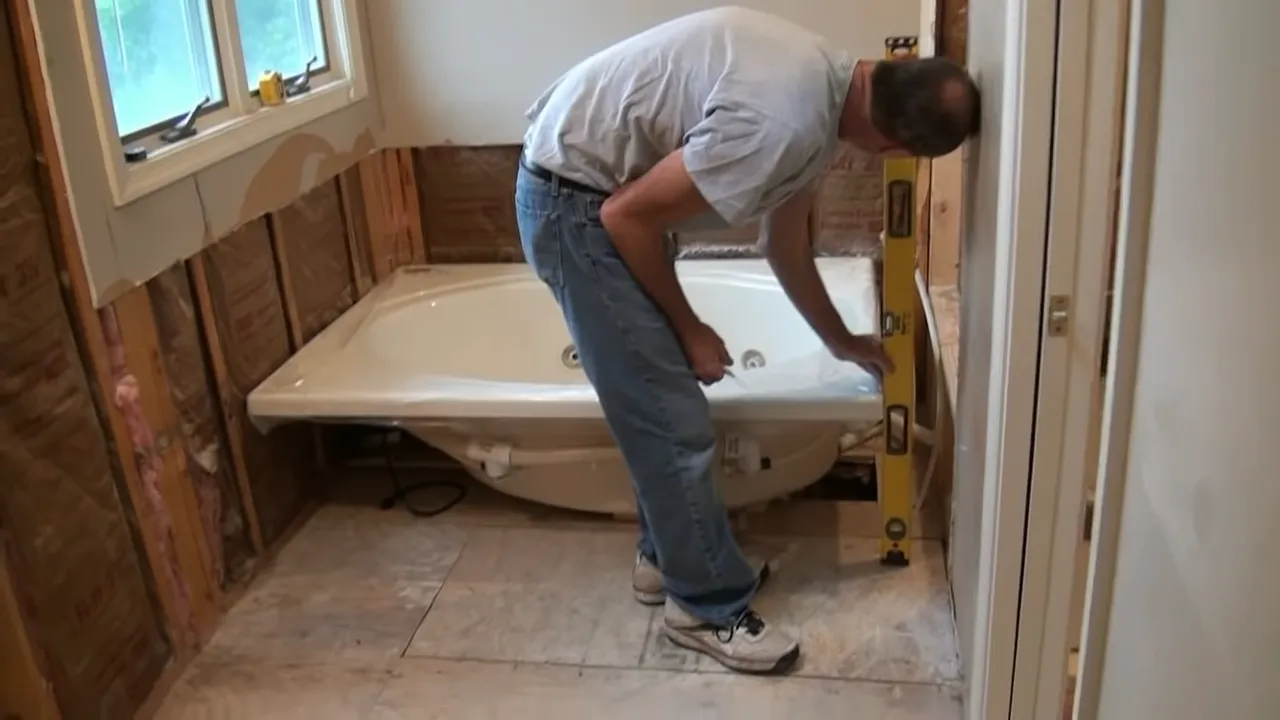
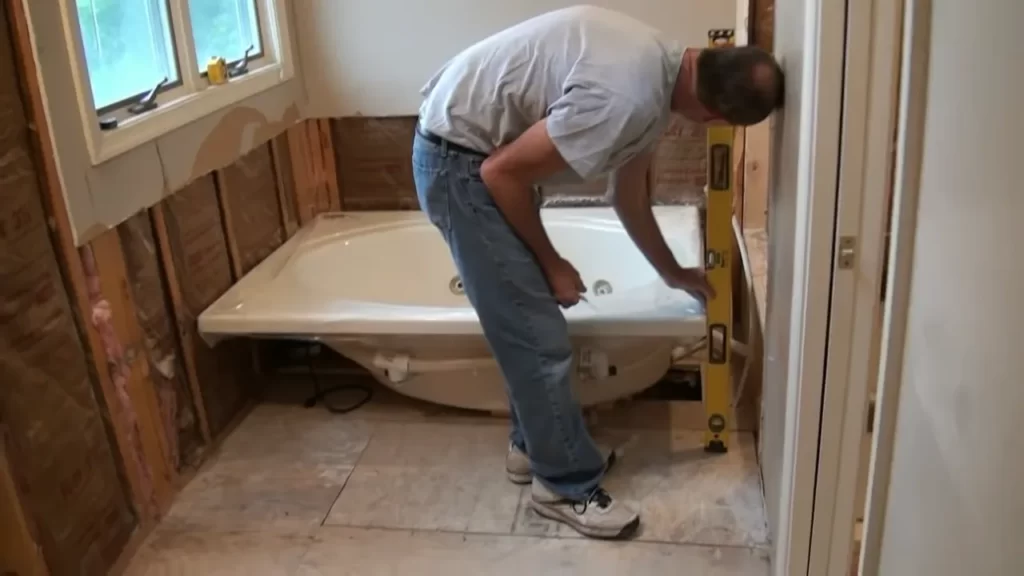
Positioning and Leveling the Jet Tub
The first step in installing a jet tub is to carefully select a suitable location in your bathroom. To ensure the tub fits properly, take accurate measurements of the space and allow for enough clearance on all sides. Once you have determined the ideal location, it’s time to position and level the tub. Follow these steps:
- Clear the area where the jet tub will be installed, removing any obstacles or debris.
- Carefully lower the tub into its designated spot, ensuring it is aligned with the walls and floor.
- Use a level to check if the tub is sitting evenly. Adjust the tub’s position as needed.
- Once the tub is level, secure it in place with adjustable legs or brackets, following the manufacturer’s instructions.
Connecting the Drain and Overflow Components
Next, you’ll need to connect the drain and overflow components of the jet tub. This step ensures proper drainage and prevents water from overflowing. Here’s how to do it:
- Locate the drain and overflow components on the jet tub. These are usually located near the bottom of the tub’s interior.
- Connect the drain pipe to the tub’s drain outlet, ensuring a tight and secure fit. Use plumber’s tape or another suitable sealant to prevent leaks.
- Attach the overflow drain cover to the overflow pipe on the tub. Again, make sure it is securely fastened.
- Connect the other end of the drain pipe to the existing plumbing in your bathroom. This step may require the use of PVC pipes, fittings, and other plumbing tools.
Attaching the Faucet and Showerhead
The final step in installing a jet tub is attaching the faucet and showerhead. These components allow you to control the water flow and provide a convenient way to bathe. Follow these steps:
- Select a suitable faucet and showerhead that complement the style and design of your jet tub.
- Install the faucet onto the designated fixture on the tub, following the manufacturer’s instructions. Ensure it is securely attached and properly aligned.
- Attach the showerhead to the shower arm or designated connection point. Tighten it securely, taking care not to overtighten and damage the fittings.
- Turn on the water supply and test the faucet and showerhead for any leaks or malfunctions. Make any necessary adjustments or repairs before using the jet tub.
By following these steps, you’ll be well on your way to successfully installing a jet tub in your bathroom. Remember to refer to the manufacturer’s instructions for specific guidance related to your jet tub model. Enjoy the soothing jets and relaxing baths that your new tub will provide.
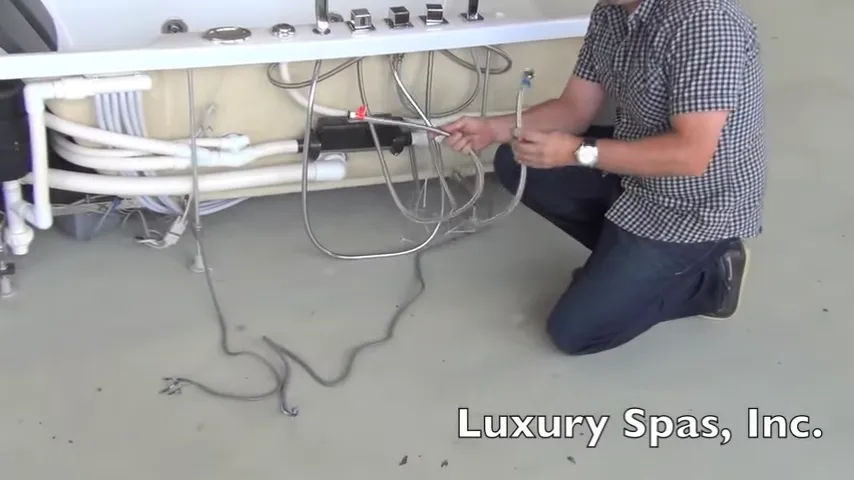
Plumbing And Electrical Connections
Once you have chosen the perfect jet tub for your bathroom, it’s time to dive into the installation process. This section will guide you through the necessary steps to make the plumbing and electrical connections for your new jet tub. Properly connecting the water supply lines, securing the drain pipes, and installing the GFCI outlet for electrical connection are essential for a functional and safe jet tub installation.
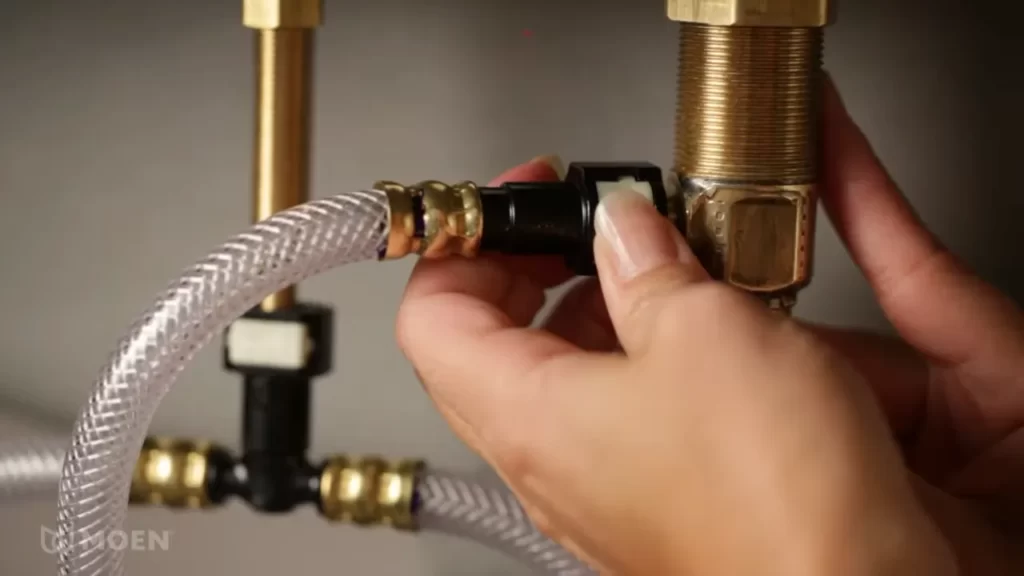
Connecting the Water Supply Lines
Before you can enjoy a relaxing soak in your jet tub, you need to ensure a reliable water supply. Here’s how you can connect the water supply lines:
- First, shut off the main water supply to your home to avoid any potential leaks or accidents.
- Locate the hot and cold water supply lines in your bathroom. These are typically found under the sink or behind the walls.
- Measure and cut the necessary lengths of copper or flexible tubing to connect the jet tub to the water supply lines.
- Use compression fittings or solder the tubing to the water supply lines, ensuring a tight and secure connection.
- Turn the main water supply back on and check for any leaks. If there are any, tighten the fittings as needed.
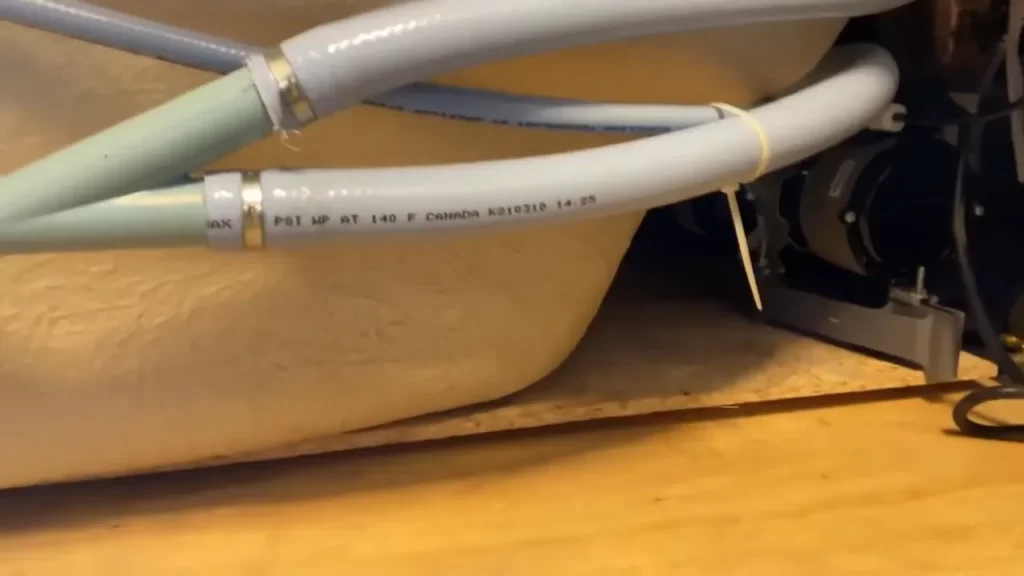
Securing the Drain Pipes
A properly secured drain system is crucial for efficient draining of your jet tub. Follow these steps to secure the drain pipes:
- Attach the drain assembly to the bathtub’s drain outlet. Ensure a proper fit and use plumber’s tape or silicone sealant to create a watertight seal.
- Connect the drain pipe to the assembly, using PVC cement or other suitable fittings.
- Check for any leaks by filling the tub with water and observing if there are any water drips or puddles around the drain area. Make necessary adjustments to prevent leaks.
Installing the GFCI Outlet for Electrical Connection
In order to power the jets and other electrical components of your jet tub, a Ground Fault Circuit Interrupter (GFCI) outlet is required. Here’s how you can install the GFCI outlet:
- Turn off the power to the bathroom circuit at the main electrical panel.
- Locate a suitable location for the GFCI outlet near your jet tub, ensuring it is at least five feet away from any water source.
- Cut a hole in the wall using a drywall saw or a similar tool.
- Connect the appropriate wiring to the GFCI outlet following the manufacturer’s instructions. Make sure to connect the wires correctly (hot to hot, neutral to neutral, and ground to ground).
- Secure the GFCI outlet to the wall using screws and cover it with a faceplate for a finished appearance.
- Turn the power back on at the main electrical panel and test the GFCI outlet to ensure it is functioning properly.
By following these steps, you can successfully complete the plumbing and electrical connections for your jet tub installation. Remember to always prioritize safety and consult a professional if you are unsure about any aspect of the installation process.
Testing And Finishing Touches
Testing and Finishing Touches
Once you have successfully installed your jet tub, it’s time for the final steps to ensure everything is working properly and looking its best. In this section, we will cover two important aspects: Filling the Tub and Checking for Leaks, as well as Testing the Jets and Adjusting as Needed. Let’s dive in and complete these essential tasks.
Filling the Tub and Checking for Leaks
Before enjoying your new jet tub, it’s crucial to carefully fill it and thoroughly check for any leaks. Follow these steps to complete this important process:
- Close the main water supply valve and any other valves connected to the tub.
- Remove the tub drain stopper, if installed, and let any remaining water drain out.
- Slowly turn on the main water supply valve and allow the tub to fill. Monitor the water level.
- While the tub is filling, keep a close eye on the surrounding areas and underneath the tub for any signs of leakage.
- If you notice any leaks, immediately turn off the water supply and address the issue before proceeding further.
- Once the tub is filled and no leaks are detected, check all the connections, including the drain and the faucets, to ensure they are functioning properly.
Testing the Jets and Adjusting as Needed
Now that your tub is securely filled and leak-free, it’s time to test the jets and make any necessary adjustments. Follow these steps to ensure your jets are working optimally:
- Turn on the jets and let them run for a few minutes.
- Observe the water flow and pressure from each jet. Note any inconsistencies or lack of performance.
- If you notice any issues, such as weak water flow or uneven distribution, you may need to adjust the individual jets.
- Refer to the manufacturer’s instructions on how to adjust the jets. It may involve using a screwdriver or other tools to modify the direction or intensity of the water flow.
- Make any adjustments needed to achieve the desired water flow and pressure from each jet.
Sealing and Caulking the Area Around the Tub
To complete the installation and ensure a polished finish, it’s important to seal and caulk the area around the tub. This helps prevent water leakage and keeps the surrounding walls and floor protected. Follow these steps to seal and caulk the tub:
- Clean the area around the tub thoroughly, removing any dirt, dust, or debris.
- Apply a bead of silicone caulk around the edges of the tub, ensuring full coverage.
- Smooth the caulk with a caulk smoothing tool or your finger to create a neat and even seal.
- Allow the caulk to dry completely according to the manufacturer’s instructions before using the tub.
Congratulations! You have successfully completed the installation of your jet tub. By following these testing and finishing touches, you can ensure both the functionality and aesthetics of your tub are at their best. Now, it’s time to sit back, relax, and enjoy the soothing jets of your new tub.
Maintenance And Care
Maintenance and care are essential for keeping your jet tub in optimal condition and ensuring its longevity. By regularly cleaning and sanitizing your jet tub, preventing mold and mildew buildup, and troubleshooting common issues, you can enjoy a clean and hassle-free bathing experience. In this section, we will guide you through the steps to maintain and care for your jet tub effectively.
Regular Cleaning and Sanitizing
Regular cleaning and sanitizing are crucial to keeping your jet tub free from dirt, grime, and bacteria. Follow these steps to keep your jet tub clean and hygienic:
- Fill the jet tub with warm water until the jets are covered.
- Measure and pour the recommended amount of jet tub cleaner into the water.
- Activate the jets and let them run for the recommended time specified by the cleaner manufacturer.
- Use a soft sponge or cloth to wipe down the surfaces of the jet tub, including the jets, walls, and fixtures, removing any remaining dirt or residue.
- Drain the jet tub and rinse it thoroughly with clean water to remove any remaining cleaner.
- For added protection against bacteria, sanitize the jet tub by using a disinfectant specifically formulated for whirlpool tubs. Follow the instructions on the disinfectant product carefully.
- Finally, dry the surfaces of the jet tub with a clean towel to prevent water spots and maintain its shine.
Preventing Mold and Mildew Buildup
Mold and mildew can quickly grow in the moist environment of a jet tub if not properly maintained. Here’s how you can prevent their buildup:
- After each use, dry the surfaces of the jet tub, including the jets and walls, to remove any residual moisture.
- Ensure the bathroom is well-ventilated to prevent excessive humidity. Open windows or use an exhaust fan during and after using the jet tub.
- Regularly inspect the jet tub for any signs of mold or mildew, such as dark spots or unpleasant odors. If you notice any, clean the affected areas immediately using a mixture of water and white vinegar. Scrub gently, then rinse thoroughly.
- Consider using a mold and mildew-resistant caulk around the edges and joints of the jet tub to provide an extra barrier against their growth.
Troubleshooting Common Issues
Even with proper maintenance, certain issues may arise with your jet tub. Here are some common problems and their solutions:
- If the jets are not producing enough power, check if the water level is sufficient. Low water levels can affect the performance of the jets. Adjust the water level as needed.
- If the jets are clogged, remove any debris or buildup by using a small brush or toothbrush. Pay attention to the small nozzles where dirt can accumulate.
- In case of leaks, inspect the jet tub’s plumbing connections. Tighten loose fittings or replace faulty components if necessary.
- If the jet tub motor malfunctions or makes unusual noises, turn off the power and consult a professional technician to diagnose and repair the issue.
- For any other concerns or complex problems, refer to the manufacturer’s manual or contact their customer support for guidance.
By following these maintenance and care steps, you can enjoy a clean, hygienic, and smoothly functioning jet tub for years to come.
Frequently Asked Questions
Are Jetted Tubs Hard To Install?
Installing jetted tubs can be a challenging task. You need proper plumbing and electrical connections, as well as careful handling to avoid damage. Hiring a professional is recommended for a smooth installation process.
Is There A Way To Add Jets To A Bathtub?
Yes, it is possible to add jets to a bathtub. By installing a jetted tub conversion kit, you can enjoy the relaxing and therapeutic benefits of a jetted tub in your existing bathtub.
Does A Jetted Tub Require A Dedicated Circuit?
Yes, a jetted tub typically requires a dedicated circuit.
How Long Does It Take To Install A Jetted Tub?
Installing a jetted tub typically takes about 2-4 days. The exact time may vary depending on factors such as the type of tub, the complexity of the installation, and any necessary modifications to the plumbing or electrical systems.
Conclusion
Installing a jet tub can be a rewarding project that enhances your bathroom experience. By following the step-by-step instructions provided in this blog post, you can successfully complete the installation yourself. Remember to gather all the necessary tools, measure accurately, and ensure proper plumbing connections.
With careful planning and attention to detail, you can enjoy the therapeutic benefits of your new jet tub for many years to come. Happy DIY-ing!