
To install a rain shower head in the ceiling, follow these steps: 1. Locate the center of the shower area in the ceiling and mark it.
2. Use a stud finder to find ceiling joists above the marked spot. 3. Drill a small hole in the ceiling and verify the position of the joist. 4. Cut a hole in the ceiling according to the size of the shower head.
5. Attach a shower arm to the plumbing in the ceiling. 6. Connect the rain shower head to the shower arm, ensuring a secure fit. 7. Turn on the shower and test for any leaks. Now, you can enjoy a refreshing rain-like shower experience directly from your ceiling-mounted shower head.
Are you tired of your ordinary shower head? Do you long for a luxurious and invigorating rain-like shower experience? Installing a rain shower head in the ceiling can provide you with the spa-like feel you’ve been dreaming of. In this comprehensive guide, we will walk you through the step-by-step process of installing a rain shower head in your bathroom ceiling.
Whether you’re a DIY enthusiast or a homeowner looking for a simple upgrade, this installation is easily achievable with a little bit of planning and following the right steps. So, let’s dive into the details and transform your ordinary shower into a tranquil haven of relaxation and rejuvenation.
Factors To Consider When Selecting A Rain Shower Head
When it comes to creating a luxurious and refreshing showering experience, a rain shower head installed in the ceiling can be a game-changer. Not only does it add an elegant touch to your bathroom, but it also provides a soothing rainfall-like effect that can wash away the stress of the day.
Water Pressure Requirements
Before you start shopping for a rain shower head, it’s essential to consider the water pressure requirements in your bathroom. This is crucial because rain shower heads typically require higher water pressure to operate effectively. If your water pressure is too low, you may experience a weak flow, which can detract from the overall experience.
Here are a few things to keep in mind:
- Check your bathroom’s water pressure to ensure it meets the manufacturer’s recommendations for the rain shower head you choose.
- If your water pressure is on the lower side, you may need to install a water pump or consider a rain shower head with pressure-boosting features.
- Consult with a professional plumber if you’re unsure about the water pressure in your bathroom.
Size and Style Options
Rain shower heads come in various sizes and styles to suit different preferences and bathroom aesthetics. Choosing the right size and style is crucial to ensure an enjoyable showering experience while complementing your bathroom decor.
Consider the following factors:
- Size: Measure the available space in your bathroom and determine the ideal diameter for the rain shower head. Keep in mind that larger heads generally provide a more immersive rainfall effect, while smaller ones can fit better in compact spaces.
- Style: Decide whether you prefer a traditional round rain shower head or a sleek square design. Additionally, consider the finish options such as chrome, brushed nickel, or oil-rubbed bronze to match your existing fixtures.
Material and Durability
The material and durability of the rain shower head play a vital role in its longevity and performance. Choosing a high-quality, durable product ensures that you can enjoy your rain shower head for years to come.
Consider the following factors:
- Material: Look for rain shower heads made from durable materials like stainless steel or brass. These materials are resistant to rust and corrosion, ensuring a long-lasting product.
- Durability: Read product reviews and choose a rain shower head that is known for its durability. It’s worth investing in a reliable brand that offers warranties and excellent customer support.
By considering these important factors, you can confidently choose a rain shower head that meets your water pressure requirements, size and style preferences, and ensures long-lasting performance in your bathroom. It’s time to turn your daily shower into a refreshing and indulgent experience!
Assessing Your Ceiling For Installation
Before you embark on the exciting task of installing a rain shower head in your ceiling, it’s important to assess your ceiling to ensure it can handle the weight and dimensions of the shower head. This step is crucial to prevent any structural damage and ensure a safe and sturdy installation. In this section, we will guide you through the process of measuring ceiling height and space, as well as evaluating ceiling strength and support.
Measuring Ceiling Height and Space
The first step in assessing your ceiling for rain shower head installation is to measure the height and available space in your bathroom. This will help determine whether your ceiling has sufficient clearance and whether the shower head will be a good fit for your bathroom’s dimensions. To measure the ceiling height:
- Start by obtaining a tape measure or ruler.
- Stand in the area of the bathroom where you plan to install the shower head.
- Extend the tape measure from the floor to the ceiling, ensuring it is vertically aligned.
- Read the measurement on the tape measure to determine the ceiling height.
Once you have measured the ceiling height, it’s important to assess the available space. Consider factors such as the distance from the shower head to the bathtub or shower area, as well as any other fixtures or obstructions that may affect the installation. Make sure the rain shower head has ample space to provide a comfortable and enjoyable shower experience.
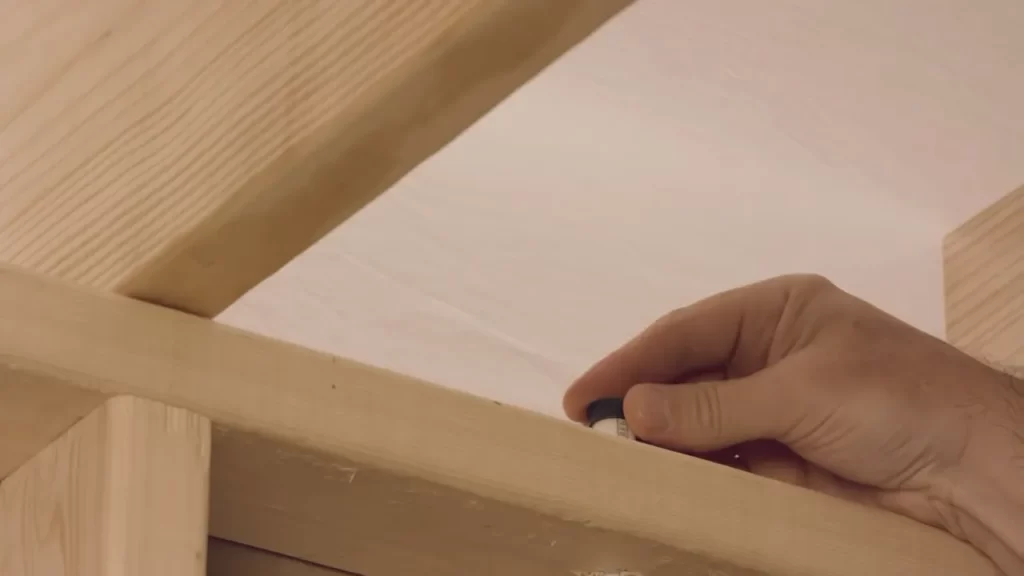
Evaluating Ceiling Strength and Support
After measuring the height and space, the next step is to evaluate the strength and support of your ceiling. This is necessary to ensure that your ceiling can support the weight of the rain shower head without causing any damage or safety hazards. Here’s how you can evaluate the ceiling strength and support:
- Inspect the construction of your ceiling. Determine whether it is made of solid materials such as concrete or sturdy wood.
- Identify any existing joists or support beams in the ceiling. These structural components provide vital support and should be considered while installing a rain shower head.
- Check for any signs of water damage or structural weakness, such as sagging or cracking. These issues could compromise the integrity of your ceiling and should be addressed before installation.
- If necessary, consult a professional contractor or structural engineer to assess the ceiling’s load-bearing capacity and provide expert advice.
By measuring the ceiling height and available space, as well as evaluating the strength and support of your ceiling, you can ensure a successful rain shower head installation that enhances your showering experience. Taking the time to properly assess your ceiling will help you achieve a safe, secure, and enjoyable addition to your bathroom.
Gathering The Necessary Tools And Materials
Installing a rain shower head in your ceiling can transform your daily shower experience into a luxurious and spa-like getaway. To complete this project successfully, you’ll need to gather the necessary tools and materials. In this section, we’ll discuss the essential tools for installation and introduce some optional tools that can enhance the process. By having everything ready and organized, you’ll save time and ensure a smooth installation process.
Essential Tools for Installation
To install a rain shower head in the ceiling, you’ll need the following essential tools:
- Adjustable wrench
- Tape measure
- Hacksaw or reciprocating saw
- Plumber’s tape
- Pipe wrench
- Drill
- Drill bits
- Stud finder
Using an adjustable wrench, tape measure, and pipe wrench will allow you to secure the necessary connections and adjust the shower head accordingly. The hacksaw or reciprocating saw will help you cut through the existing shower pipe, while plumber’s tape will ensure secure and leak-free joints. A drill and drill bits will come in handy for creating holes in the ceiling to mount the shower head. Lastly, a stud finder will help you locate the ceiling joists for added stability.
Optional Tools to Enhance the Process
While the essential tools are enough to complete the installation, there are some additional tools that can enhance the process further:
- Ceiling support brace
- Extension arm
- Wireless camera
- Ceiling paint and brush (for touch-ups)
- Waterproof sealant
- Self-adhesive silicone gasket
A ceiling support brace can provide extra support for the shower head and reduce the risk of damage or sagging over time. An extension arm can be used to extend the reach of the shower head, allowing you to customize the height and angle to your preference. A wireless camera can help you inspect hard-to-reach areas during the installation process. Ceiling paint and a brush will come in handy for any touch-up work required after the installation. Waterproof sealant and a self-adhesive silicone gasket can be used to ensure watertight connections and prevent leaks.
By having these optional tools on hand, you can make the installation process more convenient and efficient, while also improving the overall result.
Now that you have gathered all the necessary tools and materials, it’s time to move on to the next section and start the installation process.

Preparing The Installation Area
When it comes to installing a rain shower head in the ceiling, proper preparation is key for a successful and leak-free installation. Before you start, it’s important to carefully plan and prepare the installation area. This section will walk you through the necessary steps to mark the location of the shower head and remove any existing fixtures if applicable.
Marking the Location of the Shower Head
Before you start marking the location of the shower head, make sure to measure the ceiling height and ensure you have enough clearance for installation. Once you have determined the right spot, follow these steps to mark the location:
- Clean the area: Start by cleaning the ceiling where the shower head will be installed. This will help ensure proper adhesion and prevent any unwanted debris from interfering with the installation.
- Use a stud finder: Locate the ceiling joists using a stud finder. These joists provide the necessary support for the shower head and should be used as a guide when marking the location.
- Mark the center: Measure and mark the center of the shower area on the ceiling. This will serve as your starting point for the installation.
- Create an outline: Using a pencil or a marker, create an outline of the shower head’s shape and size. This will help you visualize the final installation and ensure accurate positioning.
- Double-check the alignment: Take a step back and double-check the alignment of the marked location. Make any necessary adjustments to ensure the shower head is centered and properly aligned with the surrounding tiles or fixtures.
Removing Existing Fixtures
If you already have existing fixtures installed in the area where you plan to install the rain shower head, you will need to remove them before proceeding. Follow these steps to safely remove any existing fixtures:
- Turn off the water supply: Locate the shut-off valve for the shower and turn off the water supply. This will prevent any accidental leaks or water damage during the removal process.
- Remove the showerhead: Unscrew the existing showerhead by turning it counterclockwise. If necessary, use a wrench or pliers to loosen and remove any stubborn connections.
- Detach the arm or pipe: If there is an arm or pipe connecting the showerhead to the wall, unscrew and detach it from the plumbing system. Again, use a wrench or pliers if needed.
- Inspect for leaks: Once the fixtures are removed, inspect the exposed plumbing connections for any signs of leaks or damage. If you notice any issues, it’s recommended to repair or replace the affected components before proceeding with the installation.
By marking the location of the shower head accurately and removing any existing fixtures with care, you’re now ready to move on to the next steps of installing a rain shower head in the ceiling.
Installing The Ceiling Mount
Installing the Ceiling Mount
Now that you have chosen the perfect rain shower head for your bathroom, it’s time to focus on installing the ceiling mount. This crucial step will ensure that your shower head is securely attached to the ceiling, allowing you to enjoy a luxurious rainfall experience every time you step into your shower. In this section, we will guide you through the process of choosing the right mounting option, attaching the mounting plate to the ceiling, and getting everything ready for the final installation. Let’s dive in!
Choosing the Right Mounting Option
Before you can begin the installation process, it’s essential to choose the right mounting option for your rain shower head. There are several options available, each offering different advantages and considerations. Here are a few popular mounting options:
- Ceiling Arm Mount: This is the most common and straightforward option. It involves attaching a shower arm directly to the ceiling, allowing you to connect the rain shower head to it. This option provides a clean and minimalist look.
- Ceiling Flush Mount: If you prefer a seamless and sleek appearance, the ceiling flush mount is an excellent choice. This option requires a hole to be cut into the ceiling, and the shower arm and rain shower head will fit flush against it.
- Ceiling Drop Mount: For those who want to create a more dramatic effect, the ceiling drop mount is a fantastic option. In this case, the shower arm is installed in the ceiling at a higher point, creating a cascading water flow.
Consider your bathroom’s layout, ceiling height, and personal preferences before deciding on the mounting option that best suits your needs. Take into account the shower head’s size and weight when making your choice to ensure that the ceiling can support it.
Attaching the Mounting Plate to the Ceiling
Once you have selected the mounting option, it’s time to attach the mounting plate to the ceiling. This plate will serve as the base for securing the shower arm and rain shower head.
- Locate the ideal position on the ceiling where you want the rain shower head to be installed. Ensure there is enough clearance and that it aligns with your shower area.
- Using a pencil, mark the spot where the mounting plate will be attached.
- If necessary, drill holes into the ceiling at the marked spots, following the instructions provided with your mounting plate.
- Place the mounting plate over the drilled holes and align it with the marks on the ceiling.
- Secure the mounting plate to the ceiling using the appropriate screws or fasteners. Make sure it is tightly attached for stability.
Once the mounting plate is successfully installed, you can proceed to the final steps of connecting the shower arm and rain shower head, which we will cover in the next section.
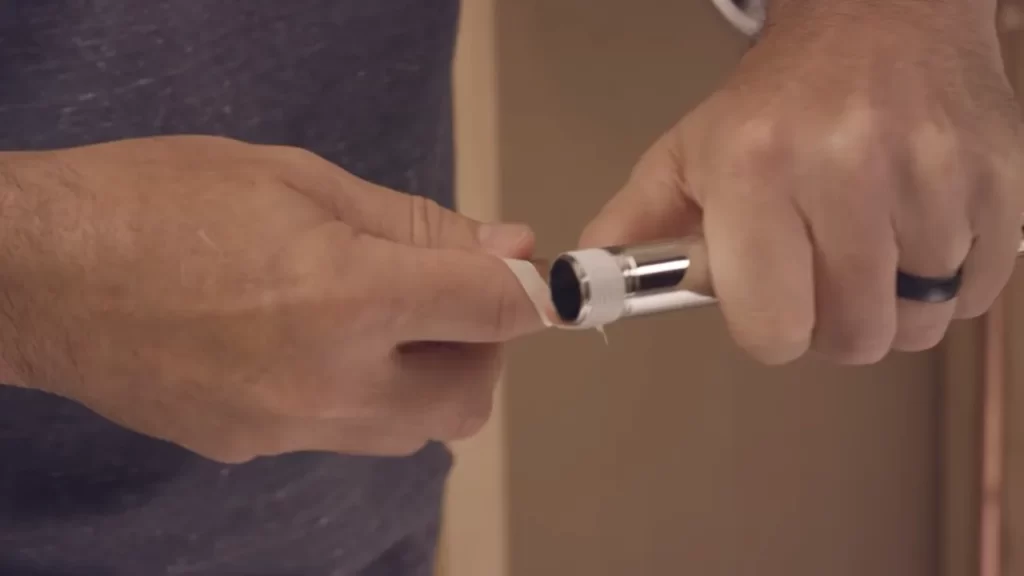
Installing The Water Supply Pipe
Proper installation of the water supply pipe is essential to ensure the optimal functioning of your rain shower head in the ceiling. This crucial step involves connecting the water supply line to the ceiling pipe and ensuring proper sealing and leak prevention.
Connecting the Water Supply Line to the Ceiling Pipe
Before you begin this step, it is important to gather all the necessary tools and materials, including a wrench, pipe cutter, Teflon tape, and an adjustable wrench. Here is a step-by-step guide on how to connect the water supply line to the ceiling pipe:
- Locate the water supply pipe in the ceiling. This pipe is typically found in the bathroom or above the shower area.
- Using a pipe cutter, carefully cut the existing pipe to create a clean, even surface for the connection.
- Wrap Teflon tape around the threads of the water supply pipe. This helps create a watertight seal and prevents leaks.
- Attach the water supply line to the ceiling pipe by screwing it onto the threaded end. Be sure to tighten it securely using an adjustable wrench. Avoid over-tightening, as it may damage the pipe.
- Once the connection is made, turn on the water supply to check for any leaks. If you notice any leaks, tighten the connection further or consider using plumber’s tape for additional sealing.
Ensuring Proper Sealing and Leak Prevention
Proper sealing is crucial to prevent water leaks and damage to your ceilings or walls. Take the following steps to ensure the sealing is done correctly:
- Apply plumber’s tape or Teflon tape to all threaded connections to create a watertight seal.
- Inspect the connection between the water supply line and the ceiling pipe for any signs of leaking. If there are any leaks, tighten the connection further or apply more plumber’s tape.
- Check the surrounding area for any moisture or signs of water damage. If you notice any issues, consult a professional plumber for further assistance.
- Regularly inspect the connection for any signs of wear or deterioration. Replace any worn-out parts or connections to prevent future leaks.
By following these steps, you can ensure a proper and secure installation of the water supply pipe for your rain shower head in the ceiling. Remember to test the connection for leaks and perform regular maintenance to keep your shower experience enjoyable and free from any water-related issues.
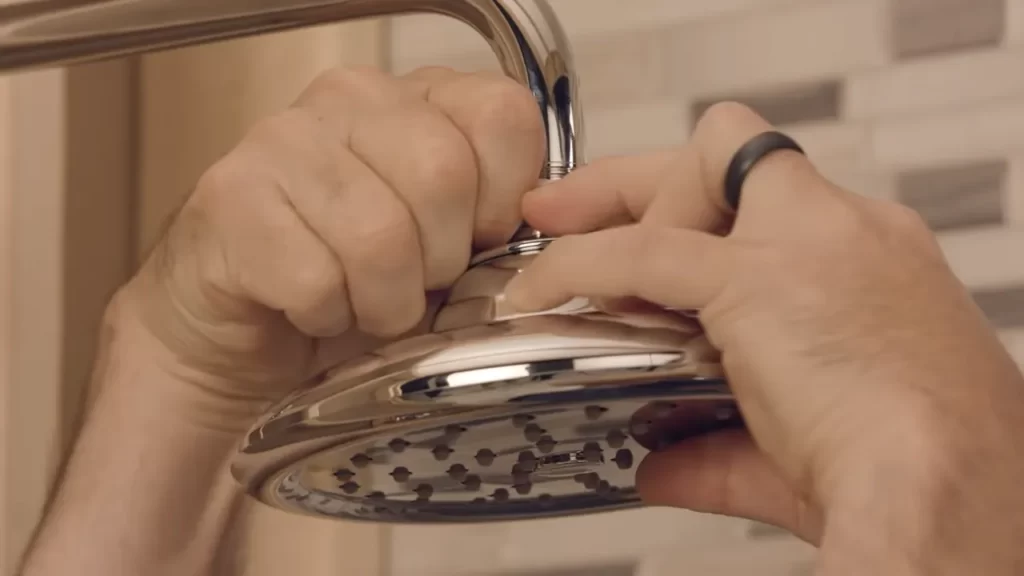
Mounting The Rain Shower Head
Mounting a rain shower head in the ceiling can transform your shower experience into a luxurious and refreshing spa-like retreat. The process may seem daunting, but with a few simple steps, you can easily install a rain shower head and enjoy the soothing sensation of rainfall every time you shower. In this section, we will guide you through the process of attaching the shower head to the ceiling mount and adjusting the angle and height for an optimal shower experience.
Attaching the Shower Head to the Ceiling Mount
The first step in mounting your rain shower head is to securely attach it to the ceiling mount. Follow these steps to ensure a proper installation:
- Begin by checking the manufacturer’s instructions to determine the specific mounting requirements for your shower head.
- Locate the ceiling mount and position it directly above your desired shower area. Ensure that the mount aligns with the water supply pipe.
- Using a wrench, securely fasten the ceiling mount to the water supply pipe. Make sure to tighten it firmly, but be careful not to overtighten and risk damaging the pipe.
- Next, take your rain shower head and attach it to the ceiling mount. Align the shower head with the mount and twist it clockwise until it is securely in place.
- Confirm that the shower head is firmly attached by gently tugging on it. If it feels loose, tighten it further to ensure a stable connection.
Adjusting the Angle and Height for Optimal Shower Experience
After attaching the rain shower head to the ceiling mount, the next step is to adjust the angle and height to achieve a comfortable and invigorating shower experience. Follow these guidelines to optimize your shower settings:
- Stand under the shower head and assess the water flow. Determine if the water is distributed evenly across your body.
- If necessary, adjust the angle of the shower head by gently rotating it until the water flows in the desired direction.
- To modify the height of the shower head, adjust the length of the extension arm, if applicable. If your rain shower head is directly mounted to the ceiling, skip this step.
- Continue adjusting the angle and height until you achieve an optimal position that provides maximum coverage and comfortable water pressure.
Remember, everyone’s preferences might vary, so take the time to customize the angle and height to suit your individual needs. Experiment with different settings until you find the perfect configuration that delivers a heavenly shower experience.
With the shower head securely mounted and properly adjusted, you can now relish the sensation of gentle rainfall or invigorating downpour whenever you step into your shower. The installation process is not as complicated as it may seem, and the rewards of a luxurious rain shower experience are well worth the effort.
Testing And Finishing Touches
Checking for Leaks and Proper Water Flow
Once you have installed your rain shower head in the ceiling, it’s time to test it out and make sure everything is working smoothly. Start by checking for any leaks in the plumbing connections. Begin with the water supply valve turned off, then slowly turn it on and watch for any signs of dripping or water pooling.
If you notice any leaks, tighten the connection using a wrench or adjust the plumbing tape to ensure a watertight seal. It’s important to fix any leaks before proceeding, as they can cause water damage and reduce the efficiency of your rain shower head.
Once you’ve confirmed there are no leaks, it’s time to check the water flow. Turn on the shower and ensure the water is flowing evenly from all the nozzles of the rain shower head. If you notice any uneven flow or clogging, you may need to clean the nozzles or adjust the water pressure.
Securing the Shower Head in Place
After testing for leaks and ensuring proper water flow, it’s essential to secure the rain shower head in place to prevent any movement or accidents. Depending on the specific design of your rain shower head, there are different securing methods you can employ.
If your rain shower head comes with a mounting bracket, attach it securely to the ceiling using the provided screws or adhesive. Ensure that the bracket is level and aligns perfectly with the shower head. This will provide stability and prevent any swaying or drooping over time.
If your rain shower head is designed to be directly installed into the ceiling without a mounting bracket, you can use plumber’s tape or silicone caulk to create a waterproof seal around the edges. Apply the tape or caulk evenly, making sure to cover any gaps between the shower head and the ceiling. This will help keep the rain shower head firmly in place.
Cleaning and Maintaining the Rain Shower Head
To ensure optimal performance and longevity of your rain shower head, regular cleaning and maintenance are necessary. Over time, mineral deposits and grime can accumulate, affecting the water flow and overall experience.
Start by removing the rain shower head from the ceiling as per the manufacturer’s instructions. Take a soft toothbrush or a cloth and gently scrub away any buildup or debris from the nozzles and surface of the shower head. Rinse it thoroughly with warm water to ensure all residue is removed.
In cases of stubborn mineral deposits, you can soak the rain shower head in a mixture of equal parts white vinegar and water for about 30 minutes. This will help loosen the buildup and make it easier to clean. After soaking, scrub the shower head once again and rinse thoroughly.
Once clean, reinstall the rain shower head securely in place using the previously mentioned methods. Regularly repeating this cleaning process will help maintain the efficiency and aesthetics of your rain shower head.
Low Water Pressure Or Inadequate Shower Experience
Are you frustrated with your shower feeling weak and lacking the invigorating water pressure you desire? Low water pressure can put a damper on your showering experience, but don’t worry – there are solutions for increasing water pressure and adjusting your shower to enhance the overall experience.
Solutions for Increasing Water Pressure
If you’re dealing with low water pressure in your shower, there are several solutions that can help you achieve a more satisfying shower experience:
- Remove flow restrictors: Many showerheads come with flow restrictors installed to conserve water. While they serve an important purpose, they can also limit the water pressure. You can remove these flow restrictors to increase water flow and improve your shower experience.
- Clean the showerhead: Over time, mineral deposits and debris can build up in your showerhead, causing blockages that restrict water flow. By regularly cleaning the showerhead and removing any accumulated grime, you can restore water pressure and enjoy a more powerful shower.
- Check for plumbing issues: Sometimes, low water pressure can be due to plumbing problems such as clogged pipes or faulty valves. If you’ve tried other solutions but still experience inadequate water pressure, it may be worth calling a plumber to diagnose and address any underlying issues.
- Install a water pressure booster: If all else fails, installing a water pressure booster can significantly increase the water pressure in your shower. These devices work by amplifying the incoming water pressure, ensuring a strong and satisfying shower experience.
Adjustments to Enhance Showering Experience
Even if your water pressure is adequate, you might still want to enhance your showering experience. Here are some adjustments you can make to take your shower to the next level:
- Install a rain shower head: A rain shower head can provide a luxurious and soothing showering experience. By installing it in the ceiling, you can recreate the feeling of standing under a gentle rain while enjoying the benefits of increased water coverage.
- Optimize water temperature: Experiment with different water temperatures to find the perfect balance for your preferences. Some people enjoy hot showers, while others prefer cooler temperatures to wake them up in the morning. Find what works best for you and make adjustments accordingly.
- Add aromatherapy: Enhance your shower experience by incorporating aromatherapy. You can use essential oils or scented shower gels to create a soothing and relaxing atmosphere.
- Upgrade your shower accessories: Consider investing in high-quality shower accessories such as shower caddies, shelves, or hooks to keep everything organized and within reach. This can help create a clutter-free and enjoyable showering environment.
Leaks Or Dripping From The Ceiling Shower Head
Having a rain shower head installed in your ceiling can be a luxurious addition to your bathroom. However, it can become quite a nuisance if you start experiencing leaks or dripping from the ceiling shower head. Not only does it ruin the aesthetic appeal of your bathroom, but it can also cause water damage to your ceiling and even pose electrical hazards if the wiring is affected. It is essential to address these issues promptly to ensure a hassle-free showering experience. In this section, we will discuss the common causes of leaks and dripping from a ceiling shower head and provide you with step-by-step instructions on how to resolve these leakage issues.
Common Causes of Leaks and Dripping
Understanding the common causes of leaks and dripping from a ceiling shower head can help you identify the problem and take the necessary steps to fix it. Here are some factors that commonly contribute to such issues:
- Loose or Damaged Connection: Over time, the connections between the shower head and the water supply pipes can become loose or damaged. This can result in water leaks or dripping from the shower head.
- Worn-out Gaskets: The gaskets, which are responsible for creating a watertight seal between the shower head and the water supply pipes, can wear out over time. This can cause leaks or dripping.
- High Water Pressure: Excessively high water pressure can put strain on the shower head and its components, leading to leaks or dripping. It is important to ensure that your rain shower head is compatible with the water pressure in your home.
- Improper Installation: Incorrect installation of the ceiling shower head can also contribute to leaks or dripping. If the shower head is not securely attached to the ceiling or if the connections are not properly sealed, water can seep through and cause leakage.
Steps to Resolve Leakage Issues
If you are facing leakage issues with your ceiling shower head, follow these steps to address the problem effectively:
- Step 1: Turn off the water supply to the shower head by shutting off the corresponding water valves.
- Step 2: Disconnect the shower head from the water supply pipes by unscrewing the connections. Carefully examine the connections for any signs of damage or looseness.
- Step 3: Replace any worn-out or damaged gaskets with new ones. Make sure to choose gaskets that are compatible with your shower head and water supply pipes.
- Step 4: Use plumber’s tape to create a tight seal between the shower head and the water supply pipes. Wrap the tape around the threaded connections in a clockwise direction.
- Step 5: Reconnect the shower head to the water supply pipes, ensuring that the connections are securely tightened.
- Step 6: Turn on the water supply and test the shower head for any signs of leaks or dripping. If the issue persists, you may need to consult a professional plumber to diagnose and fix any underlying problems.
By following these steps, you can effectively resolve leakage issues with your ceiling shower head and ensure a leak-free, relaxing showering experience. Remember to regularly inspect and maintain your shower head to prevent future issues.
Incompatibility With Existing Plumbing
Incompatibility with existing plumbing can be a common issue when installing a rain shower head in the ceiling. The existing plumbing connections may not be compatible with the new rain shower head, leading to leaks or improper water flow. However, with some simple steps and precautions, you can adapt the plumbing connections for compatibility and ensure a successful installation.
Adapting Plumbing Connections for Compatibility
When installing a rain shower head in the ceiling, you may need to adapt the plumbing connections to ensure compatibility. Here are a few steps to follow:
- Assess the existing plumbing: Before making any changes, it’s important to assess the existing plumbing connections. Determine the type of connection and the size of the pipe. This information will help you choose the right adapters or fittings.
- Choose the right adapters: Based on your assessment, choose the appropriate adapters or fittings to make the necessary connections. These adapters can help you connect the existing plumbing to the rain shower head.
- Use Teflon tape: To ensure proper sealing and prevent leaks, use Teflon tape when making the connections. Wrap the tape around the threaded ends of the pipes and fittings before screwing them together. This will create a tight and reliable seal.
- Tighten the connections: Use a wrench or pliers to tighten the connections properly. Avoid over-tightening as it can damage the fittings or cause leaks.
- Check for leaks: After making the necessary adaptations and connections, turn on the water and check for any leaks. If you notice any leaks, tighten the connections further or use additional Teflon tape to eliminate them.
Seeking Professional Assistance if Necessary
Installing a rain shower head in the ceiling can be a complex task, especially if you have little experience with plumbing. If you feel unsure or encounter difficulties during the process, it is always recommended to seek professional assistance. A licensed plumber can assess the existing plumbing, make the necessary adaptations, and ensure a proper and secure installation.
Frequently Asked Questions
Can You Put A Shower Head In The Ceiling?
Yes, it is possible to install a shower head in the ceiling. This type of shower is known as a ceiling-mounted shower head. It provides a luxurious and unique showering experience. The water flows directly from above, creating a rainfall-like effect.
It can be a stylish addition to any bathroom.
How Much Does It Cost To Install A Rain Shower Head On A Ceiling?
The cost of installing a rain shower head on a ceiling can vary, but typically ranges from $200 to $500. The final price depends on factors such as the type of shower head, any additional plumbing work required, and the complexity of the installation process.
Can You Put A Rain Shower Head To Existing Shower?
Yes, you can easily install a rain shower head to your existing shower. Simply remove the current shower head and attach the rain shower head. Ensure a proper seal to prevent leaks. Enjoy the luxurious shower experience!
How Much Clearance Do You Need For A Rain Shower Head?
A rain shower head typically requires a clearance of at least 6 to 12 inches from the ceiling. This allows for proper water dispersion and an enjoyable shower experience.
Conclusion
Installing a rain shower head in the ceiling is a simple and luxurious way to enhance your shower experience. By following the step-by-step guide provided, you can easily achieve a spa-like feel in your own bathroom. Remember to consider factors such as water pressure and compatibility with your existing plumbing system.
With some basic tools and a little effort, you can transform your shower into a relaxing oasis. Upgrade your daily routine and enjoy the soothing sensation of rainfall right in your own home.