To install a shower stall in a mobile home, prepare the area and ensure proper plumbing connections before assembling the pre-fabricated unit. A well-planned installation ensures a functional and convenient shower space for mobile home residents.
Adequate preparation and careful execution are essential for a successful and long-lasting installation. We will guide you through the step-by-step process of installing a shower stall in a mobile home, providing valuable tips and considerations along the way. By following these instructions, you can confidently tackle this project, improving the functionality and comfort of your mobile home bathroom.
So, let’s get started!
Steps To Take Before Installing A Shower Stall
Assessing the Space and Measurements
Before you dive into installing a shower stall in your mobile home, it’s essential to assess the available space first. Mobile homes come in different sizes and layouts, so it’s crucial to measure the area accurately to determine which shower stall size will fit best.
To assess the space, start by measuring the length and width of the designated shower area. Take note of any existing fixtures, such as plumbing and electrical outlets, that may affect the placement of the shower stall. Consider the height of the ceiling as well to ensure that the chosen shower stall will fit comfortably within the space.
Gathering the Necessary Tools and Materials
Once you have assessed the space and measurements, it’s time to gather the necessary tools and materials for the installation process. Having everything on hand before you begin will save you time and ensure a smoother installation experience.
Below is a list of tools and materials that you will typically need:
| Tools | Materials |
|---|---|
|
|
Preparing the Floor and Walls for Installation
Once you have gathered all the necessary tools and materials, it’s time to prepare the floor and walls for the shower stall installation. This crucial step ensures that the shower stall is stable, secure, and waterproof.
Start by clearing the area of any debris or existing flooring materials. Inspect the subfloor for any signs of damage or rot. If you find any issues, address them before proceeding with the installation.
The next step is to install a shower pan or base, which serves as the foundation for the shower stall. Follow the manufacturer’s instructions to ensure proper installation.
After the shower base is in place, apply a waterproofing membrane to the walls surrounding the shower area. This will protect the underlying structure from water damage and mold growth. Finally, install the wall panels or tiles, using grout and tile adhesive to create a watertight seal.
By taking these preparatory steps, you’ll set a solid foundation for installing a shower stall in your mobile home. With the right tools, materials, and careful planning, you’re one step closer to enjoying a refreshing shower in the comfort of your mobile home.

Choosing The Right Shower Stall For Your Mobile Home
When it comes to installing a shower stall in your mobile home, choosing the right one is crucial. The right shower stall not only enhances the functionality and aesthetics of your bathroom but also ensures a long-lasting and hassle-free investment. To help you make an informed decision, this section will guide you through different factors to consider when selecting a shower stall.
Understanding the Different Types of Shower Stalls Available
Before you decide on a shower stall, it’s essential to familiarize yourself with the different types available. Here are a few common options:
| Type of Shower Stall | Description |
|---|---|
| Fiberglass | Lightweight and affordable, fiberglass shower stalls are easy to install and maintain. They come in a variety of colors and designs, making it easier to match your mobile home’s existing bathroom decor. |
| Acrylic | Similar to fiberglass, acrylic shower stalls are also lightweight and easy to clean. They offer more flexibility in terms of design and customization options, allowing you to create a unique look for your bathroom. |
| Tile | If you prefer a more traditional and luxurious feel in your bathroom, a tile shower stall might be the right choice for you. Although they require more maintenance and can be more costly, they offer endless design possibilities and increased durability. |
By understanding the characteristics of each type, you can choose a shower stall that suits your preferences and budget.
Considering the Size and Layout of Your Bathroom
Another crucial aspect to consider is the size and layout of your bathroom. Measure the available space accurately to determine the shower stall dimensions that will fit best. You need to ensure that there is enough space for comfortable movement within the shower area. Additionally, consider the shape and orientation of your bathroom to determine whether a corner shower stall or a standard one would be a better fit.
Evaluating the Durability and Maintenance Requirements
The durability and maintenance requirements of a shower stall are important factors to consider for long-term satisfaction. Look for shower stalls made from high-quality materials that are resistant to water damage, stains, and cracks. This will ensure longevity and reduce the need for frequent repairs or replacements. Additionally, consider the maintenance requirements of the shower stall. Some materials may require regular cleaning and sealing, while others may be more low-maintenance.
By taking these factors into account while choosing a shower stall for your mobile home, you can create a functional and stylish bathroom that will withstand the test of time. Remember to analyze your options thoroughly and select a shower stall that meets your specific needs and preferences.

Step 1: Preparing The Area For Installation
Before you can start installing a new shower stall in your mobile home, it’s important to properly prepare the area. This involves several key tasks, including removing the old shower stall (if applicable), cleaning and leveling the subfloor, and ensuring proper plumbing and drainage connections. By following these steps diligently, you’ll set the foundation for a successful shower stall installation. Let’s dive into the details of each task.
Removing the Old Shower Stall, if Applicable
If you’re replacing an existing shower stall, you’ll need to remove it first. This step ensures a fresh start for your new installation. Begin by turning off the water supply to the shower and shutting off the electricity in the bathroom. This will prevent any accidents during the removal process. Next, carefully disconnect the water supply and drain pipes, making sure to catch any excess water that may spill out. With these connections detached, you can begin removing the shower stall itself. Depending on the type of stall you have, this may involve unscrewing or cutting through any fastenings or caulk. Once the shower stall is free, dispose of it properly and clean the area thoroughly before moving on to the next step.
Cleaning and Leveling the Subfloor
With the old shower stall out of the way, it’s time to clean and level the subfloor. Start by removing any debris or remnants left behind from the old installation. Use a vacuum or broom to ensure the area is completely clear. Next, carefully inspect the subfloor for any signs of damage, such as rot or water stains. If any issues are found, address them promptly to prevent further damage. Once the subfloor is clean and in good condition, use a level to check for any unevenness. If necessary, make appropriate adjustments by adding shims or using a leveling compound. A level subfloor is crucial for preventing future leaks and ensuring a stable installation.
Ensuring Proper Plumbing and Drainage Connections
Before proceeding with the shower stall installation, it’s essential to ensure proper plumbing and drainage connections. Start by inspecting the existing pipes and drains to ensure they are in good condition. Replace any damaged or worn-out components as needed. Next, carefully measure and mark the positions for the water supply and drain connections on the subfloor. Using appropriate tools, make the necessary openings for the pipes and drains. Take care to align them correctly to avoid any future plumbing issues. Once the openings are made, securely attach the pipes and drains, ensuring tight connections to prevent leaks. Test the connections by running water and checking for any leaks. Address any issues immediately to ensure a watertight system.
Completing these tasks will ensure that you have a clean, level, and properly prepared area for installing your new shower stall. By giving attention to detail during the preparatory stage, you’ll set the stage for a successful installation and a functional, beautiful shower stall in your mobile home.
Step 2: Assembling And Positioning The Shower Stall
Now that you have gathered all the necessary tools and prepared the mobile home for installing a shower stall, it’s time to move onto the next step – assembling and positioning the shower stall. This step is crucial to ensure that the shower stall is properly installed and fits securely in your mobile home.
Following the Manufacturer’s Instructions for Assembly
Before you begin assembling the shower stall, it is imperative to read and follow the manufacturer’s instructions carefully. Each shower stall may have specific assembly instructions, so it is essential to have them on hand to avoid any unnecessary complications.
Once you have familiarized yourself with the instructions, gather all the included parts and components required for assembly. Take note of any special tools or materials that may be needed and ensure you have them readily available.
Follow the step-by-step instructions provided by the manufacturer to assemble the shower stall. This may involve connecting panels, securing joints, or attaching shower doors. Be cautious not to skip any steps or rush through the process, as proper assembly is vital for the structural integrity and functionality of the shower stall.
Securing the Walls and Base of the Shower Stall in Place
After the shower stall components have been properly assembled, it’s time to secure the walls and base in place. This step ensures that the shower stall is stable and prevents any movement or potential leaks.
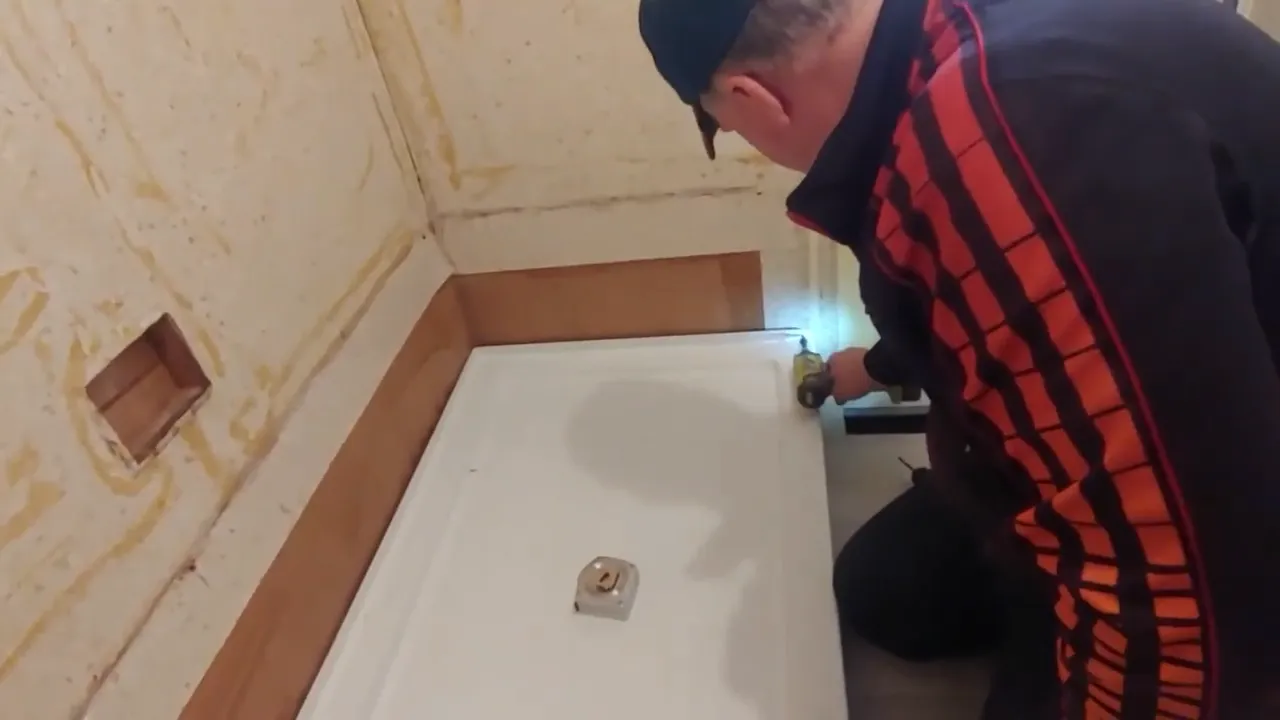
Begin by positioning the shower stall against the wall where it will be installed. Ensure that the plumbing outlets align correctly with the corresponding pipes in the mobile home.
Using an appropriate adhesive or sealant, apply a thin, even layer to the bottom edges of the shower stall’s walls. Carefully press the walls against the walls of the mobile home, making sure they are plumb and level. Use a leveler to verify that the walls are perfectly straight.
For extra stability, secure the shower stall to the wall studs using screws or brackets as per the manufacturer’s instructions. This prevents any movement or shifting of the shower stall over time.
Next, secure the base of the shower stall to the floor using the recommended method specified by the manufacturer. This may involve using screws, adhesive, or a combination of both. It is essential to secure the base firmly to prevent any leaks or water damage in the future.
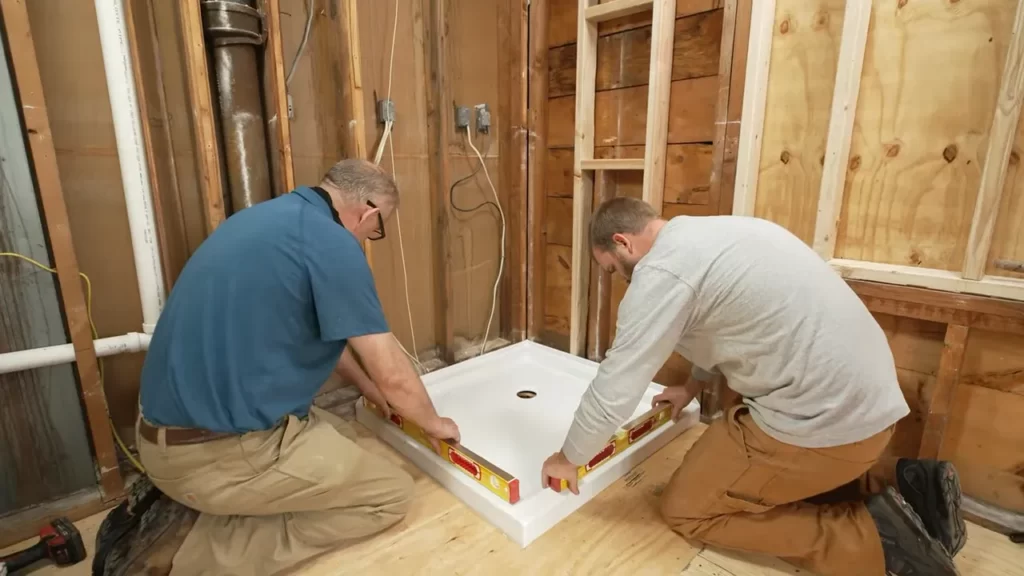
Checking for Proper Fit and Alignment
Once the shower stall walls and base are securely in place, it’s crucial to double-check for proper fit and alignment. This ensures that the shower stall is correctly positioned and will function optimally.
Inspect the shower stall for any gaps between the walls and the mobile home. If any gaps are present, use an appropriate sealant to fill them, ensuring a watertight seal.
Check that all the doors and panels align correctly and open and close smoothly. Adjust any hinges or brackets if necessary to ensure a proper fit.
Take a few moments to step back and visually inspect the shower stall from different angles. Verify that it appears level and aligned with the surrounding walls and floor. This attention to detail will help prevent any future issues with the installation.
By following these steps for assembling and positioning the shower stall, you are well on your way to completing a successful installation. Now that the shower stall is in place, the next step will be connecting the plumbing and making the necessary adjustments for a fully functional shower in your mobile home.
Step 3: Connecting The Plumbing And Drainage
Now that you have successfully prepared the shower stall and laid the necessary foundation, it’s time to move on to the crucial step of connecting the plumbing and drainage. This step involves installing the shower valve and faucet, connecting the water supply lines, and ensuring proper drainage and sealing. By following these instructions carefully, you’ll have a fully functional shower stall in your mobile home.
Installing the Shower Valve and Faucet
The shower valve and faucet play a vital role in controlling the water flow and temperature. To install these components, follow these steps:
- Start by positioning the shower valve into the designated area on the shower wall. Ensure it is leveled and centered properly.
- Secure the valve in place using the screws or brackets provided with the valve.
- Connect the hot and cold water supply lines to the corresponding inlets on the valve. Use appropriate plumbing tools to tighten the connections securely.
- Next, install the shower faucet by screwing it onto the valve. Make sure it is aligned correctly and tightened properly to prevent any leaks.
Connecting the Water Supply Lines
Properly connecting the water supply lines is crucial for ensuring a steady flow of water in your shower stall. Follow these steps:
| Steps | Action |
|---|---|
| 1 | Locate the main water supply line in your mobile home. |
| 2 | Shut off the main water supply to avoid any accidental leaks. |
| 3 | Measure and cut the required length of copper or PEX pipe for the water supply lines. |
| 4 | Connect one end of the supply lines to the water outlets on the shower valve, ensuring a secure fit. |
| 5 | Connect the other end of the supply lines to the main water supply line using appropriate connectors and fittings. |
| 6 | Tighten all connections using plumbing tools to prevent any leaks. |
| 7 | Turn on the main water supply and check for any leaks. If any leaks are detected, tighten the connections further. |
Ensuring Proper Drainage and Sealing
Proper drainage and sealing are crucial to prevent water damage and maintain the longevity of your shower stall. Follow these steps:
- Position the shower drain in the designated area and secure it in place according to manufacturer instructions.
- Connect the drain pipe to the shower drain, ensuring a watertight connection.
- Apply a generous amount of waterproof sealant around the shower drain and the drain pipe to prevent any leaks.
- Inspect all areas where the shower stall meets the walls or flooring for any gaps or openings.
- Seal these gaps using a suitable waterproof sealant or caulk to ensure proper water containment.
Now that you have successfully connected the plumbing and drainage, you are one step closer to enjoying your new shower stall in your mobile home. In the next step, we will focus on tiling and finishing touches to complete the installation process.
Step 4: Securing And Finishing The Shower Stall
Step 4: Securing and Finishing the Shower Stall
Once you have successfully installed the shower walls and base in your mobile home, it’s time to move on to securing and finishing the shower stall. This step is crucial to ensure the durability and functionality of your new shower. In this section, we will cover three important tasks: anchoring the shower stall to the walls and floor, applying waterproofing and sealing the edges and joints, and finally testing for leaks and making necessary adjustments.
Anchoring the Shower Stall to the Walls and Floor
To prevent any movement or shifting of the shower stall, it’s essential to securely anchor it to the walls and floor. This not only provides stability but also helps to maintain the structural integrity of the shower stall. To anchor the shower stall, follow these steps:
- Start by locating the anchor points on the shower walls and floor. These are usually marked with pre-drilled holes or mounting brackets.
- Using the appropriate screws or anchors, attach the shower stall to the walls and floor. Make sure to align the holes in the shower stall with the anchor points.
- Tighten the screws or fasteners securely, but be cautious not to overtighten as it may damage the shower stall or the mounting surface.
Applying Waterproofing and Sealing the Edges and Joints
To ensure that your shower stall remains waterproof and free from potential leaks, it’s important to apply waterproofing and seal the edges and joints. This step will help prevent water damage and extend the lifespan of your shower stall. Follow these guidelines when applying waterproofing and sealing:
- Using a suitable waterproofing membrane or sealing tape, apply it on the edges and joints of the shower stall. This will create a barrier against water penetration.
- Ensure that all seams, corners, and connections are properly sealed. This includes the area where the shower walls meet the base and where the walls meet each other.
- Smooth out any excess waterproofing or sealing material to ensure a seamless finish and optimal protection against leaks.
Testing for Leaks and Making Necessary Adjustments
Before considering your shower stall installation complete, it’s crucial to test for leaks and make any necessary adjustments. This step will help identify any potential issues and allow you to address them promptly. Follow these steps to test for leaks:
- Turn on the water supply to your mobile home’s shower.
- Inspect the shower stall for any signs of leakage, such as water dripping from the walls or floor.
- If you notice any leaks, identify the source and determine the cause. It could be a loose connection or a faulty seal.
- Make the necessary adjustments by tightening connections or reapplying waterproofing and sealing as needed.
- Continue testing until no leaks are detected, ensuring that the shower stall is fully sealed and watertight.
By properly anchoring the shower stall, applying waterproofing and sealing, and thoroughly testing for leaks, you can ensure a secure and functional installation. Taking the time to complete these steps will provide you with a reliable and long-lasting shower stall in your mobile home.
Installing Shower Accessories And Fixtures
Installing shower accessories and fixtures is an important step in the process of installing a shower stall in a mobile home. It is these accessories and fixtures that truly enhance the functionality and convenience of the showering experience. In this section, we will discuss the different elements you can add to your shower stall to create a safe, stylish, and luxurious space.
Installing Shower Doors or Curtains
One of the first decisions to make when it comes to shower accessories is whether you want to install shower doors or curtains. Both options have their own advantages, and the choice ultimately depends on your personal preferences and the space available in your mobile home.
If you prefer a sleek, modern look and want to add a touch of elegance to your bathroom, shower doors are a great option. They not only create a clean and streamlined appearance but also help to contain the water within the shower stall. They can be installed as sliding doors or hinged doors, depending on the layout of your bathroom.
On the other hand, if you have limited space or prefer a more flexible and budget-friendly option, shower curtains are the way to go. They are easy to install, versatile in design, and can be easily replaced or updated to match your changing style. Plus, they offer a wide range of colors, patterns, and materials to choose from, allowing you to add a personal touch to your bathroom.
Adding Handrails or Grab Bars
When it comes to safety in the bathroom, handrails or grab bars are essential accessories to consider. These sturdy and secure fixtures provide support and stability, particularly for individuals with limited mobility or balance issues. Installing handrails or grab bars near the entrance of the shower stall, as well as inside the stall itself, can help prevent slips and falls.
It’s important to install handrails or grab bars properly to ensure they can support the weight of the user. They should be securely mounted onto the walls using suitable anchors or brackets. Additionally, consider the height and placement of the handrails or grab bars to accommodate the needs of different individuals using the shower stall.
Enhancing the Aesthetics with Shower Heads and Controls
Shower heads and controls play a significant role in the functionality and aesthetics of your shower stall. They allow you to customize water pressure, temperature, and spray patterns to create a luxurious and invigorating shower experience.
When selecting a shower head, consider the different types available, such as fixed mount, handheld, or rain shower heads. Each type offers its own unique benefits and can be chosen based on personal preference. Ensure that the shower head is compatible with your existing plumbing system and can be easily installed or replaced.
Shower controls, such as thermostatic valves or pressure-balancing valves, allow you to regulate water temperature and maintain a consistent flow. These controls not only offer convenience but also provide safety by preventing sudden temperature changes that could scald or shock the user.
| Shower Accessories and Fixtures | |
|---|---|
| Shower Doors | Enhance aesthetics and contain water within the stall. |
| Shower Curtains | Flexible, budget-friendly option with a wide range of designs. |
| Handrails or Grab Bars | Ensure safety and stability, particularly for individuals with limited mobility. |
| Shower Heads | Customize water pressure, temperature, and spray patterns for a luxurious experience. |
| Shower Controls | Regulate water temperature to prevent scalding or shocking the user. |
By carefully selecting and installing the right shower accessories and fixtures, you can transform your mobile home shower stall into a functional and visually appealing space. Whether you choose shower doors or curtains, add handrails or grab bars, or enhance the aesthetics with shower heads and controls, these additions will enhance both the safety and enjoyment of your showering experience.
Proper Maintenance And Care For Your Shower Stall
Ensuring proper maintenance and care for your shower stall is essential to keep it functioning smoothly and looking its best. Regular cleaning and maintenance practices, addressing common issues and repairs, and extending the lifespan of your shower stall are all important aspects of maintaining a mobile home shower stall. By following these tips and guidelines, you can enjoy a clean and well-maintained shower stall for years to come.
Regular Cleaning and Maintenance Practices
Cleaning your shower stall on a regular basis is crucial to prevent the buildup of dirt, grime, and mold. Here are some important cleaning and maintenance practices to incorporate into your routine:
- Start by removing any soap scum or residue from the walls and floor of your shower stall. You can use a mixture of warm water and mild detergent or a non-abrasive cleaner.
- For stubborn stains or mold, consider using a mixture of vinegar and water. This natural solution can help break down tough stains without causing any damage to the shower stall.
- Make sure to clean the showerhead regularly to prevent clogs and ensure proper water flow. Remove the showerhead and soak it in a mixture of warm water and vinegar to remove any mineral deposits.
- Don’t forget to clean the shower door or curtain. Wipe down glass shower doors with a glass cleaner, and wash fabric shower curtains according to the manufacturer’s instructions.
- Regularly check for any leaks or drips in the shower stall. Fixing these issues promptly can prevent further damage and water wastage.
Addressing Common Issues and Repairs
Despite regular maintenance, your shower stall may encounter some common issues that need to be addressed. Here are a few tips for handling these issues:
- Blocked drains: If you notice the water draining slowly or not draining at all, there may be a blockage in the drain. Remove any visible debris or hair from the drain and use a plunger or drain snake to clear any remaining clogs.
- Leaky faucets: Leaks in your shower stall can waste water and increase your utility bills. Check for any worn-out washers or valves and replace them as necessary. If the leak persists, it may be best to call a professional plumber.
- Cracked or damaged tiles: Over time, tiles in your shower stall may crack or become damaged. Replace any broken tiles to maintain the integrity of the stall and prevent water leakage.
Extending the Lifespan of Your Shower Stall
To maximize the lifespan of your shower stall, consider the following tips:
- Use proper ventilation: Adequate ventilation is crucial to preventing mold and mildew growth in your shower stall. Ensure that your bathroom has proper ventilation, such as an exhaust fan, to reduce moisture and humidity.
- Seal grout lines: Regularly inspect and seal the grout lines between tiles to prevent water from seeping in and causing damage. Grout sealer is readily available at most home improvement stores.
- Avoid abrasive cleaners: Harsh chemicals and abrasive cleaners can damage the surface of your shower stall. Stick to mild detergents or natural cleaning solutions to protect the integrity of the materials.
- Monitor water pressure: Excessive water pressure can strain the plumbing of your shower stall. Install a pressure regulator if needed to maintain a safe and appropriate water pressure level.
By following these regular cleaning practices, addressing common issues promptly, and taking steps to extend the lifespan of your shower stall, you can ensure that it remains in optimal condition for years to come.
Frequently Asked Questions
Can You For A Shower In A Mobile Home?
Yes, you can shower in a mobile home. Mobile homes come with bathroom facilities, including a shower.
Is It Difficult To Install A Shower Stall?
Installing a shower stall can be a bit challenging, but with the right tools and instructions, it’s doable. Follow the steps carefully, such as preparing the area, installing the base and walls, connecting the plumbing, and sealing everything properly. Take your time and don’t hesitate to seek professional help if needed.
What Is The Cost Of Installing A Shower Stall?
The cost of installing a shower stall varies depending on factors like size, materials, and complexity of the installation. On average, you can expect to pay between $1,200 to $5,000 for installation.
What Do You Put Under A Shower Base?
Shower bases are usually placed on a layer of mortar or a shower base underlayment. This provides support, prevents flexing, and helps with water drainage.
Conclusion
Installing a shower stall in a mobile home can seem like a daunting task, but with the right knowledge and tools, it can be done smoothly. By following the step-by-step instructions in this guide, you’ll be able to create a functional and stylish shower space in your mobile home.
Remember to measure accurately, select the appropriate materials, and take your time during the installation process. With a little patience and effort, you’ll soon be enjoying a refreshing and convenient shower in your mobile home.