To install multiple shower heads, first, ensure you have the necessary tools and materials. Then, follow a step-by-step process of removing the existing shower head, adding a diverter valve to the water pipe, attaching additional shower arms, and finally, connecting the new shower heads to the added arms.
Creating a luxurious and spa-like experience in your bathroom is easier than you may think. By installing multiple shower heads, you can enjoy the ultimate showering experience with the added convenience of dual or even triple streams of water. Whether you want to improve your morning routine or simply indulge in a revitalizing shower, this guide will walk you through the steps to install multiple shower heads in your bathroom.
Grab your tools, and let’s get started on upgrading your shower to a whole new level of relaxation and luxury.
Benefits And Considerations
When it comes to enhancing your daily shower routine, installing multiple shower heads can be a game-changer. Not only does it amplify your shower experience, but it also provides you with a variety of showering options. However, before diving into the installation process, there are a few points to consider.
Amplify Your Shower Experience with Multiple Shower Heads
Imagine stepping into your shower and being enveloped in a cascade of warm water from multiple angles. That’s exactly what installing multiple shower heads can offer. By strategically placing shower heads at different heights and angles, you can create a spa-like experience right in the comfort of your own bathroom.
Whether you prefer a gentle rainfall shower, a targeted massage spray, or a combination of both, having multiple shower heads allows you to customize your shower experience to your liking. The increased water coverage not only provides a soothing and invigorating sensation to your body, but it can also help relieve stress and promote relaxation.
Enjoy Different Showering Options
With multiple shower heads, you can enjoy a wide range of showering options to suit your needs. Want to switch between a rain shower and a handheld shower? No problem. Prefer a wall-mounted shower head for a quick rinse and a ceiling-mounted shower head for an immersive rainfall experience? You got it.
Having different types of shower heads gives you the flexibility to choose the water flow and intensity that best fits your mood and preferences. Whether you want a refreshing shower in the morning or a soothing one before bed, the options are endless. Say goodbye to the one-size-fits-all shower experience and say hello to customized showering bliss.
Points to Consider Before Installation
Before embarking on your multiple shower head installation journey, there are a few points to consider:
- Water pressure: Ensure that your current water pressure is adequate to support multiple shower heads simultaneously. Low water pressure can result in a weak and unsatisfying shower experience.
- Plumbing compatibility: Check if your existing plumbing system can accommodate the additional shower heads. Consult with a professional plumber if needed to ensure proper installation.
- Space: Assess the available space in your shower area to determine the number and placement of shower heads. Consider both practicality and aesthetics when deciding on the ideal configuration.
- Budget: Determine your budget for the installation, including the cost of purchasing multiple shower heads and any necessary plumbing adjustments. Research different brands and models to find options that fit your budget and requirements.
By keeping these points in mind, you can make informed decisions and ensure a successful multiple shower head installation that enhances your showering experience for years to come.

Step 1: Selecting The Right Shower Heads
Choosing Shower Heads that Complement Each Other
When it comes to installing multiple shower heads in your bathroom, the first step is selecting the right shower heads. Choosing shower heads that complement each other is crucial in achieving a well-balanced and enjoyable shower experience.
Consider the overall design aesthetic of your bathroom and the desired style you want to achieve. Whether you prefer a modern, minimalist look or a traditional, classic feel, there are shower heads available in various designs and finishes to match your preferences. For instance, if you have a sleek and contemporary bathroom, a square-shaped shower head with a chrome finish can create a cohesive and stylish look.
Another important factor to consider when selecting multiple shower heads is the size of your shower space. If you have a small shower area, opting for compact shower heads will help maximize the space and prevent overcrowding. On the other hand, if you have a spacious shower, larger rain shower heads can provide a luxurious and spa-like experience.
Furthermore, you should also think about the functionality of the shower heads you plan to install. Some showers offer adjustable sprays, such as massage or pulsating options, allowing you to customize your shower experience according to your preferences. By choosing shower heads with different spray settings, you can create a multi-functional and personalized shower experience for yourself and your family.
Ultimately, the goal is to select shower heads that complement each other in terms of design, size, and functionality. This will ensure a visually pleasing and enjoyable shower experience every time you step into your bathroom.
Considerations for Water Pressure and Flow Rate
In addition to choosing shower heads that complement each other aesthetically, it is vital to consider the water pressure and flow rate of your bathroom. Different shower heads require specific water pressure and flow rates to function optimally and prevent any issues such as inadequate water supply or clogging.
Begin by checking the water pressure in your home. Low water pressure can affect the performance of your multiple shower heads, resulting in weak water flow. If you have low water pressure, consider installing shower heads that are specifically designed for low-pressure environments. These shower heads usually have smaller spray holes to create a more powerful water flow.
On the other hand, if you have high water pressure, it is important to choose shower heads that can handle the water volume without causing excessive water splashing or wastage. Look for shower heads with adjustable flow settings or pressure regulators to ensure a comfortable and efficient showering experience.
Additionally, consider the flow rate of your shower heads. The flow rate refers to the amount of water that the shower head releases per minute. Showers with multiple heads may require higher flow rates to provide adequate water coverage. Understanding the flow rate capabilities of your chosen shower heads will help you determine the compatibility and overall performance of your multi-shower system.
By taking into account the water pressure and flow rate considerations, you can ensure that your multiple shower heads operate smoothly and deliver the best showering experience possible.
Step 2: Gathering The Necessary Tools And Materials
Before you embark on installing multiple shower heads, it’s important to gather all the necessary tools and materials. Having everything ready beforehand will make the process smoother and more efficient. In this step, we will cover the essential tools you need as well as the materials required for a successful installation.
Essential Tools for Installation
To ensure a successful installation, here are the essential tools you will need:
- Adjustable wrench: This tool will come in handy for securing and tightening various connections.
- Plumber’s tape: Also known as Teflon tape, this thin white tape is used to create a leak-free seal between threaded connections.
- Hacksaw: You may need this tool to cut pipes or remove any unwanted parts during the installation.
- Drill: If you’re planning to mount the shower heads on the wall, a drill will be necessary to create the holes.
- Screwdriver: Depending on the type of shower head you choose, you may need a screwdriver to attach or adjust certain parts.
Materials Needed for a Successful Installation
Aside from the tools mentioned above, you will also need the following materials to ensure a successful installation:
- Shower head(s): Depending on your preference, choose the number and type of shower heads you want to install. Options range from rain shower heads to handheld shower heads.
- Shower arm(s): The shower arm connects the shower head to the water supply pipe. Make sure to choose a shower arm that is compatible with your chosen shower head.
- Piping and fittings: You may need additional piping and fittings if you’re extending or reconfiguring the plumbing system.
- Adequate Teflon tape: Make sure you have enough plumber’s tape to seal all threaded connections securely. It’s always better to have extra tape on hand.
- Wall anchors (if necessary): If you’re mounting the shower heads on the wall, wall anchors may be required for added stability.
By gathering all the necessary tools and materials before beginning the installation, you’ll save time and ensure a smoother process. Now that you have everything you need, you’re ready to move on to the next step: measuring and marking the placement of the shower heads.
Step 3: Preparing Your Shower Area
Congratulations on reaching Step 3 of installing multiple shower heads! Now, it’s time to prepare your shower area for this exciting upgrade. This step is crucial to ensure a smooth and successful installation process. In this section, we will guide you through two important aspects: assessing your existing shower setup and preparing the plumbing for multiple shower heads.
Assessing Your Existing Shower Setup
Before diving into the installation process, it’s essential to assess your existing shower setup. This will help you determine if any modifications or adjustments are needed to accommodate multiple shower heads. Here are a few key points to consider:
- Check the current water flow: Ensure that your existing plumbing system can handle the increased water pressure required for multiple shower heads. If necessary, consult a professional plumber to assess your water supply and make any necessary adjustments.
- Evaluate the available space: Take a good look at the size of your shower area. Ensure it has enough room to accommodate the additional shower heads without feeling overcrowded or compromising functionality.
- Assess the existing shower fixtures: Examine your current shower fixtures, such as the shower arm and valve. Determine if they are compatible with multiple shower heads or if they need to be replaced for proper installation.
Preparing the Plumbing for Multiple Shower Heads
Once you have assessed your existing shower setup, it’s time to prepare the plumbing for multiple shower heads. This step involves making the necessary adjustments to ensure proper water supply and distribution to each shower head. Follow these important steps during the preparation process:
- Shut off the water supply: Begin by turning off the water supply to your shower. Locate the main shut-off valve and close it to avoid any mishaps during the installation process.
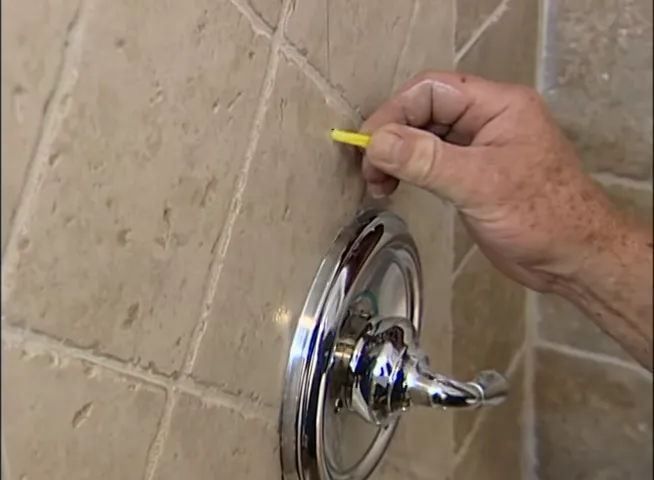
- Remove the existing shower arm: Using a wrench, carefully detach the current shower arm from the wall. Be cautious not to damage any surrounding tiles or fixtures.
- Install a diverter valve: To enable the use of multiple shower heads, a diverter valve is necessary. Replace the standard shower arm with one that includes a diverter valve. This valve will divert water flow to each shower head independently.
- Connect the new shower heads: Attach the additional shower heads to the diverter valve. Ensure a secure and leak-free connection by using plumber’s tape or thread sealant.
- Turn on the water supply: After connecting all the shower heads, turn on the water supply. Check for any leaks or irregularities in the water flow. Make necessary adjustments if needed.
By following these steps, you are well on your way to enjoying a luxurious and rejuvenating shower experience with multiple shower heads. Creating a tranquil oasis in your own bathroom has never been easier!
Step 4: Installing The Main Shower Head
Now that you have removed the existing shower head and attached the diverter valve, it’s time to move on to the final step of installing the main shower head. This is the step where you’ll install the main shower head onto the arm, completing your multiple shower head setup.
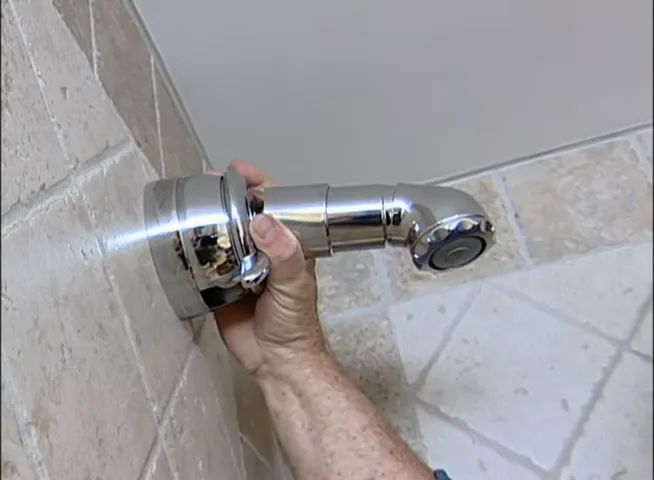
Removing the Existing Shower Head
The first step in installing the main shower head is to remove the existing shower head. This is usually done by twisting the shower head counterclockwise until it comes off. If the shower head is too tight or stuck, you can use a pair of pliers or an adjustable wrench to loosen it. Be sure to protect the shower arm by using a cloth or a piece of rubber to prevent any scratching or damage.
Attaching the Main Shower Head to the Arm
Once the existing shower head has been removed, it’s time to attach the main shower head to the arm. Before attaching the shower head, make sure there is a rubber washer inside the shower head’s connecting nut. This washer helps to create a watertight seal and prevents any leaks.
Table 1: Steps to Attach the Main Shower Head
| Steps | Description |
|---|---|
| Step 1 | Place the rubber washer inside the connecting nut of the main shower head |
| Step 2 | Screw the main shower head onto the shower arm in a clockwise direction |
| Step 3 | Tighten the main shower head using an adjustable wrench or your hand, making sure not to overtighten |
Once you have followed the steps listed in Table 1, your main shower head should be securely attached to the shower arm. Make sure the shower head is facing in the desired direction for optimal water flow.
Congratulations! You have successfully installed the main shower head of your multiple shower head setup. The next step is to test the water flow and make any necessary adjustments. After that, you can enjoy the luxury of a multi-head shower experience right in the comfort of your own home!
Step 5: Installing The Additional Shower Heads
Now that you have determined the best placement for your additional shower heads in Step 4, it’s time to install them. Follow these steps to ensure a successful installation.
Determining the Placement of Additional Shower Heads
Before you start installing the additional shower heads, it’s important to determine the proper placement. Consider the size of your shower, the placement of existing fixtures, and the desired water flow coverage. Here are the steps to determine the placement:
- Measure the distance between the existing shower head and the area where you want to install the additional shower heads.
- Ensure that there is enough space for comfortable movement while using multiple shower heads.
- Take into account the direction and angle of water flow to avoid any interference or splashing.
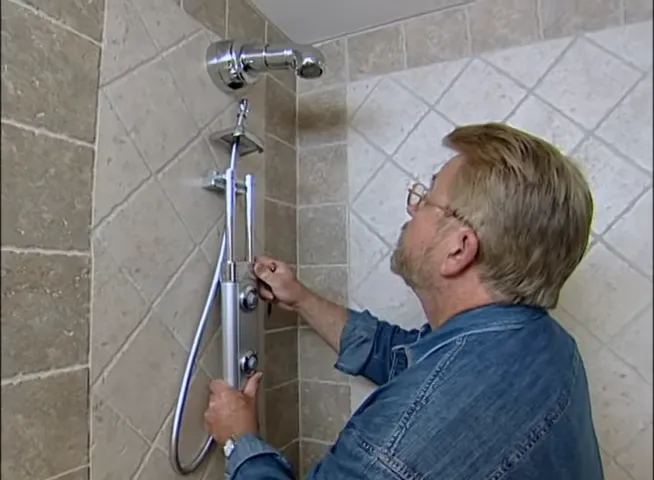
Connecting the Additional Shower Heads to the Plumbing System
Once you have determined the placement, you can proceed with connecting the additional shower heads to the plumbing system. Follow these steps:
- Shut off the water supply to the shower.
- Remove the existing shower head using a wrench.
- Apply plumber’s tape to the threaded part of the shower arm.
- Screw on the diverter valve to the shower arm, making sure it is tightly secured.
- Attach the shower head to the top outlet of the diverter valve. Use an adjustable wrench to ensure a tight fit.
- Connect the additional shower heads to the remaining outlets of the diverter valve. Again, ensure a tight fit.
- Turn on the water supply and test each shower head for proper water flow and pressure.
Remember to double-check all connections to avoid any leaks. If you do notice any leaks, tighten the connections as necessary or seek professional help if needed.
With the additional shower heads now properly installed and connected to the plumbing system, you can enjoy a luxurious and invigorating shower experience. Invite your friends and family to try it out and bask in the joy of multiple shower heads!
Step 6: Testing And Adjusting Your Multiple Shower Heads
Once you have successfully installed your multiple shower heads, it’s time to put them to the test. This step is crucial to ensure the proper functioning and performance of your shower system. In this section, we will discuss two important aspects of testing and adjusting your multiple shower heads: verifying proper water flow and pressure, and adjusting the flow and spray pattern of each shower head.
Verifying Proper Water Flow and Pressure
Before you begin adjusting the flow and spray pattern of each shower head, it’s essential to first verify that you have proper water flow and pressure. This will ensure that your shower heads are delivering a satisfying and invigorating shower experience. Here’s how you can do it:
| Step | Procedure |
| 1 | Turn on the water supply to your shower. |
| 2 | Check the water flow from each shower head. |
| 3 | Ensure that the water flow is consistent and without any blockages or leaks. |
| 4 | If you notice any issues with water flow or pressure, check the plumbing connections and make any necessary adjustments. |
Adjusting the Flow and Spray Pattern of Each Shower Head
Now that you have verified the water flow and pressure, it’s time to adjust the flow and spray pattern of each shower head. This step is important to ensure that each shower head provides the desired water coverage and intensity. Follow these steps to adjust the flow and spray pattern:
- Step: Start by turning on one shower head at a time.
Observe the flow and spray pattern. If the flow is too strong, you can reduce it by adjusting the water flow valve. If the spray pattern is uneven or concentrated in one area, you can adjust the angle or position of the shower head to achieve a more balanced spread of water.
- Step: Repeat the process for each shower head, ensuring that you achieve the desired flow and spray pattern.
Remember, it may take some trial and error to find the perfect combination of flow and spray pattern for each shower head. Take your time and make adjustments until you are satisfied with the performance of your multiple shower heads.
By following these steps and testing and adjusting your multiple shower heads, you can optimize your shower experience and enjoy the ultimate relaxation and rejuvenation.
Step 7: Maintenance And Troubleshooting
In order to keep your multiple shower heads functioning properly and ensure optimal performance, regular maintenance and troubleshooting are necessary. Here are some important aspects to consider:
Regular Cleaning and Descaling of Shower Heads
Over time, mineral deposits can accumulate in your shower heads, leading to reduced water flow and spray pattern. To maintain the efficiency of your multiple shower heads, it is important to regularly clean and descale them. Here’s how you can do it:
- Start by unscrewing the shower heads from their respective hoses or arms.
- Inspect the shower heads for any visible buildup or blockages.
- If there is mineral deposit buildup, soak the shower heads in a solution of equal parts white vinegar and water for at least 30 minutes. You can also use a commercially available descaling solution.
- Use a soft brush or toothbrush to scrub away any remaining deposits.
- Rinse the shower heads thoroughly with clean water.
- Reattach the shower heads to their hoses or arms, making sure they are securely tightened.
Regular cleaning and descaling will not only improve the performance of your multiple shower heads but also prolong their lifespan.
Common Issues and How to Resolve Them
Despite regular maintenance, you may encounter certain issues with your multiple shower heads. Here are some common problems and their possible solutions:
| Issue | Solution |
|---|---|
| Uneven water flow between the shower heads | Check the flow control valves to ensure they are fully open. Adjust the valves as necessary to achieve equal water flow. |
| Leakage around the shower heads | Inspect the connections and make sure they are tightly sealed. If necessary, use plumber’s tape to create a watertight seal. |
| Low water pressure | Check for any blockages in the shower heads or water supply lines. Clean or replace any clogged components if needed. Also, check the water pressure in your entire plumbing system, as it may be a larger issue. |
| Strange noises during operation | Ensure that all connections are secure and that there are no loose parts. If the noise persists, consult a professional plumber to identify and resolve the issue. |
By addressing these common issues promptly, you can maintain the functionality and efficiency of your multiple shower heads, ensuring a relaxing and enjoyable showering experience.
Going Beyond: Enhancing Your Multiple Shower Head System
Installing multiple shower heads in your bathroom can transform your showering experience. But why stop there? With a little extra effort, you can take your multiple shower head system to the next level. By incorporating additional features like a diverter valve, body jets, or handheld shower heads, you can create a spa-like experience right in your own home. Let’s explore some of these options to enhance your multiple shower head system.
Installing a Diverter Valve for More Control Options
If you want to have more control over your showering experience, installing a diverter valve is a great option. With a diverter valve, you can divert water flow between different shower heads, allowing you to choose which one to use at any given time. This gives you the flexibility to enjoy all of your shower heads individually or simultaneously, depending on your preference.
Adding Features like Body Jets or Handheld Shower Heads
To truly take your multiple shower head system to the next level, consider adding features like body jets or handheld shower heads. Body jets, also known as side sprays, are small shower heads that are installed on the walls of your shower. They provide a gentle massaging sensation, offering a luxurious and invigorating experience. Handheld shower heads, on the other hand, provide maximum flexibility as they can be detached from their holder and used for targeted rinsing or for those hard-to-reach areas.
By incorporating these additional features into your multiple shower head system, you can create a personalized and customizable showering experience that will make you feel like you’re stepping into a high-end spa every time you step into your bathroom.
Frequently Asked Questions
Can You Run Two Shower Heads One Valve?
Yes, you can run two shower heads using one valve. Simply install a diverter valve that allows you to switch between the shower heads. This provides the convenience of having multiple shower heads without the need for additional valves or plumbing work.
Can You Have Multiple Shower Heads?
Yes, you can have multiple shower heads in your bathroom. Having multiple shower heads can enhance your showering experience by providing a wider coverage and a more luxurious feel.
What Valve Do I Need For 2 Shower Heads?
You will need a diverter valve to operate two shower heads simultaneously.
How Many Shower Heads Can You Have On One Drain?
You can have multiple shower heads connected to one drain, as long as the drain can handle the increased water flow. The number of shower heads you can have depends on the size and capacity of the drain system.
Conclusion
Installing multiple shower heads can significantly enhance your shower experience by providing a luxurious and invigorating spa-like feeling. By following the step-by-step guide outlined in this blog post, you can easily and effectively add multiple shower heads to your bathroom.
With proper installation and careful consideration of water pressure, you can create a rejuvenating oasis right in the comfort of your own home. So why wait? Upgrade your shower today and enjoy the ultimate bathing experience.