To install a fiberglass shower pan, watch a concise video guide and follow the step-by-step instructions. It’s a convenient way to learn the process quickly and efficiently.
A fiberglass shower pan installation can be a great option for your bathroom remodel. It offers durability, versatility, and a sleek modern look. If you’re considering installing a fiberglass shower pan yourself, watching a video guide can be immensely helpful.
Visual instructions allow you to see each step in action and ensure that you’re on the right track. In just a short amount of time, you can learn how to properly prepare the space, set the pan in place, and secure it for a leak-free shower. Installing a fiberglass shower pan doesn’t have to be a daunting task, and a video guide can make the process straightforward and manageable.
Factors To Consider When Purchasing A Fiberglass Shower Pan
Fiberglass shower pans are a popular choice for bathroom installations due to their durability, ease of maintenance, and affordability. However, when purchasing a fiberglass shower pan, there are several important factors to consider to ensure you select the right one for your bathroom. In this article, we will explore the key factors that you should keep in mind when purchasing a fiberglass shower pan: size and dimensions, quality and durability, and design and style.
Size and Dimensions
One of the first factors to consider when purchasing a fiberglass shower pan is the size and dimensions. The size of your bathroom and the available space for installation will help determine the size of the shower pan you need. Measure the area where you plan to install the shower pan to get accurate dimensions. This will ensure that you choose a shower pan that fits perfectly in your bathroom without any issues.
Quality and Durability
When investing in a fiberglass shower pan, it is important to consider the quality and durability of the product. Look for shower pans that are made from high-quality materials and offer long-lasting performance. Consider the thickness of the fiberglass and the strength of the base. A thicker and sturdier shower pan will be more durable and less prone to cracks or leaks over time. Additionally, check for reviews or manufacturer warranties to ensure you are purchasing a reliable and durable product.
Design and Style
Besides functionality, the design and style of the fiberglass shower pan should also be taken into account. Consider the overall aesthetic of your bathroom and choose a shower pan that complements your existing decor. Look for different design options, such as tile patterns or textured surfaces, that can add visual interest to your shower area. Additionally, consider whether you prefer a square, rectangular, or curved shape for your shower pan. These design elements can enhance the overall look and feel of your bathroom.

Measuring And Marking The Shower Pan Area
Before you begin the installation process for a fiberglass shower pan, it is crucial to measure and mark the area where the pan will be placed. This step ensures that the shower pan fits perfectly and is aligned with the existing plumbing and walls. In this section, we will guide you through the measurement and marking process, providing you with the necessary tools and techniques to achieve a seamless installation.
Tools needed for measurement
Prior to measuring and marking the shower pan area, gather the following tools:
- Tape measure
- Pencil or marker
- Straightedge or level
Ensure that you have these tools readily available to expedite the measurement process.
Marking the area for the shower pan
Once you have gathered the necessary tools, it’s time to mark the area where the shower pan will be placed. Follow these steps:
- Clear the space: Remove any existing fixtures or debris from the shower area to create a clean and unobstructed workspace.
- Measure and mark the base dimensions: Using the tape measure, measure the dimensions of the shower area. Start by measuring the length and width, ensuring accuracy to avoid any future complications. Mark the measurements using the pencil or marker on the walls or floor, depending on the material of your bathroom.
- Establish a straight centerline: Use the straightedge or level to draw a straight line from the middle of one wall to the middle of the opposite wall. This centerline will serve as a guide for aligning the shower pan.
- Consider the drain location: Locate the position of the drain in the shower area. Measure the distance of the drain from the walls and mark it accordingly. This marking will help you align the shower pan with the plumbing system.
- Double-check the markings: Before proceeding with the installation, review your measurements and markings to ensure accuracy. This step helps to avoid potential errors during the installation process.
By following these steps and using the appropriate tools, you can successfully measure and mark the area for your fiberglass shower pan. Taking the time to ensure precise measurements will contribute to a seamless installation process and a perfectly-fitted shower pan.

Removing The Existing Shower Pan (If Applicable)
Before you can install a new fiberglass shower pan, you need to remove the old one. This step is only applicable if you already have a shower pan that needs to be replaced. Removing the existing shower pan can be a complex task, but with the right steps and precautions, you can safely complete the process without causing any damage or complications.
Steps to Safely Remove the Old Shower Pan
- Start by turning off the water supply to the shower. This step is crucial to prevent any accidents or water damage during the removal process.
- Remove any fixtures or accessories attached to the shower pan, such as handles, faucets, or drain covers. Use a screwdriver or wrench to loosen and remove these components.
- Next, you will need to break the seal between the shower pan and the surrounding walls. Carefully run a utility knife along the edges of the pan to cut through any caulk or adhesive.
- Now, it’s time to lift and remove the old shower pan. Start by gently lifting one corner, gradually working your way around the pan. Be cautious and take your time to avoid causing any damage to the plumbing or surrounding walls.
- If the shower pan is secured with screws or bolts, use a screwdriver or wrench to remove them. Keep track of these fasteners as they may be needed when installing the new pan.
- Once the old shower pan is removed, carefully inspect the subfloor and surrounding area for any signs of damage or water leaks. Address any issues before proceeding with the installation of the new shower pan.
Tips for Dealing with Any Potential Issues During Removal
While removing the existing shower pan, you may encounter some unexpected challenges. Here are a few tips to help you handle these potential issues:
- If the shower pan is stubborn and difficult to lift, use a pry bar or a crowbar to provide some leverage, ensuring you apply even pressure to avoid cracking the pan or damaging the surrounding area.
- In case you encounter any water leaks or damage to the subfloor, it’s essential to address these issues promptly. Consult a professional plumber or contractor if needed to ensure the necessary repairs are done correctly.
- Take pictures or make notes of the plumbing connections and any specific details you may need when installing the new shower pan. These references will be helpful during the reinstallation process.
- If you’re unsure about any part of the removal process or you’re dealing with a complex layout, consider seeking professional assistance. Expert guidance can save you time, effort, and potential headaches in the long run.
Now that you have successfully removed the old shower pan and navigated through any potential issues, you’re ready to move on to the next step of installing the new fiberglass shower pan. Stay tuned for our upcoming blog post, where we will guide you through the installation process, ensuring a seamless and watertight fit for your new shower pan.
Preparing The Subfloor
Before installing a fiberglass shower pan, it is crucial to properly prepare the subfloor. This ensures a stable and secure foundation for the shower pan, preventing any future issues such as leaking or sagging. In this section, we will guide you through the essential steps of preparing the subfloor.
Checking the Subfloor for Any Damage
The first step in preparing the subfloor is to carefully inspect it for any signs of damage. This includes checking for rot, water damage, or structural issues. To do this, follow these steps:
- Remove any existing flooring materials, such as tiles or vinyl, to expose the subfloor.
- Visually inspect the subfloor for any visible signs of damage, such as discoloration, warping, or soft spots.
- Probe the subfloor using a screwdriver or awl to check for any soft or weakened areas. Pay extra attention to areas near drains or water sources.
If you notice any damage during the inspection, it is important to address it before proceeding with the installation of the fiberglass shower pan.
Repairing or Reinforcing the Subfloor if Necessary
If the subfloor exhibits any signs of damage or weakness, it is crucial to repair or reinforce it before proceeding. Here are some steps to follow:
- Replace any rotten or damaged sections of the subfloor by cutting out the affected area and installing a new piece of plywood or oriented strand board (OSB).
- Ensure that the new piece of subfloor is securely fastened to the existing floor joists using screws or nails.
- If the subfloor is sagging or uneven, you may need to install additional support beams or joists to provide the necessary stability.
By thoroughly inspecting and repairing the subfloor, you can ensure a solid foundation for your fiberglass shower pan installation. Taking the time to complete these steps will help prevent future issues and ensure a long-lasting and reliable shower.
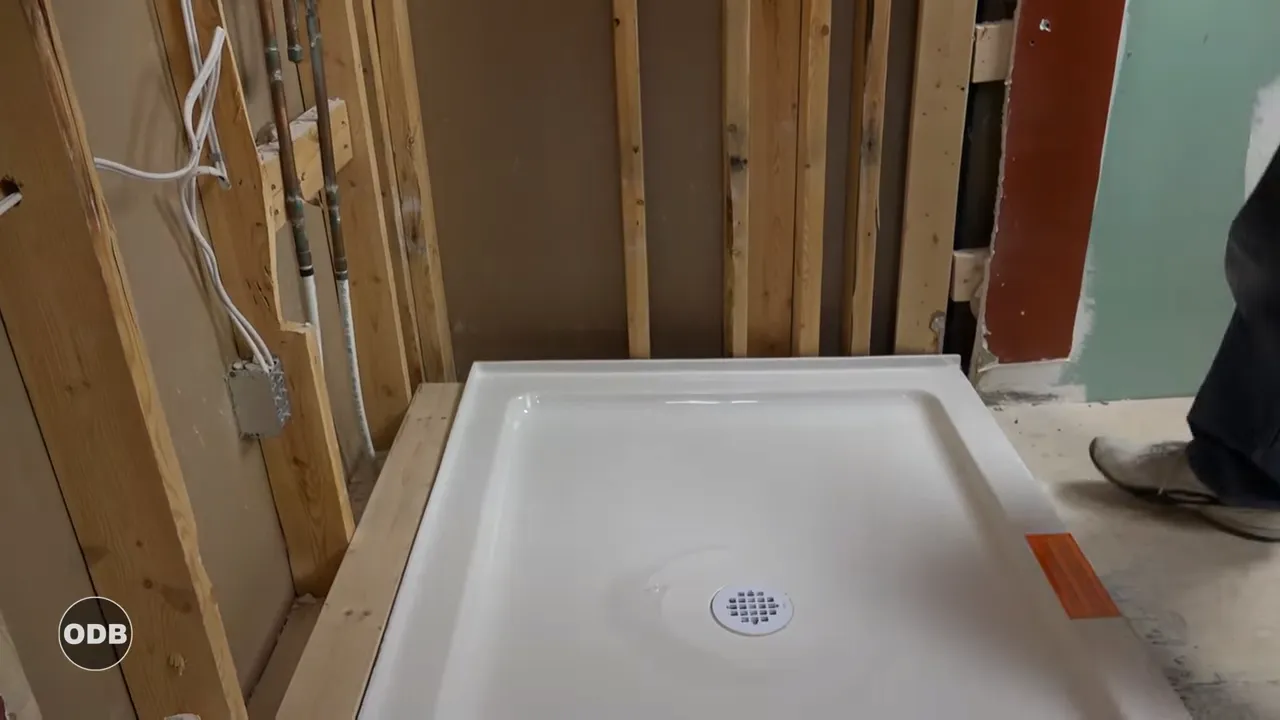
Placing The Shower Pan
Positioning the pan correctly in the marked area
Once you have prepared the area for your new fiberglass shower pan, it’s time to start the installation process. The first step is to position the pan correctly in the marked area. This is crucial to ensure a proper fit and functionality of your shower.
To position the pan correctly, follow these steps:
- Carefully lift the fiberglass shower pan and place it in the designated area. Make sure it aligns with the drain hole and the walls of the shower enclosure.
- Use a level to check if the pan is sitting evenly. Adjust the position if necessary to ensure a level placement.
- Ensure that the flange of the shower pan is resting securely against the studs or support structure of the shower walls. This will provide stability and prevent any shifting or movement in the future.
Properly positioning the fiberglass shower pan is essential to ensure a secure and stable foundation for your shower. Taking the time to position it correctly will save you from potential headaches down the line.
Ensuring proper alignment and level placement
Once you have positioned the pan correctly, it’s important to ensure proper alignment and level placement. This will guarantee a smooth and functional shower experience. Here are the key steps to follow:
- Use a level to check if the pan is perfectly aligned with the surrounding walls. A level installation is crucial to prevent water leakage and ensure proper drainage.
- Adjust the position of the shower pan if necessary to achieve proper alignment. This may involve slight movements and adjustments to ensure a seamless fit.
- Continue to use the level to ensure the pan is placed levelly. Any unevenness in the placement can lead to water pooling and potential damage to the shower pan.
- Double-check all sides of the shower pan to ensure it is evenly aligned and level. Take your time during this step to guarantee an optimal installation.
By ensuring proper alignment and level placement of your fiberglass shower pan, you are laying the foundation for a functional and long-lasting shower. Attention to detail during this step will pay off in the long run.
Attaching The Shower Pan To The Subfloor
Securing the pan using appropriate fasteners
Attaching the shower pan to the subfloor is a crucial step in the installation process. Using the right fasteners not only ensures a secure fit but also helps prevent any future movement that may lead to leaks or damage. In this section, we will explore the different types of fasteners that are suitable for securing a fiberglass shower pan to the subfloor.
Types of fasteners for securing the shower pan
When it comes to fastening a fiberglass shower pan to the subfloor, it’s important to choose the appropriate type of fasteners. Here are some commonly used options:
- Screws: Screws are a popular choice for securing shower pans as they provide a strong hold. Make sure to use corrosion-resistant screws to prevent rusting and ensure longevity.
- Nails: Nails can also be used to attach the shower pan to the subfloor. However, they may not offer the same level of security as screws.
- Adhesive: In addition to using fasteners, applying adhesive between the shower pan and subfloor can further enhance stability. You can use a waterproof construction adhesive specifically designed for this purpose.
Ensuring stability and preventing future movement
Once you have selected the appropriate fasteners, it’s essential to ensure stability and prevent any future movement of the shower pan. This will help avoid potential leaks or damage in the long run. Here are some steps to follow:
- Positioning: Carefully position the shower pan in the desired location on the subfloor, ensuring it aligns with the drain opening.
- Leveling: Use a leveling tool to ensure the shower pan is perfectly level from all sides. This will prevent any tilting or unevenness that may affect its stability.
- Securing: Using the selected fasteners, firmly attach the shower pan to the subfloor at regular intervals. Follow the manufacturer’s instructions for recommended spacing and installation techniques.
- Reinforcing: For additional stability, consider reinforcing the edges and corners of the shower pan with additional fasteners. This will help distribute the weight evenly and minimize the risk of movement.
- Sealing: Finally, apply a waterproof sealant or caulk around the edges of the shower pan where it meets the subfloor. This will provide an extra layer of protection against water penetration.
By securing the shower pan using appropriate fasteners and ensuring stability, you can enjoy a leak-free and durable installation for years to come.
Sealing And Waterproofing
If you’re planning to install a fiberglass shower pan, the next crucial step is sealing and waterproofing. This step is essential to ensure that your shower pan remains watertight and free from leaks. In this section, we will guide you through the process of applying a waterproof membrane or sealant around the edges of your shower pan and checking for potential leaks. By following these steps, you can ensure a longer lifespan for your shower pan and prevent any water damage to your bathroom.
Applying a waterproof membrane or sealant around the edges
One of the most important steps in sealing and waterproofing your fiberglass shower pan is applying a waterproof membrane or sealant around the edges. This will help to provide an additional layer of protection against water seepage. Here’s how you can do it:
- First, ensure that the edges of your shower pan are clean and free from any debris or dust.
- Apply a thin layer of waterproofing membrane or sealant along the edges of your shower pan. You can use a brush or a roller for this step, depending on the type of sealant you are using.
- Make sure to cover all the edges thoroughly, paying extra attention to the corners and joints.
- Allow the waterproof membrane or sealant to dry completely, as per the manufacturer’s instructions.
Checking for any potential leaks and addressing them
Once you have applied the waterproof membrane or sealant, the next step is to check for any potential leaks and address them promptly. Here’s what you need to do:
- Fill your shower pan with water to a level just below the edges.
- Observe the water level closely for any signs of leakage. Pay attention to areas around the drain, corners, and seams.
- If you notice any leaks, mark the area and drain the water from the shower pan.
- Once the shower pan is dry, apply an additional layer of waterproof membrane or sealant to the marked areas. Make sure to follow the manufacturer’s instructions for drying time.
- Repeat the water-filling and leak-checking process until no leaks are detected.
By applying a waterproof membrane or sealant around the edges of your fiberglass shower pan and checking for potential leaks, you can ensure a watertight installation. Follow these steps carefully, and enjoy a durable and leak-free showering experience in your newly installed fiberglass shower pan.
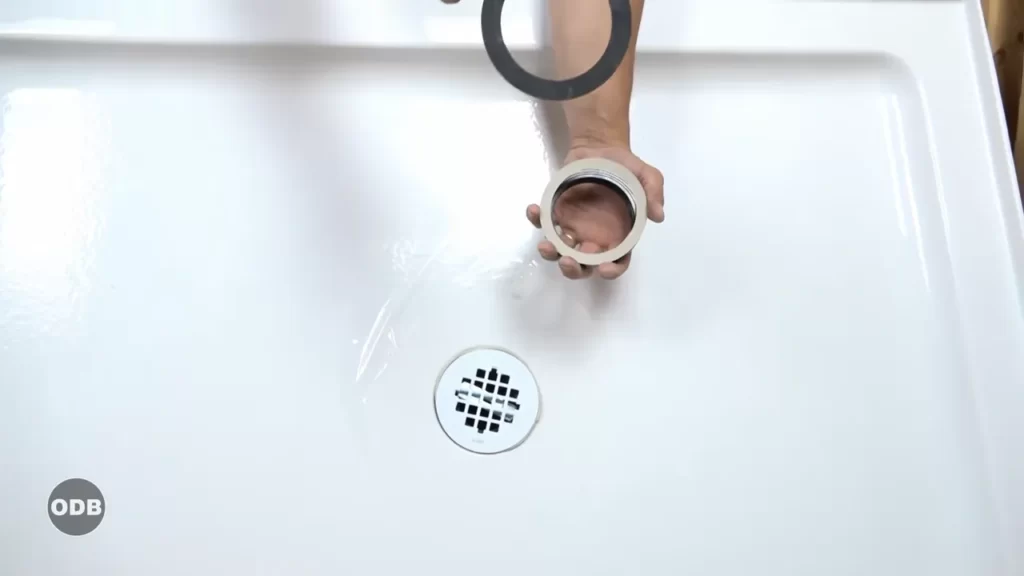
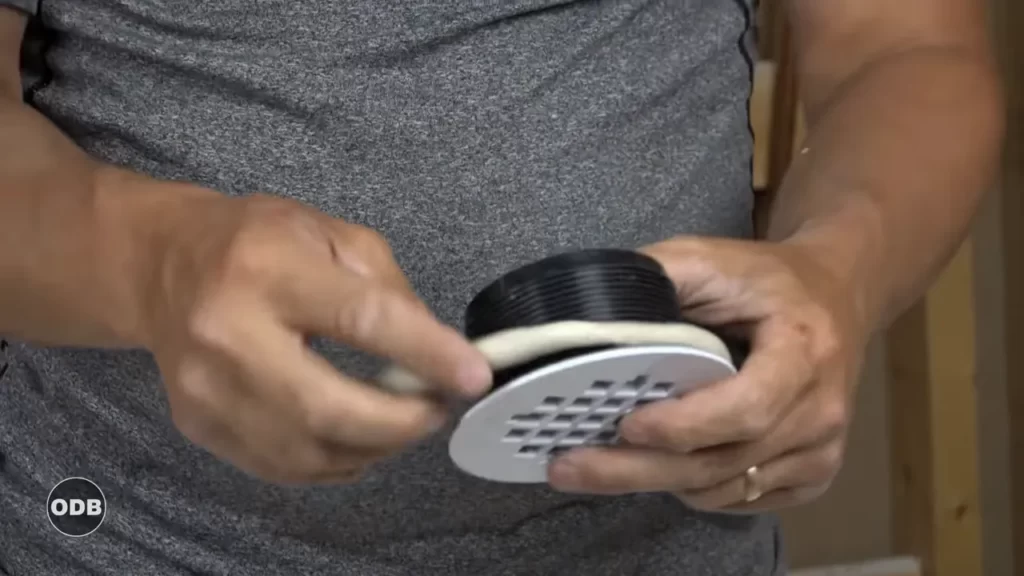
Installing The Drain Base
Attaching the Drain Base to the Shower Pan
When it comes to installing a fiberglass shower pan, one crucial step is attaching the drain base securely. Proper installation of the drain base ensures a stable and functional shower that will last for years to come. In this section, we will guide you through the process of attaching the drain base to the shower pan, ensuring a proper seal and tight connection.
- First, gather all the necessary tools and materials for this step. You will need the fiberglass shower pan, drain base, plumber’s putty, adjustable wrench, and a screwdriver.
- Before starting, make sure the area where the drain base will be attached is clean and free from any debris. A clean surface will help to ensure a proper seal.
- Apply a thin layer of plumber’s putty around the outer edge of the drain base. The plumber’s putty acts as a sealant, preventing any leaks from occurring.
- Place the drain base on top of the plumber’s putty, aligning it correctly with the drain hole in the shower pan.
- Using an adjustable wrench, tighten the screws on the drain base to secure it in place. Make sure not to overtighten, as this could damage the fiberglass shower pan.
By following these simple steps, you can ensure a proper seal and tight connection between the drain base and the fiberglass shower pan. This will prevent any leaks or water damage, providing you with a reliable and long-lasting shower.
Connecting The Drain Pipe
In the process of installing a fiberglass shower pan, connecting the drain pipe is a crucial step that requires attention to detail. By following the proper procedure, you can ensure that your drain pipe is correctly cut to the appropriate length and securely attached to the drain base. This section will guide you through the steps necessary for a successful connection.
Cutting the Drain Pipe to the Correct Length
Before installing the shower pan, it is important to cut the drain pipe to the correct length. This ensures a proper fit and prevents any potential leaks or complications down the line. Here is a step-by-step process to guide you through cutting the drain pipe:
- Measure the distance from the bottom of the shower pan to the drain base.
- Using a hacksaw or pipe cutter, carefully cut the drain pipe to the measured length. Take your time and make precise cuts to ensure accuracy.
- Smooth out any rough edges or burrs on the cut pipe using a file or sandpaper. This will help create a clean and secure connection.
Attaching the Drain Pipe to the Drain Base
Once the drain pipe has been cut to the correct length, it’s time to attach it to the drain base. This step requires careful attention to ensure a tight and secure connection. Follow these steps:
- Apply plumber’s putty or silicone sealant to the drain base to create a watertight seal.
- Insert the cut end of the drain pipe into the drain base, ensuring it fits snugly.
- Tighten the nut on the drain base using a wrench or pliers to secure the connection. Be careful not to overtighten, as this can damage the seal or cause leaks.
- Inspect the connection to ensure it is secure and leak-free. If necessary, apply additional sealant or tightening to achieve a watertight connection.
By carefully following these steps, you can confidently connect the drain pipe of your fiberglass shower pan. As a result, you’ll have a secure and efficient plumbing system that will enhance your showering experience for years to come.
Testing For Leaks And Proper Drainage
Testing for Leaks and Proper Drainage
When it comes to installing a fiberglass shower pan, testing for leaks and ensuring proper drainage is crucial. After all, you want to make sure that your new shower is both watertight and functional. In this section of our blog post, we will guide you through the process of filling the shower pan with water and checking for leaks. We’ll also cover how to ensure proper drainage and functionality so that you can confidently enjoy your new shower.
Filling the shower pan with water and checking for leaks
To test for leaks, you’ll need to fill the shower pan with water. Follow these steps to ensure that your shower is leak-free:
1. Begin by closing the drain and filling the shower pan with water. Make sure the water level reaches above the drain hole.
2. As the water fills the pan, carefully inspect the entire surface of the pan for any signs of leakage. Pay close attention to corners, seams, and around the drain area.
3. If you notice any leaks, stop the water flow and identify the source of the leak. Common areas for leaks include faulty seals, cracks in the pan, or loose connections.
4. Once you’ve identified the source of the leak, take appropriate measures to fix it. This may involve applying a silicone sealant or tightening loose connections. Make sure to let the sealant dry before retesting for leaks.
Ensuring proper drainage and functionality
Proper drainage is essential for preventing water accumulation and potential damage to your bathroom. Here’s how to ensure that your shower has efficient drainage:
1. Check the slope: The shower pan should have a slight slope towards the drain to allow water to flow smoothly. Use a level to ensure that the pan’s surface is sloping correctly. Adjust the leveling if necessary.
2. Test the drain: Remove the cap or cover of the drain and pour some water directly into it. Observe how quickly the water drains. Ideally, the water should drain away within a few seconds. If there are any obstructions or slow drainage, you may need to clear the drain or adjust its components.
3. Install a drain strainer: To prevent future clogs, consider installing a drain strainer. This simple addition can catch hair, debris, and other particles, minimizing the risk of blockages and maintaining proper drainage.
By following these steps, you can ensure that your fiberglass shower pan is leak-free and has efficient drainage. Taking the time to test for leaks and ensure proper functionality will save you potential headaches down the road. Now, you can confidently move on to the next steps of your shower installation process. Remember to consult the manufacturer’s instructions and seek professional assistance if needed.
Securing And Finishing The Shower Pan
Once you have successfully installed the fiberglass shower pan in your bathroom, the next step is to secure and finish the shower pan to ensure a durable and stylish installation. This involves adding additional support if necessary and installing any trim or finishing touches to complete the installation.
Adding additional support if necessary
If you have a large shower pan or if your floor is not perfectly level, you may need to add additional support to ensure that the shower pan is stable and sturdy. Here are the steps to follow:
- Start by identifying any areas where the shower pan feels unstable or wobbles.
- Measure and cut wooden shims to fit the areas that require additional support.
- Place the wooden shims underneath the shower pan in the areas where support is needed.
- Check for stability and adjust the shims as necessary until the shower pan feels secure.
By adding this extra support, you can be confident that your fiberglass shower pan will withstand daily use and provide a stable base for your shower.
Installing any trim or finishing touches to complete the installation
Once the shower pan is securely in place, it’s time to add the finishing touches that will not only enhance the overall look of your shower but also provide a watertight seal. Follow these steps for a polished and completed installation:
- Apply a silicone adhesive along the edges of the shower pan where it meets the walls. This will create a watertight seal and prevent any leaks.
- Install any required trim pieces, such as corner trims or decorative borders, following the manufacturer’s instructions.
- Check all the seams and joints for any gaps or imperfections. Fill in any gaps with silicone caulk and smooth it out with a caulk finishing tool or your finger.
- Inspect the entire installation to ensure that everything is properly secured and sealed. Make any necessary adjustments or repairs.
By completing these finishing touches, you will not only enhance the aesthetics of your shower but also ensure that it remains leak-free for years to come.
Frequently Asked Questions
Do Fiberglass Shower Pan Need Mortar Under?
No, fiberglass shower pans do not require mortar underneath. They are designed to be installed directly on the subfloor or a bed of adhesive. Make sure to follow the manufacturer’s instructions for proper installation.
What Is The Proper Way To Install A Shower Pan?
To install a shower pan, follow these steps: 1. Prepare the base by checking for levelness and making necessary adjustments. 2. Apply a layer of mortar or adhesive to the subfloor. 3. Place the shower pan onto the mortar and press down firmly.
4. Connect the drain to the shower pan and tighten securely. 5. Seal the edges of the shower pan with silicone caulk. Remember to consult the manufacturer’s instructions for specific installation details.
What Is The Difference Between A Shower Base And A Shower Pan?
A shower base and a shower pan are the same thing. They refer to the waterproof foundation of a shower that collects and drains water.
How Do You Attach A Shower Pan To Studs?
Attach a shower pan to studs by following these steps. First, position the pan over the drain and mark the stud locations. Then, drill pilot holes through the pan and into the studs. Next, secure the pan to the studs using screws or nails.
Finally, check for any leaks and ensure a tight fit.
Conclusion
To summarize, installing a fiberglass shower pan is a straightforward process that can be easily accomplished with the right tools and techniques. By following the step-by-step instructions outlined in the video, you can achieve a professional-looking installation. Remember to measure carefully, properly prepare the subfloor, and ensure a watertight seal.
With a little patience and attention to detail, you can successfully install a fiberglass shower pan and enjoy a beautiful and durable shower space.