To install a shower control valve, shut off the water supply, remove the old valve, and attach the new valve according to the manufacturer’s instructions. Now let’s delve into the details of installing a shower control valve.
When it comes to updating or renovating your bathroom, one of the essential components to consider is the shower control valve. This valve is responsible for controlling the flow and temperature of the water in your shower. Installing a new shower control valve may seem daunting, but with the right tools and steps, it can be a straightforward process.
In this guide, we will provide you with a step-by-step tutorial on how to install a shower control valve. By following these instructions, you can ensure that your new valve is properly installed and functioning efficiently.
Understanding The Basics Of Shower Control Valves
When it comes to installing a shower control valve, having a clear understanding of the basics is essential. A shower control valve is a vital component that regulates the flow and temperature of water in your shower. Without it, you would be left with inconsistent water pressure and potentially scalding temperatures.
What is a Shower Control Valve?
A shower control valve, also known as a mixing valve, is responsible for blending hot and cold water to achieve the desired temperature in your shower. It is typically installed within the wall and connects to the water supply lines. This valve allows you to adjust the water temperature and control the flow with ease.
Different Types of Shower Control Valves
There are several types of shower control valves available in the market, with each having its own unique features and advantages. Here are some of the most common types:
- Pressure-Balancing Valve: This type of valve ensures a steady water pressure, even if there are fluctuations in the hot or cold water supply. It helps to prevent sudden changes in temperature, ensuring a comfortable and safe showering experience.
- Thermostatic Valve: A thermostatic valve allows you to set and maintain a specific water temperature. It automatically adjusts the ratio of hot and cold water to keep the temperature consistent, even if there are changes in the overall water pressure.
- Manual Valve: A manual valve is the most basic type of shower control valve. It requires you to manually adjust the water temperature and flow by turning the handle or lever. While it lacks the advanced features of other valves, it can be a cost-effective option for those on a budget.
Importance of a Properly Installed Control Valve
Ensuring that a shower control valve is properly installed is crucial for a number of reasons. A correctly installed control valve:
- Prevents scalding: A properly installed valve helps to maintain a safe temperature and prevents sudden surges of hot water that can cause scalding.
- Ensures consistent water pressure: By regulating the flow of water, a control valve helps to maintain consistent water pressure, allowing for a comfortable shower experience.
- Increases efficiency: An accurately installed control valve helps to optimize water usage, reducing wastage and increasing overall efficiency.
- Enhances durability: A well-installed valve ensures that the internal components are protected, extending the lifespan of the shower system.
It is important to hire a professional plumber or follow the manufacturer’s instructions carefully when installing a shower control valve to ensure that it functions properly and provides a safe and enjoyable showering experience.
Step 1: Gathering The Necessary Tools And Materials
Identifying the tools needed for the installation
In order to successfully install a shower control valve, you’ll need to gather a few essential tools. Having the right tools on hand will make the process much smoother and ensure that you can complete the job without any unnecessary interruptions. Here are the tools you will need:
- Adjustable wrench
- Phillips screwdriver
- Plumber’s tape
- Tubing cutter
- Pliers
- Level
- Drill
- Masking tape
By having these tools ready before you begin the installation, you can be confident that you have everything you need to complete the job efficiently.
Understanding the materials required for the job
In addition to the necessary tools, there are also a few materials that you will need for installing a shower control valve. These materials will vary depending on the type of valve you choose, but here are some common materials that you may need:
- Shower control valve
- Pipe fittings
- Pipe connectors
- Pipe thread sealant
- PVC primer and cement
- Teflon tape
- Showerhead and arm
It’s important to have these materials readily available to ensure that your installation goes smoothly. By preparing them in advance, you can avoid unnecessary delays and interruptions during the process.
How to choose the right control valve for your shower
Choosing the right control valve for your shower is crucial to ensure that you have a satisfying and functional showering experience. Here are some key factors to consider when making your selection:
- Water pressure compatibility: Determine the water pressure in your home and choose a control valve that is compatible with it. This will ensure optimal performance.
- Temperature control options: Look for a valve that offers precise temperature control, allowing you to enjoy your shower at the perfect temperature.
- Durability and reliability: Invest in a control valve that is made from high-quality materials, ensuring longevity and minimal maintenance.
- Style and design: Consider the overall aesthetic of your bathroom and select a control valve that complements the existing fixtures and decor.
By considering these factors, you can choose a control valve that not only meets your functional requirements but also enhances the overall look and feel of your shower.
Step 2: Shutting Off The Water Supply
Before you can begin installing a new shower control valve, it is crucial to shut off the water supply to the shower. This step ensures a safe and smooth installation process without any unwanted leaks or accidents.
1. Locate the main water shut-off valve
The main water shut-off valve is usually located near the water meter or in the basement. It is essential to know the exact location of this valve to effectively turn off the water supply to the entire house or specific areas.
2. Turning off the water supply to the shower
Once you have located the main water shut-off valve, follow these steps to turn off the water supply to the shower:
- Locate the water shut-off valves specifically for the shower. These may be beneath the sink or behind an access panel in the wall.
- Turn the valves clockwise (to the right) until they are fully closed. This will stop the flow of water to the shower.
- To ensure that the water supply is completely shut off, open the shower faucet and let any remaining water drain out.
3. Draining any remaining water in the pipes
After turning off the water supply to the shower, it is crucial to drain any remaining water in the pipes. This step helps avoid any unwanted leakage or damage during the installation process.
To drain any remaining water in the pipes, follow these steps:
- Start by opening all the faucets in the affected area. This includes both hot and cold water faucets.
- Allow the water to flow until it stops completely.
- Once the water has stopped, close all the faucets in the area.
By following these steps, you can safely and effectively shut off the water supply and drain any remaining water before moving on to the next steps of installing the shower control valve. Take care to ensure that each step is carried out correctly to avoid any issues during the installation process.
Step 3: Removing The Existing Shower Head And Trim
Now that you have successfully shut off the water supply and disconnected the pipes, it’s time to move on to the next step: removing the existing shower head and trim. This step is crucial in the installation process as it allows you to access the control valve and make any necessary replacements or repairs.
How to safely remove the shower head
Removing the shower head requires a delicate touch to avoid damaging any surrounding tiles or fixtures. Follow these steps for a safe removal:
- Using an adjustable wrench, grip the base of the shower head firmly.
- Rotate the shower head counterclockwise until it loosens.
- Continue unscrewing the shower head by hand until you can fully remove it.
- Set aside the old shower head for disposal or cleaning, depending on its condition.
Removing the old trim from the control valve
After removing the shower head, you can proceed to remove the old trim from the control valve. Follow these steps:
- Inspect the trim for any visible screws or clips holding it in place.
- Using a screwdriver or appropriate tool, remove the screws or clips securing the trim.
- Gently pull the trim away from the wall, being careful not to damage the surrounding tiles or the valve itself.
- Set aside the old trim for disposal or replacement if needed.
Inspecting the exposed valve for any damage
With the shower head and old trim removed, take a moment to inspect the exposed valve for any signs of damage or wear. This step is crucial to ensuring the proper functioning of your new shower control valve. Pay attention to the following:
- Check for any visible cracks, leaks, or rust on the valve body.
- Ensure that the valve is securely fastened to the wall without any loose parts.
- Take note of any potential issues or abnormalities that may require further attention.
By inspecting the exposed valve during the installation process, you can address any issues promptly, ensuring a smooth and trouble-free shower control valve replacement.
Now that you have successfully removed the shower head and old trim, as well as inspected the exposed valve, you are ready to move on to the next step: installing the new trim and shower head. Stay tuned for step 4 of our comprehensive guide to installing a shower control valve!
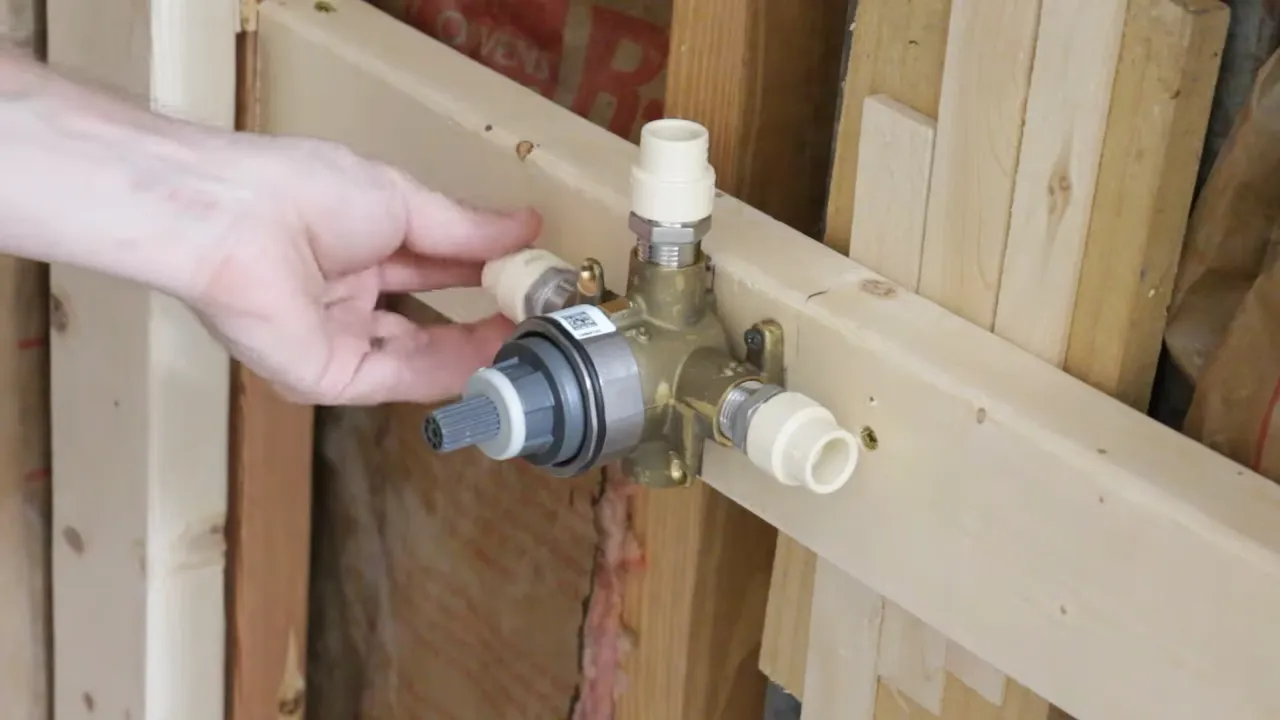
Step 4: Preparing The Valve And Water Lines
Now that you have successfully attached the showerhead and arm, it’s time to focus on preparing the valve and water lines. This step plays a crucial role in ensuring proper functioning and longevity of your shower control valve. Let’s break down this process further.
Cleaning the Valve and Water Lines
Once you have located the valve inside the wall, it’s essential to clean it thoroughly before installation. Use a clean cloth to wipe away any dirt or debris that may have accumulated over time. Ensure all parts are free from any obstructions that could potentially cause leaks or hinder water flow.
Applying Plumber’s Tape or Thread Sealant
After cleaning, it’s time to apply plumber’s tape or thread sealant to the valve threads. This step is crucial for preventing leaks and ensuring a tight seal between the valve and water lines. Plumber’s tape is a thin, white tape that you can wrap around the threads, while thread sealant is a liquid substance that you can apply directly to the threads. Both options work effectively, so choose one that suits your preference.
Ensuring Proper Alignment and Orientation of the Valve
Before connecting the valve to the water lines, it’s essential to ensure proper alignment and orientation. Improper alignment can lead to leaks or restricted water flow. Take the time to double-check that the valve is facing the correct direction, with the hot and cold water inlets aligned accordingly. This step will help ensure optimal water temperature control and a smooth showering experience.
To facilitate easy understanding, here are the steps in an ordered list format:
- Clean the valve and water lines thoroughly
- Apply plumber’s tape or thread sealant to the valve threads
- Ensure correct alignment and orientation of the valve
Remember, proper preparation of the valve and water lines is essential for optimal functioning and longevity of your shower control valve. Take your time through this step to ensure a smooth installation process.
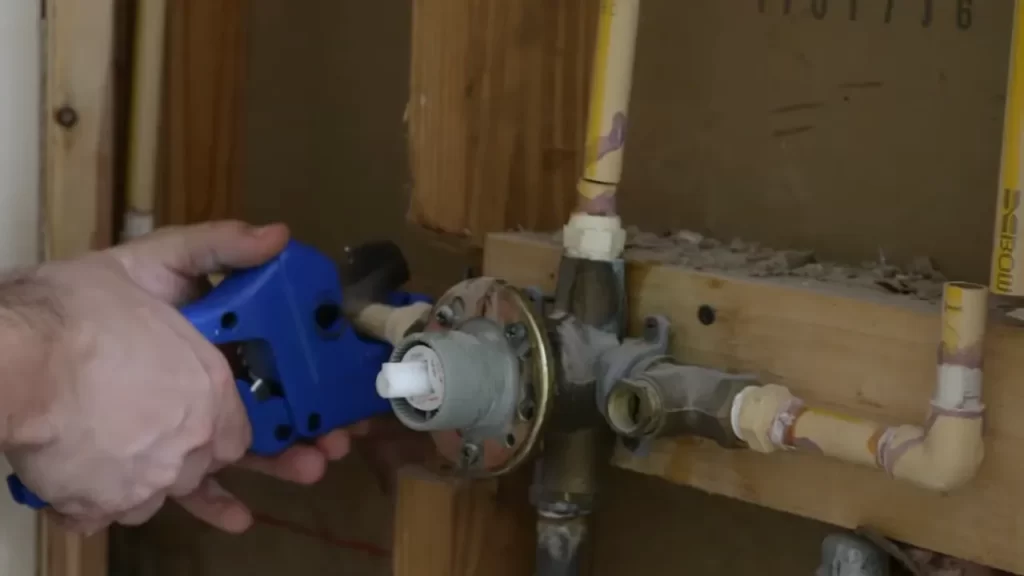
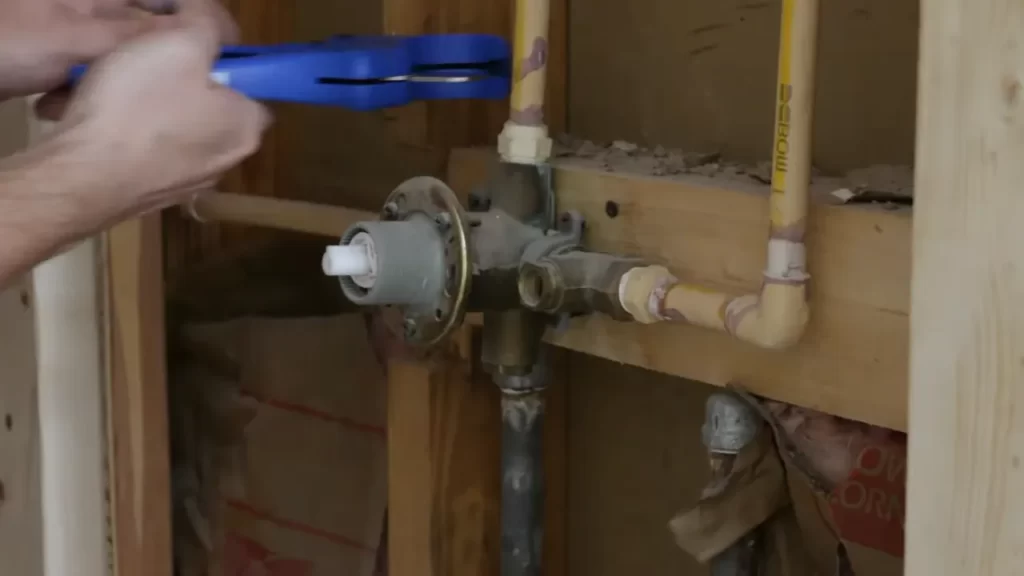
Step 5: Installing The Control Valve
Now that you have prepared the shower area and connected the water lines, it’s time to install the control valve. This step is crucial as it allows you to regulate the water flow and temperature to your liking. Follow the instructions below to ensure a proper installation of the control valve.
Connecting the valve to the water lines
Take the control valve and carefully position it in the designated area on the shower wall. Ensure that the hot and cold water supply lines are within reach. Use a tape measure or ruler to double-check the distance and ensure accurate positioning. Once you have confirmed the positioning, proceed with the following steps:
- Using an adjustable wrench, connect the hot water supply line to the valve’s designated hot water inlet. Apply gentle pressure and turn the wrench clockwise to tighten the fitting securely. This will prevent any potential leaks in the future.
- Repeat the above step for the cold water supply line, connecting it to the valve’s cold water inlet. Again, ensure the fitting is tightened securely to avoid any water leakage.
Remember to use plumbers tape on the threaded areas of the fittings to create a watertight seal.
Tightening the fittings securely
After connecting the water lines to the control valve inlet, it’s important to ensure that all fittings are tightened securely. A loose fitting can not only cause water leaks but also compromise the functionality of the valve. Follow these steps to tighten the fittings:
- Using your adjustable wrench, grasp the fittings on both the hot and cold water supply lines at the point where they connect to the control valve.
- Apply pressure in a clockwise direction to tighten each fitting. Be careful not to overtighten, as this can damage the threads or fittings.
- Once tightened, visually inspect the fittings to ensure there are no gaps or visible signs of looseness.
Testing the valve for leaks
Now that the control valve is securely connected and the fittings are tightened, it’s time to test for leaks. This step is crucial to guarantee the proper functioning and reliability of your shower system. Follow the steps below to test the valve for leaks:
- Turn on both the hot and cold water supply lines.
- Allow the water to flow through the control valve and check for any signs of leakage around the fittings and valve body.
- If you notice any leaks, use your adjustable wrench to gently tighten the fitting in question. Check again for leaks after tightening.
- Once you are satisfied that there are no leaks, turn off the water supply lines.
Congratulations! You have successfully installed the control valve for your shower. Make sure to double-check the fittings and valve connections before proceeding with the next steps of your shower installation.
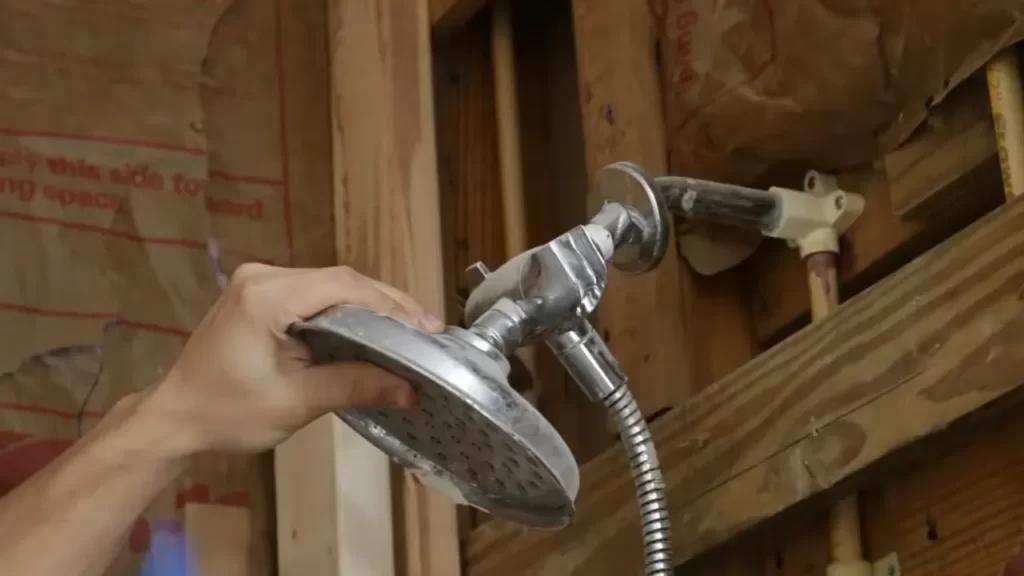
Step 6: Installing The New Trim And Shower Head
After successfully attaching the valve and connecting the water supply and shower arm in the previous steps, it is now time to add the finishing touches to your new shower installation. This step involves attaching the new trim onto the valve and mounting the shower head to the arm. Let’s dive right in.
Attaching the new trim onto the valve
To complete the aesthetic look of your shower, you will need to attach the new trim onto the valve. This is a relatively straightforward process that requires a few simple steps:
1. Start by removing the protective cover from the trim. Be careful not to damage the finish during this step.
2. Align the trim with the valve, ensuring that all the screw holes are in their proper positions.
3. Once aligned, insert the screws through the trim and into the screw holes on the valve.
4. Using a screwdriver, tighten the screws firmly but not excessively, as overtightening can cause damage to the trim and valve.
5. Once all the screws are securely fastened, take a step back and admire the updated look of your shower.
Mounting the shower head to the arm
With the trim securely in place, it’s time to install the shower head onto the arm. Follow these simple steps:
1. Apply plumber’s tape to the threads of the shower arm to ensure a watertight seal.
2. Align the shower head with the arm, making sure that the threads match up.
3. Begin turning the shower head clockwise onto the arm, starting by hand. Continue tightening with a wrench until it is snug.
4. Take care not to overtighten, as this can cause damage to the shower head or arm.
5. Once properly attached, turn on the water supply and test the shower head for any leaks. If you notice any leaks, use the wrench to tighten the connection further.
6. Adjust the shower head position to your desired angle, ensuring optimal water flow during your showers.
Checking for any leaks and adjusting as necessary
Now that everything is installed, it is important to check for any leaks and make adjustments if necessary. Follow these steps to ensure a leak-free shower:
1. Turn on the water supply and let the water run for a few minutes.
2. Inspect the connections between the valve, trim, shower arm, and shower head for any signs of leaks or dripping water.
3. If you detect any leaks, try tightening the connections with a wrench. Be careful not to overtighten as this may cause damage.
4. After tightening, repeat the water test to see if leaks have been resolved. If leaks persist, you may need to disassemble and reassemble the affected parts to ensure a proper seal.
5. Once all leaks have been resolved, pat yourself on the back for a job well done.
By following these steps, you can successfully install the new trim and shower head, completing your shower control valve installation. Now that everything is in place, you can enjoy a refreshing and efficient shower experience.
Step 7: Testing And Finalizing The Installation
After following all the previous steps to install your shower control valve correctly, it’s time to test and finalize the installation process. This step is crucial to ensure that your shower control valve is functioning properly and there are no leaks or other issues that need to be addressed.
Turning on the water supply
Now that you have completed the installation, the next step is to turn on the water supply. Locate the main water shut-off valve and turn it on fully. This will allow water to flow into your shower system and enable the control valve to operate.
While turning on the water supply, it’s important to pay attention to any potential leaks or unusual sounds. Look for any water dripping from the valve connections or any hissing noises that may indicate a problem. If you notice any leaks, you may need to tighten the connections or use plumber’s tape to ensure a watertight seal. Remember, it’s essential to address any leaks before proceeding further.
Testing the control valve functionality
To ensure that your shower control valve is functioning correctly, it’s essential to test its functionality. Begin by turning the valve to the cold water position and check if the water flows accordingly. Then, switch the valve to the hot water position and verify that the water temperature increases as expected.
You can also test the control valve’s ability to divert water flow between different shower outlets. If your system has multiple showerheads or a handheld sprayer, ensure that water efficiently flows through each outlet when the control valve is adjusted accordingly.
Making any necessary adjustments or repairs
During the testing process, it’s possible that you may encounter issues with the control valve’s functionality. If you notice any problems such as water not flowing properly or inconsistent water temperatures, it may be necessary to make adjustments or repairs.
If the water flow is weak, check for any obstructions or debris in the valve or showerhead. Clean them thoroughly, ensuring unobstructed water flow. If the water temperature is inconsistent, you may need to adjust the temperature limit stop or consult the manufacturer’s instructions for troubleshooting steps.
Additionally, if any leaks are found during the testing process, it’s crucial to address them promptly. Identify the source of the leak and tighten connections or replace any faulty parts as needed.
Remember, it’s important to ensure that your control valve is working correctly and all issues are resolved before finalizing the installation. This will help you avoid problems in the future and ensure optimal functionality and satisfaction with your newly installed shower control valve.
Frequently Asked Questions
Can You Install A Shower Valve Yourself?
Yes, you can install a shower valve yourself. It is a feasible DIY project with proper research and guidance. Make sure to follow step-by-step instructions, use the right tools, and adhere to safety precautions. Remember, consulting a professional is recommended for complex installations.
How Do You Replace A Temperature Control Valve On A Shower?
To replace a temperature control valve on a shower, follow these steps: 1. Turn off the water supply to the shower. 2. Remove the shower handle or knob, taking note of any screws or buttons. 3. Unscrew or unclip the valve housing to access the control valve.
4. Disconnect the old valve and remove it. 5. Install the new valve, making sure it aligns properly. 6. Reassemble the shower handle and test the new temperature control valve.
How Do You Replace A Shower Stem Valve?
To replace a shower stem valve, first turn off the water supply. Remove the handle and trim, and then unscrew the old valve. Install the new valve by screwing it in and reassembling the trim and handle. Finally, turn the water supply back on to test for leaks.
What Are The Three Types Of Shower Valves?
The three types of shower valves are thermostatic, pressure-balancing, and manual. Thermostatic valves maintain a constant water temperature, pressure-balancing valves balance hot and cold water to prevent scalding, and manual valves allow you to control the water temperature and pressure manually.
Conclusion
To wrap up, installing a shower control valve doesn’t have to be a daunting task. By following the steps outlined in this blog post, you can ensure a smooth and successful installation process. Remember to turn off the water supply, remove the old valve, and carefully connect the new one.
Don’t forget to test for leaks and make any necessary adjustments. With these simple guidelines, you’ll have a fully functional and enjoyable shower experience in no time. Happy installing!