To install a shower valve, first, turn off the main water supply. Next, remove the old valve by unscrewing the connections, and clean the opening.
Then, apply plumber’s tape to the threads of the new valve. Finally, screw the new valve into place and connect the water lines, ensuring they are secure. Welcome to this step-by-step guide on how to install a shower valve. Whether you’re renovating your bathroom or replacing a faulty valve, this process can be completed with a few simple steps.
By following these instructions, you’ll have your new shower valve installed and ready to use in no time. So let’s dive in and get started!
Understanding The Different Types Of Shower Valves
If you’re considering installing a new shower valve in your bathroom, it’s important to understand the different types of valves available. The type of valve you choose will determine the level of control you have over the water temperature and pressure in your shower. In this section, we will explore three common types of shower valves: pressure-balancing valves, thermostatic valves, and manual shower valves.
Pressure-Balancing Valves
Pressure-balancing valves are a popular choice for many bathrooms due to their ability to maintain a consistent water temperature even when there are fluctuations in water pressure. These valves work by automatically adjusting the mix of hot and cold water to keep the temperature within a set range. This is especially useful in households where other faucets or appliances may be used simultaneously, causing sudden changes in water pressure.
When installing a pressure-balancing valve, it’s important to consider the flow rates of your showerhead and any other fixtures that may be connected to the same water supply. Different models of pressure-balancing valves may have specific requirements for minimum flow rates to ensure proper functionality.
Thermostatic Valves
Thermostatic valves are known for their precise temperature control. These valves feature built-in thermostats that monitor and adjust the water temperature to your desired setting. This ensures a consistent and comfortable shower experience every time.
One of the key advantages of thermostatic valves is their ability to prevent scalding. Many thermostatic valves have a preset maximum temperature limit that can be adjusted according to your preference. This is especially important for households with children or elderly individuals who may be more sensitive to hot water.
When installing a thermostatic valve, it’s important to check if the valve is compatible with your plumbing system. Some thermostatic valves may require specific installation techniques or additional accessories to ensure proper function.
Manual Shower Valves
Manual shower valves are the most basic type of valve and offer simple control over water temperature and flow. These valves rely on your manual adjustment to find the desired water temperature.
While manual shower valves may lack the advanced features of pressure-balancing or thermostatic valves, they are often the most cost-effective option. They are relatively easy to install and suitable for bathrooms with low water pressure.
When installing a manual shower valve, make sure to check the manufacturer’s instructions to ensure proper installation and operation.

Determining The Right Valve For Your Shower
Choosing the perfect valve for your shower is an essential step in achieving a satisfying and functional shower experience. With the wide range of options available, it can be overwhelming to make the right decision. This guide will walk you through the key factors to consider when determining the right valve for your shower.
Considering Water Pressure
One of the crucial aspects when selecting a shower valve is to consider the water pressure in your home. Water pressure determines the strength and flow of water from your showerhead and is typically measured in pounds per square inch (PSI). It is important to check the recommended pressure range of the valve and ensure it aligns with the pressure in your home.
Here’s what you need to know about water pressure:
- The ideal water pressure range for most shower valves is between 45-60 PSI.
- Low water pressure can result in weak spray and unsatisfactory shower experience, while high water pressure can cause water wastage and potential damage to the valve.
- If your home has low water pressure, you may want to consider a valve with a pressure-balancing feature that helps maintain a consistent water flow regardless of pressure fluctuations.
Evaluating Temperature Control Needs
Temperature control is another important factor to consider when choosing a shower valve. You want to ensure the valve provides precise control over both hot and cold water, allowing you to easily adjust the temperature to your preference.
Here are a few things to consider for temperature control:
- A thermostatic valve offers advanced temperature control by maintaining a consistent water temperature even when there are changes in water pressure or usage elsewhere in your home.
- A pressure-balancing valve is a viable option if temperature control is not a primary concern, as it focuses more on maintaining a steady flow of water.
- If you have a separate volume control for your shower, you may opt for a valve that offers separate temperature and volume controls for maximum customization.
Budget and Compatibility Factors
In addition to water pressure and temperature control, it is important to consider your budget and the compatibility of the valve with your existing plumbing system. Making sure the valve you choose fits within your budget while being compatible with your plumbing setup will save you time, money, and frustration in the long run.
Here are a few budget and compatibility factors to keep in mind:
| Factor | Consideration |
|---|---|
| Valve type | There are different types of valves available, such as pressure-balancing valves, thermostatic valves, and manual valves. Each type varies in price, so research and compare the options to find one that suits your budget. |
| Plumbing configuration | Ensure the valve you choose is compatible with the existing plumbing setup in your bathroom. This includes considering the number of water outlets, the size of the pipes, and any additional features like hand showers. |
| Brand and quality | While it’s important to stick to your budget, investing in a reputable brand and a high-quality valve will provide durability and reliability in the long run. Consider reading customer reviews and seeking recommendations from professionals or trusted sources. |
By considering water pressure, evaluating temperature control needs, and taking budget and compatibility factors into account, you can confidently determine the right valve for your shower. Remember to research, compare, and consult professionals if needed to ensure a successful installation and an enjoyable shower experience.
Gather The Necessary Tools And Materials
Before installing a shower valve, it’s important to gather all the tools and materials you’ll need. Having everything ready ahead of time will help streamline the installation process and ensure a smoother outcome. Below, you’ll find a list of essential tools and materials required for the job.
Screwdriver
A screwdriver is a versatile tool that comes in handy for many home improvement projects. For installing a shower valve, you’ll need a screwdriver with both flathead and Phillips head bits. The flathead bit is essential for removing screws, while the Phillips head bit is useful for tightening or loosening screws.
Adjustable Wrench
Another vital tool for installing a shower valve is an adjustable wrench. This type of wrench allows you to tighten or loosen nuts of various sizes, ensuring a secure connection. Make sure to get an adjustable wrench that fits the pipe fittings of your shower valve. It will help prevent potential leaks.
Pipe Tape
Pipe tape, also known as plumber’s tape or Teflon tape, is an essential material for ensuring leak-free connections. It’s a thin, white tape that you wrap around the threads of pipe fittings. Pipe tape helps create a tight seal between threaded connections, preventing water from seeping out.
Measuring Tape
Accurate measurements are crucial for a successful shower valve installation. A measuring tape allows you to measure the spacing of pipe connections and ensure proper alignment. Make sure to have a reliable measuring tape on hand to make precise measurements throughout the installation process.
Shower Valve Kit
Of course, you’ll need a shower valve kit itself to complete the installation. A shower valve kit typically includes the valve body, trim plate, handles or knobs, and any necessary attachments. Depending on your specific shower valve model, additional tools or materials may be required. Refer to the instructions provided with your kit to ensure you have everything you need.
Gathering the necessary tools and materials before starting your shower valve installation ensures a smoother and more efficient process. By preparing in advance, you can avoid unnecessary interruptions and complete the installation successfully.
Shutting Off The Water Supply
Before you start installing a shower valve, it is crucial to shut off the water supply to prevent any mishaps or leaks. In this section, we will guide you through the steps on how to shut off the main water supply and ensure a safe and smooth installation process.
Locating the Main Water Shut-Off Valve
Firstly, you need to locate the main water shut-off valve in your house. This valve is typically found near the water meter or where the main water line enters your home. It is usually located in the basement, crawl space, utility room, or near the water heater. Take a moment to familiarize yourself with its position.
| Important Note: | It is essential to know the exact location of the main shut-off valve beforehand to avoid wasting time during an emergency or when performing plumbing repairs. |
|---|
Turning Off the Water Supply
Once you have located the main shut-off valve, carefully follow these steps to turn off the water supply:
- Using a wrench or pliers, turn the valve handle clockwise to shut off the water supply.
- Remember to turn the valve firmly but not too forcefully to avoid damaging the valve or plumbing lines.
- Check that the water has stopped flowing by turning on a faucet or flushing a toilet. If water continues to flow, the valve may not be fully closed, and you should try turning it tighter.
- If you are unable to shut off the water supply using the main shut-off valve, consider using the individual shut-off valves located near the fixture. These valves are typically found under the sink or behind the toilet.
By successfully shutting off the water supply, you can proceed with confidence to install your new shower valve, knowing that you have taken the necessary precautionary steps to prevent any potential water damage or accidents. Remember to keep the main shut-off valve in mind for future plumbing needs as well.
Removing The Old Shower Valve
Removing the old shower valve is the first step in installing a new one. Although it may seem like a daunting task, with the right preparation and guidance, you can tackle this job with confidence. In this section, we will walk you through the process of removing the handle and trim, disconnecting the water supply lines, and detaching the old valve from the wall. Let’s get started!
Removing the Handle and Trim
The handle and trim of the old shower valve are the visible parts that you interact with on a daily basis. To remove them, follow these steps:
- Turn off the water supply to the shower. This can usually be done by shutting off the main water supply to your house.
- Locate the screw or setscrew that secures the handle to the valve stem. Use a screwdriver or Allen wrench to remove it.
- Gently pull off the handle to expose the trim.
- Inspect the trim and remove any screws or fasteners that are holding it in place. Take note of their locations for future reference.
- Carefully pry off the trim using a flathead screwdriver or a trim removal tool. Be cautious not to damage the surrounding tiles or walls.
By following these steps, you will have successfully removed the handle and trim of the old shower valve. It is important to take your time and be gentle to avoid any unnecessary damage.
Disconnecting the Water Supply Lines
The next step in removing the old shower valve is to disconnect the water supply lines. This process will vary depending on the type of connection, but generally, you will need the following tools:
- Adjustable wrench
- Pipe wrench (if applicable)
- Plumber’s tape
Follow these steps to disconnect the water supply lines:
- Using the adjustable wrench, loosen the compression fittings that connect the water supply lines to the valve. Turn them counterclockwise until they are fully released.
- If the water supply lines are attached using threaded connections, use a pipe wrench to loosen and remove them.
- Once the water supply lines are disconnected, inspect them for any signs of wear or damage. Replace them if necessary.
- Before installing the new valve, wrap plumber’s tape around the threads of the water supply lines to create a watertight seal.
By following these steps, you will have successfully disconnected the water supply lines from the old shower valve. Take care when working with plumbing connections to avoid any leaks or damage.
Detaching the Old Valve from the Wall
The final step in removing the old shower valve is detaching it from the wall. This process will require the following tools:
- Adjustable wrench
- Pipe wrench (if applicable)
- Phillips screwdriver
- Utility knife
Follow these steps to detach the old valve from the wall:
- Using the adjustable wrench, remove any nuts or bolts that secure the valve to the wall. Turn them counterclockwise until they are fully released.
- If the valve is attached using threaded connections, use a pipe wrench to loosen and remove it.
- Inspect the surrounding area for any caulk or sealant that may be holding the valve in place. Use a utility knife to carefully cut through the caulk or sealant.
- Once the valve is detached, inspect the wall for any damage or deterioration. Repair or reinforce the area as needed.
By following these steps, you will have successfully detached the old shower valve from the wall. Take your time during this process to avoid any damage to the surrounding area.
Preparing The Valve And Wall
Preparing the Valve and Wall
Before installing a shower valve, it is essential to properly prepare both the valve itself and the wall where it will be mounted. This step is crucial to ensure a smooth and efficient installation process. In this section, we will discuss two key steps: checking the valve for compatibility and measuring and marking the valve placement on the wall.
Checking the Valve for Compatibility
Before beginning the installation process, it is important to check the valve for compatibility with your plumbing system. This simple but crucial step will save you both time and frustration down the road. Here’s how to do it:
1. Start by examining the valve’s specifications and ensure that it is suitable for your plumbing setup. Look for details such as the valve’s size, type, and compatibility with your shower system (e.g., pressure-balanced, thermostatic).
2. Take note of any additional components or accessories required for the valve installation. These might include trim kits, extension kits, or rough-in valves. Ensure that you have all the necessary parts on hand before proceeding.
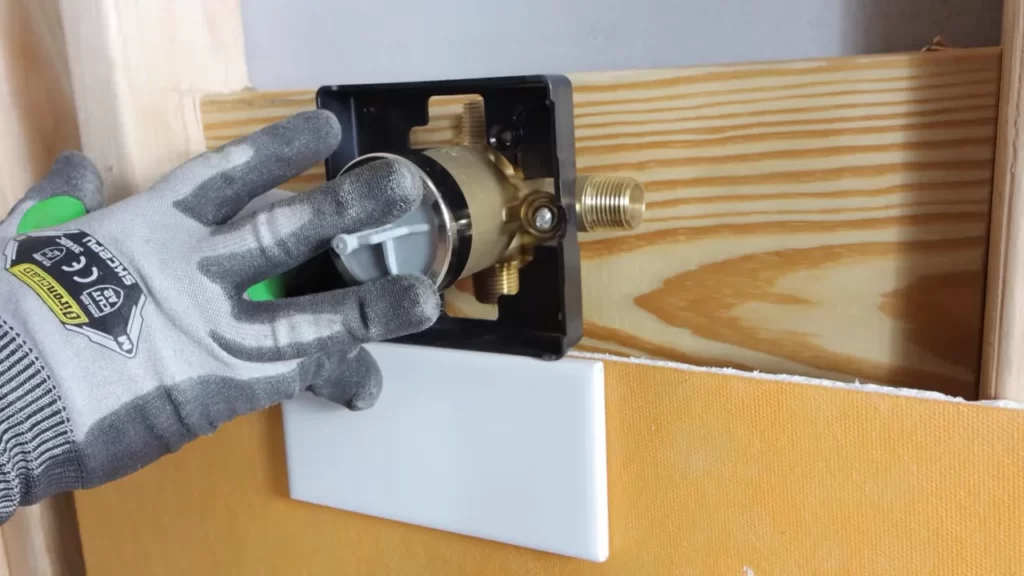
3. Inspect the valve for any visible defects or damages. Look for cracks, leaks, or signs of wear and tear. If you notice any issues, it is crucial to address them before proceeding with the installation.
Measuring and Marking the Valve Placement on the Wall
Now that you have ensured the valve’s compatibility, it is time to measure and mark the valve placement on the wall. This step is crucial to ensure that the valve is correctly positioned and aligned. Here’s how to do it:
1. Start by identifying the ideal height for your shower valve. This will depend on personal preference and any specific requirements for your household. As a general rule, most shower valves are installed at a height of around 48 to 52 inches.
2. Use a measuring tape to mark the desired height on the wall. Make sure to double-check and measure twice to ensure accuracy.
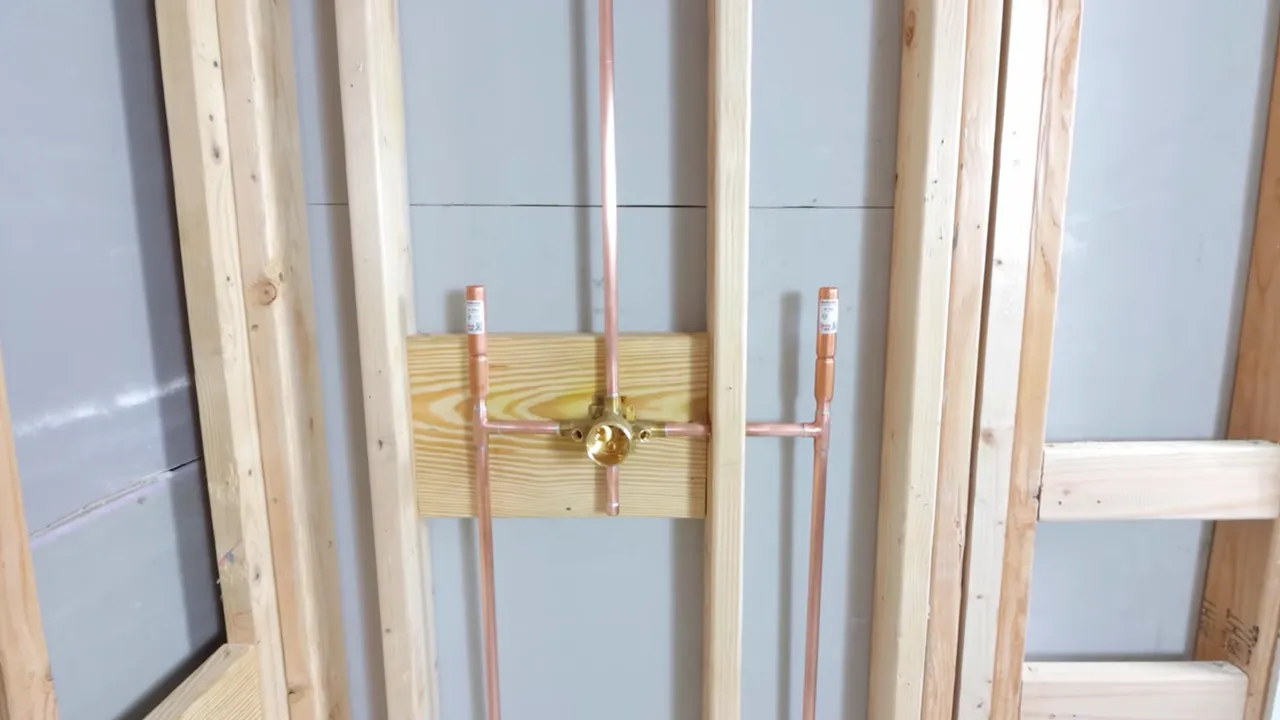
3. Next, measure the distance from the center of the valve to the adjacent plumbing pipes. This will help you determine the precise positioning of the valve and ensure proper alignment.
4. Once you have determined the position, use a pencil or marker to mark the center point of the valve on the wall. This mark will serve as a guide during the installation process.
By following these simple steps to prepare the valve and wall, you are setting yourself up for a successful shower valve installation. Checking the compatibility of the valve and accurately measuring and marking the valve placement are crucial to ensure a seamless installation process. In the next section, we will discuss the steps involved in actually installing the shower valve.
Connecting The New Valve
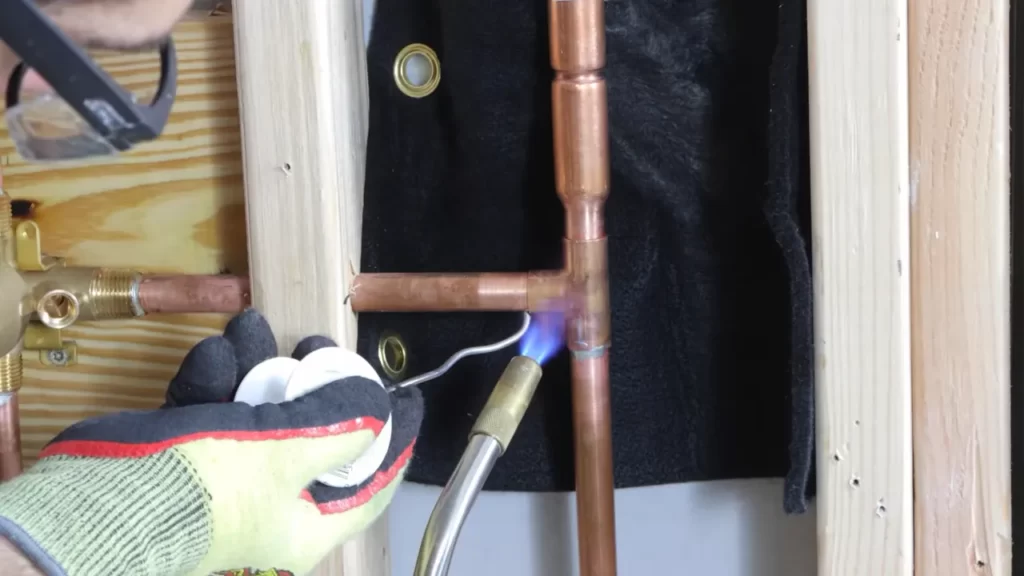
When installing a new shower valve, one of the crucial steps is connecting it to the hot and cold water supply lines. This step ensures that the water flows properly and allows you to control the temperature and pressure of the water coming out of your shower. In this section, we will walk you through the process of attaching the valve to the water supply lines, using pipe tape for secure connections, and tightening the connections with an adjustable wrench.
Attaching the Valve to the Hot and Cold Water Supply Lines
Before you begin, it’s important to ensure that the hot and cold water supply lines are properly shut off. You can do this by locating the main water valve and turning it off. Once the water is off, you can follow these steps to attach the valve to the hot and cold water supply lines:
- Start by identifying the hot and cold water supply lines. Typically, the hot water line is red and the cold water line is blue, but it’s always a good idea to double-check.
- Apply a generous amount of pipe tape to the threads of the supply lines. This helps create a watertight seal and prevents leaks.
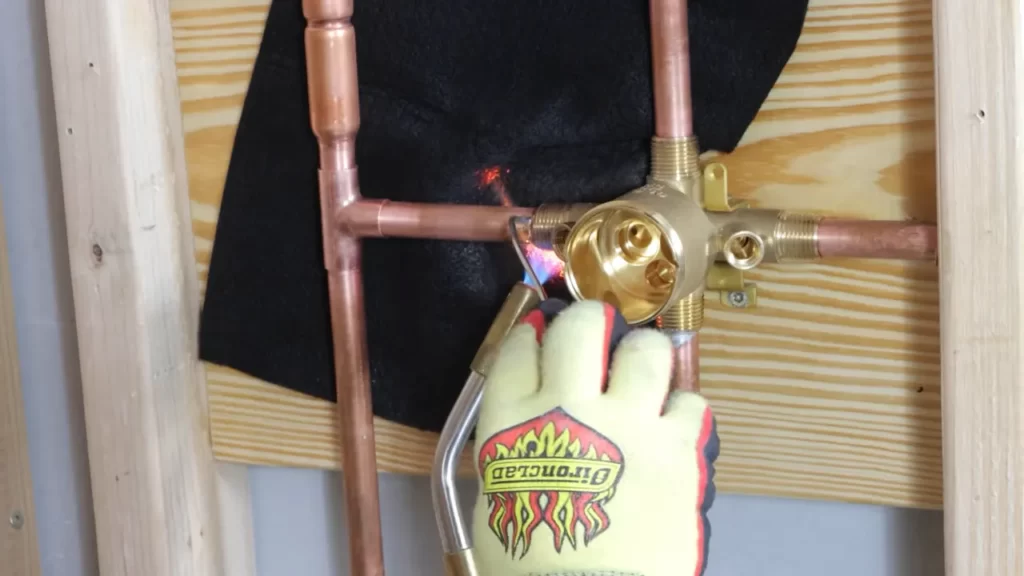
- Insert the threaded ends of the supply lines into the corresponding ports on the valve. Make sure they are tightly secured.
By following these steps, you can ensure a secure and leak-free connection between the valve and the hot and cold water supply lines.
Using Pipe Tape for Secure Connections
Pipe tape, also known as Teflon tape, is a thin white tape that is used to create a tight seal between threaded connections. It helps prevent leaks and ensures a secure connection. When using pipe tape, it’s essential to follow these guidelines:
- Start by applying the tape in a clockwise direction around the threads of the supply lines.
- Wrap the tape around the threads at least three times, making sure to cover all the areas where the threads meet.
- Press the tape firmly against the threads to secure it in place.
By using pipe tape correctly, you can be confident that your connections are secure and leak-free.
Tightening the Connections with an Adjustable Wrench
Once the valve is attached to the supply lines and pipe tape is applied, it’s time to tighten the connections. An adjustable wrench is the perfect tool for this job. Here’s how you can ensure that the connections are tightened properly:
- Place the adjustable wrench around the nut or fitting that connects the valve to the supply lines.
- Tighten the nut or fitting by turning the wrench clockwise. Be careful not to overtighten, as it can damage the threads or cause leaks.
- Check for any signs of water leaks around the connections. If you notice any leaks, use the adjustable wrench to tighten the connections a bit more until the leaks stop.
By following these steps, you can ensure that the connections are tightened securely without any leaks.
Remember, connecting the new valve to the hot and cold water supply lines is an essential part of installing a shower valve. By following these steps and paying attention to the details, you can enjoy a properly functioning shower with optimum water flow and temperature control.
Testing The Valve
Turning on the Water Supply
Once you have successfully installed the shower valve, the next step is to turn on the water supply. It is important to ensure that the water supply is turned on gradually to avoid any sudden surges in water pressure, which can cause damage to the valve and the plumbing system.
To turn on the water supply, follow these steps:
- Locate the main water shut-off valve in your home.
- Slowly turn the valve in a clockwise direction to open it.
- Allow the water to flow through the pipes and into the shower valve.
- Check for any leaks or dripping water around the valve.
Checking for Leaks and Proper Functioning
After turning on the water supply, it is essential to check for any leaks or issues with the shower valve’s proper functioning. This step is crucial to ensure that the valve is installed correctly and to prevent any future water damage.
Here’s how you can check for leaks and proper functioning:
- Inspect the connections between the shower valve and the water supply pipes. Look for any signs of water leakage or moisture.
- Check the valve’s body and handle for any visible cracks or damage.
- Turn the shower valve on and off several times to ensure smooth operation and proper water flow.
- Observe if there are any unusual noises or vibrations coming from the valve.
Adjusting the Temperature and Water Pressure
Once you have confirmed that there are no leaks and the shower valve is functioning correctly, you can proceed to adjust the temperature and water pressure according to your preference. This step is essential for ensuring a comfortable and enjoyable shower experience.
Follow these steps to adjust the temperature and water pressure:
- Refer to the manufacturer’s instructions to locate the temperature and pressure adjustment controls on the shower valve.
- Turn the temperature control knob or handle to the desired temperature. Start with a lower temperature and gradually increase it until you find the perfect balance.
- Test the water temperature by running the shower and adjusting as needed.
- Adjust the water pressure control knob or handle to achieve the desired water flow.
- Once you have set the temperature and water pressure, test the shower to ensure they meet your expectations.
Remember, it’s important to regularly check and maintain your shower valve to prevent any future issues. If you notice any leaks or problems, it’s best to call a professional plumber to address the situation promptly.
Installing The Handle And Trim
Once you have attached the escutcheon plate and trim to the shower valve, the next step is to install the handle and escutcheon sleeve. This final part of the installation process will complete the look of your shower and allow you to control the water flow and temperature with ease.
Attaching the Escutcheon Plate and Trim
To begin, make sure the escutcheon plate is aligned properly with the valve body. The escutcheon plate is the decorative cover that conceals the valve and plumbing behind the wall. It should fit snugly against the wall to create a clean and finished look.
- Start by aligning the holes in the escutcheon plate with the holes in the valve body.
- Insert the screws provided with the valve into the holes.
- Tighten the screws with a screwdriver until the escutcheon plate is securely fastened to the valve body.
Installing the Handle and Escutcheon Sleeve
Once the escutcheon plate is in place, it’s time to install the handle and escutcheon sleeve. The handle is the part of the shower valve that you’ll use to turn the water on and off, as well as adjust the temperature. The escutcheon sleeve is the decorative cover that hides the valve stem and provides a polished look.
- Align the handle with the valve stem and slide it onto the stem.
- Secure the handle in place by tightening the set screw located on the underside of the handle. Use an Allen wrench to tighten the screw.
- Next, slide the escutcheon sleeve over the valve stem and align it with the handle.
- Secure the escutcheon sleeve to the wall by tightening the set screw on the bottom of the sleeve. Use the provided screwdriver to tighten the screw.
Once the handle and escutcheon sleeve are securely installed, give them a test. Turn the handle to ensure it moves smoothly and that the water flow and temperature adjust properly. If everything is functioning correctly, you can pat yourself on the back for successfully installing a shower valve!
Sealing And Caulking
Sealing and caulking are essential steps in installing a shower valve to ensure a watertight and leak-free connection. By properly applying silicone caulk around the valve and trim, and then smoothing and cleaning the caulk lines, you can achieve a professional-looking finish while preventing any potential water damage or mold growth.
Applying Silicone Caulk around the Valve and Trim
Once you have installed the shower valve and trim, it’s time to apply silicone caulk to seal any gaps and prevent water from seeping through. Follow these steps to ensure a proper application:
- Clean the surface thoroughly: Before applying caulk, make sure the area around the valve and trim is clean and dry. Use a mild detergent and water solution to remove any dirt, grime, or residue. Allow the surface to dry completely.
- Prepare the caulk: Cut the tip of the caulk tube at an angle, making a small opening. Insert the caulk tube into a caulk gun and gently squeeze until the caulk starts to flow. Start with a small bead of caulk and gradually increase as needed.
- Apply the caulk: Begin by applying the caulk along the edges of the valve and trim, ensuring full coverage. Use steady pressure on the caulk gun and maintain a consistent bead size. Move in a continuous motion to achieve a smooth and even application.
- Fill the gaps: Pay attention to any gaps or spaces between the valve and the wall, as well as between the trim and the wall. Run a bead of caulk along these areas, ensuring a tight seal.
Smoothing and Cleaning the Caulk Lines
After applying the silicone caulk, it’s important to smooth and clean the caulk lines for a polished look. Follow these steps to achieve clean and professional caulk lines:
- Smooth the caulk: Immediately after applying the caulk, use a caulk smoothing tool or your finger to smooth the caulk lines. Wet your finger with a small amount of water or a silicone caulk remover to prevent sticking. Apply light pressure and run your finger along the caulk lines to create a neat and even finish.
- Clean up excess caulk: Use a damp cloth or sponge to wipe away any excess caulk before it dries. Cleaning the caulk lines while they are still wet will give you a cleaner final result.
- Allow the caulk to dry: Follow the manufacturer’s instructions to determine the drying time for the caulk. Avoid using the shower or exposing the caulked area to water until it has fully cured.
By following these steps for sealing and caulking, you can ensure a professional and watertight installation of your shower valve and trim. Taking the time to properly seal and caulk will not only give your shower a polished look but also protect your bathroom from potential water damage.
Final Inspection And Cleanup
Once you have successfully installed the shower valve, the final step is to perform a thorough inspection to ensure everything is working properly. Additionally, it’s important to clean up the work area before truly considering the project complete. Let’s go over the final inspection and cleanup process in detail below.
Checking for any Issues or Leaks
Before wrapping up the installation, it’s crucial to check for any potential issues or leaks that may have arisen during the process. Here’s a step-by-step guide to conducting a proper inspection:
- Turn on the water supply and allow the shower to run for a few minutes. This will help you identify any leaks or irregularities in the flow.
- Inspect the connections and joints for any signs of water leaks. Pay particular attention to the areas where the shower valve connects to the pipes.
- If you detect any leaks, tighten the connection or replace any faulty parts as necessary. Ensure you have the proper tools on hand to address these issues promptly.
- Test all the functions of the shower valve, including the temperature control, water pressure, and diverter if applicable. Make sure everything is working smoothly and efficiently.
By following this checklist, you can be confident that your shower valve installation is leak-free and functioning optimally.
Cleaning up the Work Area
Now that you’ve completed the final inspection and resolved any issues, it’s time to clean up the work area. Here’s how to ensure a tidy and safe space:
- Gather any debris or excess materials and dispose of them properly.
- Wipe down the surrounding area with a clean cloth to remove any dust, dirt, or adhesives that may have accumulated during the installation process.
- Inspect the floor and walls for any splatters or marks and clean them accordingly.
- Dispose of any used tools or materials responsibly, and organize your remaining supplies for future use.
By taking the time to clean up after your shower valve installation, you not only create a visually appealing space but also prevent any potential hazards or damage caused by leftover debris.
Frequently Asked Questions
Can You Install A Shower Valve Yourself?
Yes, you can install a shower valve yourself. It’s important to carefully follow the instructions and have the necessary tools.
How Do You Install A New Shower Valve?
To install a new shower valve, follow these steps: 1. Shut off the water supply. 2. Remove the old valve by unscrewing it. 3. Clean the area and prepare it for installation. 4. Attach the new valve by screwing it in.
5. Turn on the water supply and test for leaks.
What Is The Easiest Shower Valve To Install?
“The easiest shower valve to install is a pressure-balancing valve, which ensures a constant water temperature and reduces the risk of scalding. Its simple design and installation process make it a popular choice for DIY projects. “
What Does It Cost To Install A Shower Valve?
The cost of installing a shower valve varies depending on factors such as the type of valve, location, and labor fees. On average, it can range from $150 to $500. It is best to consult with a professional plumber for an accurate estimate based on your specific requirements.
Conclusion
Installing a shower valve may seem daunting at first, but with the right guidance and tools, it can be a straightforward process. By following the steps outlined in this blog post, you can ensure a successful installation that will enhance your showering experience.
Remember to always turn off the water supply before beginning any work and consult a professional if you encounter any difficulties. Happy shower valve installation!