To install a shower insert, first remove any existing fixtures and clean the area thoroughly. Then, assemble the shower insert according to the manufacturer’s instructions and secure it in place.
Gathering The Necessary Tools And Materials
Before you can begin installing a shower insert, it’s important to gather all the tools and materials you’ll need. Having everything prepared ahead of time will make the installation process much smoother and more efficient. In this section, we will provide you with an easy-to-follow checklist of tools and materials that you’ll need for a successful shower insert installation.
Checklist of Tools
Here is a comprehensive list of tools that will come in handy during the installation process:
- A power drill with drill bits
- A level
- A tape measure
- A utility knife
- A caulk gun
- A rubber mallet
- A pry bar
- A screwdriver set
- Adjustable wrench
- Plumber’s putty
Checklist of Materials
To ensure a successful shower insert installation, make sure you have the following materials ready:
- A shower insert kit (check the manufacturer’s instructions for specific kit components)
- Plumbing fittings and pipes
- Waterproofing membrane
- Adhesive or caulking
- Shower pan liner
- Screws or nails
- Plumbing tape
- Tile backer board
- Grout and grout sealer
- Waterproof sealant
Remember, it’s always a good idea to have extra materials on hand, just in case of any unforeseen circumstances that may arise. Now that you have all the necessary tools and materials ready, you’re one step closer to installing your shower insert successfully. In the next section, we will guide you through the steps of preparing the installation area.

Measuring And Preparing The Shower Area
When it comes to installing a shower insert, measuring and preparing the shower area is a crucial first step. Taking accurate measurements and removing existing fixtures and surrounding materials are essential tasks that need to be done properly to ensure a successful installation. In this section, we will walk you through these important steps in detail so you can confidently begin your shower insert installation project.
Taking Accurate Measurements
Before you start installing your shower insert, it’s vital to take accurate measurements of your shower area to ensure a perfect fit. This will help you determine the size and type of shower insert you’ll need. Here’s how you can do it:
- Measure the width, height, and depth of your shower area using a measuring tape. Make sure to measure from wall to wall for width and height, and from the back of the shower area to the front for depth.
- Take note of any variations in the measurements, such as uneven walls or slopes in the floor. These details will be important when choosing the right shower insert.
- Double-check your measurements to ensure accuracy. It’s always a good idea to measure multiple times to be certain.
Removing Existing Fixtures and Surrounding Materials
Before you can install a new shower insert, you’ll need to remove any existing fixtures and surrounding materials. Here’s how you can do it:
- Start by turning off the water supply to the shower. This can usually be done by shutting off the water valves located under the sink or in the basement.
- Next, remove the showerhead, faucet handles, and any other hardware attached to the walls. A wrench or screwdriver may be required for this step.
- If your shower has an existing surround, carefully remove it from the walls. This may involve using a utility knife or pry bar to loosen any adhesive or sealant.
- Inspect the walls and floor for any damage or mold. If necessary, repair or replace any damaged areas before proceeding with the installation.
By taking accurate measurements and properly preparing the shower area, you are setting a solid foundation for the installation of your new shower insert. This will help ensure a smooth and successful installation, providing you with a beautiful and functional shower for years to come.

Preparing The Shower Insert
Before installing a shower insert, it is crucial to properly prepare the area to ensure a smooth and successful installation. This includes inspecting and cleaning the insert as well as applying proper waterproofing measures. In this section, we will break down these important steps in detail to help you get started with your shower insert installation project.
Inspecting and Cleaning the Insert
Before installing the shower insert, it is essential to thoroughly inspect it for any defects or damage. Check for cracks, chips, or any signs of wear and tear that could affect its performance and longevity. If you come across any issues, it is advisable to contact the manufacturer or supplier for assistance or consider replacing the insert.
Once you have inspected the insert and ensured its durability, the next step is to clean it thoroughly. Use a mild detergent or cleanser along with a soft cloth or sponge to remove any dirt, grime, or residue from the surface. Pay special attention to corners and crevices to ensure a clean and sanitized surface.
Applying Proper Waterproofing Measures
Proper waterproofing is critical to prevent water leakage and potential damage to the surrounding walls and flooring. It is essential to apply a waterproof membrane or sealant to ensure a watertight barrier between the shower insert and the surrounding structure.
There are various options available when it comes to waterproofing the shower insert. One popular method is to use a liquid waterproofing membrane, which can be applied using a brush, roller, or sprayer. This membrane creates a protective layer that prevents water from seeping through and causing damage.
Another option is to use a waterproofing sealant, which can be applied to the joints, corners, and edges of the shower insert. This helps to seal any potential gaps or openings where water could penetrate. Make sure to follow the manufacturer’s instructions for the specific sealant you choose.
In addition to the waterproofing membrane or sealant, you may also consider installing a shower pan or liner to provide an extra layer of protection. This pan or liner is typically placed beneath the shower insert to catch any water that may penetrate through the surface.
By thoroughly inspecting and cleaning the shower insert and applying proper waterproofing measures, you can ensure a durable and leak-free installation. These steps are essential for the long-term functionality and aesthetics of your new shower. Now that we have covered the preparation phase, it’s time to move on to the next steps of installing the shower insert.

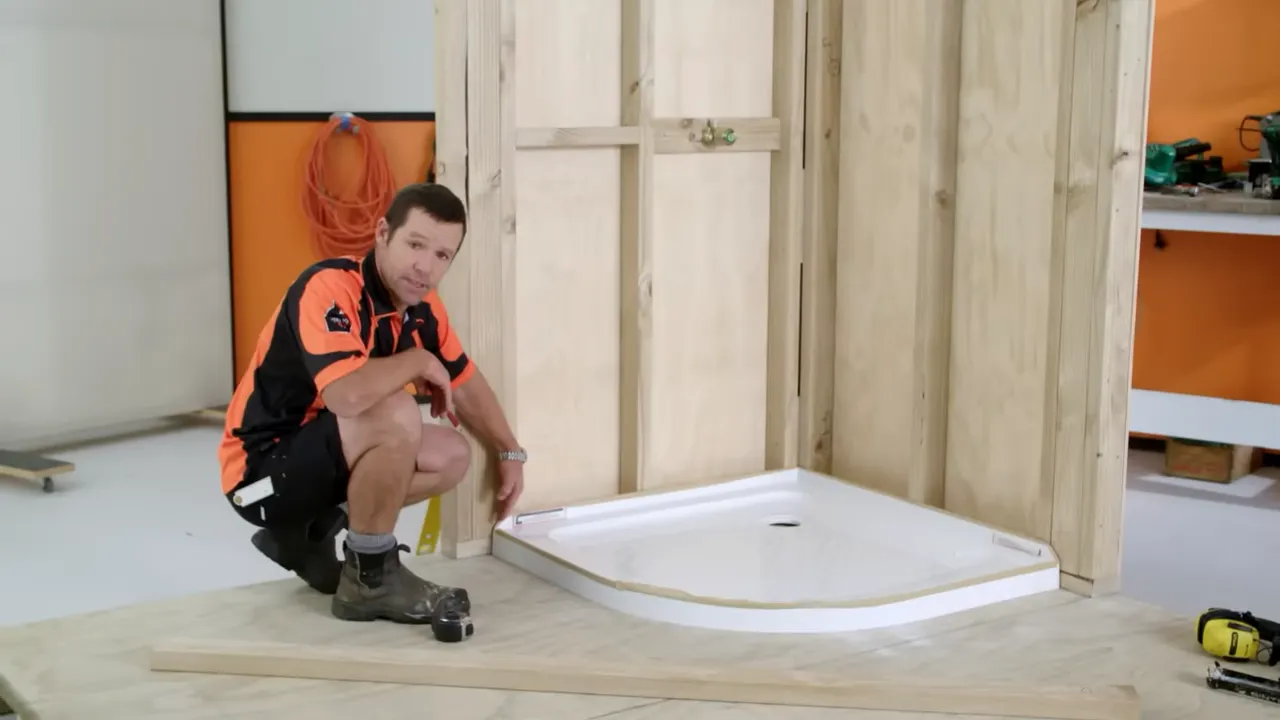
Installing The Base Of The Shower
One of the most important parts of installing a shower insert is properly setting up the base. The base of the shower not only provides a sturdy foundation for the rest of the installation but also ensures proper drainage and prevents leaks. In this article, we will guide you through the process of positioning, leveling, and securing the base of the shower.
Positioning and Leveling the Base
The first step in installing the base of the shower is positioning it correctly. Begin by placing the shower base in the desired location and make sure it aligns with the existing plumbing. This is a critical step as any misalignment can cause issues with the drain and create complications later on.
Once you have properly positioned the base, it’s time to focus on leveling it. Use a leveling tool, such as a bubble level, to check if the base is even. If you notice any areas that are uneven, you may need to make adjustments. This can be done by adding shims or adjusting the feet of the base if it is adjustable.
Take your time during this step to ensure that the base is level from all angles. A properly leveled base will not only guarantee better water drainage but will also prevent any potential leaks or structural issues in the future.
Securing the Base to the Floor
Once you have positioned and leveled the base, it’s time to secure it to the floor. This step is crucial for the overall stability and durability of the shower. The exact method of securing the base will depend on the type of shower base you have chosen. Typically, this involves using screws, adhesive, or a combination of both.
If your shower base comes with pre-drilled holes, you can use these to guide the placement of the screws. Make sure to use screws that are specifically designed for securing shower bases to ensure optimal performance and avoid any water penetration.
If the shower base requires adhesive, make sure to follow the manufacturer’s instructions carefully. Apply the adhesive evenly and allow it to dry as recommended before proceeding with the next steps of the installation process.

Attaching The Side Walls
Once the shower base is securely in place, the next step in installing a shower insert is attaching the side walls. This crucial step not only provides structural stability but also ensures a watertight enclosure. Here’s how you can connect the side walls to the base.
Connecting the Side Walls to the Base
Start by positioning one of the side walls against the corresponding edge of the shower base. Ensure that the flanges or tabs on the back of the wall fit into the slots or grooves on the base. This will help maintain proper alignment during installation.
Next, place a level vertically against the side wall to ensure it is perfectly plumb. Adjust as necessary until it is level in all directions. Once the wall is plumb, secure it to the base by inserting screws through the pre-drilled holes in the flanges or tabs. Be sure to use screws that are compatible with the material of your shower insert to prevent corrosion and ensure long-lasting strength.
Repeat this process for the other side wall, making sure that both walls are securely attached to the base.
Ensuring Proper Alignment and Stability
After attaching both side walls to the base, it is essential to check for proper alignment and stability. This step is crucial in preventing any future issues such as leaks or shifting. Here are a few tips to ensure your shower insert is aligned correctly and stable:
- Use a level to check if the walls are plumb both vertically and horizontally. Adjust if necessary by loosening the screws and repositioning the walls.
- Ensure that the walls are flush against the base and there are no gaps or uneven spaces. This will help maintain a watertight seal.
- Inspect the walls for any wobbling or movement. If they are not stable, consider reinforcing them by adding additional screws or using adhesive caulk to secure them to the surrounding walls.
By following these steps and ensuring proper alignment and stability, you can successfully attach the side walls of your shower insert. This will help create a sturdy and waterproof enclosure that will stand the test of time.
Installing The Back Wall
Positioning and Securing the Back Wall
Now that you have successfully prepared the shower area and installed the side walls, it’s time to move on to the next crucial step: installing the back wall. The back wall plays a vital role in providing stability and support to your shower insert, ensuring a durable and long-lasting installation.
To begin, carefully position the back wall into place, aligning it with the side walls. Make sure it fits snugly and securely into position. Take a spirit level to check if the wall is plumb and adjust if necessary. A plumb wall is essential as it ensures proper water drainage and prevents any leakage issues in the future.
Once you are satisfied with the positioning, mark the locations for screw holes along the flange of the back wall. These holes should be evenly spaced and should correspond to the studs or solid backing behind the wall. Pre-drill the holes using an appropriate drill bit size, ensuring that they are slightly smaller than the screws you will be using to secure the wall.
Now, insert the screws into the pre-drilled holes and gently tighten them, being careful not to over-tighten and crack the shower insert. It’s a good idea to have a helping hand at this stage to ensure the wall remains in position while you secure it. Repeat the process for all the marked locations, ensuring the back wall is properly secured to the studs or solid backing.
Sealing and Waterproofing the Joints
To ensure a watertight and leak-free installation, it is crucial to seal and waterproof the joints of the back wall. This step will help prevent any water from seeping through the cracks and causing damage to the surrounding walls and flooring.
Begin by applying a bead of waterproof caulk along the edges where the back wall meets the side walls and the shower base. Use a caulk gun for precise and controlled application. Smooth out the caulk with a caulk smoothing tool or a damp cloth, ensuring a neat and even seal. This seal acts as a protective barrier against moisture, preventing any potential leaks.
Additionally, it’s important to seal any gaps or holes present in the back wall itself. Check for any openings or imperfections, especially around plumbing fixtures or existing holes that may have been created during the installation process. Fill these gaps with an appropriate waterproof sealant or caulk, ensuring complete coverage.
Remember, proper sealing and waterproofing is an essential step that shouldn’t be overlooked. It provides an added layer of protection and increases the longevity of your shower insert.
In conclusion, the installation of the back wall is a crucial step in the process of installing a shower insert. By carefully positioning and securing the wall and ensuring proper sealing and waterproofing, you can create a sturdy and watertight enclosure that will stand the test of time. So, take your time, follow the steps outlined above, and enjoy your newly installed shower insert for years to come.
Installing The Shower Door Or Curtain
Once you have successfully installed your shower insert and have ensured that the walls and base are properly sealed, it’s time to focus on installing the shower door or curtain. This step is crucial in completing your shower enclosure and creating a functional and aesthetically pleasing space. In this section, we will guide you through the process of selecting and installing the door or curtain rod, as well as checking for proper operation and fit.
Selecting and Installing the Door or Curtain Rod
When it comes to selecting the door for your shower insert, you have a few options to consider. You may choose a traditional swinging door, a sliding door, or even a stylish frameless glass door. If you prefer a curtain, ensure that it is made of a waterproof material and hangs securely to prevent water leakage.
To install a swinging or sliding door, follow these steps:
- Measure the width and height of the opening where the door will be installed, ensuring accuracy for a proper fit.
- Choose the appropriate door size based on your measurements and the manufacturer’s recommendations.
- Securely attach the door hinges or rollers to the shower insert walls or frame, following the manufacturer’s instructions.
- Hang the door onto the hinges or rollers, making sure it is level and properly aligned.
- Test the door’s operation by opening and closing it a few times, checking for any restrictions or misalignment.
- Tighten any screws or adjust the door as needed for a smooth and secure operation.
If you opt for a curtain rod, the installation process is generally simpler:
- Measure the width of the shower opening to determine the appropriate curtain rod length.
- Select a curtain rod that suits your style and is designed to withstand humidity and water exposure.
- Attach the curtain rod brackets securely to the shower walls, making sure they are level and properly aligned.
- Slide the curtain hooks onto the rod and hang the curtain securely.
- Test the curtain’s operation by opening and closing it, ensuring it moves smoothly and doesn’t get caught on the rod or hooks.
- Make any necessary adjustments to the curtain rod or hooks for proper fit and operation.
Checking for Proper Operation and Fit
Once the shower door or curtain rod is installed, it’s crucial to check for proper operation and fit to avoid any issues with water leakage or malfunctioning parts. Here’s what you should do:
- Open and close the shower door or curtain several times, ensuring that it moves smoothly and doesn’t catch on the surrounding walls or frame.
- Inspect the door’s or curtain’s seal for any gaps or areas where water could potentially leak out. If necessary, adjust or replace the seal to ensure a watertight enclosure.
- Test the handle or latch mechanism, ensuring it securely locks the door in place.
- Double-check the alignment of the door or curtain within the shower opening, making sure it sits flush against the walls and doesn’t leave any gaps.
- Check for any signs of water leakage after taking a shower. If you notice any leaks, address them promptly to prevent potential water damage.
By following these steps and thoroughly checking the proper operation and fit of your shower door or curtain, you can enjoy a functional and leak-free shower enclosure in your bathroom. Take your time during the installation process and ensure everything is secure and properly aligned for a satisfying end result.
Sealing And Caulking
Once you have successfully installed your shower insert, the next crucial step is to seal and caulk it properly. This is essential for ensuring that your shower remains water tight, preventing any leaks or moisture damage in the future. In this section, we will guide you through the process of applying sealant and caulk, allowing you to enjoy a leak-free shower for years to come.
Applying Sealant and Caulk
Before you begin applying sealant and caulk, it is important to gather the necessary tools and materials. You will need a high-quality silicone-based caulk, a caulk gun, a utility knife, a putty knife, and a clean cloth. Make sure to choose a caulk color that matches your shower insert to achieve a seamless look.
Here’s a step-by-step guide on how to apply sealant and caulk:
- Prepare the surface: Thoroughly clean the areas where the sealant and caulk will be applied. Remove any dirt, grime, or old caulk using a putty knife or utility knife. The surface needs to be dry and free of any debris for optimal adhesion.
- Load the caulk gun: Insert the tube of caulk into the caulk gun and cut the tip of the tube at a 45-degree angle. Make sure the opening is small enough to allow for precise application but large enough to allow the caulk to flow smoothly.
- Apply the sealant: Start by applying a thin bead of sealant along the joints and edges of the shower insert. Press the caulk gun firmly against the surface and move it in a steady, even motion. Be sure to fill any gaps or crevices to ensure a watertight seal.
- Smooth the caulk: Use your finger or a caulk finishing tool to smooth the freshly applied caulk. This will help create a neat and even finish while ensuring maximum adhesion. Wipe away any excess caulk with a clean cloth.
Cleaning and Finishing the Sealant
Once you have applied the sealant and caulk, it is important to clean and finish the area for a polished look. Here’s what you should do:
- Allow drying time: Let the sealant and caulk dry according to the manufacturer’s instructions. This will ensure proper curing and adhesion. Avoid using the shower during this time to prevent any damage to the application.
- Clean up any residue: After the sealant and caulk have dried, clean up any residue or smudges with a damp cloth. Make sure to remove any excess caulk that may have accumulated.
- Inspect the seal: Once the area is clean, inspect the seal to ensure there are no gaps or areas that require additional touch-ups. If necessary, reapply caulk to any areas that need improvement.
Sealing and caulking your shower insert is an essential step that should not be overlooked. Properly applied sealant and caulk will prevent leaking, protect against moisture damage, and prolong the lifespan of your shower. By following these steps, you can ensure a water-tight seal and enjoy a hassle-free showering experience.
Testing And Final Inspection
Conducting Water Leak Tests
Testing the shower insert for potential water leaks is a crucial step in the installation process. To ensure a watertight seal, start by thoroughly inspecting all the joints and connections of the shower insert. Look for any visible gaps or areas that could potentially let water seep through. Apply a generous amount of water to these areas and observe for any signs of leakage. If there are no apparent leaks, proceed to the next step.
Next, it’s time to perform a water leak test. Prepare a bucket and fill it with water. Carefully pour the water onto the shower insert, focusing on one area at a time. Watch closely for any signs of water leakage, paying extra attention to the seams, corners, and edges. Keep an eye out for water seeping through, dripping, or forming puddles.
Addressing any Issues or Deficiencies
If the water leak test reveals any issues or deficiencies, it’s important to address them promptly to ensure a proper installation. Start by identifying the specific areas where the leaks are occurring or where water is seeping through.
To address smaller gaps or areas of concern, consider using a waterproof sealant or adhesive. Apply the sealant to the affected area, making sure it fills any gaps or crevices. Allow the sealant to dry and re-test by conducting another water leak test.
If the leaks persist or if you notice larger or more significant deficiencies, it may be necessary to consult a professional plumber or contractor. They will have the expertise to identify and resolve any underlying issues, ensuring a watertight shower insert installation.
In conclusion, testing and final inspection plays a vital role in ensuring a successful shower insert installation. Conducting water leak tests and addressing any issues or deficiencies are crucial steps in this process. By following these steps diligently, you can enjoy a shower that is not only visually appealing but also completely watertight.
Regular Cleaning And Maintenance
Maintaining cleanliness and hygiene in your shower insert is crucial to ensure its longevity and to keep it looking fresh and inviting. Regular cleaning and maintenance not only prevent the buildup of dirt and soap scum but also address potential issues like mold and mildew growth. In this section, we will provide you with effective techniques and products to clean your shower insert and tips on how to prevent and address mold and mildew.
Recommended Cleaning Techniques and Products
To keep your shower insert spotless, it’s important to choose the right cleaning techniques and products. Here are some recommended options:
- Vinegar and Water Solution: Mix equal parts white vinegar and water in a spray bottle. Spray the solution on the surfaces, let it sit for a few minutes, and then wipe it off with a clean cloth or sponge. Vinegar is effective in removing soap scum and mineral deposits.
- Baking Soda Paste: Create a paste by mixing baking soda with a small amount of water. Apply the paste to stubborn stains, such as grime or mildew, and gently scrub with a soft brush or sponge. Baking soda is known for its mild abrasive properties, making it effective for tough-to-remove stains.
- Commercial Shower Cleaners: There are several commercial cleaners specifically designed for shower surfaces. Look for products that are suitable for your shower insert material and follow the instructions provided by the manufacturer.
Preventing and Addressing Mold and Mildew Growth
Mold and mildew can thrive in moist environments, making your shower insert susceptible to their growth. Here are some tips to prevent and address mold and mildew:
- Proper Ventilation: Ensure your bathroom is well-ventilated by using an exhaust fan or opening windows after showering. Adequate airflow helps to minimize moisture buildup and discourages mold and mildew growth.
- Frequent Drying: After using your shower, take a few minutes to dry the surfaces with a towel or squeegee. Removing excess moisture reduces the chances of mold and mildew developing.
- Regular Inspections: Periodically inspect your shower insert for any signs of mold or mildew growth. If you notice any discoloration or a musty odor, take immediate action to address the issue.
- Mildew-Resistant Caulking: Ensure that the caulk around your shower insert is mold and mildew resistant. If you notice any cracks or signs of deterioration, remove and replace the caulk promptly to prevent further problems.
- Natural Mold Remedies: If you encounter mold or mildew growth, consider using natural remedies such as hydrogen peroxide or tea tree oil mixed with water. Apply the solution to the affected areas and scrub gently. Remember to wear protective gloves and ensure proper ventilation.
By following these recommended cleaning techniques and preventive measures, you can maintain a clean and healthy shower insert, ensuring its longevity and providing a pleasant bathing experience for yourself and your loved ones.
Troubleshooting And Common Issues
Installing a shower insert can enhance the overall functionality and appearance of your bathroom. However, like any home improvement project, there may be common issues that arise during the installation process. It’s essential to identify potential problems and their solutions to ensure a smooth and successful installation. In some cases, seeking professional assistance may be necessary to overcome more complex issues.
Identifying Potential Problems and Solutions
During the installation of a shower insert, it’s crucial to be aware of potential problems that may arise. By recognizing these issues early on, you can address them promptly and minimize any significant setbacks. Here are some common problems and their recommended solutions:
1. Leaks
One of the most common issues encountered during shower insert installation is leaks. Leaks can occur due to improper sealing or faulty plumbing connections. To address this problem, follow these steps:
- Inspect all plumbing connections for any signs of leakage.
- If you find any leaks, tighten the affected connections and ensure they are properly sealed.
- If the problem persists, consider applying waterproof caulk or sealant around the edges of the shower insert to prevent water from seeping through.
2. Uneven or Unstable Base
An uneven or unstable base can lead to issues such as water pooling or a wobbly shower insert. To fix this problem, follow these steps:
- Check the subfloor or existing base for any unevenness or instability.
- If necessary, level the surface by adding shims or using a leveling compound.
- Allow the leveling compound to dry thoroughly before proceeding with the installation.
Seeking Professional Assistance when Necessary
While many shower insert installations can be completed as do-it-yourself projects, certain situations may require professional assistance. If you encounter any of the following issues, it is advisable to reach out to a professional plumber or a bathroom renovation specialist:
- Extensive plumbing problems that are beyond your expertise.
- Structural issues that need to be addressed before installing the shower insert.
- Complicated electrical connections that require the assistance of a licensed electrician.
- Unique customization requirements that demand professional expertise.
By seeking professional assistance when necessary, you can ensure that any complex issues are handled correctly, reducing the risk of further problems and ensuring a successful installation.
Frequently Asked Questions
What Do You Put Behind A Shower Insert?
You can put cement board or moisture-resistant drywall behind a shower insert. These materials provide a solid and waterproof surface for the installation.
Can You Put Shower Insert Over Tile?
Yes, it is possible to install a shower insert over existing tile. This can be a cost-effective and convenient option for renovating a bathroom without having to remove the existing tile. However, it is important to ensure that the tile is in good condition and properly prepared before installing the shower insert.
How Long Does It Take To Install A Shower Insert?
It typically takes around 1-2 days to install a shower insert. The exact time may vary depending on the complexity of the installation and any additional modifications required.
What Kind Of Adhesive To Use For A Shower Surround?
For a shower surround, it is recommended to use a waterproof adhesive specifically designed for bonding shower and bathroom fixtures. This type of adhesive is resistant to water and moisture, ensuring a secure and long-lasting installation.
Conclusion
Installing a shower insert may seem daunting, but following the right steps can make the process much simpler. By ensuring that you have the correct tools and materials, measuring and preparing the area, and carefully following the instructions, you will be able to successfully complete this project.
Remember to consult a professional if you encounter any difficulties. With a little patience and attention to detail, you can achieve a beautiful and functional shower that will enhance your bathroom for years to come.